

Sarah Vivian
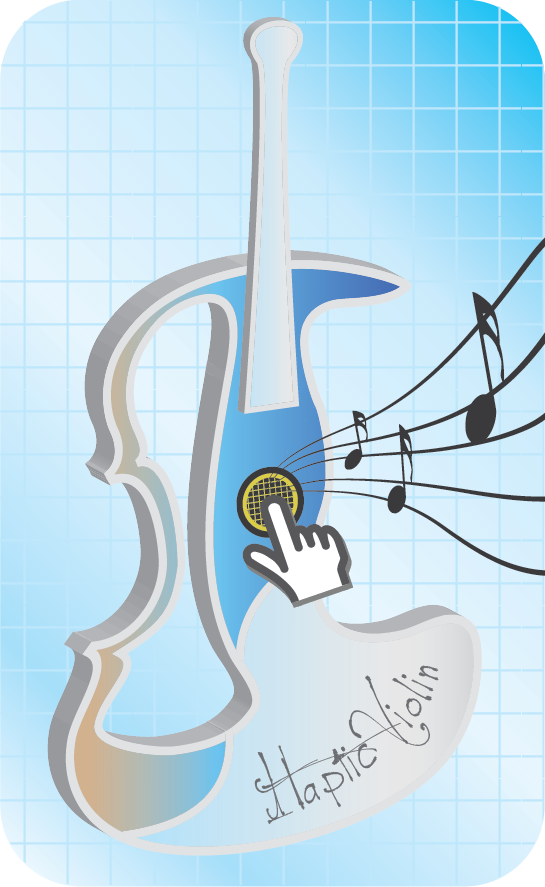
Haptic Violin
Project team members: Sarah Van Sickle & Vivian Wang
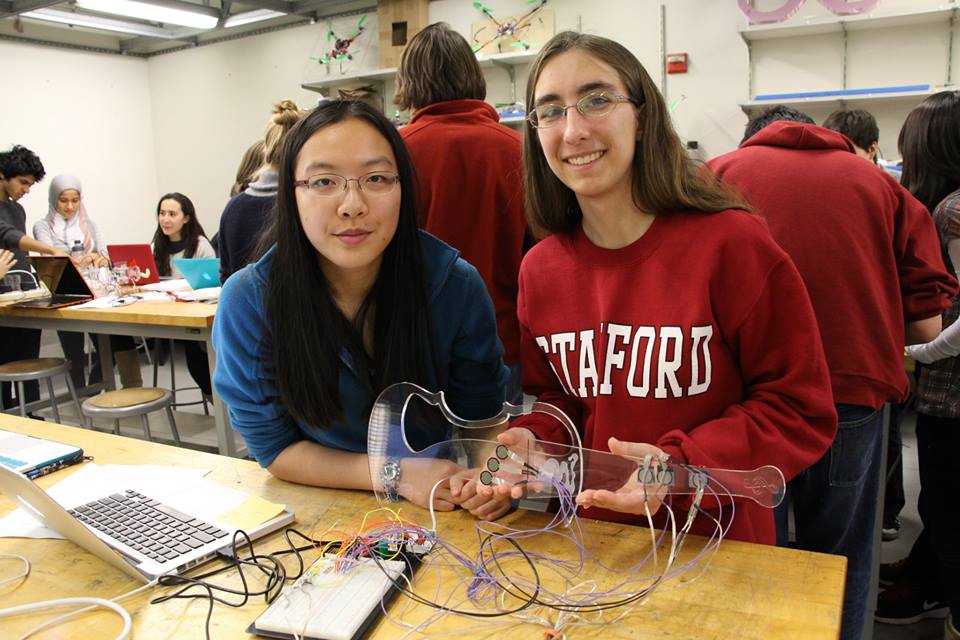
Haptic Violin @ the Open House!
The Haptic Violin is intended to provide an interface modeled after a real violin that integrates haptic input and feedback with auditory and visual feedback. The inclusion of haptic response in digital musical instruments can greatly enhance the �feel' of the instrument and result in a more convincing experience when coupled with the typical auditory feedback. Furthermore, research has shown that fairly effective motor learning in music playing can be achieved through haptic guidance. The Haptic Violin therefore also is intended to aid physical violin learning by providing controlled vibration feedback, which can reinforce basic violin concepts such as where fingers should be placed on the fingerboard or which fingers should be pressed to produce a certain note or chord. We use force-sensitive resistors to sense finger presses on the simulated strings, as well as vibration motors to provide vibration feedback upon playing notes on the violin. The final implementation of the Haptic Violin was successful in achieving our intended goals of allowing a user to play the violin and receive simultaneous auditory and haptic feedback.
On this page... (hide)
Introduction
Haptics: the modern face of music!
As both of us enjoy playing some sort of musical instrument(s), we naturally gravitated towards a project that would incorporate haptic feedback with music, and finally came up with the idea of a Haptic Violin. We decided to create a simplified, digital replica of a violin that would allow the user to "play" the violin while receiving controlled haptic feedback, for entertainment and educational purposes which are described below. This simulated violin, which would be of a relatively lower cost compared to a real violin, might allow a wider range of people to explore violin playing, in addition to providing an extra creative outlet for digital artists/musicians. A haptic device was essential to this violin model because real violinists experience non-trivial haptic and vibrational feedback while playing a violin that affect their playing, and current digital music instruments often lack this haptic dimension. By adding vibration feedback to the Haptic Violin, we would be able to better simulate the physical effects of playing a violin and implement some interesting features with regards to musical motor learning (see �Applications' section below).
Background
A variety of work has been done in haptics with regards to music, from a haptic music synthesizer to a haptic carillon to a virtual violin bow model with haptic feedback. A number of haptic instruments modeled after real instruments have been created as well, including Edgar Berdahl's haptic drum and Cellomobo (a haptic instrument that allows the user to bow a virtual string) [1]. In creating these new digital musical instruments (DMIs), a number of authors have stressed the importance of including haptic feedback, since various haptic cues, even when they do not largely affect the sound being generated from the instrument, are integral to the response and intimacy a person feels when playing a real instrument [2]. While playing an instrument, performers often rely on these tactile cues, which might include vibrations in the neck of a violin, to monitor and modify their performance. Accordingly, Birnbaum created a "Touch Flute" that integrated vibrotactile feedback through actuators on the keys as well as a skin stimulator for the mouthpiece [3]. A great deal of other work involving music and haptics has been done at Stanford's CCRMA, and their Music 250A course on physical interaction design has also led to some really interesting work.
Besides musical aesthetics, these new instruments also have significant implications for musical motor learning. For instance, Berdahl's haptic drum includes haptic feedback to enable the playing of complex drum rolls by the user, while gloves with haptic feedback have been shown to allow for passive learning of piano melodies [4]. Grindlay demonstrated that coupling haptic with auditory feedback aids music learning--after receiving haptic guidance while holding a drumstick, participants were able to recreate the note rhythms much more accurately [5]. As far as we know, an interface like the Haptic Violin has not been created yet, but the motivation and principles underlying the Haptic Violin are similar to that of the projects described above.
Regarding audio aspects, there has been a large amount of previous work related to the digital synthesis of instrument sounds. As this was not the focus of our project, we opted for simple sinusoids in generating the violin bowing sounds. For generating the plucking sounds, however, the algorithm used in our program was adapted from Dan Ellis's sketch, found here.
Design
The Haptic Violin consisted of the physical violin, with sensors/motors connected through breadboard circuitry to the Hapkit, which fed into computer software.
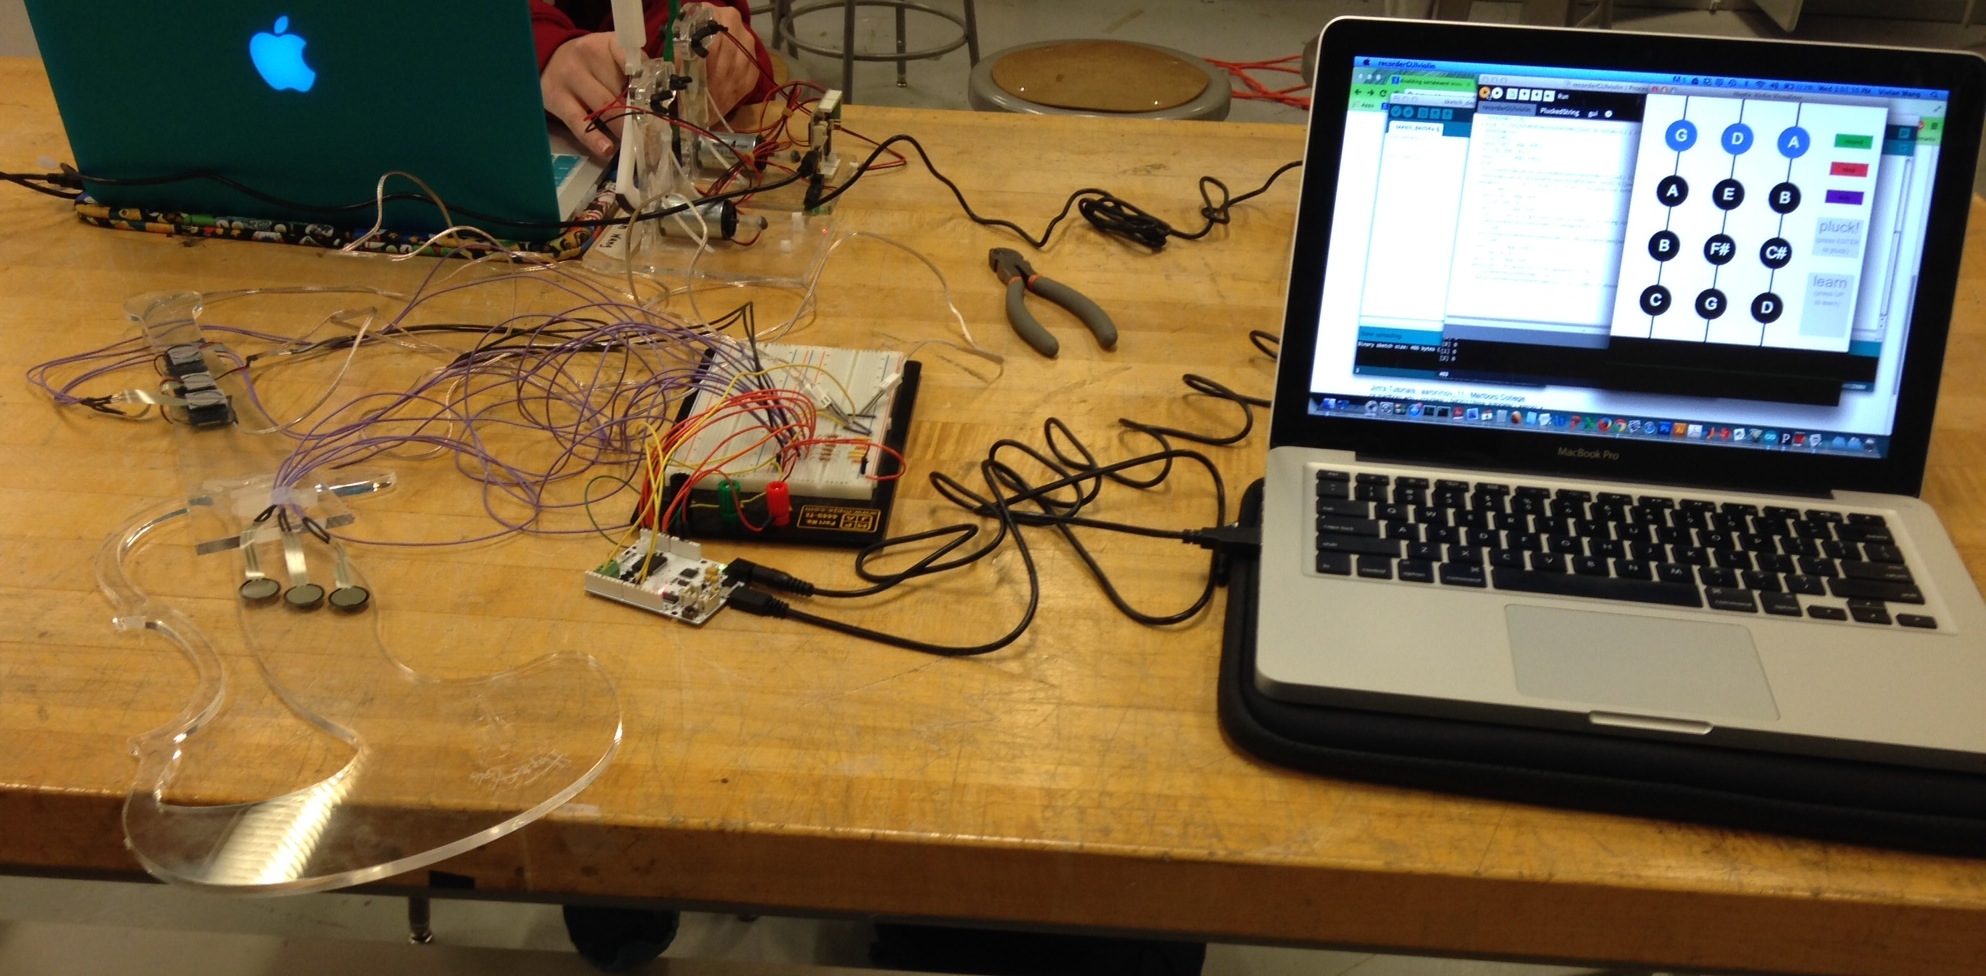
Overall setup of the Haptic Violin (left to right: the physical violin, breadboard and Hapkit board, laptop)
Hardware design
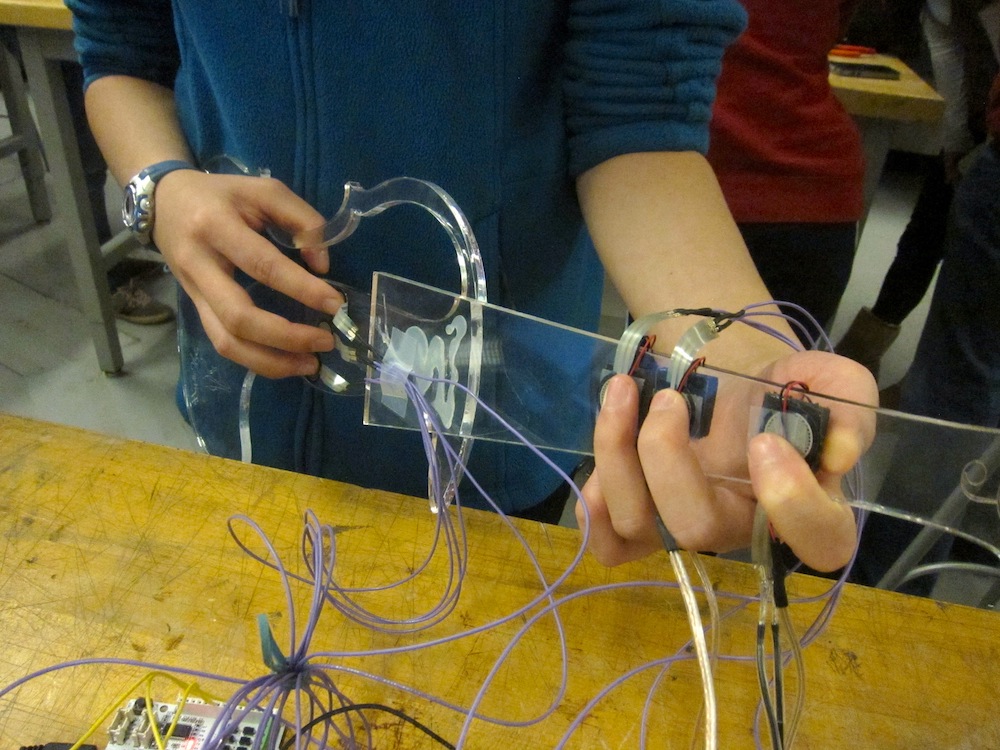
The hardware design was rather straightforward. The violin fingerboard and body were laser cut out of 1/4"-thick clear acrylic sheets (see Illustrator file for exact shape/dimensions) and hot glued together (which, admittedly, is not the best option for a long-term build, but this sufficed for our purposes). Due to a limited number of analog pins on the Hapkit board, we only set up 3 fingered notes on the fingerboard and 3 strings. Three force-sensitive resistors (FSRs) were placed on the fingerboard to represent the 1st, 2nd, and 3rd finger locations on a real violin, and three FSRs were placed in the middle of the body of the violin to represent the G, D, and A strings. Given more FSRs and a larger or multiple Arduino boards, an E-string and more finger positions can be easily added in the future. The wires soldered onto the FSRs were then taped to the violin for security and connected to the breadboard.
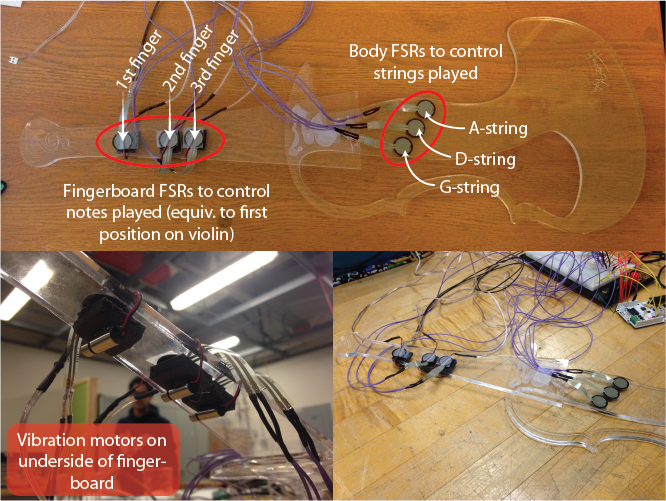
Photos of the Haptic Violin build (top: explanation of FSRs, bottom left: vibration motors underneath FSRs)
The 3 vibration motors corresponding to finger presses on the fingerboard were glued onto small pieces of black foam (for slight dampening, so that the vibrations would not propagate as much along the violin body), which were then attached to the back of the fingerboard opposite the finger FSRs to provide somewhat local haptic feedback for each finger. The wires of the motors were then wrapped around and taped on top of the FSRs before being passed to the breadboard, in order to provide a physical 'feel' of having touched a string while the user plays the violin.
Electrical design
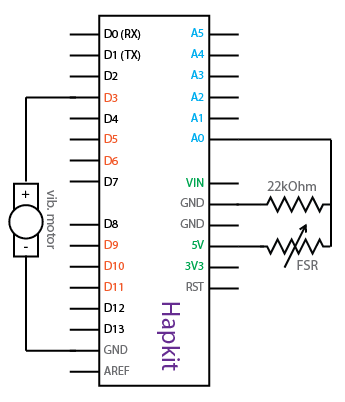
Basic circuit diagram for a single vibration motor and FSR
We unscrewed the Hapkit board from the original Hapkit for greater ease when connecting the wires from the breadboard to the Hapkit pins. For the force-sensitive resistors, we used the voltage divider circuit provided in the data sheet here, using a 22 kOhm resistor and 5V input from the Hapkit board. FSRs for the 1st, 2nd, and 3rd fingers were connected to analog input pins A0, A1, and A2, and the FSRs for the G-, D-, and A- strings were connected to the A3, A4, and A5 pins. Since we used the Hapkit board for our project, the MR sensor had to be pried off in order to use the A2 pin. Additionally, the 3 vibration motors were connected to 3 of the digital PWM output pins in order to create varying vibration amplitudes/strength.
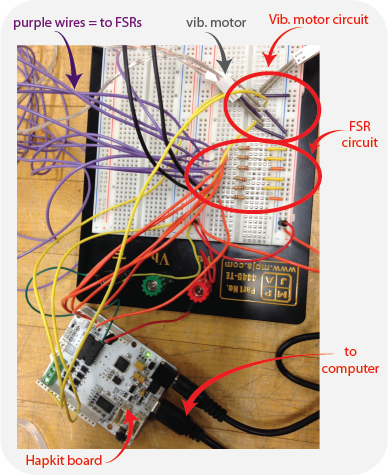
Breadboard circuit explanation
Software design
To provide simultaneous haptic/auditory/visual feedback, Arduino was used to read the FSR sensor values and output motor vibrations, and Processing was used to generate the graphical user interface and control the audio/haptic feedback. Audio was generated via the Minim library. The software was generally structured to (1) read all FSR values in Arduino, (2) send these values to Processing, (3) translate these values into a corresponding note depending on which string/fingers are pressed, (4) output a corresponding tone and graphical display, (5) tell Arduino which motor to vibrate (from Processing), and (6) write a voltage output to the motor from Arduino.
At the basic level, the Processing sketch was designed so that the user can see what notes s/he is playing on the Haptic Violin in real-time. We displayed a grid of notes (representative of notes and strings on a real violin), where the letters of the notes being played become colored as the corresponding FSRs are pressed. The notes in the blue circles (G, D, A) are the open string notes, which can be played by pressing a string FSR by itself, without pressing any fingers on the fingerboard.
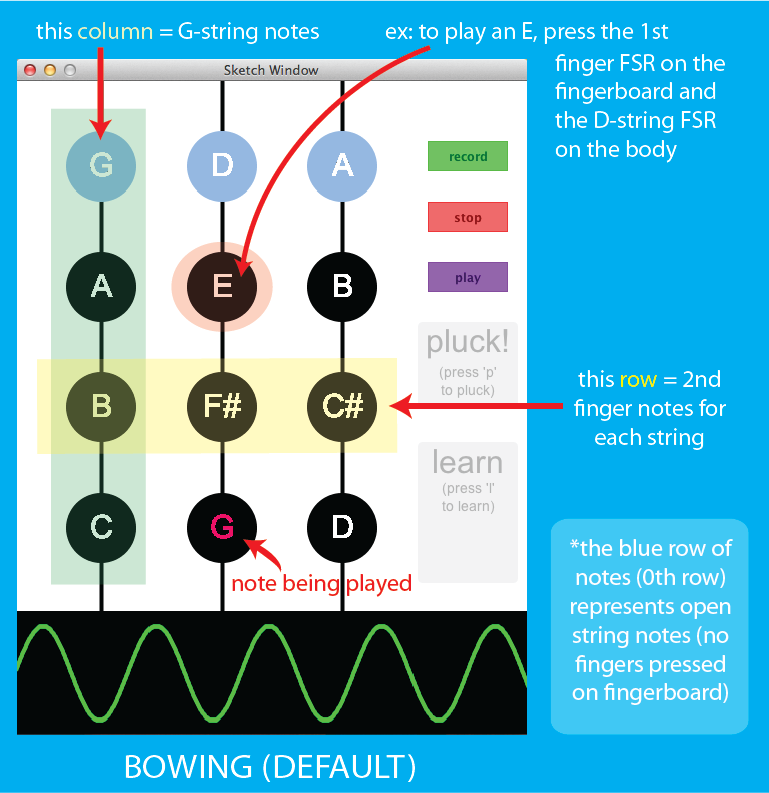
Screenshot explanation of note display
The GUI also includes several other features:
- Bowing and plucking modes provide different ways of playing the violin. �Bowing' lets the user play continuous sounds by pressing the FSRs while �plucking' allows the user to play discrete plucked notes by tapping the FSRs, sort of like a real violin. We generated sinusoidal tones for the bowing mode, and used Dan Ellis' code to generate the plucked sounds for the plucking mode.
- record, stop, and play buttons allow the user to record his/her performance and then play it back, along with the corresponding motor vibrations--a sort of haptic recorder in a sense.
- The learn mode allows note-by-note melody learning. When toggled on, the GUI will display/play notes of a pre-loaded melody, one-by-one, and wait for the user to play those notes. If played correctly, the motor under the corresponding note finger vibrates. If played incorrectly, no motor vibrations occur.
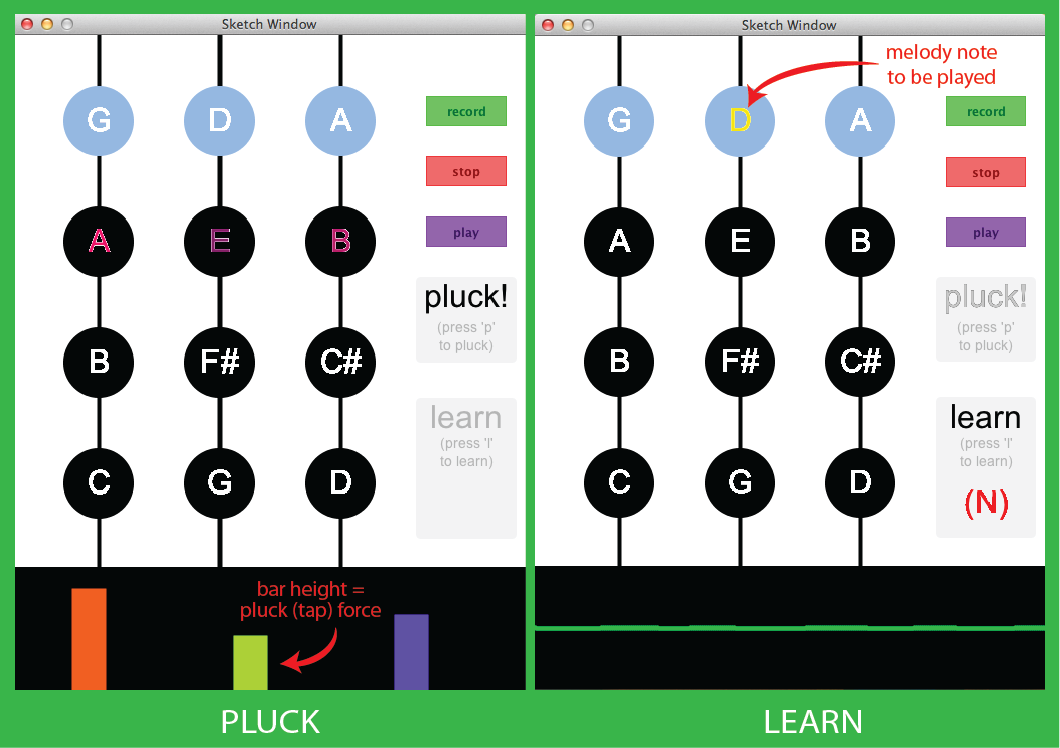
Screenshot of different modes (left: multiple notes plucked simultaneously, right: 'learn' mode toggled on)
Different modes are toggled by keypresses. The bowing vs. plucking mode is toggled by the �p' key on the keyboard, and the learning vs. free playing mode is toggled by the �l' (lowercase L) key.
Graphics are also included for aesthetic purposes:
- In bowing mode, the waveform being played is displayed. We used single sinusoids to generate each of the bowed notes, where the amplitude of the tone depends on the bowing strength (i.e. the force on the string FSR). In the case of chords (simultaneous strings pressed), the superposition of the individual notes/waves is displayed. This might also inspire education about the basic physics of waves.
- In plucking mode, colored bars are used to display plucks. The height of the bar represents the force with which the user plucked the note.
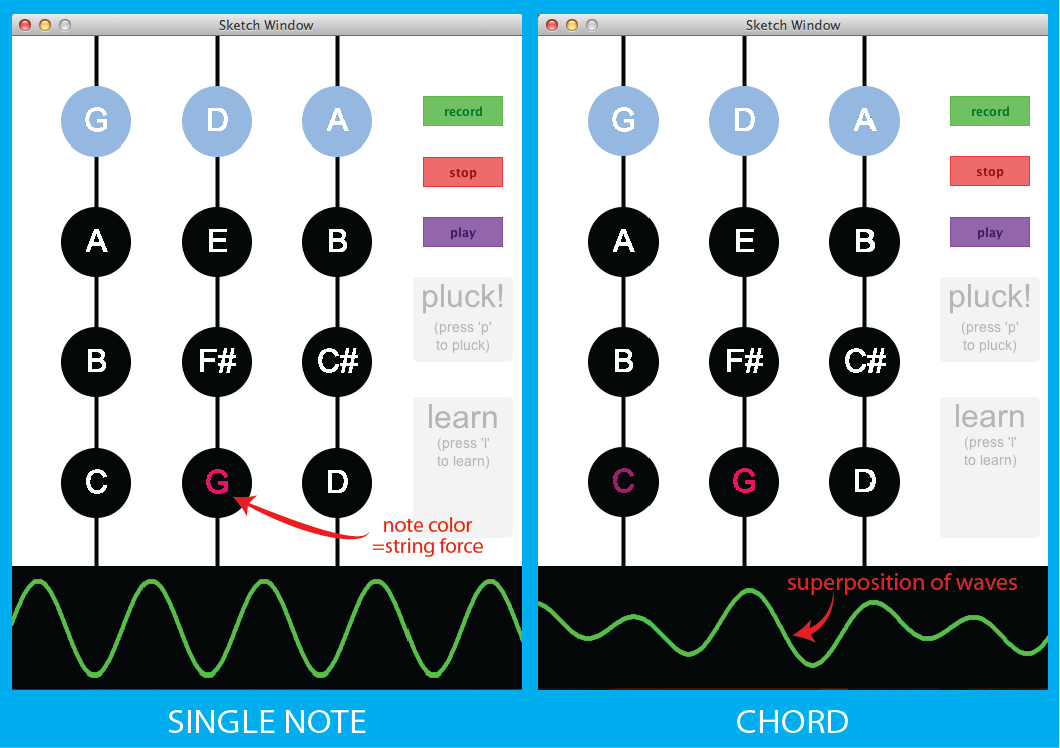
Example graphics (left: single string FSR pressed (i.e. note bowed), right: multiple string FSRs pressed (i.e. chord bowed))
For sake of brevity, more details on the code structure & other various nuances in sound/graphics/vibration feedback can be found in the files below.
Functionality
Playing the Haptic Violin (guitar-style for better ease...)
Playing the Haptic Violin is fairly similar to playing a real violin. In bowing mode, pressing and holding a string will play a note whose amplitude is modulated by the force with which the string FSR is pressed. In plucking mode, the FSR must be tapped or struck in order to generate a pluck--the code looks for a sudden increase in FSR force value. While playing the violin, the user should also feel motor vibrations under whichever note finger is being held or tapped on the fingerboard, which simulates vibrato on a real violin. The finger/note interactions also simulate a real violin. For instance, to play an E, the D-string and the 1st finger should be pressed. Alternatively, to play a G (equivalent to bowing an open G-string on a violin), the G-string FSR and no fingers on the fingerboard should be pressed. The computer keyboard is used to switch between the various software modes (bowing vs. plucking, free playing vs. learning vs. recording music).
A demo of the Haptic Violin being played using the default �bowing' mode. (Can you tell what song it is?):
The device functioned as planned for the most part--however, due to the lack of a chin/shoulder rest, the violin was much easier held/played like a guitar. Additionally, there was some latency in the motor vibration, due to lag in the motor itself and minute delays in writing data from Processing to the Hapkit board. At the Open House, users were generally able to play the Haptic Violin and feel the vibration feedback. It does, however, require a little familiarity with how a violin is played, as was apparent--so while the violin was relatively easy to play (aside from all the wires, that is), the sounds that pressing an FSR(s) would produce was a little less intuitive.
As such, here are a couple of comments on playing the Haptic Violin (which should hopefully be obvious to actual violinists!):
- Simply pressing a note/finger on the fingerboard won't produce any sound; you must also bow or pluck (�press') a string (�FSR') to sound that note
- If multiple fingers on the fingerboard are pressed, only the highest finger pressed will actually sound for a given string because of the nature of a string on a real violin. For example, if the 1st finger and 2nd finger on the fingerboard are pressed along with the G-string FSR, the violin will only play a B (i.e. the 2nd note on the G-string).
- Chords on a violin are played across strings (e.g. by bowing the G- and D- strings). For example, if the G- and D-string FSRs are pressed along with the 1st finger FSR, the Haptic Violin will assume the 1st finger is being held across all strings and thus play the A/E chord (i.e. the 1st note on the G-string plus the 1st note on the D-string).
Future improvements to the Haptic Violin could include the addition of an E-string and more finger positions along the fingerboard to replicate a real violin more closely. A re-design of the fingerboard that allows for more localized vibration feedback specific to each finger, such as with newly developing haptic touchscreen technology, would also be beneficial. Given modeling of real vibrations on a violin, more realistic haptic feedback could be implemented this way. Additionally, it would be interesting to synthesize more realistic audio effects (such as for the bowing of the violin), as well as audio effects that depended on various force measurements, so that the playing more closely resembles a real violin. For example, bowing a violin with greater force should produce a �stickier' sound due to friction, rosin, etc. Including more realistic audio feedback might even result in user perception of a more compelling haptic interaction. Finally, the software could be improved to allow for the reading of digital music scores, so that in 'learn' mode, the software could teach the user any song instead of requiring the user to manually input the notes herself.
Software demo
For a demo of the rest of the software features, we've transformed the Processing sketch into an interactive applet here, which lets you play the violin using keys on your computer keyboard so that you can explore the software & audio/graphics without having to hook anything up.
(Note: you need to have Java enabled in your browser to view the applet (for Mac users, best to use Firefox/Safari). Or, you can download and open the standalone .jar file here. Or, you can copy this code directly into Processing and run the sketch from your computer [but make sure to install the g4p library first--you can do this pretty quickly in Processing by going to �Tools' ==> �Add Tool...' on the menu bar up top].)
Applications
Some final thoughts on applications of the Haptic Violin to music/violin education:
1) Learning finger positions: This can be tricky for the novice violin player. Unlike a guitar, there are no �frets' on a violin to indicate where you should put your finger. Teachers often resort to putting strips of tape on the fingerboard to provide visual cues for where the string should be pressed. The Haptic Violin augments this by providing haptic cues. Note that the Haptic Violin force sensors are placed on the fingerboard to resemble the finger locations on a real violin. When a student presses a note, a motor vibration is generated at that finger, reinforcing the learning of finger positions through positive feedback.
2) Learning music passively: The �record' and �play' buttons are designed to enable passive learning. For example, a teacher can perform and record a song on the Haptic Violin. Then, the student can hold the violin and play back the recording. The software not only replays the audio sounds, but also regenerates motor vibrations corresponding to the notes being played in the recording. Through this method, the student can simultaneously hear and �feel' the correct order in which the fingers are supposed to be pressed. This also allows the student to feel the rhythm of the music as the recording is time-dependent.
3) Learning music actively: The �learn' mode of the software allows for active learning of music melodies. With this, a song can be pre-loaded into the computer program. When the �learn' mode is toggled, the GUI will display and play the first note of the song, and wait for the student to play that note. If the student plays the right note, s/he will feel a motor vibration on the corresponding finger, and the program will then move onto the next note of the song and repeat the same process. If the student plays the wrong note, no motor vibration will be outputted and the program will stay on the current note, forcing the student to figure out the correct note.
Acknowledgments
Thanks to Professor Allison Okamura for providing various parts and help with the project. Also, thanks to the wonderful Internet for providing a couple first-time tinkerers with countless helpful tutorials on how to work magic in Arduino and Processing!
Files
- Attach:violinparts.xls List of major parts/cost
- Attach:violin_body.ai Illustrator file to laser cut violin body
- Attach:violin_fingerboard.ai Illustrator file to laser cut violin fingerboard
- Attach:violin_read.ino.zip Arduino file to read sensors and write to motors
- Attach:violin_disp.zip Processing files to display graphics/audio and control motors. Run violin_disp.pde.
References
[1] E. Berdahl, H. Steiner, and C. Oldham. "Practical Hardware and Algorithms for Creating Haptic Musical Instruments." In Proceedings of New Interfaces for Musical Expression, 2008. Link: https://ccrma.stanford.edu/~eberdahl/Papers/NIME2008BerdahlSteiner.pdf.
[2] L. Chu. "Haptic Feedback in Computer Music Performance." In Proceedings of the ICMC, pp. 57-8, 1996. Link: http://www.furiant.com/materials/papers/icmc1996.pdf.
[3] D. Birnbaum. "The Touch Flute: Exploring roles of vibrotactile feedback in music performance." Technical Report, McGill University, 2003. Link: http://idmil.org/_media/projects/breakflute/touch_flute.pdf.
[4] K. Huang, E. Do, and T. Starner. "PianoTouch: A Wearable Haptic Piano Instruction System For Passive Learning of Piano Skills." In Proceedings of 12th IEEE International Symposium on Wearable Computers, pp. 41-4, 2008. Link: https://wiki.cc.gatech.edu/designcomp/images/c/c8/Piano-touch.pdf.
[5] G. Grindlay. "Haptic Guidance Benefits Musical Motor Learning." In Proceedings of the Symposium on Haptic Interfaces for Virtual Environment and Teleoperator Systems, pp. 397-404, 2008. Link: http://ieeexplore.ieee.org/xpls/abs_all.jsp?arnumber=4479984.