

Ellie Caroline
Ellie and Caroline's final robot
Silicone Worm Robot
Project team member(s): Ellie Talius and Caroline Dee
Summary
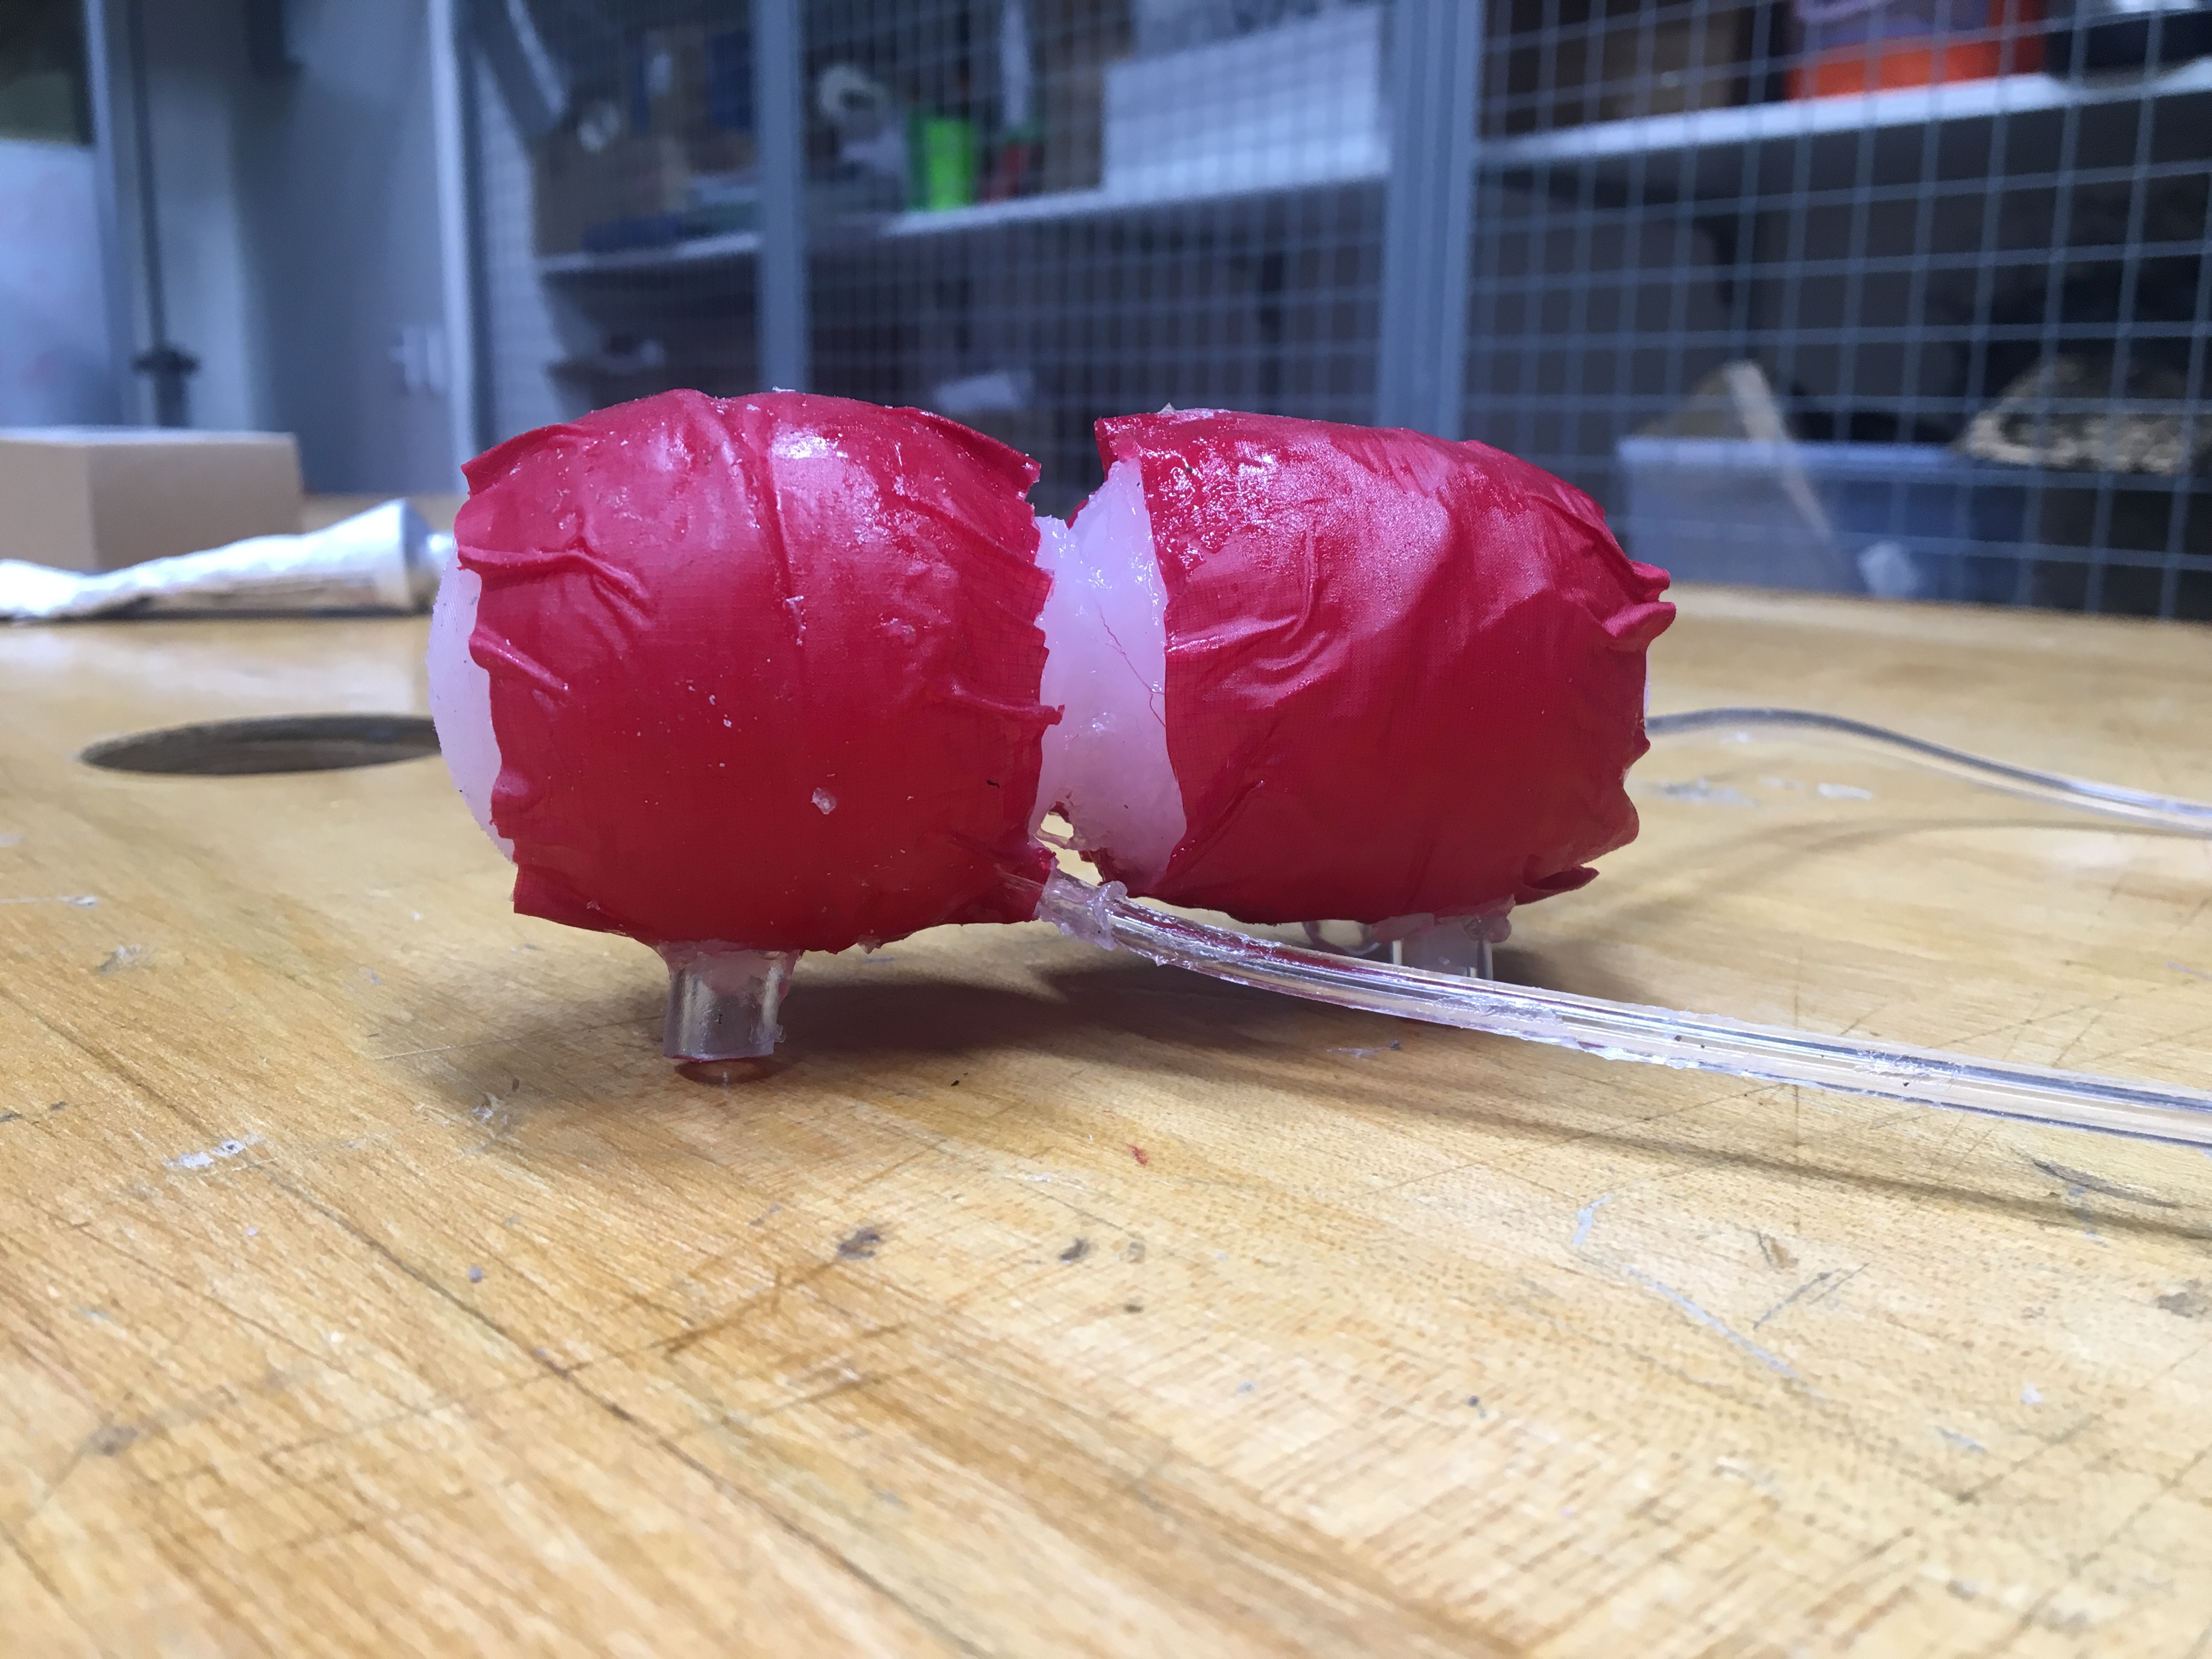
Our soft robot was a silicone worm robot made of two silicone bubbles that when inflated would allow the robot to move forwards. Each bubble is a hollow silicone sphere with a pneumatic tube inserted into the center and wrapped in inextensible fabric to prevent the bubble from expanding in all directions. When the bubble is filled with air, it expands in length while maintaining a constant width due to the fabric. Therefore, when the bubble expands, it pushes outwards. The robot moves by expanding one bubble, then the other, then deflating the original bubble and then deflating the other bubble. The bubbles also have frictional feet made of large pneumatic tubing at the bottom, so when the bubbles expand, the frictional feet hold on to the surface and allow the robot to move forwards. The applications of this robot are that it could go in to environments that are unsafe for humans to collect data or since it is small, it can observe animals without being noticed.
Introduction
Our soft robot was designed to go in to area that humans cannot visit to observe various condition. It could observe wildlife without being detected if a camera was attached or collect different samples to determine if humans can enter an environment safely if there has been a natural disaster. Because the worm is small, it makes it hard to detect and therefore able to observe the environment in its natural state. The soft nature of it also makes it able to travel through various environments because it can adapt and move over different terrains. Our worm robot is also well designed for these tasks because it moves like an actual inchworm and therefore can pull itself across all the types of surfaces an inchworm moves on. Making the robot out of silicon also makes it robust enough to not be harmed or popped by the environment, ensuring that it will able to successfully enter and exit the environment without breaking down.
Background
In brainstorming ideas for our soft robot we looked at Harvard's Whitesides Research Group project on their Soft-Bodied Pneumatic Robot. This robot, shaped like an "X", is made with silicone and is propelled forward through a specific cycle of air pressurization. The silicone bubbles up in the back of the robot and by bending up in the middle of the "X" moves forward. We also looked at an article labeled "Mechanical Programming of Soft Actuators by Varying Fiber Angle" from the Soro Soft Robotics Lab. By expanding or extending different parts of the robot, they were able to make their robot move forward in the same way as an inchworm. We also read an academic article from 2013 called "Meshworm: A Peristaltic Soft Robot With Antagonistic Nickel Titanium Coil Actuators". By using soft actuators this group was able to move their worm-shaped robot forward by controlling the fibers in the robot to mimic the movement of an inchworm as well.
Construction
To make our robot, we first needed to create a mold for the silicon to be poured in to. Once we had 3D printed the mold, we then used it to create the silicon bubbles by using it to create half a bubble and then sticking two halves together with silicon. From there, we inserted the tube to supply the air, added the inextensible fabric and created frictional feet for the bubble. Once we had the functioning bubbles, we used silicon to attach them in to one robot.
Materials we used were the 3D printed mold, silicone, silicone poxy, pneumatic tubing, wall air supply, inextensible fabric and frictional feet made of pnuematic tubing.
Mold Creation
We created a 3D printed mold to pour our silicon in to to create the bubbles. The mold was designed in a lower piece to pour the silicon in to and an upper piece that was inserted to create a hollow shape. We first created the mold in CAD software and then had it 3D printed. The mold would produce a semi-sphere, and we would take 2 silicon pieces produced with the mold and put them together with silicon to create one bubble.
Attach:Mold_Base_CAD Attach:Mold_Topper_CAD Attach:Mold_Base Attach:Mold_Topper
Individual Bubble Creation
To create the bubbles, we mixed 32g of silicone and then poured the silicone in to the mold. we let is set for 4 hours, and then removed the semi-sphere from the mold. Afterwards, we used silicone to stick two of the hemispheres together to create a sphere. Once the sphere was dry, we poked a hole in the silicone and inserted a piece of pneumatic tubing into the bubble. We then wrapped the bubbles with inextensible fabric covered in silicon poxy to attach the fabric to the bubbles.
Final Robot Creation
We created the final robot by joining the individual bubbles using silicone. We wrapped rubber bands around the robot to keep it in place when the silicone dried to create the final robot and ensure the bubbles were aligned. Once we had the bubbles attached, we cut 1/4 inch pieces of thick pneumatic tubing to use for the feet. We used silicone poxy to attach them to the bottom of each bubble.
Attach:Final_Robot1 Attach:Final_Robot2 Attach:Final_Robot3
Results
Our robot functioned by moving in a way similar to an inchworm. We inflated bubble 1, causing it to expand horizontally and the frictional feet to latch on to the surface of the table the robot was on. We then inflated bubble 2 to push bubble 1 forwards even more and create more movement. The fabric on bubbles 1 and 2 prevented the robot from inflating in a vertical direction. Then, by deflating bubble 1, the robot contracted and moved towards the edge of bubble 1 because of the friction between the frictional feet of bubble 1 and the surface of the table. Lastly, be deflating bubble two, the robot contracted in without moving due to the friction between the frictional feet on bubble 1 and the surface. This motion is how an inchworm moves, with every two sections of the worm performing this pattern at once. To test our robot, we measured and recorded the step size it would take for many steps. We found the best step size was 2 cm forwards, with an average of 1 cm forward per step. The optimal pressure for the bubbles was also tested, as we tried to determine what pressure would maximize inflation without causing excessive ballooning in the vertical direction and we found 30 psi to be the best.
To improve and expand on our design, there are many changes that could be made. We could change the shape of the individual bubbles to more of a cylinder so they would be easier to wrap in fabric and the expansion would be more horizontal. In addition, by adding more sets of bubbles and then actuating every set in the same pattern at the same time, the robot would take more steps forward at once, causing it to move a greater distance with every actuation. Therefore, it would move faster. Also, a computer program could be written to control the inflation and deflation of the bubbles instead of doing it by hand. This program would need to control the air supply to the bubbles, turning the values connected to the bubbles on and off. By creating a program that carries out these steps, the robot could be remotely controlled by a researcher if a camera was mounted to the robot. Lastly, the angle of the frictional feet could be improved to create more friction with the surface and therefore a larger step.
With these improvements, our robot could be used to observe animals and collect data in environments that are unsafe for humans. Since the robot is soft, it is robust and can handle difficult environments because it will not break easily and can move over a variety of different terrains. To observe animals, its small size means it will be difficult for animals to notice and it can collect video footage of them in its natural environment. In addition, sensors could be mounted to it to collect data about conditions that may make an environment unsafe for humans, such as the presence of radiation or certain chemicals. With this data, researchers could better judge when an environment is safe for humans to reenter without putting any people at risk.
Acknowledgments
Thank you to Laura for helping us design the mold, 3D printing the mold, giving us ideas about the use of fabric and frictional feet, and helping gather materials for us.
Files
References
List the referenced literature, websites, etc. here.
Harvard University, Whitesides Research Group, https://gmwgroup.harvard.edu/soft-robotics
SOFT ROBOTICS, Volume 2, Number 1, 2015, Mary Ann Liebert, Inc. DOI: 10.1089/soro.2015.0001 Fionnuala Connolly, Panagiotis Polygerinos, Conor J. Walsh, and Katia Bertoldi, Soro Soft Robotics, https://bertoldi.seas.harvard.edu/files/bertoldi/files/soro_fionnuala.pdf
IEEE/ASME TRANSACTIONS ON MECHATRONICS, VOL. 18, NO. 5, OCTOBER 2013, Sangok Seok, Cagdas Denizel Onal, Kyu-Jin Cho, Robert J. Wood, Daniela Rus, and Sangbae Kim, http://softrobotics.wpi.edu/papers/2013-Seok-TransMechat.pdf
Checkpoint 1
Our goal for checkpoint one was to create sketches of how the robot and mold would be created. We researched how inchworms move and then applied this to our design and created a drawing of our robot and the 3D printed mold for it. Attach:Mold_Robot_Sketch
Checkpoint 2
For checkpoint 2, we wanted to have 2 working bubbles of our robot. We also planned to develop frictional feel for the robot by this checkpoint as well.