Leena Alana
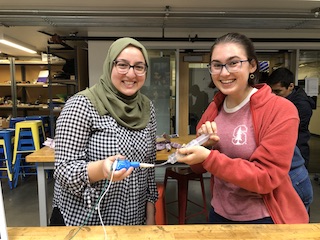
Leena and Alana
on Demo day (12/05/19).
Interactive Stress/Rehabilitation Ball
Project team member(s): Leena Bahrami and Alana Mermin-Bunnell

Introduction
We wanted to create a soft robot to create an active stress/rehabilitation ball. Our intention is to create a particle jamming ball that will be used by people to either help relieve stress through squeezing the ball or by patients for rehabilitation purposes. For example, a stroke survivor or arthritis patient may be struggling with using their hand to grasp objects. The rehabilitation ball could also be of use to people needing to rebuild hand or finger strength after a bone fracture. Our rehabilitation stress ball uses a good approach as it has an adjustable stiffness, so the feel of the ball can be personalized. In addition, the thresholds of the sensor to achieve various color levels can be personalized (ideally by a physical therapist) to fit a patient�s needs.
Background
One major aspect of our rehabilitation ball was the use of particle jamming techniques to change the resistance of the ball. In our research, we found many applications with soft grippers, similar to the ones we made in class in Lab 2. However, we also found that many are using jamming techniques to change the structural rigidity of their device as well. For example, some researchers have created a soft robot to replicate the human hand�s palm. In this device, the researchers changed the rigidity of the palm through jamming, which enabled the palm to be both flexible and stiff. The researchers described how they used jamming in their 2019 paper, �A Novel Versatile Robotic Palm Inspired By Human Hand.� They wrote, �Without jamming, particles are loosely enclosed in the particle sac, which is connected with the atmospheric environment, so the system is soft and highly adaptive with low stiffness. When the particle sac is vacuumed, the particles are tightly squeezed together under negative pressure and the palm is rigidified.� Another group of researchers is creating a soft spine using both particle jamming and integrated ball joint techniques. Particle jamming is very effective to change the stiffness of robotic arms for example, but their article, �A Soft Robotic Spine with Tunable Stiffness Based on Integrated Ball Joint and Particle Jamming,� also discusses the unreliability of particle jamming. The researchers elaborate on this topic, �Particle jamming is a promising method to obtain variable stiffness. Particles are loosely enclosed in a membrane sac to create a soft and flexible structure as shown in Fig. 1(a). Particles inside the sac will pack firmly under vacuum pressure thus the sac will stiffen. However, particle jamming suffers from unpredictable behavior due to particle rearrangement and deformation. This drawback severely affects its repeatability and stability.� In order to combat this, they combined jamming with ball joints.
The soft sensor we created follows the approach outlined this link from Soft Robotics Toolkit: https://softroboticstoolkit.com/resources-for-educators/tsh-sensor. Hybrid silicone-fabric sensors are an exciting innovation for measuring bodily movement and integration into wearable technologies due to their toughness and flexibility. In their 2017 paper, �Batch Fabrication of Customizable Silicone‐Textile Composite Capacitive Strain Sensors for Human Motion Tracking� Harvard Wyss Institute researchers describe the benefits of soft sensors: �Soft sensors provide the ability to obtain accurate measurements close to the human body in a comfortable manner and are straightforward to integrate into wearable garments. To date, resistive and capacitive, soft sensors have dominated research in this field due to ease of read‐out electronics and general compatibility with soft materials.� Our sensor is a capacitance sensor. According to Atalay, et. al. current capacitance sensors are created with either a silicone-based or textile-based approach. However, alone, each of these approaches has limitations. Silicone-based sensors have low sensitivity and complex manufacturing processes. Fabric-based sensors have low elastic operation range and capacitance baseline values. Combining the silicone and textile approaches allows for a hybrid sensor with both good elastic range and sensitivity levels.1
Construction
Components and Approximate Costs
Ball Materials:
- Balloon (1) - $.07
- Flour (< 1 cup) - $.11
- Syringe (1) - $1.00
- Cotton quilter�s batting (a small fluff) - $.02
- Masking Tape (6in) - $.05
- Zip-Tie (1) - $.05
Sensor Materials:
- Cardboard (10cm2) - $0.10
- Index Card (1) - $0.05
- Clear Tape (1 roll) - $1.59
- Conductive Fabric (2 * 5cm2) - $2.50
- Silicone (<� cup) - $2.00
- Arduino Board (1) - $10.00
- Alligator Clips (2) - $2.20
BUILDING THE BASE
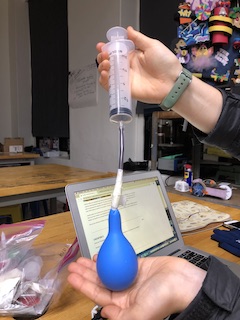
Fill the balloon with flour by placing a funnel into the open end of the balloon. Slowly scoop the flour into the balloon. Once the balloon is sufficiently full, remove the balloon from the funnel.
Place some quilter stuffing into the end of the syringe. This will prevent any flour particles from transferring from the balloon to the syringe. Place the syringe into the open end of the balloon and tighten the balloon around the syringe using a zip tie. Then, use masking tape and wrap it around the neck of the balloon, the zip tie, and the end of the syringe to seal it tight.

BUILDING THE SENSOR
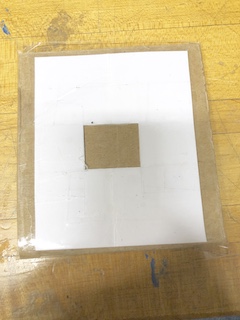
Begin by creating a mold for the silicone. Cut a square from the index card of the desired sensor size (we used 5cm by 5cm). Completely coat this index card and a larger piece of cardboard in clear tape. Secure the index card to the surface of the cardboard. Weigh (1 to 1 ratio) and mix your silicone according to manufacturer�s instructions. Slowly pour just enough silicone to fill the mold (cut out from the index card). Spread to a uniform level. Let the silicone cure. Remove the square of silicone from the mold, which you can dispose of. Cut two pieces of conductive fabric the same size as the silicone. Mix a small amount of silicone according to manufacturer�s instructions. Using the silicone like a glue, spread it onto the silicone surface and attach one fabric square (apply enough silicone to wet the fabric through). Repeat for the other side. Let cure.
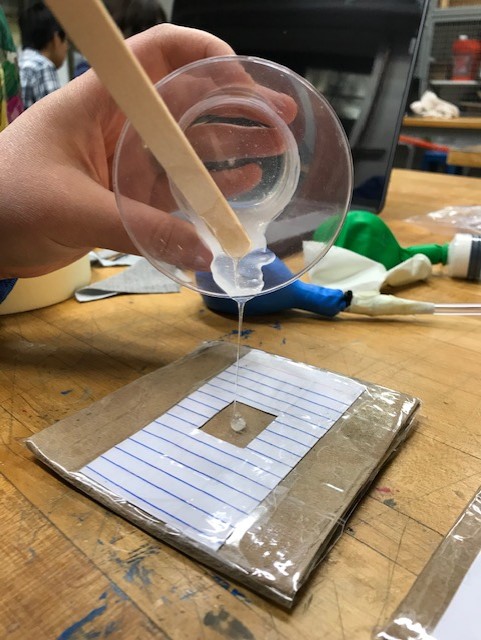
Credit for this image of the process for creating the silicone dielectric goes to Soft Robotics Toolkit (link in references section). 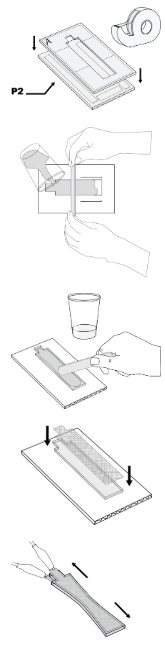
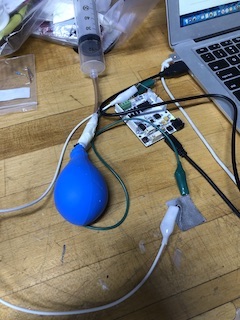
Slowly peel back one corner of the fabric on each side and attach an alligator clip to each. Once the sensor is created, it needs to be calibrated. Download the first Arduino program from files. The blank, blank, and blank values should be set to 0, 0, and 1, respectively. Attach the alligator clips from each side of the sensor to pins A0 and A2 on the Arduino Hapkit Board. Plug the Arduino Hapkit board and upload the code in the program. The program will read off capacitance values of the sensor. Measure the initial length and initial capacitance of the sensor. Wearing gloves, stretch the sensor to several lengths (ideally at least 5-6) and record the capacitance at each length. Plot these points with capacitance (pF) on the x-axis and length (cm) on the y-axis, and calculate the slope of the trendline. Then go back to your arduino code and fill in the initial capacitance, initial length, and slope values with the one you have calculated/measured.
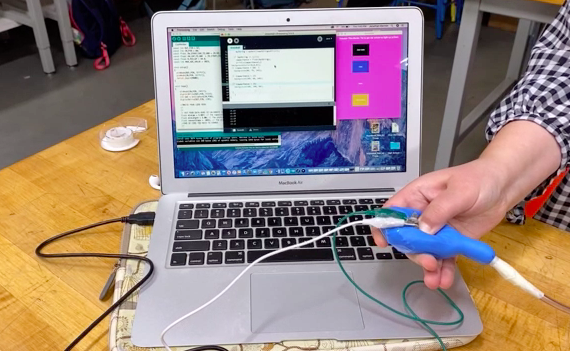
CREATING THE CODE
Attach the other end of each alligator clip that is on the sensor to your arduino board. Files for the code can be found in the files section. The Arduino program will read the capacitance values which will be transferred to Processing to create the graphical interface with various color thresholds that will light up when that pressure level is reached by the user.
Results
Download a video of the ball in action!
Attach:RehabilitationBallVideo.mov
The stress/rehabilitation ball has two soft robotics components: a particle jamming ball and a soft sensor to measure how much the user is squeezing. The particle jamming works as the user adjusts the syringe attached to the flour-filled balloon. A vacuum is applied, forcing the flour particles closer together and achieving a stiffer ball. The amount of stiffness can be adjusted by how far the plunger of the syringe is pushed in. The soft sensor works through measuring capacitance. The two conductive fabric pieces sandwich a silicone dielectric. This data is transmitted through Arduino to Processing which allows us to output a graphical interface with changing colors depending on the capacitance value measured. In creating the ball, we performed qualitative tests of comfort or how good it felt to squeeze the balloon based on the material inside. This lead us to use flour rather than coffee grounds due to the more pleasant feeling. We performed qualitative tests applying a variety of pressures on the sensor in order to set thresholds for the colors in Processing to change.
Our design could be improved by integrating the sensor into the ball, either beneath the surface of the balloon or into the actual surface of the balloon/other container of the flour. Additionally, our Processing graphical interface can be adjusted and honed to be more visually appealing. Ideally, it could become an application on the user�s phone that connects wirelessly to the sensor, eliminating the need for cumbersome alligator clips. Making a smaller, more transportable model would allow our users to more easily set up the rehabilitation ball in a variety of locations, for use both in and outside the home. An application that could send recorder user data to a physical therapist could even help to improve the amount that rehabilitation patients practice hand strength exercises since there would be an accountability system. This set-up could also allow a physical therapist to remotely adjust the desired thresholds of capacitance for the patient to reach remotely and rapidly, making at-home therapy practice sessions more effective in between visits to the physical therapist.
Another way the design could be improved is by changing the technique for jamming. In our device, we used a syringe to add or remove air into the balloon. While this technique is great for costs and portability, it would likely be difficult for the patient to change the resistance of the ball by themselves if they are in need of hand rehabilitation. Using another air supply system where the user could change the supply more easily would be more beneficial for our user base.
Acknowledgments
We would like to thank Allison, Laura, and the rest of the wonderful teaching team for their advice and support throughout the project. Thank you for a wonderful quarter! <3
Files
Drawings, code, and anything else that cannot be directly shown in the report should be linked here. You can upload these using the Attach command.public site, please discuss with Allison. Also, in this section include a link to a file with a list of major components and their approximate costs.
- Processing Code: Attach:ProcessingCode
- Arduino Code: Attach:ArduinoCode
- Components/Costs: Attach:Components_and_Approximate_Costs
References
List the referenced literature, websites, etc. here.
1) Atalay, Asli, et al. �Batch Fabrication of Customizable Silicone‐Textile Composite Capacitive Strain Sensors for Human Motion Tracking.� Wiley Online Library, John Wiley & Sons, Ltd, 12 July 2017, onlinelibrary.wiley.com/doi/full/10.1002/admt.201700136.
2) Wei, Ying, et al. �A Soft Robotic Spine with Tunable Stiffness Based on Integrated Ball Joint and Particle Jamming.� Mechatronics, Pergamon, 3 Dec. 2015, https://www.sciencedirect.com/science/article/pii/S0957415815002019.
3) Li, Yingtian, et al. �IOPscience.� Engineering Research Express, IOP Publishing, 18 July 2019, https://iopscience.iop.org/article/10.1088/2631-8695/ab2f69.
4) Soft Robotics Toolkit: https://softroboticstoolkit.com/resources-for-educators/tsh-sensor
Checkpoint 1
State your Checkpoint 1 goal, and place text and images here showing what you achieved at this checkpoint.
Checkpoint 1 Goal: Determine the best material for the ball.
We wanted to determine the materials we will use for our stress ball by this checkpoint. Some factors we considered are the 'feel' of the material in one's hand and ability to change the resistance of the ball.
Our first consideration was inspired by our particle jamming soft gripper lab. In the lab, we filled a balloon with coffee grounds and used a syringe to add/reduce air to soften/harden the balloon. We wanted to use a similar concept, but we did not like the grainy feel of the balloon when it was filled with coffee grounds. Instead, we wanted to test the same concept with flour in the balloon instead. The ballon/flour combination created a ball that had a nice feeling and was able to become more compact or more soft with the subtraction and addition of air. The flour, because it is less coarse than coffee grounds, is not as good for particle jamming; however, for this project, we do not need the balloon to be very hard because it should always be able to be squeezed. Additionally, we had some issues with figuring out how to get it air tight and flour being released into the syringe. We will need to address these issues when we create a prototype.
Another option we considered was using an existing stress ball, courtesy of Professor Okamura, hollowing it out, and putting a particle jamming balloon inside of it. This way, we could use the outer shell of an existing ball for its feeling and still be able to manipulate the resistance. We tested this out, but felt that it was hard to feel the resistance change with the soft outer shell acting as a barrier to the balloon. Therefore, we decided not to continue with this option.
Another option we considered was creating a hollow silicone ball and changing the air pressure inside to change resistance. Due to our short timeline, the necessity to print a mold, time necessary to cure the silicone, and the success of our flour balloon, we decided not to pursue this option.
We are now working on testing a variety of sensors.


Checkpoint 2
State your Checkpoint 2 goal, and place text and images here showing what you achieved at this checkpoint.
Our Checkpoint 2 goal was to have the following:
1) a working stiffness-changing prototype
2) a working sensor
3) finished code
We completed our prototype of the stress ball using the particle jamming technique from the gripper lab expect with flour in place of coffee grounds for a softer ball. We successfully attached the syringe to the flour-filled balloon, and the adjustable stiffness of the balloon (ball) works quite well. We were able to prevent the issue of having the flour leak into the syringe by using a combination of fluffy stuffing, a zip-tie, and reinforcing masking tape.
In addition, we created molds for our sensors, poured silicone, cured it, and created two sensors using fabric scraps. The sensor we are currently testing is about a 3cm square. We began to calibrate the sensor using Arduino and a Hapkit board.
Our code is partially complete, however, we are hoping to get Laura's assistance during class on Tuesday to connect the Processing software to Arduino. This will be our top priority for class on Tuesday along with making sure the sensor is accurate.
Before the demonstration, we still need to attach the sensor to the glove. We have completed our flyer, linked below!