

2023-Group 1
Haptic Air Hockey Simulation Device

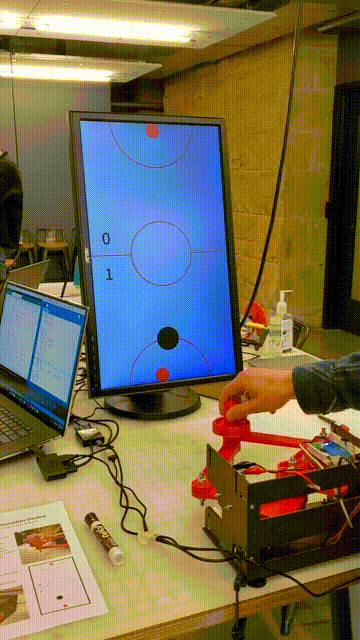
Air hockey simulation device in use
Project team members: Max Ahlquist, Dani Algazi, Luke Artzt, Ryan Nguyen
Our group sought to recreate a game from our childhoods: Air Hockey! We wanted to create a 2 degree of freedom haptic device with force feedback to mimic the forces felt from a real air hockey game. Our goal for the project was to create a game that felt as real as possible and make it a fun experience to play. We incorporate auditory feedback as well which proved to add significantly to the believability of the user experience. Overall, we achieved our goals for the project. The game felt smooth and realistic to many of the users who tested out our device while also leaving smiles on their faces.
On this page... (hide)

Introduction
Being a team of four mechanical engineers we were interested in the design and kinematics of modeling virtual systems. We sought to challenge ourselves by creating a 2-DoF pantograph because of the complexity of the mechanical design as well as the kinematics and force feedback modeling. Air hockey proved to be perfect combination of these two areas. We spent a great deal of time redesigning the previous graphkit on the Charm Lab website to create a more stable and robust pantograph. The dynamic tracking of the puck and modeling of the kinematics and force was also another challenge because collision detection in 2D is much more complex than in 1D. Combining these two aspects of the project with realistic graphics that needed to run at a high speed meant that we had to optimize the speed of solving our kinematic and dynamic equations which proved to be another challenge. Lastly, the use of various senses for feedback (haptic, visual, auditory) was an interesting challenge which allowed us to learn more about the ways in which different senses contribute to the �believability� of a haptic device. Overall, this project was very complex and required a large time commitment from every member, but our final result was very rewarding.
Background
2-DoF pantographs have been studied extensively. In [1], the authors derived equations of motion for a 2-DoF pantograph consisting of a 5 bar linkage. From these equations, the Jacobian can be derived which is essential for force feedback. These equations will form the basis of our design. Looking at previous work done on haptic air hockey games, it is clear that a fast loop speed is extremely important. In [4], the quality of experience of the users significantly decreased when the network delay between the force feedback and the visual interaction increased beyond 100ms. In another study [5], the researchers had problems calculating velocity and thus position for virtual collisions because their updating frequency is only 10Hz. To compensate for this, the researchers used separate timers for the puck and striker, but also drastically complicated their collision detection algorithm. From these two studies, we tried to optimize our loop speed so that we could have accurate position tracking and speed up the communication between Processing and Arduino so the graphics could be updated quickly to enhance realism. In modeling the forces felt by the user, [6] states that impulses are the most noticeable. This also matches with the actual air hockey game where puck and striker interactions are extremely brief. Paper [6] devised a new model to implement impulse forces which relies on the velocities, positions, and angle of contact between the puck and striker. However, this model would decrease loop speed as calculating all of these different values and constantly updating them for each object (puck, striker, and bot) would take time. This would decreases the realism of the game as evidenced by papers [3] and [4]. Their new model also outputs a velocity based on the input velocity, which poses problems in calculating a force that the user would feel based on their model. As a result, we decided to model collisions as springs with a very high spring constant, to mimic the impulse effect but also reduce calculations and output a force to the user.
Methods
Hardware design and implementation
Our system is a unique approach to the traditional planar 5-bar linkage pantograph mechanism. Featuring a "virtual" link of zero-length (in the plane of action), the two driven links share a common axis of rotation. This not only allows for the system to be more compact, but also increases the size of the effective workspace.
The overhauled mechanical design of our final version makes several significant leaps in performance, when compared to our first system prototype. A great deal of effort was put into ensuring that the mechanism would be rigid, smooth, and adequately constrained. The majority of progress was a result of improvements made to the linkage's revolute joints. We sought to increase the height of the cylindrical contact areas, increase the planar contact area, and further reduce radial tolerance-- all of which were dramatically beneficial in guaranteeing alignment of the kinematic pairs. Additionally, we attempted to incorporate axial compression along the pins (shafts) of the joints via the use of shaft collars on both sides, which were fastened while the joints were squeezed together. To avoid any binding that may have resulted from this increased compression, we installed an array of PTFE (Teflon) thrust bearings and nylon washers to reduce the coefficients of friction at the various interfaces within the joints.

Enclosure to house linkage mechanism
One of the main drawbacks to the GraphKit as given from the CHARM Lab website was the small workspace it offered. It always left the user wanting to reach �just a little bit further�, but they couldn�t. Therefore, we decided to design a new linkage system to maximize the system�s usability.
To do so, we took two steps. First, we cut slots in the linkage mounting system to allow the links to swing much wider than before. This change can be seen on the side of the �box�. Secondarily, we made the actuator links rotate around a collinear axis (see middle). This allowed the end-effector to, theoretically, trace out a semi-circle, rather than a subset of a Venn-diagram. This was beneficial because the semi-circle than the Venn-diagram even for the same links, and a semi-circle matched our needs for the game implementation much closer as our proposed �goalie� box would also be a semi-circle.

Old vs New workspace
To the right, is shown the original GraphKit workspace, juxtaposed with our improved design workspace. The improvement because of our modifications was very noticeable and improved the experience greatly.

Pantograph Linkage when removed from the Enclosure
System analysis and control

Diagram used for solving kinematic equations
Our system consists of 2DOF pantograph, made from a 5-bar linkage, with 1 bar of length 0. Using previous research on 5-bar linkages, we were able to determine linear equations for the kinematic position of the end effector based on the angle readings from the Hapkit Sensors. This was extremely important to the overall speed of the loop time. Solving non-linear equations for the end effector position would increase the loop time, thus reducing stability. Once the kinematic equations were derived for the x and y position of the puck, they were differentiated with respect to θ1 and θ5 to form the Jacobian - necessary for the directional force feedback.
Modeling Game Dynamics

Force feedback equations between the striker and puck
The puck position was tracked using dynamic tracking. Based on the forces acting on the puck, its acceleration was calculated and its velocity and position was updated every loop. In the virtual environment, when the radius of the puck overlapped with the radius of a striker, this collision was modeled as a compression spring between the two objects with an extremely high spring constant. This was done to best mimic a virtual "hardness" of the puck and the striker, similar to modelling a virtual wall.
Collisions between the puck and walls of the playing field were modeled as a spring-damper system. Once again, a very high spring constant was used to mimic the wall hardness, and a damper was incorporated to model an inelastic collision. Instead of determining an experimental coefficient of restitution to determine the exit velocity of the puck, we decided to use this damper system because it significantly reduced the calculations and logic required to model the collision using a coefficient of restitution. Because the force of damper is proportional to velocity, higher velocity collisions will lose more energy, similar to using a coefficient of restitution model.

Force feedback equations of the goalie box
In order to keep the user away from the edges of the workspace and the singularities, we created a virtual goalie box in the shape of a semi-circle. This goalie box was a set of virtual walls with a high spring constant, but low enough that no instabilities occurred. Visually, we also restricted the striker position to remain within the goalie box at all times to add to the realism of the hardness of the walls. Many users commented on the smoothness and reality of the goalie box.
Users played against an AI computer which was a simple bang-bang controller. If the puck position was to the right of the bot's striker position, the bot moved at a set velocity to the right, and did the same if the puck was positioned to the left. We chose a max speed which was not to difficult for the user to beat, but still provided some level of difficulty. Throughout the course of the demo day, the overall score between all users who tried our game and the computer was 181 to 123.

Graphic/Sound Interface

The graphics of our game was designed in Processing. A general background with the design of an air hockey arena was first created. All calculations and logic was conducted on the Arduino and sent to Processing. This information included the human's striker position, the puck's position, the score of the game, the bot's striker position, collision detection, and error messages in the case where the game was being reset but the user's striker was overlapping where the new puck would be spawned. Because so much information was being sent from the Arduino to Processing, we spent a great effort speeding up the loop time and communication between the two, eventually running at 115200 baud rate and printing every 8 loops.
A large portion of the realism came from effective graphics and sound. During the early stages of testing, many different users stated that the force feedback felt either early or late compared to the visual component. We kept adjusting the radii of the puck and strikers in the graphics so that the visual collision and force feedback would be more synced. Adding sound also increased the realism of the game. From our user study, there were many comments on the positive effect that sound had on the game experience. Sound was played at every collision between the puck and a surface.
Demonstration / Application
Below is a brief example of the device being demonstrated on Demo Day (see Files section below for full video with sound).
The methods and designs used in this device have several potential applications. First, haptic game simulations��as they become more increasingly believable��can serve to provide low-cost and easily portable alternatives to traditional forms of those games. In the case of air hockey, real tables can run anywhere between a few hundred dollars and several thousand dollars, whereas this iteration of the device cost significantly less (see Bill of Materials). Such a device also allows people to play simulations of games that otherwise might take up too much space in their homes. The virtual nature of the game also has the potential to make possible gameplay between two individuals in different locations.
User Study
We conducted a user study to determine which features of our haptic air hockey simulation were the most useful in creating a compelling, or �realistic,� user experience. For each participant, there were three factors which we randomly selected in various combinations, namely haptic feedback, auditory feedback, and workspace size. The different combinations of variables we tested were as follows:
- Visual feedback only
- Visual and auditory feedback only
- Visual, auditory, and haptic feedback
We chose to test the different combinations in this order consistently, since in our experience we have seen that haptic and auditory feedback combined tend to be the most compelling forms of feedback, and we wanted to generally add �layers� of realism to the simulation.
We used students in the d.school atrium as our main source of users for the study. They were asked to rank the believability of versions 1, 2, and 3 on a scale from 1 (not at all believable) to 7 (extremely believable).
Results
In general, we found that participants of the user study tended to be far more cautious and deliberate with their movements (moving slower) when they were given all three forms of feedback (haptic, visual, and auditory), than when the haptic feedback was removed.
Some notable quotes from the users include: "Way better with haptics!" ... "It was hard to get a feel for the boundaries without the feedback" ... "Sound is fun!" Participants during the user study used the device prior to some adjustments which made the visuals more realistic, and overall we generally received more positive feedback during the actual Demo Day, although it was fairly positive during the user study as well. One comment we received towards the end of Demo Day was that people couldn't feel the puck force feedback on the striker very well, despite earlier participants feeling it. While the feedback was strong enough for many participants to feel, it is possible that faster gamers (individuals hitting the puck very quickly) experienced skipping that lessened the feeling of feedback.
Below is a plot of the average scores for each combination of feedback tested (labeled "game modes"). In total there were 10 participants in the study.

Future Work
Link Lengths & Sector Radii
To avoid singularities, the pantograph workspace had to be artificially limited. However, in the real-world our workspace is only limited by our ability to move and nothing else. Ideally, the haptic system would emulate that. After collocating the actuation joints, to increase the workspace we would need to increase the lengths of the pantograph links. However, increasing the link lengths reduces the maximum force output to the end-effector when extended from the machine. Therefore, larger workspace can lead to reduced force feedback fidelity and motor saturation and vice-versa.
For sector radius, if it was increased it would result in higher force control at the end effector and higher precision of positioning at the expense of the speed of motion capable for the joint.
Thus, a test used to strike a balance for user comfort and experience would be helpful to determine the relative importance of these factors for realism.
Use of Encoders
The Hapkit system has a tendency to become de-calibrated when the user moves too fast. It uses a magnetoresistive sensor to sense turns of the magnet attached to the motor. When the magnet moves too fast in between the Arduino cycles, the Arduino sometimes does not register it. Using encoders with interrupts instead of a magnetoresistive sensor can provide more accurate position tracking and would make our pantograph operate much better at high user speeds.
Improved Contact Model
The puck-striker contact sensation was still a little spungy at times due to the visual lag and the realities of contact rendered by spring dynamics. To further improve this, we could implement force feedback decaying-transients which were triggered by contact events. Since there is only one kind of material pairing, the transient would merely be a function of relative velocity. For the puck-striker interaction, this addition would be especially immersive because of the sharpness of a real life air hockey collision. While it could be a source of instability, this method (as discussed in a paper in the references) would help us recreate the high-frequency vibration of a puck-striker collision and enhance the system's haptic feedback.
Game Design
Multiple game modes with different haptic feedback
1. Add a constant wind or play on a slanted surface
2. Two player game: construct a second system and communicate information between the two.
3. Multiple puck game
Cleaner Implementation
First, we would want to add a rolling ball support to the end-effector that helped support the linkage when the user applied vertical forces. This would give it a much more rigid feeling as the user would not be able to tip the system while using it to aggressively.
Second, we would add a "boot" to the top of the pantograph box to match the one on the bottom. This would further constrain the axis of rotation to be almost completely devoid of off-axis tilting.
Lastly, a better box can be made to encase all sides which makes the pantograph and object which can survive being handled with less care.
User Study
More rigorous testing could be performed to ensure that the user study results are accurate. Most importantly, our study consisted of only 10 participants, which made it difficult to only test one Game Mode (type of feedback) with each participant. Given more time and a larger pool of users, this would ensure that people's rankings of believability of the device are not influenced by the other factors. We would also test more combinations of Game Modes. Another minor change which may be helpful is keeping the haptic feedback for the goalie box boundary during all Game Mode tests, so that users are better able to "feel" and navigate through the workspace.
Acknowledgments
Thank you Michael, Will, Hallie, and Brandon for lending an extra motor for our project.
Files
Bill of Materials: https://tinyurl.com/yur6sh5n
Hapkit Code: Attach:FinalArduinoCode.zip
Graphics Code: Attach:FinalProcessingCode.zip
CAD Files: Attach:FinalCadFiles.zip Attach:FinalCADSolidworks
Full Demo Video: https://drive.google.com/file/d/1lIjdpYT8qO469bQsfHIjRjVpbff5W69A/view?usp=sharing
References
List the referenced literature, websites, etc. here.
[1] Efficient Pantograph Kinematic Solver: The Pantograph Mk-II: A Haptic Instrument.� 2005 IEEE/RSJ International Conference on Intelligent Robots and Systems, 2005, https://ieeexplore.ieee.org/document/1545066
[2] Hapkit website used for original pantograph fabrication: http://hapkit.stanford.edu/twoDOF.html
[3] Paper for enhanced contact modelling (in future work): First Joint Eurohaptics Conference and Symposium on Haptic Interfaces for Virtual Environment and Teleoperator Systems. World Haptics Conference, Pisa, Italy, 2005, pp. 381-387, https://doi.org/10.1109/WHC.2005.52
[4] Kusunose, Yuji, et al. �QoE Assessment in Networked Air Hockey Game with Haptic Media.� 2010 9th Annual Workshop on Network and Systems Support for Games, 2010, https://doi.org/10.1109/netgames.2010.5680284.
[5] Dai, Chuankai, and Takafumi Matsumaru. �Simulating and Displaying of Puck Motion in Virtual Air Hockey Based on Projective Interface.� 2015 IEEE International Conference on Robotics and Biomimetics (ROBIO), 2015, https://doi.org/10.1109/robio.2015.7418787.
[6] Kosaka, T., et al. �An Impulse-Based Approach under Penetration between Bodies for Tactile Feedback Display.� Proceedings 2003 IEEE/RSJ International Conference on Intelligent Robots and Systems (IROS 2003) (Cat. No.03CH37453), https://doi.org/10.1109/iros.2003.1249276.
Appendix: Project Checkpoints
Checkpoint 1
Goals
Our goals this week was to fabricate a working 2DOF pantograph based on the Graphkit. We wanted to derive the kinematic and dynamic equations for our device and try to implement them in a test environment. We also wanted to track the position of the handle in Processing to test the communication between the hapkits and the computer.
Kinematic and Dynamic Equations
Using a paper by G. Campion 2005, The Pantograph Mk-II: a haptic instrument, we determined the kinematic and dynamic equations for our device. The end effector position (x3,y3) is given by:


In order to calculate the Jacobian necessary for the dynamic equations, we differentiated the kinematic equations with respect to θ1 and θ5, yielding the equations

From the Jacobian the motor torque equations were derived, based on the pulley radius, sector radius, and the Jacobian. These equations were transferred to Arduino code: Attach:Checkpoint1Kinematics.txt
This code has been briefly tested and there seems to be some issues regarding the position tracking of the handle - the arduino sometimes outputs NaN. This is likely due to calibration issues as the hapkits were briefly calibrated for θ1 and θ5. Our first next steps involve debugging this issue so that we can move forward and test the Processing to arduino communication.
Hardware & Software
The Arduino project that will control our system has been under steady development. A tremendous amount of effort has gone into ensuring that the program loop will execute extremely quickly, without sacrificing readability. At the time of writing, it supports the ability to read in both of the analog inputs, track the angular position of both motors, compute the pantograph kinematics, and set the directions and duty cycles of both motors. We plan to integrate the dynamics ASAP.


Fabrication of the pantograph
We have successfully constructed a first prototype pantograph, which used the design models from the GraphKit project. Though we have some ideas for improvements that can be made for our second iteration, this version was constructed to allow us to test and learn. It should be fully operational and integrated with our graphical interface within the next few days!
 =
=Graphics Implementation
On the Processing side of our project, we were able to create a basic air hockey table that takes in position values and displays one air hockey striker (the portion that the user holds, shown in red below) and a puck (shown in black below). As a first proof of concept, we simply tracked the position of the computer�s cursor. Moving forward, we will connect the front- and back-ends by replacing this cursor tracking code with input from the Arduinos. This will be a fairly straight-forward text parsing function in our Processing code. Attach:graphicsCodeCheckpoint1.txt

Goals met and future work
Our first goal was to fabricate the Graphkit pantograph and to look into potential future improvements to the mechanisms. We successfully printed and modified the current Hapkits and made a mechanically functioning pantograph. For a future step, we may modify the links to be more rigid to allow a more consistent and frictionless planar movement. We also found that some of the range of motion was restricted by the Hapkit bases. As we combine our front- and back-end codes, we will determine if redesign of the bases is necessary.
Our second goal was to understand the kinematics of a 2-DOF pantograph. We found a methodology for forward and inverse kinematics which avoid the complications of solving nonlinear systems by guess and check which is important for a high-speed cycle needed for realistic haptic rendering. Going forward we must actually implement, in code, the inverse kinematics that allow us to give accurate translational force feedback to the user from the Hapkit motors.
Our third goal was to accomplish essential board communications. Because both motor actuator positions must be known to compute kinematics, we had to designate one board to receive both motor positions which it use to compute user position. Additionally, this board communicates the the graphics program on the laptop. In the future, we expect to have 2 Master Hapkits communicating to 1 laptop to emulate an air hockey game with 2 players.
Our last goal was to create the beginnings of a graphics program using Processing to visualize the state of the users' strikers and the air hockey puck. This has been completed and is ready to be integrated with the Hapkits once all communication details are sorted out. Future work will involve parsing the communication data and refining the aesthetics of the graphics to create a more believable and enjoyable experience for the users.
Checkpoint 2
Goals
Our goals this week were to continue development of the kinematics, controls, and force feedback involved in the physical pantograph operation. Additionally, we hoped to refine our graphics program from a static background to a program capable of communication with the pantograph and proper puck and striker position mapping. Lastly, we planned to redesign the mechanical elements of the hapkit for final operation which would increase the pantograph workspace and improve the robustness of the user experience.
Graphics
By Checkpoint 1, we had achieved a simple background, a striker that was able to take in position, and a stationary puck. Now, the background is more interactive (there is feedback keeping the striker within a the goalie box boundary), and the puck responds to contact with the walls of the game as well as with the striker.
We also implemented proxy positions for the cases where the striker attempts to pass the goalie box boundary and when it collides with the puck, to create a more realistic haptic experience when force feedback is applied to the end-effector. Next steps include displaying a score and the opponent's striker. If time permits, we would like this to be in the form of another pantograph, but under time pressure can be an AI bot.
Force Feedback and Kinematics
After checkpoint 1, the bulk of the work was spent in integrating the manufactured pantograph with the kinematics and force equations. After debugging several errors in the code, we were able to have accurate position tracking and start implementing force feedback. We started off with simple cases like a wall in the x direction and a wall in the y direction to test the derived force feedback equations before moving onto more complicated systems for the actual game. Below is a test case of an enclosed box

We then moved onto deriving force feedback equations for the goalie box to restrict player movement so that they would not be too close to singularities and the edges of our workspace. For this, we wanted to create a goalie box in the shape of a semicircle - one that could maximize the workspace of our pantograph. Once this was implemented properly, we started to work on striker and puck interactions and modelling the puck collision with the wall. For the wall collisions, we chose to model the wall as a spring damper system, so that the collisions would be inelastic and better simulate real life.


Combining these equations with graphics resulted in a virtual environment where the user could interact with the puck, directional force feedback based on the interaction with the puck, and watch how the puck moved in virtual space. https://youtu.be/mOutu7E17Bc
Future work includes refining the spring constants and damping constants to achieve a more realistic game. We also would like to implement game logic to account for score and reset the game state after a goal has been scored. Attach:file.ext Δ
Mechanical Redesign
There were four elements to the propose redesign: Workspace Modification, Link & Joint Improvements, Enclosure Design, and End-Effector Support.
Workspace Modification
With a 5th ground link, the pantograph workspace is a subset of a venn-diagram. For a given link configuration, the workspace is larger and simpler when the 5th ground link is removed and the actuated joints are coincident. Given this analysis our group decided to modify the hapkits and align the two Hapkit pivot points. To decrease the size, each link-sector straddled the support base.


Link & Joint Improvements
Modifications were made to the design of the links in order to increase their stiffness. In the interest of prioritizing alignment and minimizing friction, many of the supporting hardware components were also added or changed. The sectors and links now rotate on a steel D-shaft, accompanied by a stack of shaft collars, plastic washers, wheel hubs, and bushings. The assembly is now able to rotate almost effortlessly, while also remaining impressively rigid. We hope that this will dramatically enhance the overall system performance and the quality of user interaction.


Enclosure Design
Because of the need for inter-Hapkit communication, there are many elements of the pantograph system which are loose and susceptible to being knocked loose. In order to improve portability, compactness, and robustness to malicious users, an enclosure was developed to contain and organize all of the pantograph elements.
End-Effector Support
We have designed a more realistic striker that will cover the end-effector (see CAD below). Since the monitor we plan to use to display our graphics will likely not be as large as a real air hockey table, the workspace is smaller than it would be in real life. As a result, we chose to make the striker smaller than a standard-sized air hockey striker, so as to avoid making the user feel that the workspace is too crammed.


Goals Met
We met all of our goals this week as we wanted to incorporate force feedback, more complicated graphics, and a more robust mechanical design for the pantograph. On each of these we made great strides or completed over the course of the week.
Future Work
End Effector Mechanical Design: We plan to connect this striker with a dowel pin through the links such that the user has an additional rotational degree of freedom about the axis normal to the table, as there would be in a traditional air hockey table. We also plan to attach a low friction foot supporting the bottom of the striker by ensuring it remains in contact with the table, so that we can reduce any off-axis loads on the Hapkit motors.
Link Lengths: After we have a functional full-system, we plan to modify the link lengths to find an optimal workspace with an eye towards user comfort and maximum pantograph output force.
Final Polishing: Tune up graphics and kinematical performance of graphical mapping and feedback parameters.