Group 5
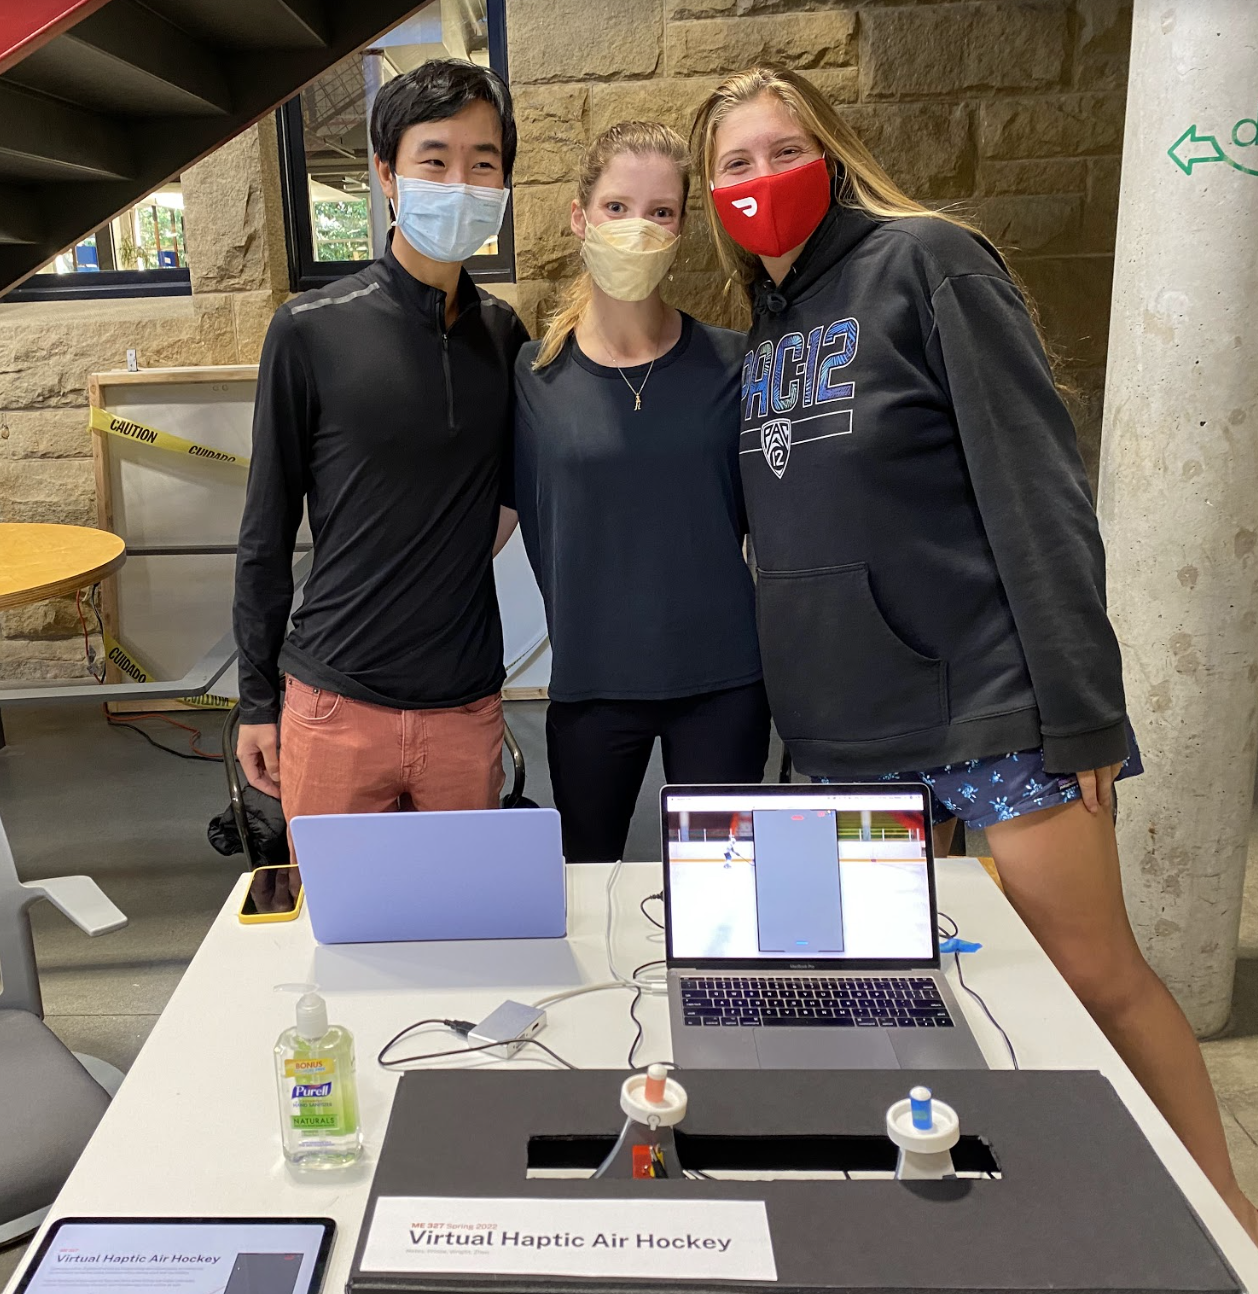
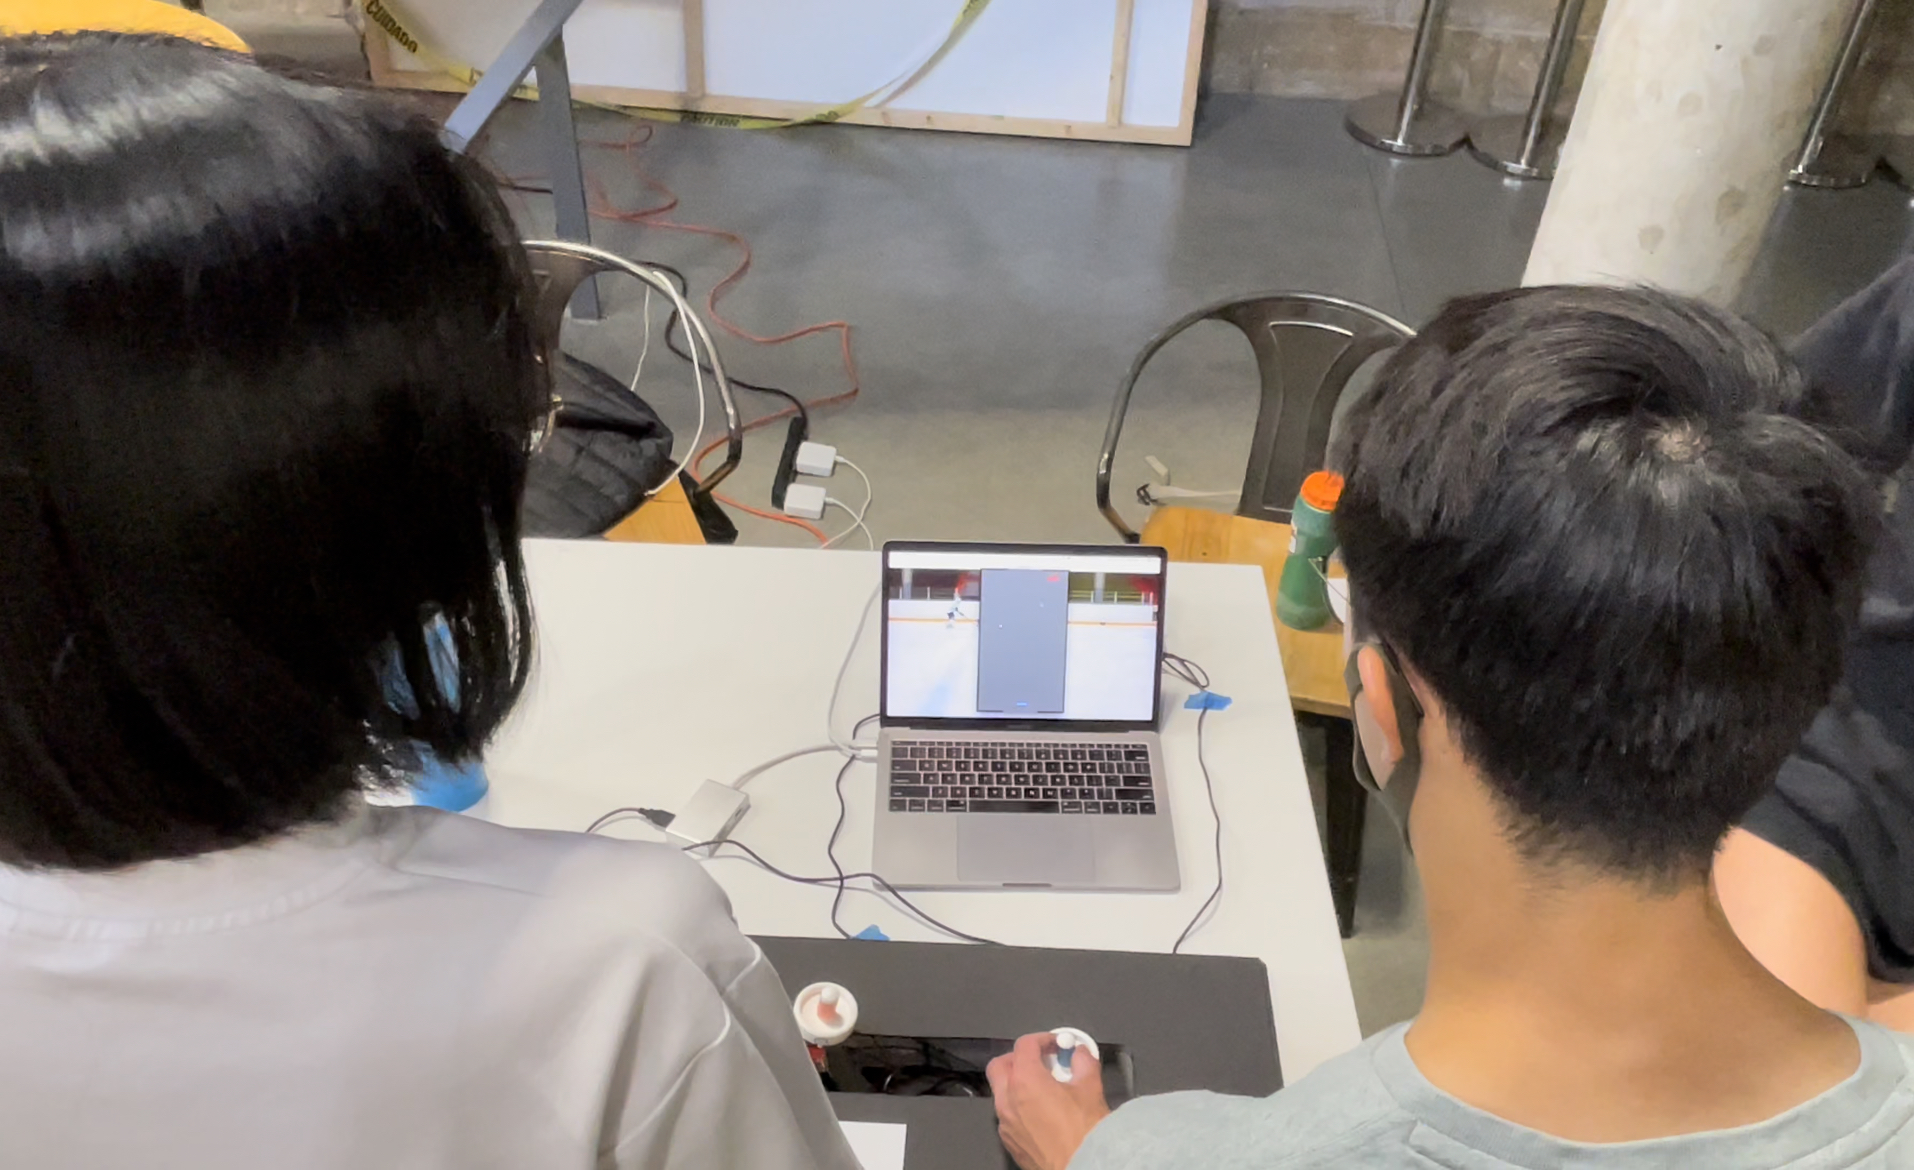
Group members demonstrating hockey table and screen setup.
Virtual Haptic Air Hockey
Project Team Members: Eva Nates, Ellie Prince, James Wright, Raymond Zhen
We investigate and create a two-person competitive virtual air hockey game that not only takes place on-screen rather than on a physical table but also provides users haptic feedback to create the most realistic experience. Custom Hapkit handles with air hockey mallet interfaces allow each user to move their virtual mallet across the screen and defend their respective goal. This mapping is achieved using the Hapkit magnetoresistor sensors, which send readings to one central leader Arduino that calculates positions and movement of both users as well as the virtual puck using Newtonian kinematics. Haptic dynamics are achieved three-fold: Wall forces (modeled as virtual springs) give users feedback force to keep them in the playing field, vibrations create the illusion of longitudinal reverberation upon impact with the puck, and lateral Hapkit forces (also modeled, indirectly, as virtual springs) simulate the lateral force upon and movement of the user�s mallet from the puck�s sideways impact. This project can not only create an engaging virtual version of a beloved game, but also lead to countless opportunities to build and elaborate on class topics in haptic feedback, illusions, and user experience.
On this page... (hide)
Introduction
Virtual renderings of everyday objects and experiences are becoming increasingly ubiquitous. From video games such as the XBox kinect to the virtual reality systems created by Meta Quest, virtual displays are reaching more people than ever. Even with the increase in visual renderings of virtual reality, haptic renderings are less available. The motivation behind this project was to create a virtual, haptic rendering of an everyday game that would be accessible and familiar to many people. As air hockey is an inherently haptic game, with kinematic perception of where the puck and paddle are as well as cutaneous perception of paddle grip as well as impact vibration, it is a game that has great potential to be displayed virtually. Due to its popularity, many users will already have a sense of the haptic sensations of the game and can experience that in a virtual setting.
Our haptic device is an appropriate approach to air hockey as it combines visual displays, position tracking, and force and vibration resolution just like in the real game. Player�s movement of the Hapkit handle will move the virtual handle on screen with little impedance. Collisions in the game will be represented with reaction force displays and vibrations on the handle, simulating a real collision of a puck with the paddle. The virtual gameplay also shows the path of the puck as well as when it goes into a player�s goal, mirroring the real game. Hardware implementations also make the cutaneous display more appropriate. Custom 3D printed Hapkit handles with air hockey paddles embedded with vibration motors allow the players to feel as if they are holding a real paddle during game play. We see this project as a step forward in displaying fun, everyday occurrences through haptic feedback and visual representations.
Background
Several past studies have investigated the realm of multiplayer haptic gaming environments.
Prior work by Morris et al. (2004) used an Omni Phantom to create a multiplayer, high degree-of-freedom Pong game [1]. They found that the force feedback algorithm that felt best to users was the following:

... where kp is the gain used when rendering a linear spring force, Pb is the xyz position of the ball, Pp is the xyz position of the ball�s projection onto the plane of the paddle, d is the maximum penetration distance at which linear spring forces are rendered, and c is the constant force applied when the penetration distance is greater than d. The above equations informed our gameplay dynamics. Since users could control the Omni Phantom with 6 degrees of freedom, the ball was able to accumulate rotational velocity, which induced forces on the Phantom that were parallel to the plane of the paddle. The many degrees of freedom made the device difficult to control. Additionally, players were instructed to not hold the Phantom like a tennis racket, because doing so could potentially break the device at a singularity. The focus of our device was to use 1 degree-of-freedom motion to make control simple, while still incorporating the game elements of wall and puck collisions and vibration to make our game exciting and competitive.
In another paper, Mart�nez and researchers (2014) created an integrated prototyping toolkit for vibrotactile interactions in video games and virtual reality [3]. The VIbroTActile prototyping toolKIt (VITAKI) for eccentric rotating mass (ERM) actuators aimed to increase the availability of vibrotactile displays in virtual environments. Related work of the paper highlighted the integral nature of experiencing haptic interactions in making sense of and navigating virtual environments. To facilitate the design of haptic feedback, VITAKI had hardware components consisting of haptic motor controller boards along with power management circuits, as well as a software interface where physical parameters of the vibration could be easily manipulated. The mechanical implementation of VITAKI supported up to 16 ERM vibration motors, each controlled bidirectionally in an H-bridge configuration. Pulse width modulation (PWM) was used to control the magnitude of the vibration driven from each motor in an open loop scheme. The authors used pulse overdrive, or high voltage with low PWM percentages, to decrease the rise time of the motors. While in this project we did not use dedicated vibration motor control boards, the findings of the paper greatly informed the driving characteristics of vibration for instantaneous perception. Using the considerations of the rise and decay times of ERM vibration motors, we tuned the high and low motor voltages to be short enough to allow the motor to decay, yet long enough to allow the motor to get to full acceleration.
Lastly, Zarate and researchers (2017) created �Keep in Touch,� or KiT, a 7-inch haptic display made of 192 taxels that can either be in an up or down state [2]. It was designed to be a low cost device for users with visual impairment to help communicate information. It is a 3D printed interface mounted over magnetic actuators that power each taxel. The kit can be used for a variety of cases: Tactile Pong, navigation, or remote drawing between the sighted and visually impaired. Information can be portrayed using static images or images with vibrating taxels. When looking at the navigation of a new room, first the outline and furniture is shown with a static display, then the designated route is portrayed with moving taxels, and the user�s current location is a vibrating taxel. The implementation of Tactile Pong using the KiT is the most relevant to our Virtual Haptic Air Hockey. Similarly, it is a two-player game, however in this case the users explore the display with their fingertips. The user moves the paddle by pressing two keys on a keyboard. The paddle was displayed with three raised taxels, the paddle was a single vibrating taxel that bounces off walls and paddles until it goes into one of the goals. At this point, the offensive player gets a point and the score, which is displayed at the top of the KiT. The 5-ms response time of each taxel allows for fast play. The players reported that they easily and quickly could determine what state the taxels were in.
Methods
Communication

Simplified version of communication. See attached code (Appendix) for full implementation (position conversion & writing to Processing).
A leader and follower system was implemented for communication between the Hapkits. The follower retrieved analog data from its MR sensor, and the leader converted data from the follower into position values. The leader was running its own MR sensor and had two motor drivers. Because it received both position values from each Hapkit, it was able to drive both motors on the Hapkit. All of the kinematics and force calculations were done through the leader, which allowed for the players� positions, and the puck positions to be printed via the Serial monitor to the Processing visual environment.
Hardware Design and Implementation
The hardware implementation largely relied on the Hapkit base with key modifications made to it. The original capstan drive connected to a DC motor and magnetoresistive sensor was used to display reaction forces from the walls as well as forces from the puck collision itself. The original Hapkit characterization of the magnetoresistive sensor, mapped into linear handle coordinates, was used.
A custom 3D printed handle was used to better represent an air hockey puck. The handle was created by taking the original Hapkit handle .stl file and converting from a mesh to a body within Fusion 360. Within CAD an air hockey paddle was modeled from manufactured paddles, with a cut out in the lip of the paddle to press fit the provided ERM vibration motors. This top paddle had an extruded cut in the bottom of it so that it could be affixed to the modified top handle of the Hapkit, as both portions of the top handle were printed separately to increase print quality and decrease support material used. The assembled handle was used with the original Hapkit base and sector assembly.
The ERM coin vibration motors were connected to available digital pins on the leader Hapkit board as the other analog pins were used for communication and Hapkit native functions. Each vibration motor was connected to a digital pin and ground, with the digital pin acting as the switching mechanism. Below is the electronics diagram for the vibration motor integration with a simplified representation of the Hapkit board.

System Analysis, Dynamics, & Control
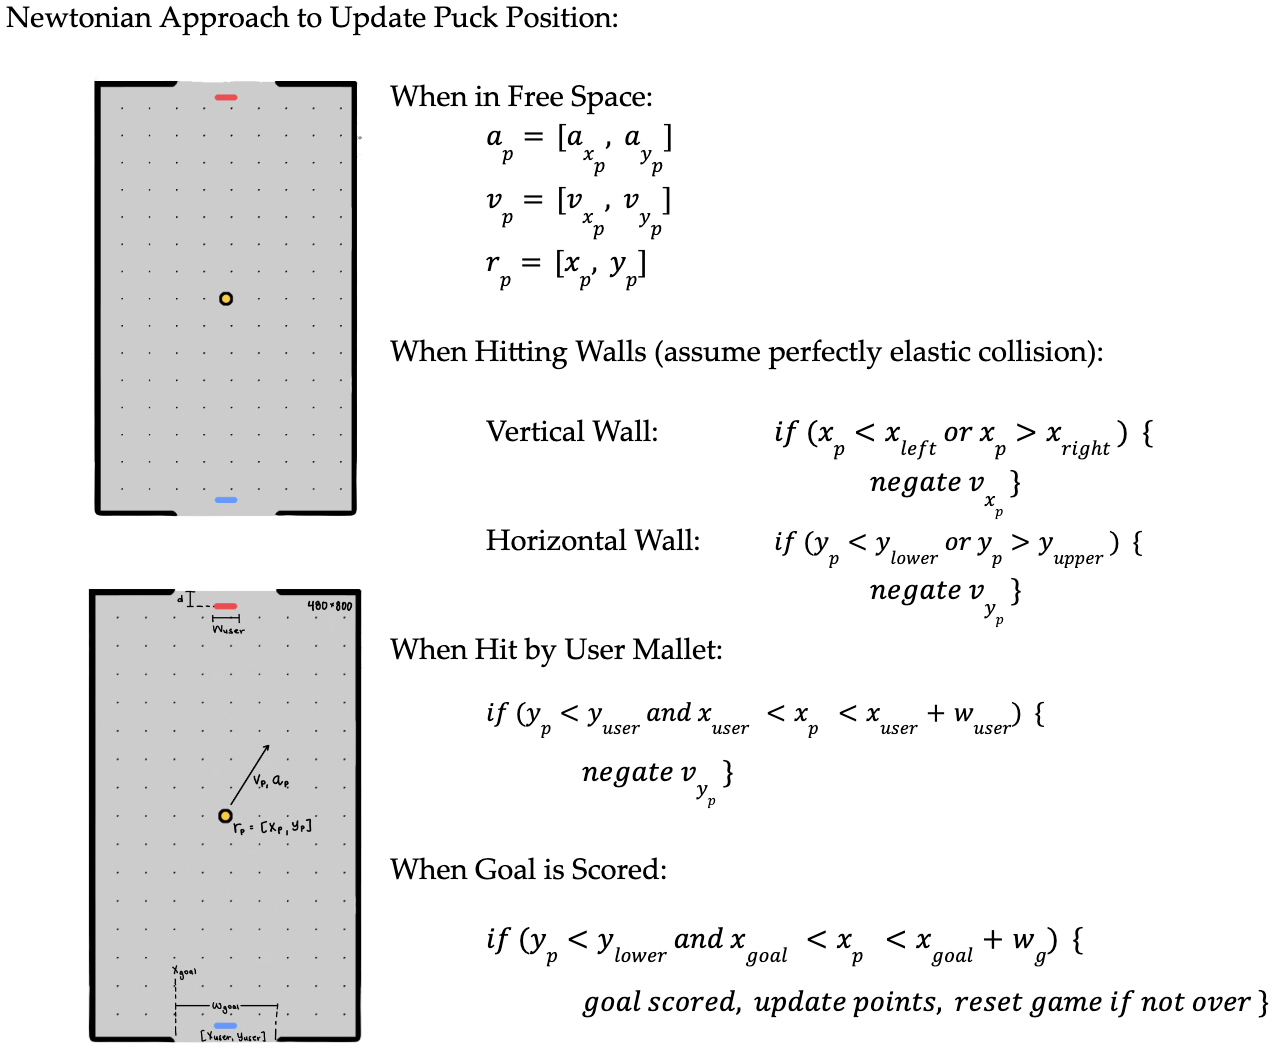
First, before any user is introduced, puck motion is created using Newtonian laws of motion. Acceleration/velocity are defined and position is then integrated. Interactions with walls are assumed to be completely elastic (no change in velocity magnitude upon collision).
Next, three separate haptic features are included. First, in order to ensure intuitive game play, a realistic table environment is required�one that keeps the player contained within its wall�s limits. This requires wall forces modeled as virtual springs.
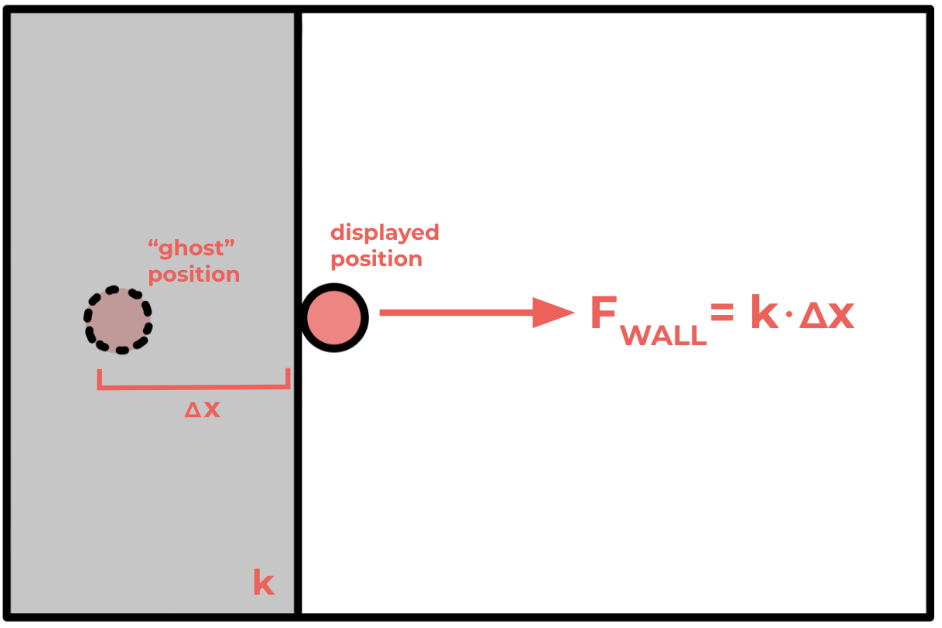
To achieve this, all table walls were modeled as virtual springs. On the Arduino computation side, this meant that a �ghost� position (where the user�s handle location truly was) was used to calculate spring force and generate this force in the opposite direction, pushing them back into the field of play. A k of 0.05 N/m was chosen in order to ensure the wall felt rigid and not so pliable that players could move far outside the table.
Also, to still realistically recreate the solidness of the virtual wall, Processing if statements were used to ensure that even when the user �ghost� position leaves the table, the displayed position remains up against the wall.
Secondly, most important to recreating the haptics of air hockey is creating realistic collisions felt between the user�s mallet and the colliding puck. To do so, we simulated this collision in both lateral (x) and longitudinal (y) directions.
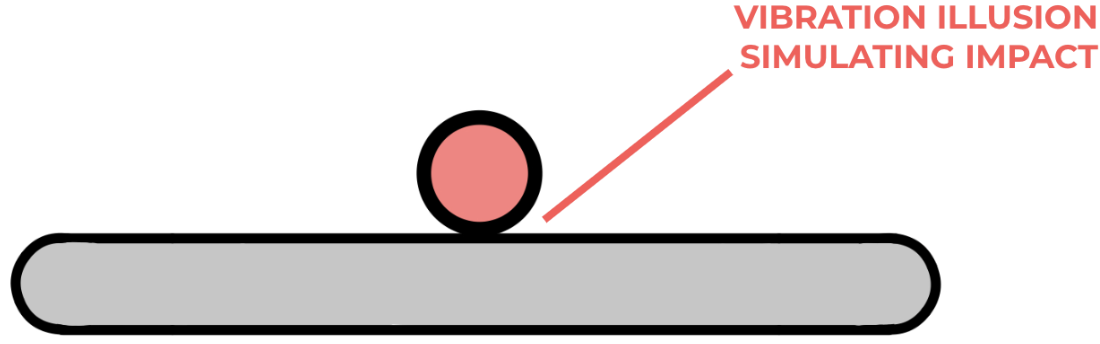
In the longitudinal direction, the group wanted to simulate the reverberation characteristic of head-on impact (or any impact with some y-velocity from the puck). To create this collision vibration feedback, the ERM vibration motors press-fit into the custom air hockey Hapkit handles were used to create vibrations upon impact. When collision was detected by the Arduino kinematics and position tracking (when the puck extents in any way overlapped with the handle extents), a vibration function buzzOn() function was called to begin vibration, with the millis() function keeping track of time similar to a counter, and buzzOff() turning off the ERM after the specified duration. Buzz duration was kept short to simulate a realistic collision, similar to the short pulses in the Cutaneous Rabbit Effect.
Interestingly, this vibration allowed the project to use a sensory illusion. While the vibration was simply general ERM buzzing inside the handle, multiple users (while looking at the gameplay screen of a puck longitudinally hitting their mallet) reported believing the vibration was specifically longitudinal vibration. This meant that the system could use a simple ERM motor to trick users into perceiving context-specific longitudinal vibration.
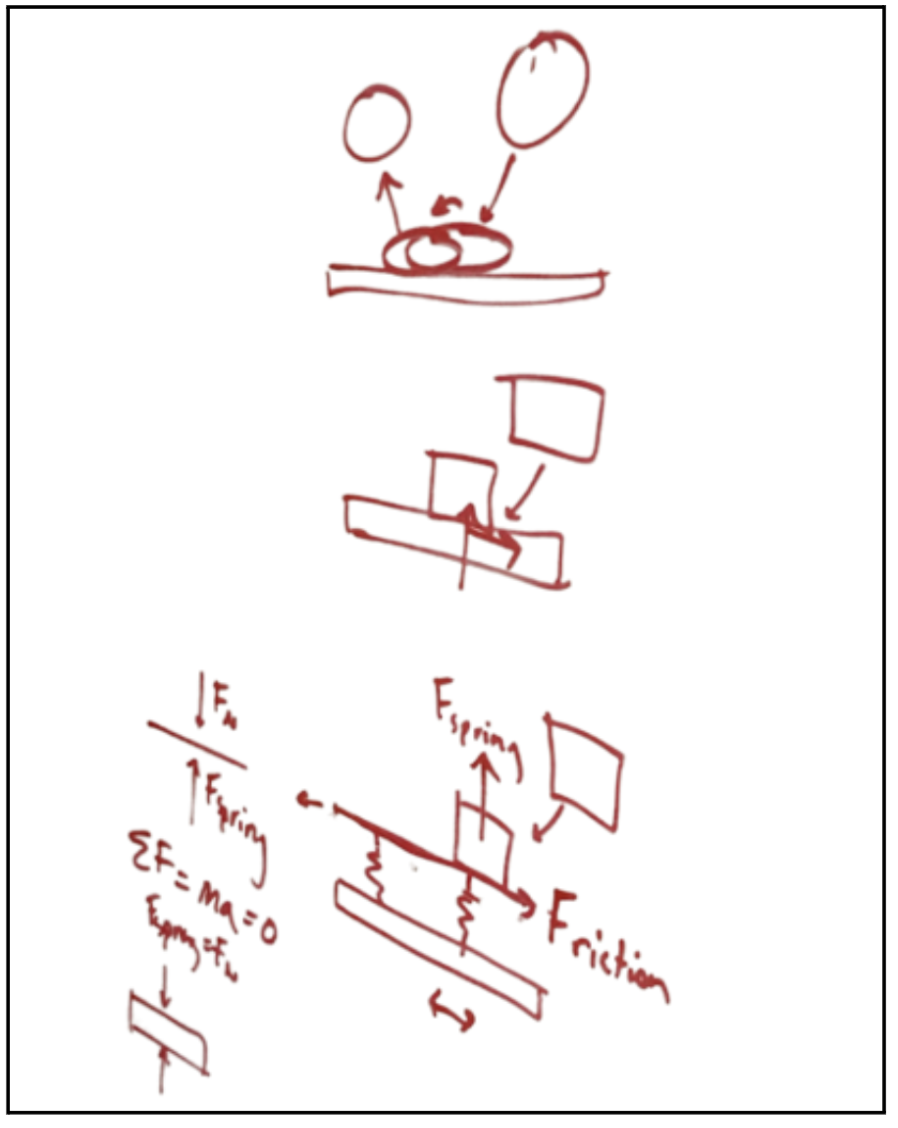
Lastly, the lateral direction of puck-handle collisions was accounted for: When the puck, traveling with some x and y velocities, hits the flat handle, it will also impart some lateral force in the direction in which it is traveling. To also simulate this force, the Hapkit motor was used to exert small and sudden collision lateral forces with the corresponding magnitude and direction. Below are the calculations to determine this force.
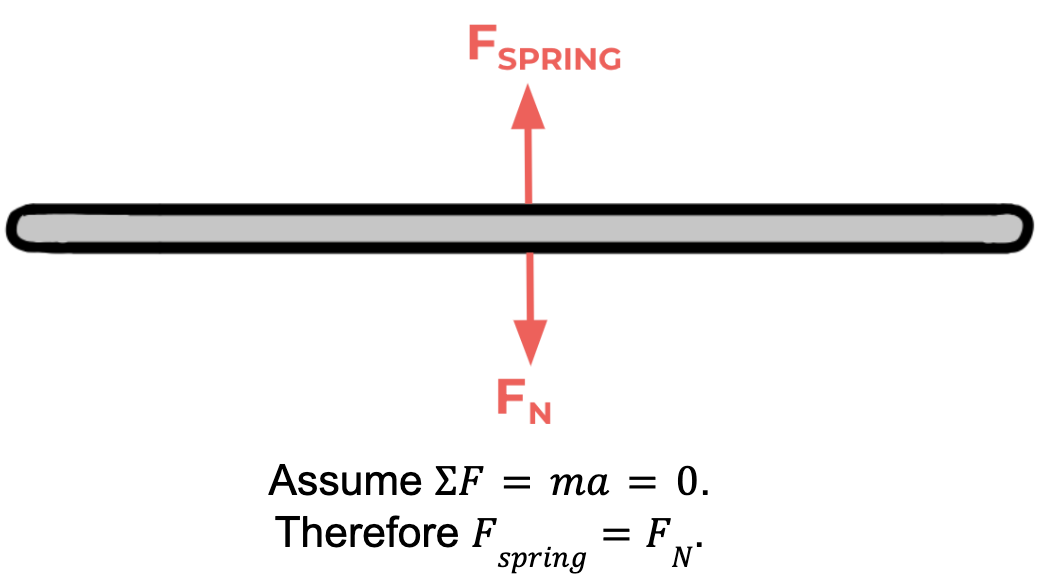
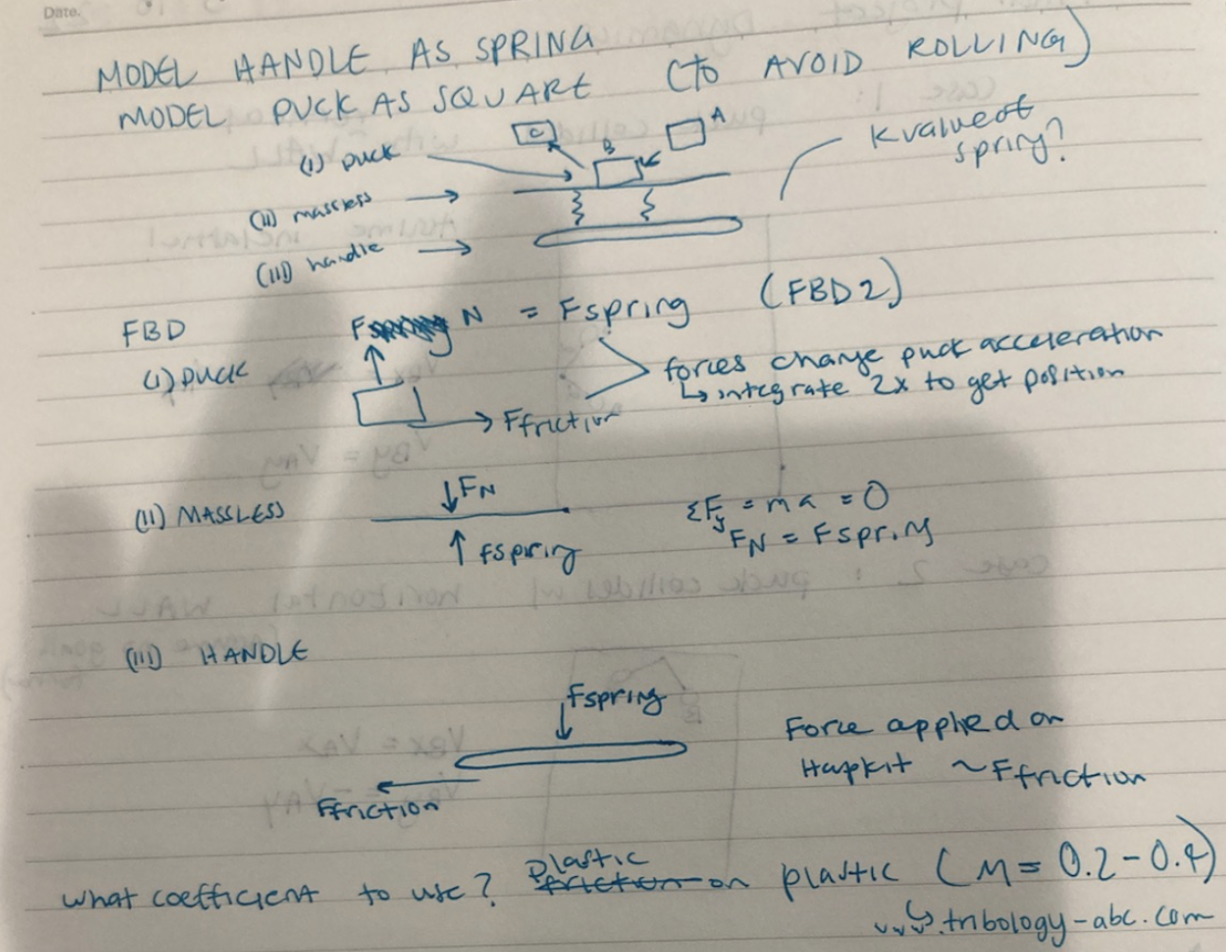
The handle is modeled as a spring, with the top surface above the spring being massless. The puck was modeled as a square to avoid rolling.

Next, the massless section can be modeled and forces found to be equal:
This can then inform the FBD model for the puck, where forces change puck acceleration (integrating twice to get position):

Therefore, we can solve the final FBD for the force applied on the Hapkit:
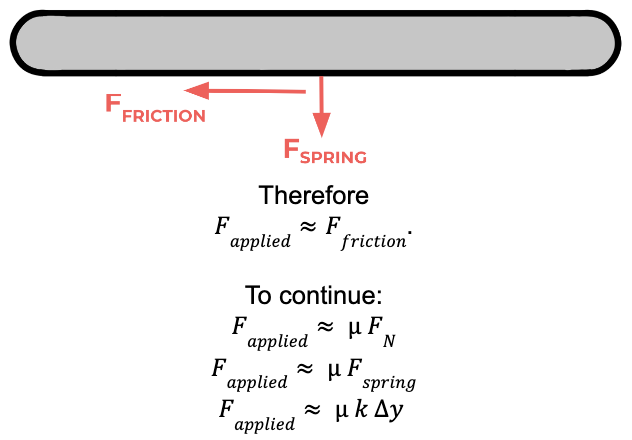
Accordingly, the applied collision force on the Hapkit was set in the Arduino code to be the product of friction coefficient, spring constant k, and depth of y into the surface. Coefficient of friction was set to 0.2 (www.tribology-abc.com) to mimic plastic-on-plastic friction. k was set to 2 to ensure a noticeable and rigid collision while not overpowering the vibration sensation as well. y is calculated by the Arduino code during the collision continually.
This force is also notable in that a puck left untouched by a user�s hand, when hit, still gets pushed in the direction of the puck�s motion by the puck�just like a real physical interaction.
GamePlay
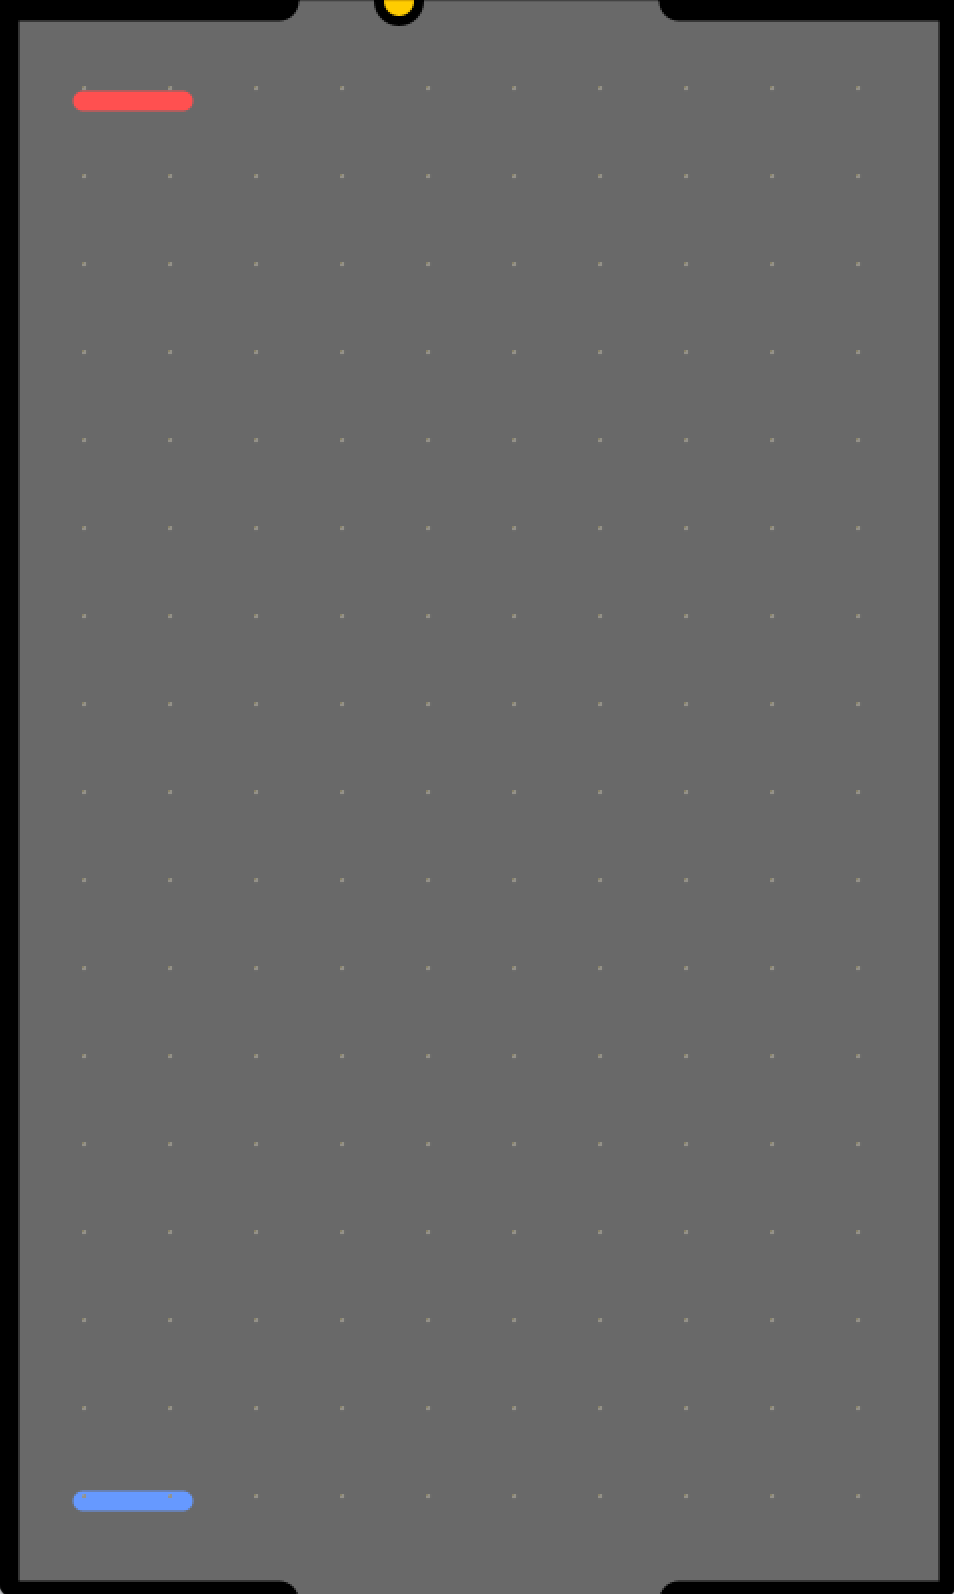
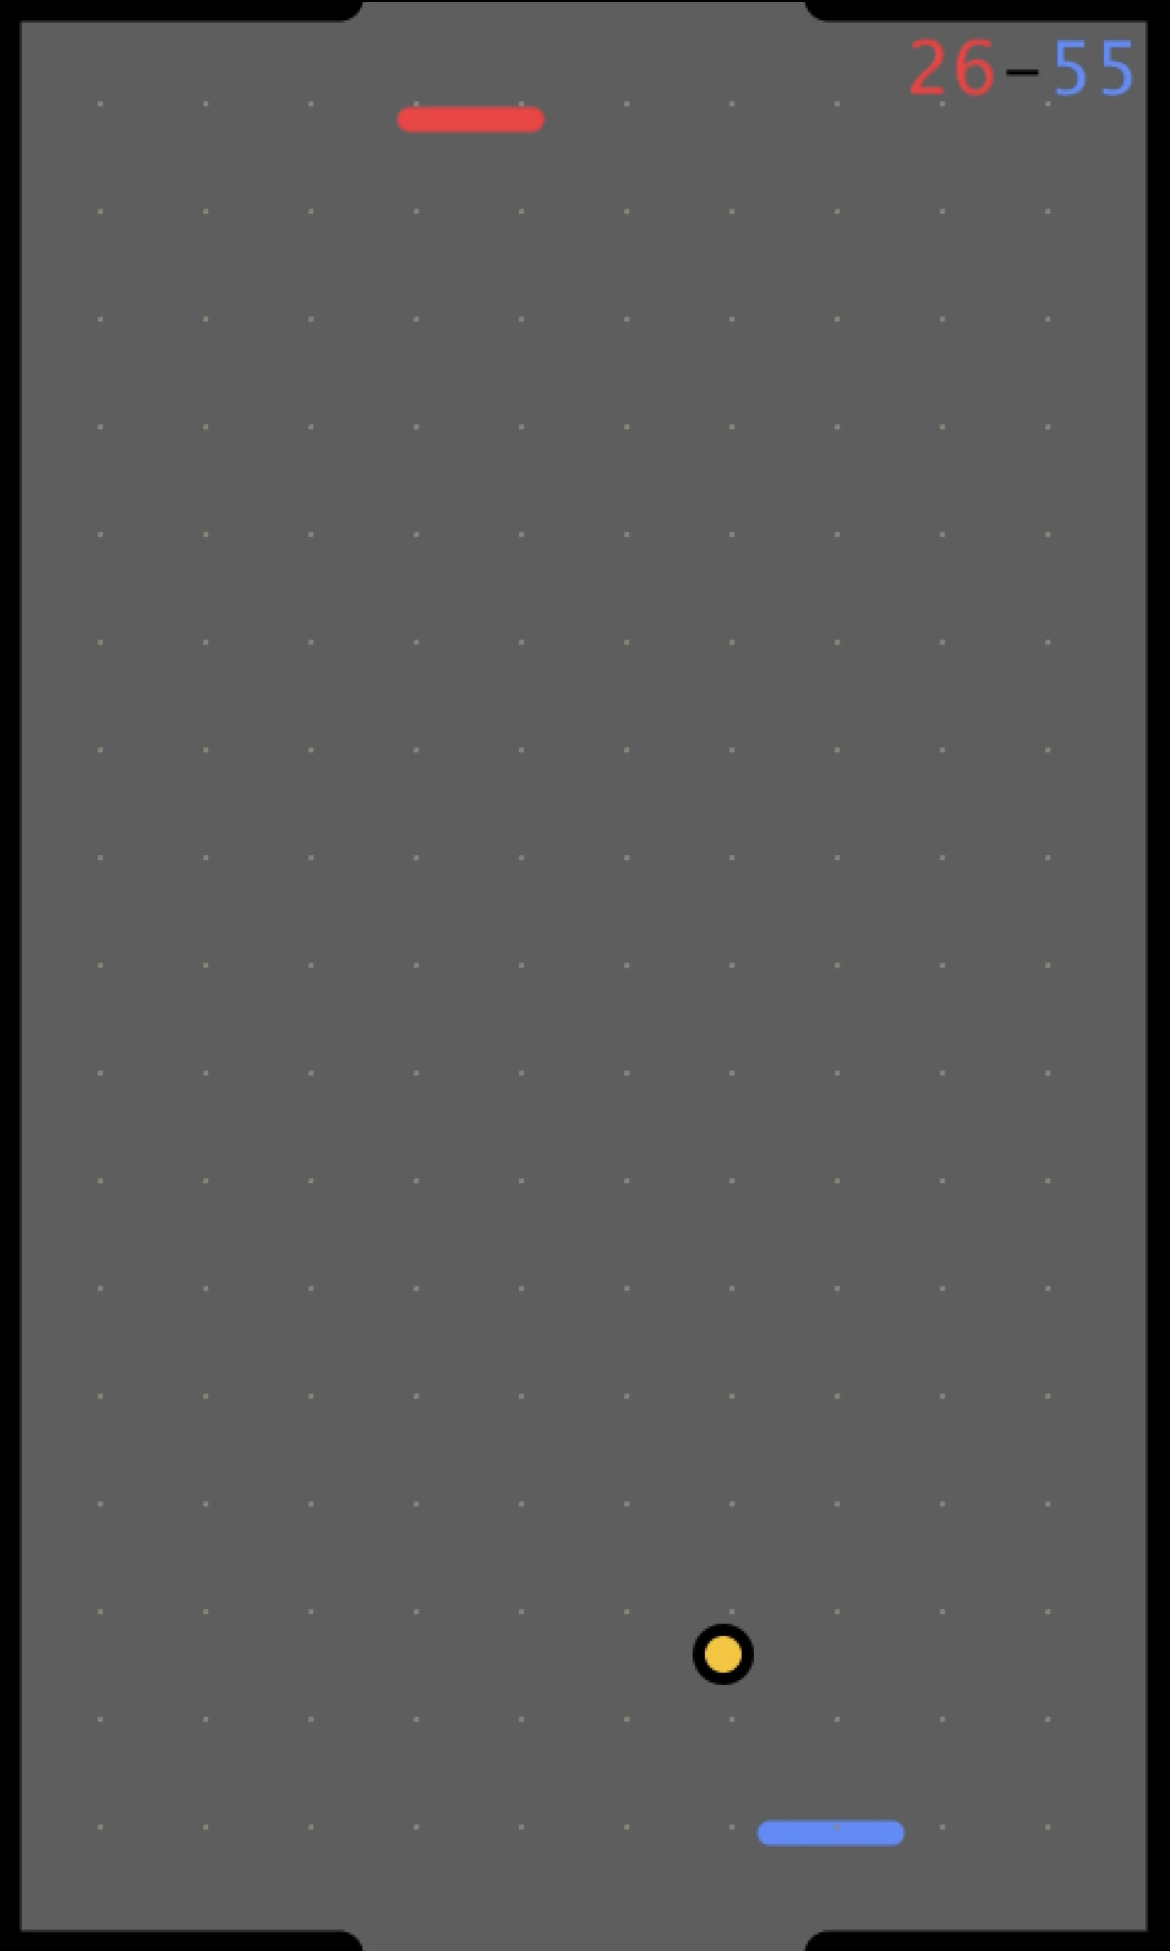
Gameplay (as intended; one player can also entertain themselves by playing as both players) requires two players for 2-vs.-2 competition. With each player moving their respective custom Hapkit handle, they move their virtual handles left and right to prevent the other player from scoring on them and to try to score on the other. When the puck enters a player�s goal, a goal is scored, the score (displayed constantly in the upper right-hand corner) updates, and the puck restarts in the middle of the table. The starting puck direction and velocity after a goal are randomized, so both players must be on guard and ready to defend their goals from the unpredictable start to the round. Processing visuals include a "retro" theme with color-coded players. Difficulty can be increased simply by changing puck speed or shortening the user�s mallets so that they cover less of the goal. The game can continue for as long as desired, with scores going as high as wished. Restarting the program restarts the score.
Demonstration / application
For the demonstration day, the group had two users play each other in Virtual Haptic Air Hockey. Players would score a few points, test out different strategies for winning or manipulating the puck, and ask any questions they had on the implementation. The group ensured they experienced all of the features: felt the force at each wall, the vibration and force feedback upon puck collision, and scored a few goals. The group also showed how the handle moves when the user does not hold it and the puck collides with it. Overall people had fun playing hockey!
Example gameplay can be found in this linked gameplay video.
Results
The result of our implementation sucessfully reflected the intended rendering of the game. As our design for the force and vibration feedback of the collision was intended to be noise-free, stable, and noticeable, we achieved all of these metrics in the final gameplay. No oscillatory behavior of either the vibration motors or the Hapkit motors was felt, illustrating our appropriate scaling of spring constants and driving motor voltages. Since the game largely was meant for user interaction, the results of other�s playing the game as documented below illustrate the strength of the final iteration.
Final virtual constants are also listed below:


User Sentiments
Users gave incredibly positive reviews, with multiple themes recurring in the sentiments. Most users immediately upon first collision with the virtual puck commented on the collision experience (directed force plus vibration) being incredibly convincing. Many unknowingly pointed out the success of the haptic illusion created by the vibration, asking how the vibration was directed longitudinally, and leading group members to reveal that in reality the vibration was not longitudinal but seemed so due to game context. Others pointed out the believability of collisions due to the force directed in the same direction as puck lateral velocity. Lastly, many noted that the free space �felt really free,� a sensation hoped for by the group considering that in real air hockey the felt bottoms of the mallets lead to nearly frictionless movement.
Suggestions for future work were also mentioned by some excited users. Some agreed that speed could be increased for more difficult gameplay�an easy and already possible change. Others wisely noted that gameplay would be more exciting and vicious if the mallet velocity could affect puck direction and speed post-collision�i.e. allowing for side-swiping and smashing. Lastly, one user noted that the Hapkit�s inherent friction/bumpiness (the small step-function-like bumps in Hapkit rotation due to friction in the assembly) was interesting and actually contributed to believability, but the group was unsure whether this was shared amongst all users.
Future Work
Describe how your system could be tested (e.g., through experiments if you have not already done so), how it can be improved, and how it might be applied.
While testing has largely been conducted through each feature�s integration and full gameplay, further testing could include studying how participants perceived the virtual game versus the real game. One such experiment could consist of players playing real air hockey, followed by virtual air hockey, and reporting their perception of the display in validating its effectiveness. Further testing of collision dynamics as well as vibration characteristics in real game play when displayed in the virtual space could also be performed.
Some improvements can be in the kinematics of the gameplay interface itself. As the augmented Hapkits have one degree of freedom rotational motion mapping to linear motion, another iteration could include a rack and pinion for true linear motion, or a ball and socket joint for two degrees of freedom movement. Alternatively, computer vision could be used to track a user�s two dimensional, natural motion, while displaying it virtually. Force displays across Hapkits can also vary, so inclusion of force gauges on the paddle or other interface could improve the display.
In software, further considerations of board friction and damping could also be included. Acceleration of the puck and general displays of velocity magnitude change would increase the gameplay fidelity, as well as potentially displaying board surface textures in the game. Another potential place for improvement would be to make the visual display horizontal to match the game, or even to have the display be beneath the player�s hapkits, mirroring the true visuals of air hockey.
Application of this gameplay can be in general virtual environments where a user is fully immersed in virtual or augmented reality, or in mobile gaming applications that are space limited. As the force and vibration displays used in the game are broadly applicable throughout many haptics projects, our implementation can be generalized to increase user satisfaction of virtual interactions which ultimately can drive technological adoption. A maximum score could be set easily so that gameplay ends at a specified score and a winner is declared.
As mentioned earlier, kinematics could be more exciting (and gameplay more vicious) if the mallet velocity could affect puck direction and speed post-collision�i.e. allowing for side-swiping and smashing. Power-ups could be added that give advantages or disadvantages to either player�s haptic settings (e.g. increased damping, etc.). Speed could be set to easily change with the use of the arrow keys on the computer.
Lastly, the game could also be one-player, where the user plays against a computer with different levels of difficulty. To get the machine to play, its mallet x postition could be set to always equal the puck�s x position (following it perfectly and allowing no goals), but then add in an error function so that some goals are allowed past. Different levels of difficulty could be created by making this error function more zero-centered/smaller-amplitude for hard levels and more frequently non-zero for easier levels.
Acknowledgments
The teaching team has been a huge part of learning so much throughout the course. Nathan joked that if we didn�t come to Office Hours, he would be lonely. All to say that we utilized the Course Assistants to bounce questions off throughout the entire design process. Elyse was particularly helpful when we transitioned our Hapkit communication to have one leader that did all of the calculations - thank you Elyse! Nathan�s office hours were also a great time to ask questions about our project. Although David did not have office hours, he was helpful to answer any questions before or after class. This all would not have been possible if Allison did not teach such a lovely course on Haptics! Our group came in with minimal knowledge on the field, and came out learning a lot! Thank you for the skills to design and create a project we are all genuinely proud of.
Files
Our files can be found at https://drive.google.com/drive/u/2/folders/1t7cKa9QaSdZOxJbm8c4paGXpKjicZpoo.
References
[1] Morris, Dan & Joshi, Neel & Salisbury, Kenneth. (2004). Haptic battle pong: High-degree-of-freedom haptics in a multiplayer gaming environment, Microsoft Research. (https://www.researchgate.net/publication/228913503_Haptic_battle_pong_High-degree-of-freedom_haptics_in_a_multiplayer_gaming_environment)
[2] Juan Jose Zarate, Olexander Gudozhnik, Anthony Sebastien Ruch, Herbert Shea. (2017). Keep in Touch: Portable Haptic Display with 192 High Speed Taxels. DOI: 10.1145/3027063.3052957 (https://dl.acm.org/doi/abs/10.1145/3027063.3052957)
[3] Jonatan Mart�nez, Arturo S. Garc�a, Miguel Oliver, Jos� P. Molina & Pascual Gonz�lez (2014) VITAKI: A Vibrotactile Prototyping Toolkit for Virtual Reality and Video Games, International Journal of Human�Computer Interaction, 30:11, 855-871, DOI: 10.1080/10447318.2014.941272 (https://doi.org/10.1080/10447318.2014.941272)
Appendix: Project Checkpoints
Checkpoint 1
Here you will write a few paragraphs about what you accomplished in the project so far. Include the checkpoint goals and describe which goals were met (and how), which were not (what were the challenges?), and any change of plans for the project based on what you learned.
COMPLETE: Goal 1: Two-Hapkit Communication: Before any code, visuals, or haptics could be tested physically, communication had to be established between the Hapkit Board, the 2 users, and the Processing visual output. Our original goal was to power both Hapkits off one board using similar Python communication as in previous homework assignments. We realized that 2 boards would be required at the least to sense the two Hapkits' rotation, so the final setup now involves two Hapkits each with a board, both communicating to a single laptop and Processing's two ports--no Python needed. If needed, we can even write back to the Arduino. Now that this goal is complete, we can test our code, haptic effects, and visuals using this communication setup. A video of working communication can be seen here: https://youtu.be/4tT0h7grpMA.
COMPLETE: Goal 2: Dynamics Analysis: Creating virtual air hockey dynamics has been split into two sections: First, kinematics were worked out to dictate how speed and direction changes in free space and during collisions. This assumed perfectly elastic collisions. Second, dynamics and FBD analysis of the puck-mallet collision were calculated to determine what feedback force should be felt by the user when hitting the virtual puck. Lastly, constants like the frictional coefficient and spring stiffness of the puck-mallet collision can be adjusted as needed afterwards. This analysis is complete and will now be implemented in the code. Next steps will also include incorporating friction/energy loss from the puck sliding from the ground, etc. The document covering general pseudocode and calculations of kinematics and dynamics can be read here: https://docs.google.com/document/d/1HM7Edt0V-r6DhSf3MOazqQNg2koybcNKkT9H0ry-MoE/edit?usp=sharing.
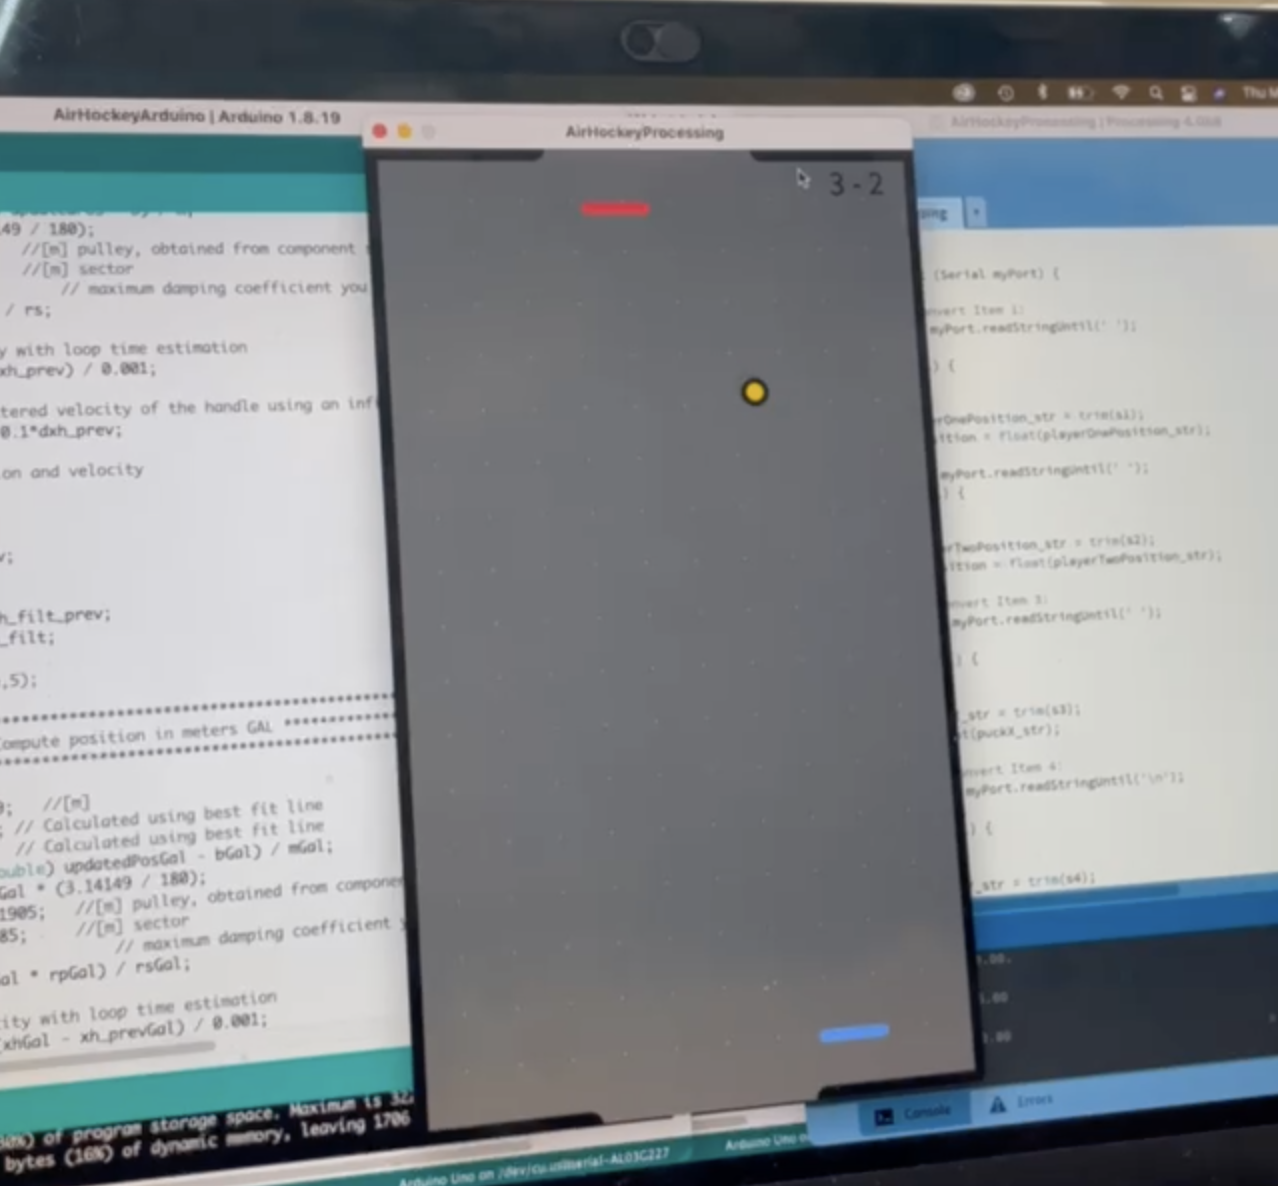
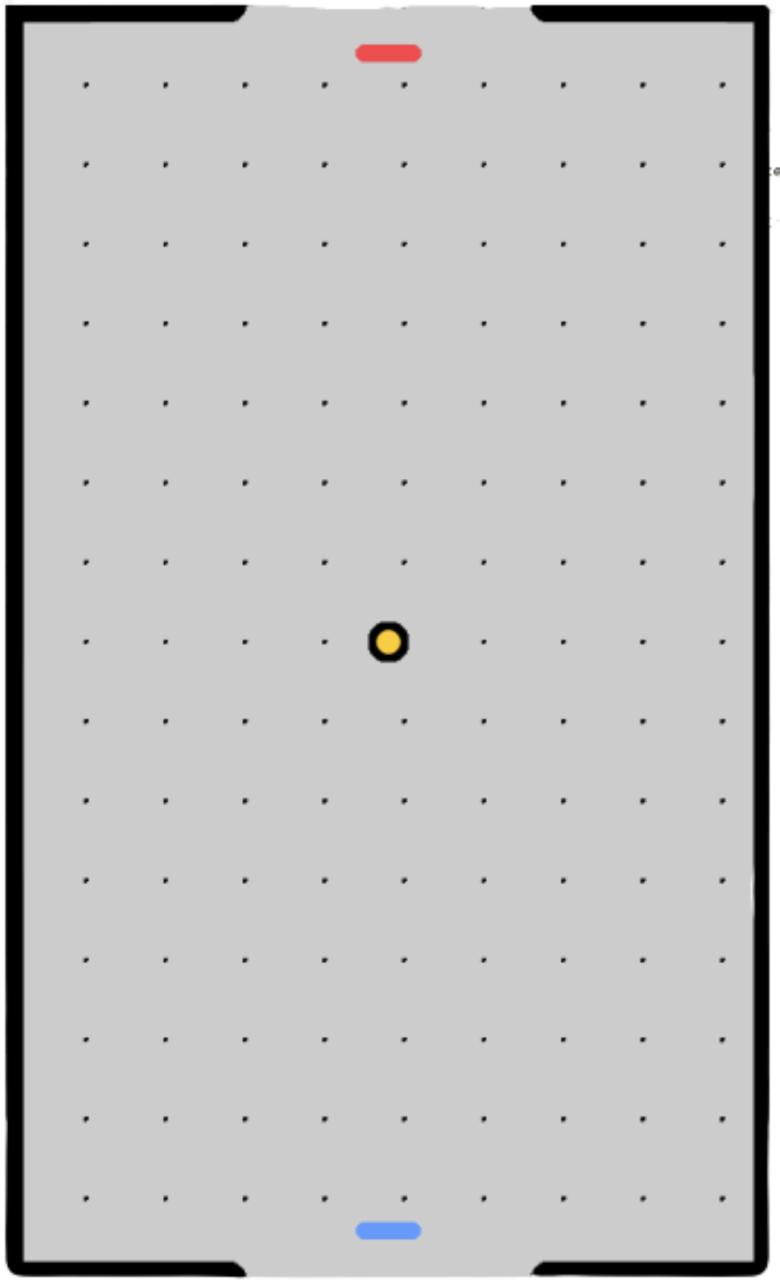
COMPLETE: Goal 3: Arduino & Processing Code Begun: We have exceeded this goal: Not only have we started the Arduino and Processing code but we have completed Processing code and nearly Arduino code implementing the kinematics/dynamics mentioned above. Next steps include debugging the Arduino code to the point where the two work perfectly together. Some obstacles we have encountered in this process include Arduino "Serial.print()" issues, the "map()" function outputting "floats" and not "doubles", and more. Below is an image of the air-hockey visualization in Processing, and a link to the complete code can be found here: https://docs.google.com/document/d/1yQt0tu3Ca1DUFxueXnVQhhIx7PGH5LbjDZkbmMupYT8/edit?usp=sharing.
Checkpoint 2
COMPLETE: Goal 4: Functional MVP of Game: The largest and most complex goal has been achieved: a minimum-viable-product game that includes Hapkit communication, Arduino code, and Processing code. One can use the handle to play virtual air hockey with complete dynamics and kinematics. This included fixing puck dynamics so it updates its position according to Newtonian kinematics rules, wall rules so that the puck bounces off of walls (completely elastic collision) but enters goals untouched. Game play is also functional: Once a goal is scored, the puck is reset for the subsequent round. A video showing two-player gameplay can be found here: https://youtu.be/t2a61pceQ3I. Code for all of these additions can be found here: https://docs.google.com/document/d/1HM7Edt0V-r6DhSf3MOazqQNg2koybcNKkT9H0ry-MoE/edit?usp=sharing.
COMPLETE: Goal 5: Haptic Add-Ins Begun: Now being added are haptic and interactive features: improved collision forces on the user's hand, wall forces on the player's Hapkit preventing them from leaving the playing table, preventing the paddle from leaving the playing table visually, a scoreboard that updates, the game ending at a certain score, increased randomization of starting configurations, and improved handles for the Hapkit that mimic air hockey play. Again, code can be found here: https://docs.google.com/document/d/1HM7Edt0V-r6DhSf3MOazqQNg2koybcNKkT9H0ry-MoE/edit?usp=sharing.
Some issues we encountered but navigated included aligning/mapping Arduino and Processing locations of items like player mallets (i.e. so that the puck did not bounce off of invisible/incorrectly-located mallets/walls), erasing the previous puck each time the puck updated its position, ensuring goal-scoring was precise, adjusting vibration code for vibration motors, finding replacement vibration motors after originals went missing, ordering the Arduino loop so that gameplay was smooth (and so the ball didn't get stuck after scoring), and making gameplay more realistic (adding a delay after scoring, adding scores to the Arduino communication items, etc.).