

Supakkul Chiu Darmawangsa

Our group members with the virtual keyboard instrument.
Virtualso: Rendering Keyboard Instruments
Project team members: Kevin Supakkul, Daniel Chiu, Kevin Darmawangsa
Different keyboard instruments have unique and distinguishable haptic feedbacks that are essential to the experience of a virtuoso musician but often not present in electronic keyboards. Our group, comprised of former musicians experienced with different keyboard instruments, decided to apply haptic technology to electronic keyboards to make them feel more realistic to the instrument they are simulating. The goal of this project is to design a haptic device that renders two different keyboard instruments, the piano and harpsichord, effective enough that those who have played both can distinguish the two by touch alone. It is comprised of three keys as well as incorporates graphical rendering of digital keys as well as aural feedback when keys are pressed. Ultimately, our project bridges the gap between acoustic and electronic keyboard instruments, allowing musicians to more accurately feel the tactile response of an actual piano or harpsichord while using our device.
On this page... (hide)
Introduction
Music performance is a multi-modal experience; it requires the involvement of multiple senses chief among them, auditory and haptic. However, electronic keyboards usually only simulate the auditory component of actual instruments but not the tactile feeling of playing them. Pressing the keys of a real keyboard instrument like a piano or harpsichord gives both force and vibrotactile feedback that aid in playing them. Our project, the Virtualso, demonstrates that it is possible to make an electronic instrument incorporate this haptic feedback. It does this by utilizing controls and system dynamics to render the tactile feeling of playing the piano and harpsichord, instruments each with their own unique dynamic systems built into each key. Such a device has application to improving future electronic keyboards to feel more realistic to the actual instruments they simulate.
Background
In the field of haptics and dynamics there has been quite a substantial amount of research conducted surrounding the piano regarding the modeling and characterization of the action of its keys. From our search into priorr work, we discovered that the Virtualso is not the first of its kind. In his paper, "A Multi-Instrument Force Feedback Keyboard"1, Researcher Roberto Oboe presented a very similar device that models not only both the mechanisms of a grand piano and harpsichord but also that of an organ. And while we only used three keys in our device representing the notes C-D-E, Oboe created his device to hold an entire octave, black keys included.
Additionally, many of the papers we consulted were actually written by a former Stanford student, Brent Gillespie, in collaboration with the Center for Computer Research in Music and Acoustics (CCRMA). Some of Gillespie's work that proved relevant to our device includes a paper titled: "The Virtual Piano Action: Design and Implementation"2 that describes a method of simulating mechanical piano action with motorized keys and a finite state machine which are very similar to how we built our device. Furthermore, his work in "Dynamic Modeling of the Grand Piano Action"3 and "Characterizing the Feel of the Piano Action"4 set the ground work for our understanding of how to render the spring-damper dynamic systems of our device's keys to make them feel like those of a piano or harpsichord when pressed.
Methods
Hardware Design and Implementation
The majority of our hardware was repurposed from the Hapkits built in the beginning of the quarter because fortunately they fit the needs of our device. We required each key to be connected to a motor and the ability to track the position of all the device's keys individually. This was done first by replacing each of the Hapkit's handles with 3D printed piano keys. These were then connected to a motor via capstan drive. Also included in each Hapkit is a magnet implanted into each motor's drive shaft which allow a corresponding magnetoresistive (MR) sensor to track the key's position and send that data to a microcontroller.
Once all three Hapkits were modified into piano keys, we designed a base that aligned them together. The Hapkits were then wired together with the middle device acting as a central processor for all the position data sent from each of the three MR sensors. While all the motors and sensors are independent, it is the middle Hapkit's microcontroller that our software is uploaded to and controls the Virtualso's motors to respond.

CAD assembly of the Virtualso

Wiring diagram of the Virtualso shown from left Hapkit to right Hapkit
Finally, to make our device appear more like a piano we cut out white covers for our piano keys and a piano body around our Hapkit arrangement out of foam core.

Our haptic device without its piano body

Our haptic device with its piano body
Software Design
As our system was heavily based on the Hapkit, the basic methods for calculating the position and velocity of keys from angular position of the motors and setting the PWM signals were all taken from ME327 code set up during homework assignments.
The main change we did was move the system over to Visual Studio Code so that we could use object-oriented programming and state machines to control the key behavior. There are two different state machines, one for piano and one for harpsichord. Below we discuss the types of states and forces used. Refer to the state machine diagram and the code (main.cpp) for more details on how we move between each state.
Each state machine has 5 states. �Pressing� refers to the condition where the key has a downwards velocity. The �hard wall� state occurs for a short time right after you�ve passed the bottom threshold (tip of the key 2 cm below original position), and �in wall� directly follows that. �Returning� occurs when key velocity is upwards, and �above� occurs when key goes above its original position.
We have five different sets of force behaviors.
The first is PD control to get the feeling of pressing a piano key. We used Kp = 30 N/m and Kd = 0.2 Ns/m for the middle key. The left key and right key use 50, 0.3, and 30, 0.1 respectively. The values differed greatly as each key had different levels of friction and behavior.
The second is a stiff wall, implemented as a stiff spring that kicks in to further impede movement of a key hitting the bottom. We used k = 300 N/m.
The third is a return force, which is an additional constant force used to return a key to its original position, as a way to overcome internal friction. Once again, this varied for each key based on its behavior.
The fourth is additional damping, which is used for a short period of time to create a sense of vibration when the key hits the bottom threshold. These forces are used in various combinations, as seen on the relevant state diagrams. For this we use b = 10 Ns/m.
The fifth is a stiff string. This force is unique to the harpsichord, which is otherwise identical in behavior to the piano. The feeling of plucking a string was modeled as a stiff spring with k = 500 N/m. This force only appears in a small band of key positions.
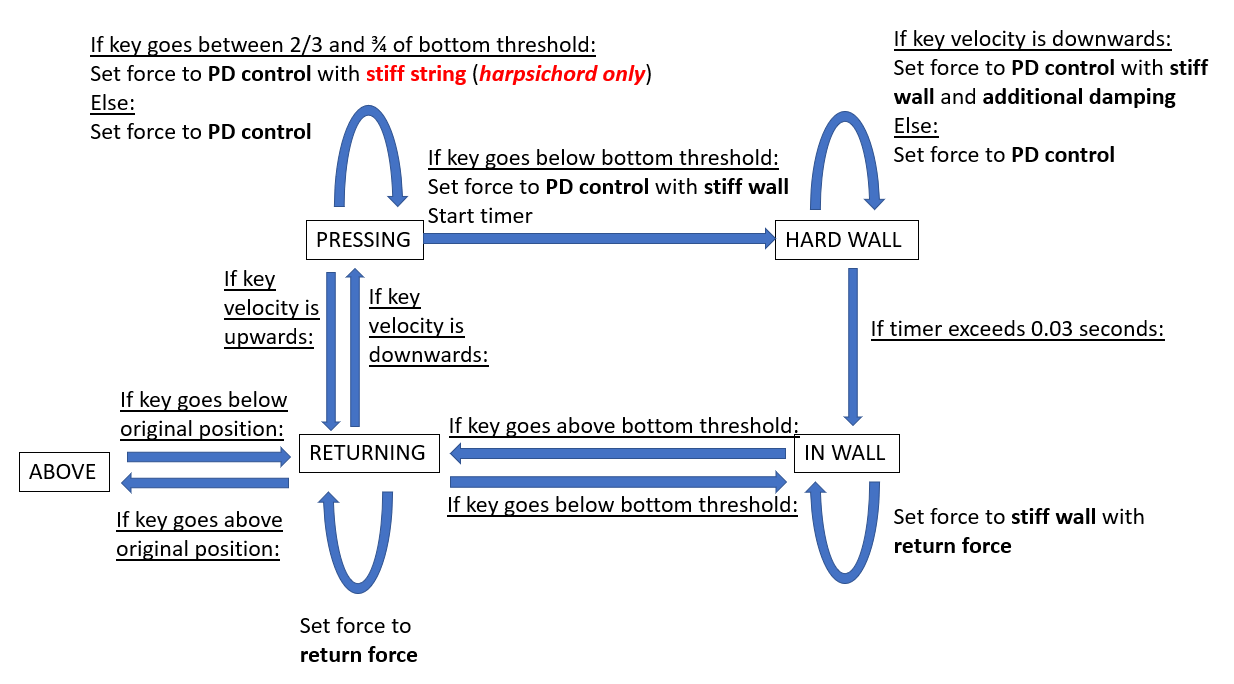
State machine for piano and harpsichord. See text for explanation of states and actions.
To render the graphics and audio files, we used Processing to receive the Arduino's serial output and display the corresponding graphics and sounds. For the virtual piano, the volume of the sound file reflected the speed at which the user pressed the key, similar to the effect of an acoustic piano. For both keyboards, each key would turn Cardinal red when pressed. Thus, the device had haptic, visual, and aural feedback.

Piano graphics drawn in Processing. The right image shows the graphics during a key press.
Dynamics/Control Systems
We can break down the goals of the controller into two main tasks:
1. Render the correct force feedback during the pressing phase and wall contact
2. Return the key to position x = 0 upon release
For the first task, we programmed the force rendering as follows for the two instruments: for the piano we experimented and found that a spring-damper system (essentially a PD controller when x_desired = 0 and dx_desired = 0) was close to the haptic feedback of a piano, so we implemented this model for the "pressing" state. Meanwhile, a harpsichord produces sound via a hook making contact with a string and plucking it, so we had to render this sensation in our device. We modeled this plucking as a really strong spring during the pressing phase that engages at a certain location and releases at a later threshold. For both the piano and harpsichord, we rendered a virtual wall with initial damping to simulate contact with a hard keybed. The force rendering profile for each instrument can be seen in the following figure:

Force rendering vs Displacement plots for both keyboard instruments. The main difference is the harpsichord's rendering of plucking.
The second task was not straightforward. We could not use a simple PD controller to return the key back to 0 because the friction was dominated by Coulomb friction as opposed to viscous damping, so the PD controller model did not return the key back to 0 without an absurdly high Kp value. We wanted to preserve a low Kp value so that the key would still feel like a keyboard instrument as opposed to feeling like a strong spring. In the previous section, we described the state machine that we implemented as our controller. This controller produced a stable underdamped response that returned the keys back to x = 0. The following figures demonstrate this controller in action, showing displacement and force plots from data that we captured with our device.

Displacement vs Time plots for both instruments. The key features are indicated in red.

Force vs Time plots for both instruments. The key features are indicated in red.
Demonstration / Application
Testing of the device in piano mode
Testing of the device in harpsichord mode
Results

Professor Okamura trying out the Virtualso on Demo day
We were able to create a good representation of the feel of the harpsichord and piano for the most part. The piano created the sensation of damping when pressed, and generated a vibration and strong force when bottoming out. The harpsichord created the feeling of plucking a string.
On a scale of 1-5 with 5 being most realistic, users rated the piano an average of 3.66 (6 users rating) and the harpsichord an average of 4 (5 users rating). This was not a controlled test but gave some idea of what others felt about it. It should be noted that the piano is a more common instrument than a harpsichord which could skew that rating, as people are more likely to know a piano feel and judge the reproduction more harshly.
We received some user comments on the device as well. One user noted that the sound of the piano was too quiet, which we could fix by recording a louder sound or applying some gain to the recorded sound we had. Another user mentioned that the bottom threshold of the piano key was too deep at 2 cm, and they had to push too far to make a sound. We originally started with a lower bottom threshold, but found that the device responded poorly as it could not track a very small change in position, so we were forced to solve that by increasing that key travel. The "plucking" of the harpsichord was also said to be too stiff and did not have enough travel, and was confused for a hard wall a few times.
Future Work
Future Testing
One way our device can be tested for effectiveness is through an experiment where participants, perhaps those who are already musicians trained with keyboard instruments, are blind-folded and asked to play the keys on our device as well as those on an acoustic piano and electric keyboard. Through headphones, they can be fed the same sound file of a piano key or no sound at all so that they focus solely on the feeling of pressing down on each key. Then we ask them to order the three keys they pressed based on how realistic they felt. If our device was successful, our participants would rate it as more realistic than the electronic keyboard but either less realistic than or close in realism to the actual instrument.
Future Development
Our system could have benefited from a higher resolution, which had hampered us in making it difficult to track small movements. This is an artifact of the Hapkit-based design, which had a larger workspace than a keyboard instrument would need. A greater pulley radius would make it easier to track the key position in a capstan-based system. Alternatively, we could also dispense with the capstan and use motors with high resolution encoders directly attached to the key.
In the future, the system could be used to render other keyboard instruments like an organ. Artists might also be interested in entirely new types of instrument that use haptic feedback in interesting ways to assist them in playing music.
Files
We used Visual Studio Code's PlatformIO extension to write C++ code for Arduino, and we used Processing to render the graphics and sounds. The following file contains our code: Attach:PianoCode.zip
The following files are the SolidWorks parts and assemblies that we used in addition to the HapKits. We also include the HapKit files so that you can see the full SolidWorks assembly. See the Appendix for images of the SolidWorks files. Attach:PianoParts.zip
The following are the list of components and their approximate prices. The vast majority of the components were from three ME327 Hapkit sets. We used PLA plastic and duron to create various parts joining the three Hapkits together and changing the handle to a piano key. Attach:PartList.xlsx
References
1. Oboe, Roberto. A multi�instrument, force�feedback keyboard. Computer Music Journal 30.3: 38�52. 2006. https://www.mitpressjournals.org/doi/pdf/10.1162/comj.2006.30.3.38
2. Gillespie, Brent. "The Virtual Piano Action: Design and Implementation." Proceedings of the 1994 International Computer Music Conference. 1994. https://www.researchgate.net/publication/242413122_The_Virtual_Piano_Action_Design_and_Implementation
3. Gillespie, B., and M. Cutkosky. �Dynamical Modeling of the Grand Piano Action.� Proceedings of the 1992 International Computer Music Conference. 1992. https://pdfs.semanticscholar.org/ef2f/207039d843a465c9bb6ddf0d07298384577a.pdf
4. Gillespie, B., B. Yu, R. Grijalva and S. Awtar, "Characterizing the Feel of the Piano Action." Computer Music Journal, vol. 35, no. 1, pp. 43�57, 2011. http://ieeexplore.ieee.org/stamp/stamp.jsp?tp=&arnumber=6791932&isnumber=6791008
Appendix: Project Checkpoints
Checkpoint 1
This week, we aimed to set up our hardware. Our first goal was to attach the motors, boards, and keys securely.
In order to achieve that goal, we had originally intended to attach plastic piano keys directly to the shaft of the motors. We intended to use our own motors with encoders for that purpose, however we found that they had insufficient resolution for that, measuring 48 counts per revolution. This worked out to a resolution of 7.5 degrees which was insufficient to model a piano key.
Because of those issues, we decided to use a transmission to increase motor rotations relative to the piano key position. We realized that the capstan drive system of our Hapkits worked well for this purpose, and the magnetometer already performed quite well in sensing motor rotation, so we decided to modify them for our project.
To change the Hapkit function, we removed the handles we had printed and designed new ones in the shape of piano keys. Each key had to be designed differently since the spacing of the Hapkits was different from the spacing of the keys. Most parts were 3D printed except for a small intermediate piece. We ran into some issues with parts warping when 3D printing many parts at once, but we solved this with the addition of rings.
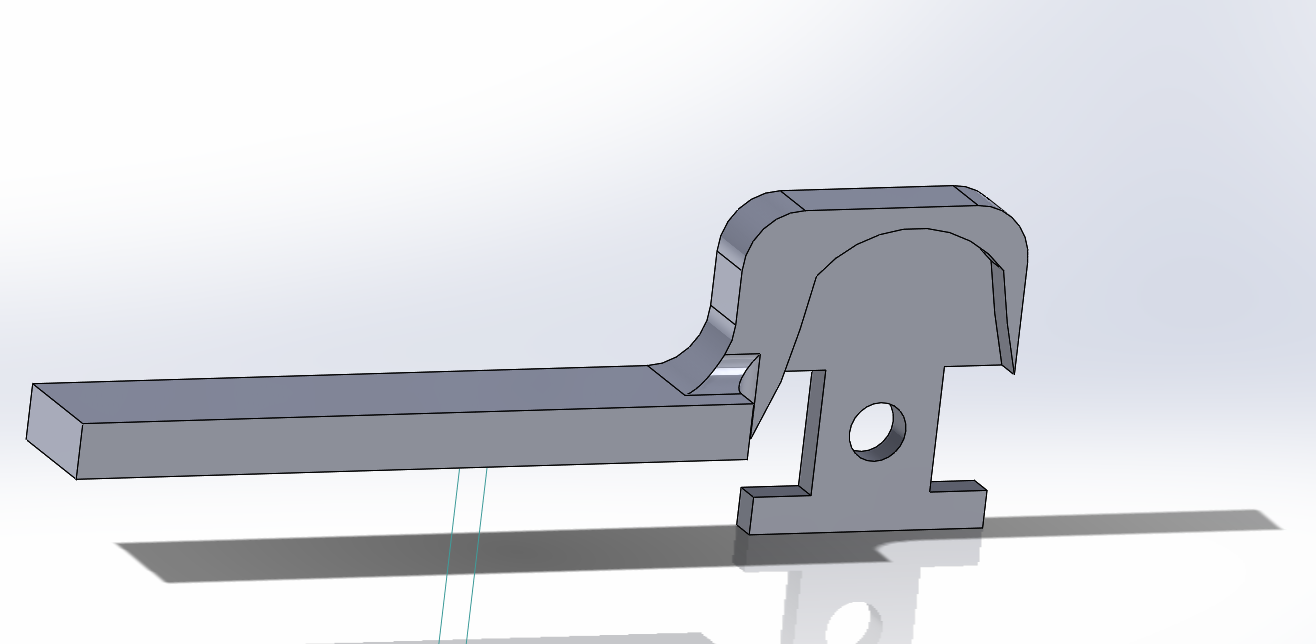
Center piano key, one piece.
This attaches to the Hapkit sector.

Right piano key. The shape
brings it closer to the center key.
The model has rings to help
keep the part flat during
3D printing.
We also attached the bases of our Hapkits to a laser cut structure. The final CAD model and the final product can be seen below.
This is a screenshot of
the CAD assembly.

This is our early prototype
Our second goal was to get started on the software interface between three Hapkits. Due to unexpected warping in 3D printing and outside events, we had to delay this to the next week.
Checkpoint 2
This week we got some basic behavior on the system up and running. Wiring was completed, and the overall software structure was decided on. We have some basic piano behavior working (with sound), and will flush it out over the coming days.
Our main approach is to get the central Hapkit board to do the bulk of the work. It reads MR sensor data from the left and right boards and drives their motors. The center and right key motors are connected to the center Hapkit board's voltage driver. The left key motor is connected to the left board's voltage driver since there is no space on the center Hapkit board.

There was a bug we ran into which may be of interest to those using multiple Arduino boards together. We used the pins PD5 and PD0 on the left board to control the left motor, but the left board itself was still outputting its own signal to the motors from a previously uploaded program. This resulted in some strange behavior. We solved this by uploading an empty starter code to the left Hapkit.
We moved over all the code to use Visual Studio instead of Arduino IDE. We wanted to use C++ object-oriented programming in order to have neater code and storing variables inside each object, instead of storing a myriad of global variables in the main file. Visual Studio can use the PlatformIO add-on so it can upload to an Arduino board.
To play the music, we recorded the sounds of pianos and saved them as .wav files. We were able to play sounds via Processing by printing the position of the keys to the Serial monitor, playing sound files when the keys were past a certain threshold.

As for the keys themselves, we have some simple force feedback on them. We implemented a PD controller to damp the movement of the keys and get them to return to their original position. We also added a virtual wall to the bottom of the key to simulate the feeling of bottoming out.
There are still a few basic features we need to complete piano functionality. The sound played by the keys should vary in loudness with the velocity of the key as it hits the bottom. Additionally, we would also like to implement vibrotactile feedback in the form of a vibration when the user hits the bottom of the key and plays music.