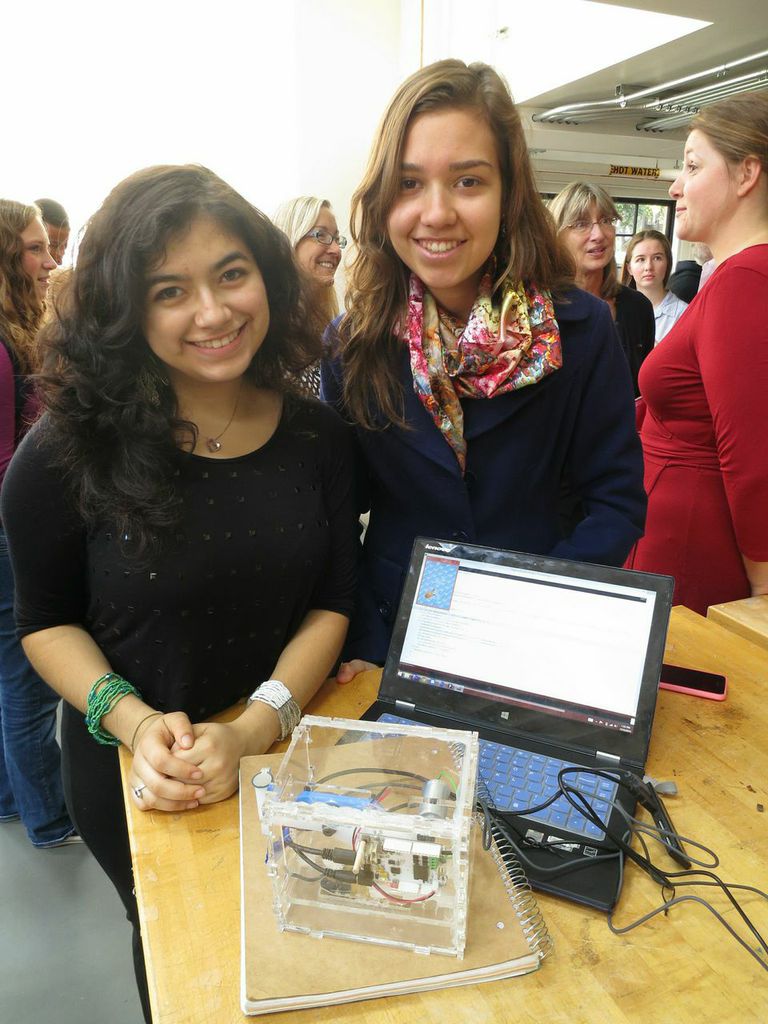
Andrea Natalie

Haptics Bubble Wrap
Project team members:
Andrea Villarreal
Natalie Homsi
The field of haptics has many applications that range from training in the labor force to improving a person's disappearing senses. The goal that started the haptic bubble wrap project was none other than entertainment. Popping bubble wrap, an activity with no obvious productive use, is amusing and certainly worth the experience. Although there were some limitations we knew we had to work with, we managed to create a device that felt like bubble wrap even though it clearly didn't look like it.
Introduction
The field of haptics studies and works with human senses. Because of that, haptic devices are great to create a compelling or realistic experience in the user. Recreating the sensations that are felt when popping bubble wrap requires thinking about and sectioning the different components of the user's experience. In a sense, we worked to dissect the action of popping bubble wrap and relate it to its interaction with the user's senses. Enhanced virtual reality and entertainment were the goals that we set out to achieve when starting the project. The user's senses would be stimulated through a haptic virtual environment that incorporated sound and visual movement and the kinesthetic relationship that rendered the device realistic to the user's touch.
Background
The following list of materials were used from the Hapkit created:
1 motor, Mabuchi motor company, 12V, 5600 RPM, shaft 0.78 diameter x 0.346 length
1 magnet (Ultra-high-temperature Alnico Disc Magnet, Grade 8, 1/4" Diameter, 1/4" thick)
1 magnetoresistive sensor (NXP company)
1 haptic board
2 wingnuts (for height adjustment), size 4-40
1 bearing: SAE 863 bronze flanged-sleeve bearing for 1/4" shaft diameter, with 3/8" outer diameter, 1/4" in length and 1/2" flange outer diameter
1 self-locking shoulder screw, 1/4" diameter x 1/2" long shoulder
1 shaft collar
1 height adjustment bar, 3D-printed
1 neoprene strip
1 neoprene tubing, 3/16" inner diameter, 3/8" outer diameter, cut to 3/4" length
1 power supply (for haptic board)
1 USB cable ( haptic board)
1 motor charger
2 leads
The relationship between the motor, the sector pulley and the haptic board were based on the Hapkit.
Arduino:
The set-up for the Arduino code in the bubble wrap was also based on the Hapkit device's code.
Processing:
The code for setting up sound in our Processing file was based on a code tutorial in SoundCipher website.
http://explodingart.com/soundcipher/tutes/bing/bing_tute.html
The code for the background image was based on an code example in the Processing 2 website.
https://processing.org/examples/backgroundimage.html
The code for the array of the popped bubble images was based on a code example in the Processing 2 website.
https://www.processing.org/reference/Array.html
!! Design
Hardware design
The haptics bubble wrap device is composed of the following materials:
1 sector pulley, made of 0.25 cm laser-cut acrylic
1 motor, Mabuchi motor company, 12V, 5600 RPM, shaft 0.78 diameter x 0.346 length
1 magnet (Ultra-high-temperature Alnico Disc Magnet, Grade 8, 1/4" Diameter, 1/4" thick)
1 magnetoresistive sensor (NXP company)
1 mouse
1 haptic board
1 force sensitive resistor
1 motor base, made of 0.25cm laser-cut acrylic
1 pulley base, made of 0.25cm laser-cut acrylic
1 haptic board base, made of 0.125cm laser-cut acrylic
1 box with two floors (the upper floor for the bases, the lower floor for the mouse), 14cm x 12cm x 10cm, made of 0.25 laser-cut acrylic
2 wingnuts (for height adjustment), size 4-40
8 screws (for height adjustment, motor, haptic board), size 4-40
1 bearing: SAE 863 bronze flanged-sleeve bearing for 1/4" shaft diameter, with 3/8" outer diameter, 1/4" in length and 1/2" flange outer diameter
1 self-locking shoulder screw, 1/4" diameter x 1/2" long shoulder
6 nuts (height adjustment, haptic board), 4-40 thread size, 1/4" width, 3/32" height
1 shaft collar
1 height adjustment bar, 3D-printed
1 neoprene strip (for the sector pulley)
1 neoprene tubing, 3/16" inner diameter, 3/8" outer diameter, cut to 3/4" length (for the magnet)
1 power supply (for haptic board)
2 USB cables (mouse, haptic board)
1 motor charger
2 leads
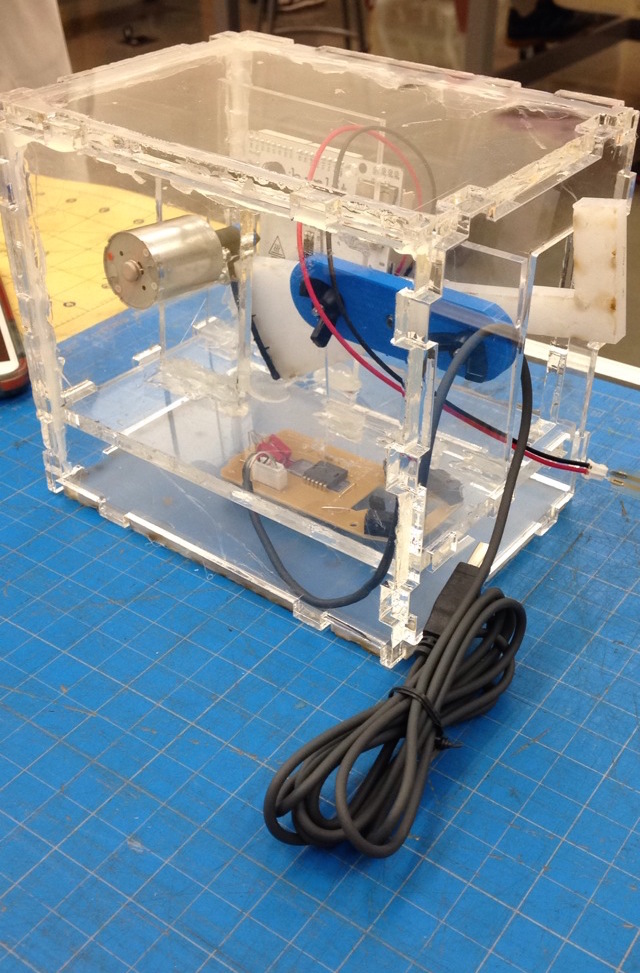
The physical haptic bubble wrap device consists of its structure and the inner arrangement. The structure includes the box and bases that were used to support the other materials that would actually work towards creating the haptic rendering, which is what we call the inner arrangement.
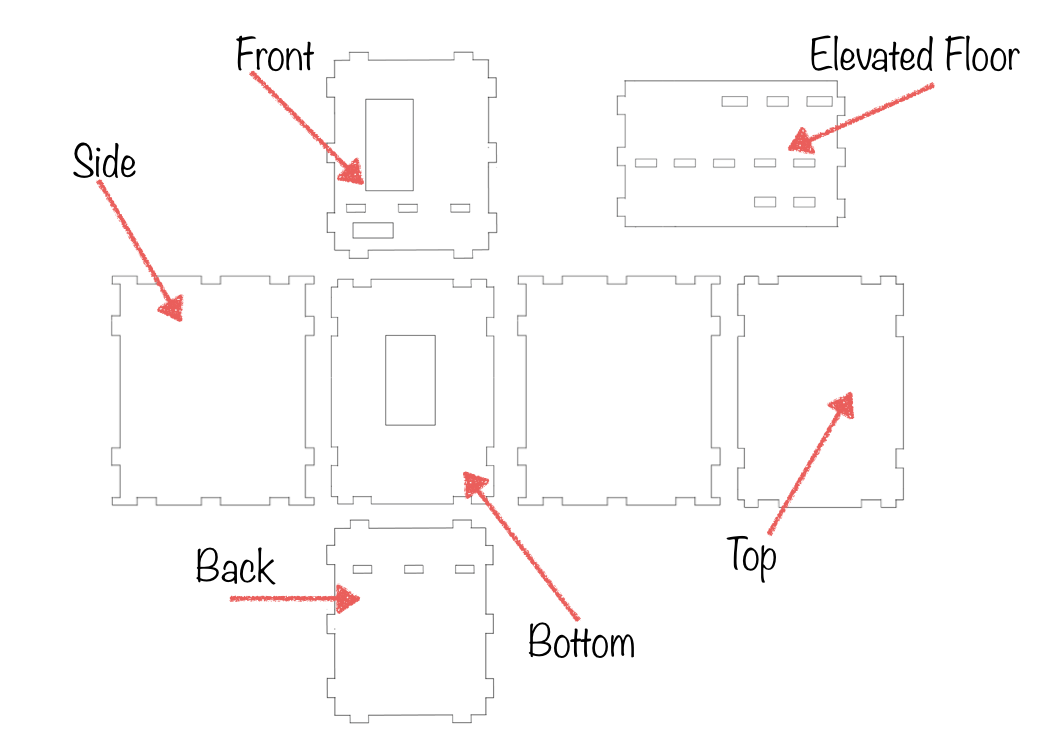
The structure of the haptic bubble wrap was laser-cut with clear acrylic. The designs of the structure were created in Adobe Illustrator. The box has a higher floor with holes to interlock the bases of the sector pulley, the motor and the haptic board. The bottom space is left for the mouse. The box was assembled together by interlocking the sides of the rectangles with rectangular tabs corresponding to rectangular dips. 
The top of the box is approximately 14 cm x 10 cm.
The bottom of the box has a rectangular hole the size of the mouse. The mouse was disassembled to remove the unnecessary materials. The bottom is approximately 14 cm x 10 cm.
The two sides are identical. They are approximately 12 cm x 14 cm.
The higher floor has corresponding holes that situate the bases in the box. It also attaches to the front and the back of the box through rectangular tabs that correspond to dips in the outer structure. It is approximately 14 cm x 10 cm.
The back is approximately 12 cm x 10 cm. It has holes that correspond to the elevated floor.
The front has a opening large enough to account for the movement of the sector pulley. It also has an opening for the mouse's USB cable and corresponding holes for the elevated floor to attach to.
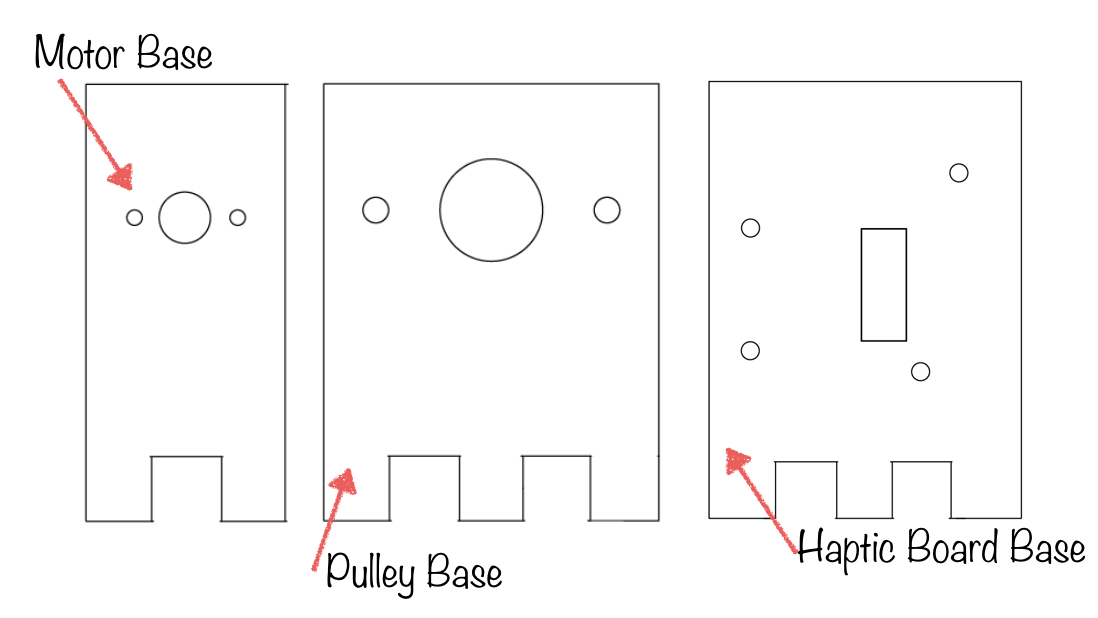
The pulley base is approximately 7.2 cm x 6.5 cm. It should have three circular holes, equally spaced. The middle hole should be bigger.
The motor base is approximately 7.2 cm x 4 cm. It should have three circular holes. One for the magnet, the others for the screws.
The haptic board base is approximately 7.2 cm x 7 cm. It has circular holes that correspond to the holes in the haptic board. The screws will attach the board to the base through these holes. 
The inner arrangement includes the motor (2 screws), haptic board (magnetoresistive sensor, 4 screws, 4 nuts) and a narrow sector pulley (2 screws, 2 wingnuts, 2 nuts, bearing, shaft collar).
Software design
The software of the haptic bubble wrap device is divided between Arduino electronics platform and Processing development environment.
The Arduino file, in short, creates two virtual walls at a certain distance from each other. The first, weaker virtual wall sends a 0 to Processing to indicate that the bubble has been popped. Once the first virtual wall has been crossed, the user encounters no resistance until the sector pulley reaches the second virtual wall. This virtual wall is stronger than the previous one and it will return the handle to the starting position so that the user can start again.
The Processing file has a bubble wrap background, the dimensions of which must be the same as the parameters. There is an image of a hand that moves around with the device. There is a loop that adds a popped bubble under the cursor every time the first virtual wall is reached. The Processing file takes 1s and 0s from Arduino and interprets a change as a pop. When that happens, a sound is made and the popped bubble image is placed.
!! Functionality
The device is connected to the computer through a USB cable. Its movement around the haptic visual background, which is a grid of bubble wrap bubbles, is achieved through computing the coordinates given by a mouse's LED structure. The bubble wrap device is moved around to position the cursor, which is followed by an image of a hand. The hand simulates the actual pinching action through which bubbles are popped. We agreed that the size of the whole haptic device should be made smaller to be able to comfortably fit inside the user's hand.
Once the user positions the hand's fingers to be between a bubble, the user presses down the sector pulley's edge to pop the bubble. The force the user exerts on the pulley will increase as the user approaches the first virtual wall. Once the user crosses the wall, the user encounters no resistance until it reaches a second, stronger virtual wall. When a specific force is sensed by the FSR (at the second wall), the haptic device will respond with an upward force, which will push on the user's finger and return the pulley to the starting position. Essentially, the user feels a resistance when it reaches a certain point, after which resistance disappears (bubble is popped). The next resistance the user will feel will be the second wall (which simulates the edge (of the floor, table, etc) once the bubble has been popped. Some of the users who experienced this device labeled the haptic rendering as "satisfying" and "actually like bubble wrap". This being said, the device needs to be smoother when it is interacting with the user because the pulley would not return exactly to the starting position. This means that the haptic device would not leave the virtual wall sometimes.
At the moment, the maximum damping is reached, an image of a popped bubble appears in between the fingers of the cursor's hand. Additionally, a sound is emitted by the computer to give audio feedback to the user. The sound could have been made more realistic if we had successfully added an external sound file to our Processing file.
How it's used:
Acknowledgments
We would like to thank Prof. Allison Okamura and Rishi Bedi for assisting us in this project.
Files
The Haptics Bubble Wrap Arduino file is posted here.
Attach:BubbleWrapArduino.zip
The Haptics Bubble Wrap Processing file is posted here.
Attach:HapticsBubbleWrapProcessing.zip
References
The SoundCipher library was obtained from this website.
http://explodingart.com/soundcipher/index.html

