

Charlotte Johnny Jabreea

Completed foot haptics prototype.
One Step at a Time: Foot Haptics
Project team member(s): Charlotte Peale, Johnny Armenta, and Jabreea Johnson
Initially designed with diabetic patients in mind, our device serves as a walking aid for those who lost sensitivity in their feet. In our project, we aimed to create a sensory substitution device that can notify an individual when their foot first comes into contact with a level surface to maintain balance. Although there were some technological limitations to our design, our group was able to turn our initial thoughts of a haptic wearable into a functioning prototype.
Introduction
When our group was first given the task of designing a haptic device, we knew we wanted to design something in the realm of sensory substitution. Since Charlotte had worked at a podiatry clinic in high school, she witnessed people with diabetes having difficulty walking as well as experiencing numbness in their feet. Our main goal for the project was to design a unique solution for patients with neuropathy that can mimic the experience of walking in the form of a haptic wearable. We thought a haptic device would be best suited for this problem due to its capacity to return vibratory feedback that an everyday individual can use.
Background
Although there are plenty of research articles addressing potential medical applications of sensory substitution, not many explore the use of haptic wearables as a walking aid. With that being said, there are a few journal articles that employ similar technologies to the realm of foot haptics and rehabilitation. For instance, a 2012 journal article employs vibratory feedback from force sensors to improve stability in people who have lost lower-limbs (Rusaw). Another source attempts to provide a foot haptic alternative to gait rehabilitation for patients with central nervous system or CNS damage (Schmidt).
Design

The circuitry and NUCLEO board.
Hardware design
Overview
The mechanical design of the walking aid is relatively simple, and can be divided into two parts: sensing and feedback. In general, a force is sensed on the heel or toe of the insole, which causes vibration motors in armbands placed on the lower and upper arm to vibrate.
Sensing
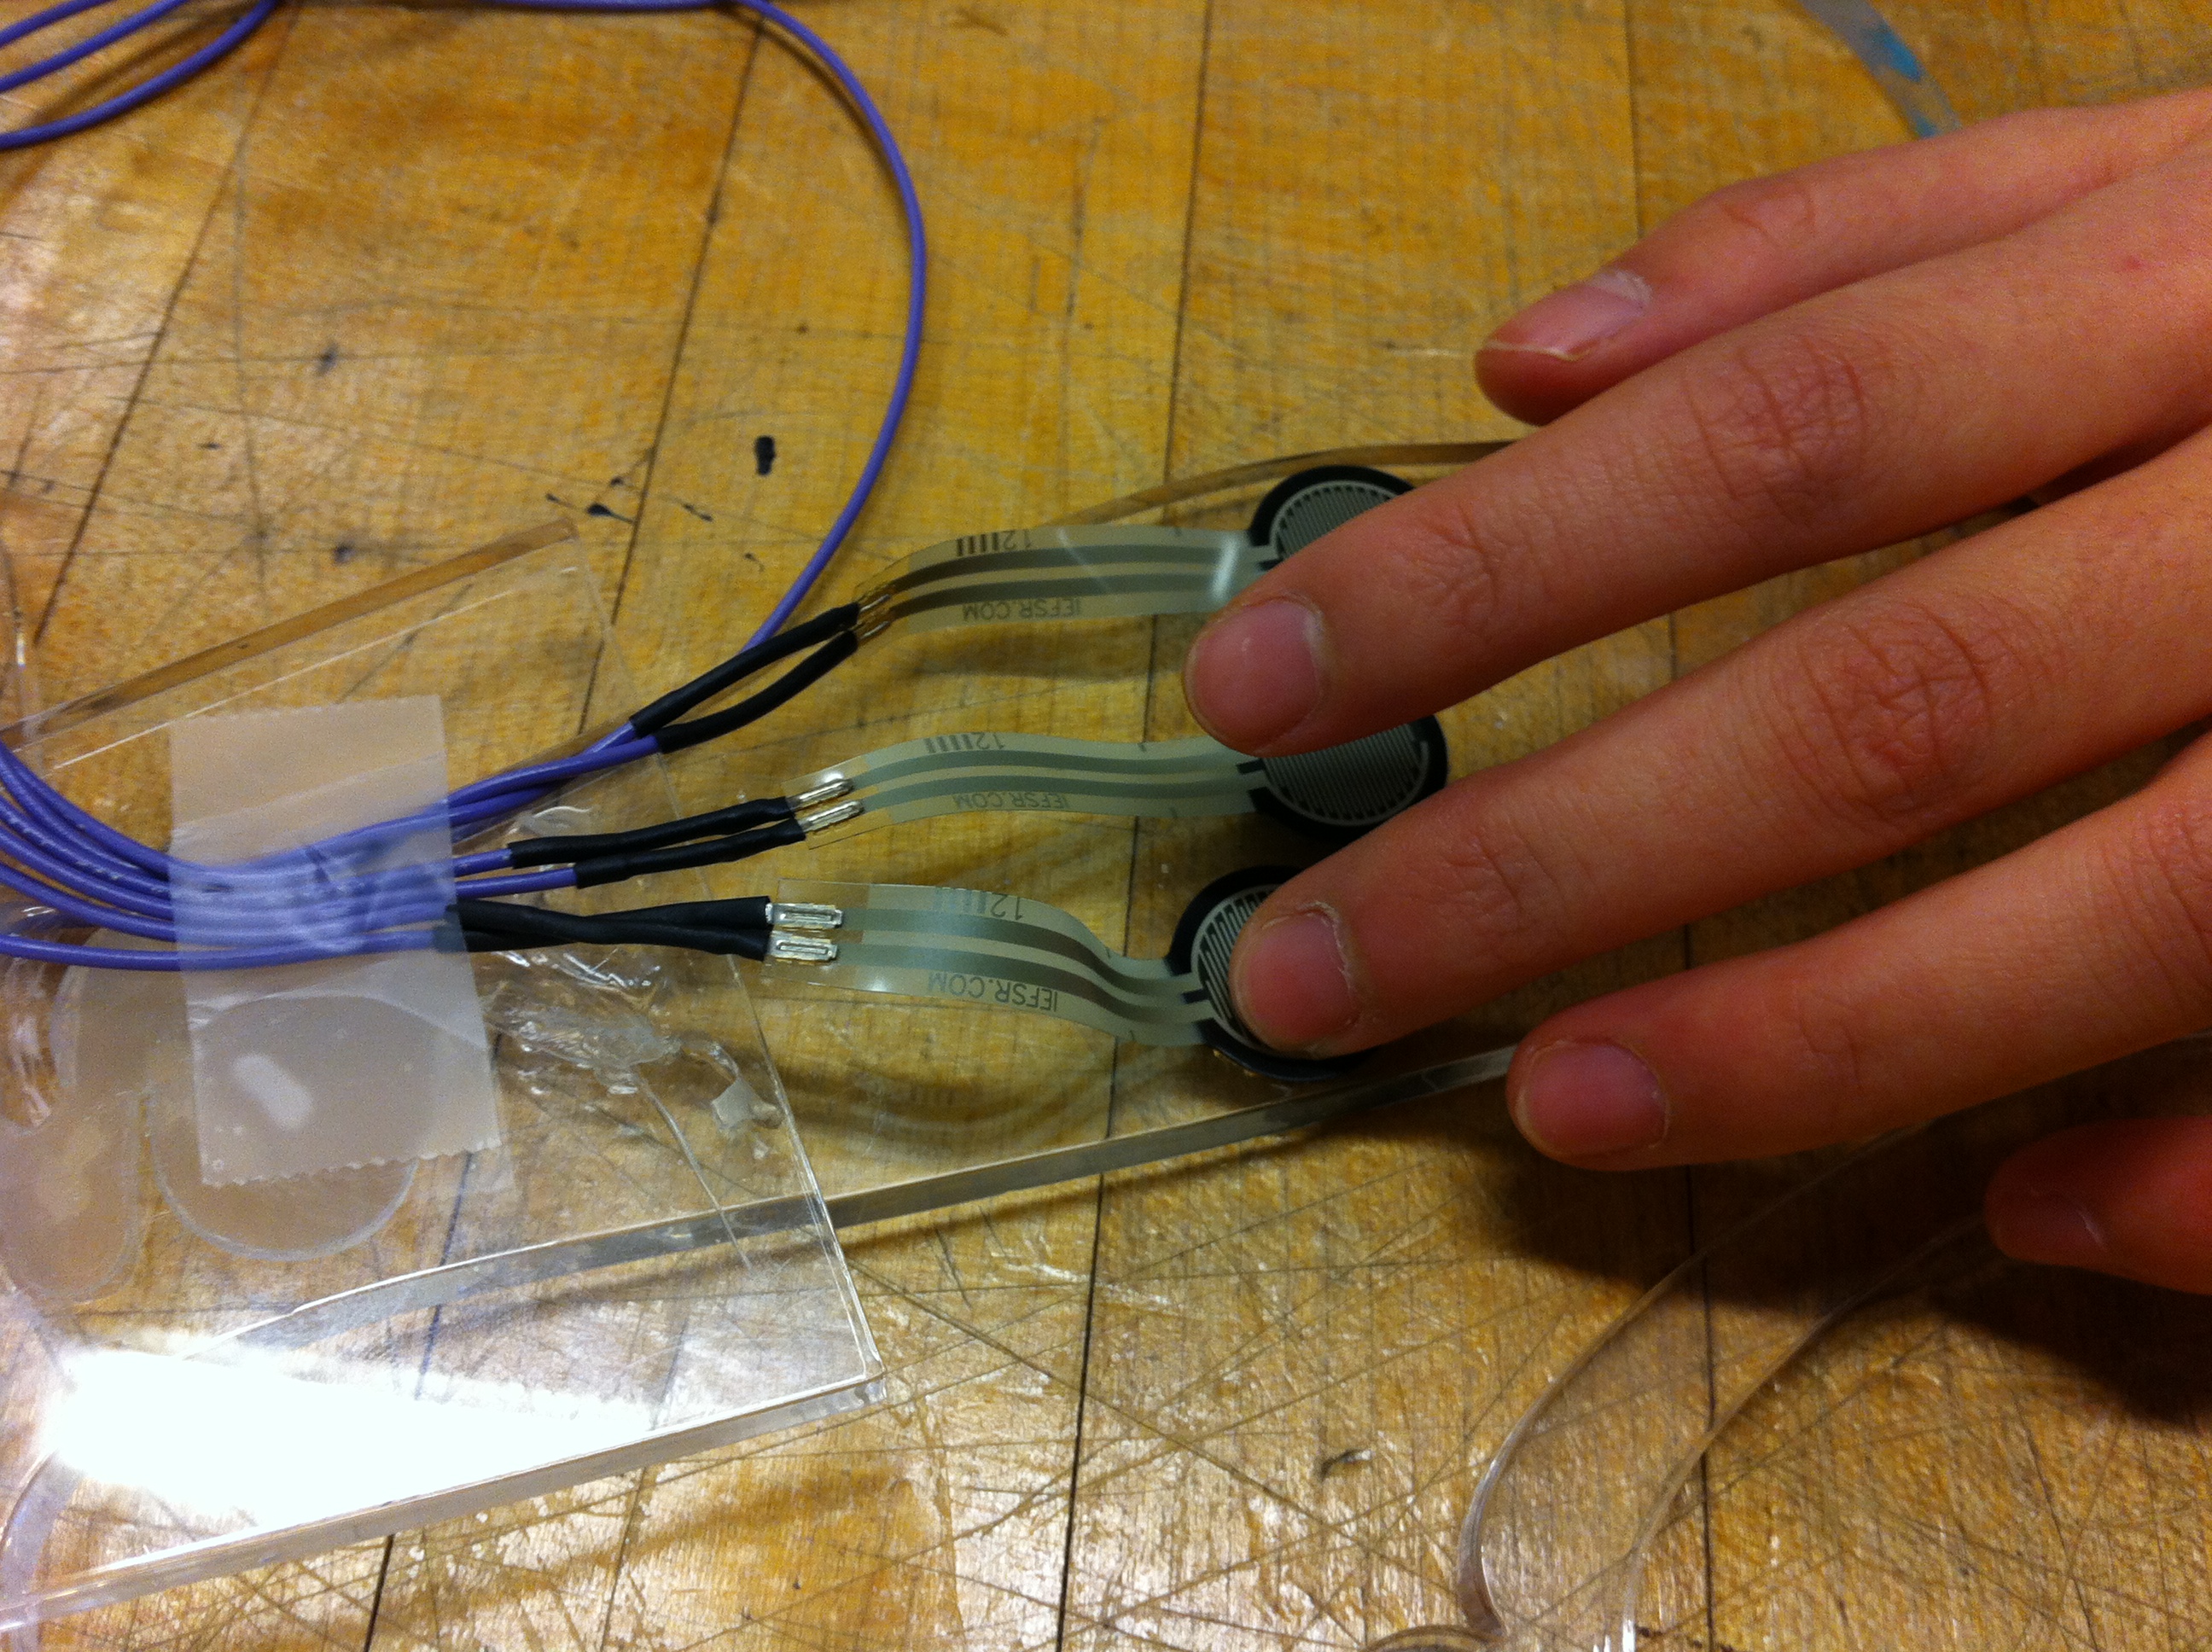
In order to sense whether a user's foot is in contact with the ground, we attached two force sensitive resistors to the heel and toe of a generic shoe insole. The force sensitive resistors are connected by wires back to our microcontroller, the NUCLEO-F446ZE, which relays the force being applied to each resistor back to a laptop.


Left: An early sketch of the sensor placement on the insole (we later reduced the number of sensors to two). Right: A bottom view of the finished insole with force sensitive resistors attached to the heel and toe.
Feedback
If our force sensitive resistors sense that a force is being applied to the toe or heel, we relay this message to the user through vibrations. We made two armbands out of elastic fabric and Velcro and embedded in each a small vibration motor, which we covered with a ~1' piece of plastic drinking straw in order to allow the motor to spin freely. One armband was designed to go on the upper arm, and one on the lower arm near the wrist. Both armbands are connected back to the NUCLEO microcontroller by wires.


Left: An early sketch of the vibrating arm band. Center: The finished armbands, with the smaller (top) one designed for the lower arm, and the longer one designed for the upper arm. Right: The armbands in use.
Software design
We wrote the code for the walking aid using C++ in Mbed Compiler. Our code was built off of the original haplink project, but we added code to the main.cpp file which read values from the force sensitive resistors, and vibrated the corresponding vibration motors with a duty cycle of 0.1. If the value from the force sensor was over a given threshold (1000 for the heel sensor, 100 for the toe sensor), the motors vibrated until a force was no longer being applied.
We added an additional feature that stopped vibration on both motors if there was a force placed on both for more than ~15s. We added this so that if a user was standing still for a prolonged amount of time, they wouldn't be annoyed by the motors constantly vibrating.
Functionality

The overarching goal of the project was being able to use haptics to replace the loss of sensation in the foot by relaying this information to a part of the body where our intended user would still have the ability to feel. In the context of our project, this quite simply means that when the force sensitive resistors (FSRs) feel any force, the user subsequently experiences a small vibration on the arm until the FSRs no longer feel any pressure being applied to them.
The FSRs and vibration motors were wired so that the location of the vibration on the given armband is dependent upon which part of the foot is feeling the pressure. If a force is felt on the heel of the foot, the user will feel a vibration on the upper arm armband, whereas the user will feel a vibration on the armband closer to their wrist when a force is felt on the toes of the foot. If both FSRs feel pressure being applied to them, the user will feel vibrations coming from both of the armbands. This system was specifically created so that one could differentiate between the different vibrations, as having the toes and heels correspond to a unique armband serves as the most effective way of being able to understand how the foot is moving without having to look down at what exactly the foot is doing. For a patient using this foot haptics technology, they would be able to understand the movement of their feet by where on their arm they are receiving the vibrations, which would eliminate the need for them to look down as they walk. Three consecutive vibrations near the wrist would signal that their toes were tapped on the ground three times, whereas something like a vibration near the wrist, followed by a vibration on the upper arm, and concluded by a vibration near the wrist, would tell them that their foot was undergoing a toe-heel-toe movement.
While we had always envisioned the use of our device being centered around patients who have lost sensitivity in their foot, a user at the "Haptics Open House" talked to us about how she could see our device potentially being applied to the ability to control character movement in virtual reality gaming. This possibility is something we never considered, and her words opened our eyes to the greater implications of our device's uses.
For the most part, our device ended up functioning as planned. However, there were a few times when our participants could not feel the vibration on the upper armband. In order to avoid having this problem in the future, we could look to place the FSR in a spot on the heel where it is more prone to contact, as this would make it easier for the FSR to register pressure and in turn, be able to power the motor. If we looked to implementing our device in the real world, we would have to find a way to make it wireless, as we were heavily limited by the wiring of our system that only allowed the foot to be a certain distance from the board it was connected to.
Acknowledgments
Many thanks to Allison Okamura for her help providing parts, hapkits, and all our introductory haptics knowledge. Huge thanks to Melisa Orta for teaching us to solder, helping design our circuits, and helping with our coding questions. Finally, thanks to Kaitlyn Gee and Tyler Cloyd for always being happy to answer all of our questions!
Files
- Attach::ProjectMaterials.pdf -- A list of major components used and their approximate prices
- Attach::FootAlertCode.zip -- The code for our haptic device, written in Mbed Compiler
References
Rusaw, D, et al. "Can Vibratory Feedback Be Used to Improve Postural Stability in Persons with Transtibial Limb Loss?" Journal of Rehabilitation Research and Development, 2012, www.ncbi.nlm.nih.gov/pubmed/23341316.
Schmidt H., Krager J., Hesse S. (2008) HapticWalker - Haptic foot device for gait rehabilitation. In: Grunwald M. (eds) Human Haptic Perception: Basics and Applications. Birkhauser Basel https://link.springer.com/chapter/10.1007/978-3-7643-7612-3_42.
Wiki examples
Here is how to link a youtube video:
Here is how to link to a file (note that you will need to compress/zip your code and CAD files into zip files so that that wiki will let you upload them): Attach:HapkitTest.ino.zip
Here is how to add an image: 
Here is how to attach an image with the height adjusted (to 100 pixels)
Here is how to attach an image with the width adjusted (to 200 pixels)