

Goli Grace

Goli and Grace with their final prototype!
Navigation by Haptics
Project team member(s): Golrokh Emami and Grace Zhao
The goal of this project was to create a demo of a wearable product that gives direction hints to the user by haptic feedback. We created a bracelet (inspired by smart watches) that gives the direction hints to the users by vibration. There are two vibration motors on the bracelet. If the user should change direction to the left, the left vibration motor (on the hand of the user) vibrates and if the user should change direction to right the right motor vibrates. The benefit of such a product is that if the user is driving or riding a bike and is in a noisy environment or is unable to hear the sound feedbacks of the map, they can use the touch feedback to get direction.
Introduction
As Stanford freshman students who are still unfamiliar with some parts of the campus, there are two things that we use quite often: bikes and google map! Everyone knows you shouldn't look at your phone while biking or driving. People do it anyway. We know you do too.
We wanted to create a device that gives you navigation guidance without having to distract you from your task of biking (or navigating the world around you in general). Vision is so powerful and accurate. In fact, sense of touch may not be as accurate as vision. In the lab 1 of the class we conducted some experiments to measure the sense of touch accuracy. Despite this fact, our touch perception is sufficient for significant touch feedbacks. Therefore, in some tasks like when you are driving or doing multiple tasks at the same time, you can use your accurate vision for harder tasks, and for easier and unambiguous signals, you can use your touch perception. That's what we aimed to create in our project.
Background
These days wearable devices are really popular. One of the most popular and famous one is the Apple Watch. The Watch has a feature called taptic feedback, a sophisticated type of haptic feedback attempting to feel like a real human touch. However, according to our friends and Allison (our professor for this course) who are Apple Watch users, this haptic feedback in the Watch only tells them that something has happened (a notification "tap" on your wrist from the watch), but does not provide any extra information. Therefore when you are trying to navigate your path, the Apple Watch's taptics may be rather confusing and distracting.
In our demo, we were inspired by the Apple Watch to create a bracelet that gives you clear signals about the direction that you have to go.
Design
Primarily, we wanted to create a bracelet that would get connected to a google map API and by getting the directions from the map create touch feedback. However this idea was ambitious, and with the tools and the hardware available, we could not create a wireless bracelet. Taking into consideration that our demo had to be able to work in a room in our haptic open house demonstration, we modified our idea to a feasible design.
In our final demo:
- we have a bracelet with two vibrating motors on it connected to the computer.

The Navigation Bracelet
- instead of having the user to walk and get direction hints, because of lack of space, we used a wireless touch pad so the user would only move their finger on it and get direction hints for their finger movements on the touch pad.
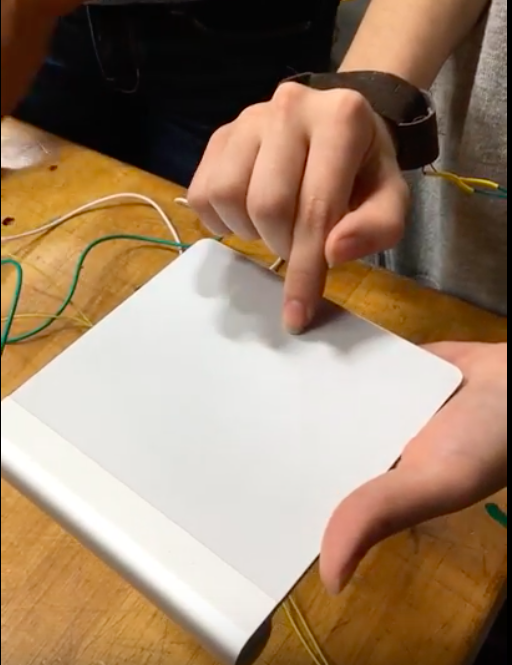
Wireless TouchPad
- We created a 2D graphical environment with processing for demonstration of the path and user movement. When we run the program we have a predetermined path with the cursor at the start of it on our lap top screen. When the user starts to move their finger on the touchpad, the cursor moves and it draws its movement with white color on the screen. Consequently, the user's finger's movement on the touchpad will be demonstrated by the movement of the cursor on the screen and the path the cursor has taken is shown by white line.
What we did in the demonstration of our demo was to ask the users to hold the touchpad. Then we asked them to, without seeing the computer's screen and only with respect to the vibration and haptic feedbacks they receive from the bracelet, move their finger on the touch pad. At the end we compared the path they have taken with the predetermined path on the screen.
A video of our demo
Hardware design
The hardware design of our demo consisted of three parts:
- (soldering and) Attaching the motors to our red and NUCLEO boards. In this part Melisa really helped us.
- the 3D-printed motor encasings:
The vibrating motor that we used in our demo have a rotating part. The mechanism of vibration in the motor is that there is a rotating part in the motor with an off-centered mass. As the rotating part rotates the motor starts to maintain equilibrium, and therefore, it starts vibrating. If the rotating part touches something like a cloth or human body it stops rotating and consequently, the whole motor stops vibrating.
We used SolidWorks to design an encasing for the whole motor, so that the motor cannot become in contact with any outer world object that can cause interruption in its vibration. Then we 3D printed our SolidWork design to make the encasing. Our encasing is a cylinder-like object. One half of the cylinder encasing has a thinner border-radius to allow the rotating mass more space to move. We 3D-printed the motor encasings, and because measurements were made to ensure that the fit would be quite snug, we did not use super glue.

- The bracelet:
The bracelet is composed of a long piece of leather fabric with velcro-tape on each end and two adjustable belt-loops for the motors. The belt-loops are also of the same fabric, with velcro-tape on each end for easy adjustability. The loops had elastic bands sewn in on the other side to secure the motors, which were also later superglued in. In designing and creating the bracelet we used the facilities in Stanford Product Realization Lab.
Software design
In our software design we had two main tasks to do: (Please refer to our Processing code and Mbed code below.)
- We had to code the commands needed to control and connect our vibrating motors to the computer. The environment we used for this part was mbed .
- We had to create a graphical environment for representing the path and the movements of the user. For this part we used Processing. Using Processing, we created a virtual maze as our pre-determined path. (you can see part of it in the image below).

Screenshot:
The virtual "maze"
Functionality
Our navigation bracelet provides haptic feedback on the left and right sides of the wrist. Everything is wired, and the vibration of the motors is manually controlled by the computer's arrow keys. The goal was that, with only the guidance of the haptic feedback, users could navigate our virtual "maze" through a trackpad.
At the level of our prototype that we had, the functionality of the device was overall successful. The user could clearly feel from which side the vibrations were coming from. We had some design problems concerning users' interpretation of the haptic feedback. Will their initial reaction be to move away from the vibration, or towards? Will they think to turn in that direction, or move in that direction? During the open house, we simplified the answer to these questions by clearly explaining to the user what to expect and what to do during the simulation. Overall, the result was very accurate, although there were still a few individuals who found it difficult to follow the instructions when they felt the vibrations.
The ultimate goal is for this functionality to be incorporated in a device like the Apple Watch, which can be wirelessly connected to a navigation app. Also, with further research and better technology, the haptic feedback may be improved to generate better (and quicker) comprehension of instruction from the user, with a variety of command sequences generated by different haptic vibrations.
Acknowledgments
We are so thankful for the help from our professor, Allison, Melisa, Tyler, and Kaitlyn for making this project and this course possible!
Thanks to all the people who tried our project and offered feedback for how to improve it.
Thanks to PRL for letting us use their facilities.
Files
- File 1: This is the code for used in Processing for out virtual maze and key-commands
- File 2: This is the Mbed code (only slightly modified from Melisa's template).
- File 3: This is the drawing for the motor enclosure
- File 4: List of all the materials we used
References
We consulted the Processing tutorial website for our key commands:
https://processing.org/reference/keyCode.html
https://processing.org/reference/keyReleased_.html