

Ma Pau Thomas Meilan
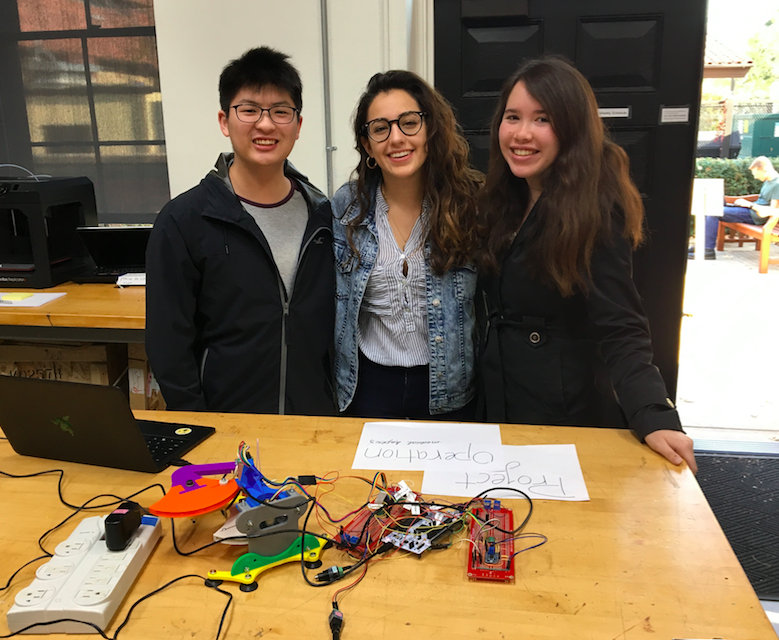
Project Operation team
in action.
Project Operation
Project team member(s): Maria Paula Hernandez, Thomas Hsieh, Meilan Steimle
Project Operation is a haptic device that combines a virtual, physical environment with a graphical display. The user is able to interact with a modified version of the Haplink, and their movements are mirrored on a screen through a cursor. The image seen by the user can be seen above, and their goal is to correctly use the Haplink to remove the heart or the bone from the body. If the user presses on the tweezers in the wrong place, they will vibrate, but if they are pressed on the inside of the heart or the bone, the user is able to move the object in the graphical display. We did this through modification of the Haplink with force sensors and vibration motors, as well as the application of the code for the graphical display. Even though it is a highly simplified version of anything that would be useful, we were able to explore the field of medical haptics and its applications, which was our goal.
Introduction
When we started this project, we were very interested in researching more about medical haptics, int he field of both performing surgery and practicing for it. Evidently, this is a field that is highly complex, so anything we did would be a simplified version of its real-world application. The project that we came up with was a but of a mix of both practice for surgery and the practical application of performing surgery with minimal invasion. Our device is a simple version of the type of device could be used for doctors to practice surgeries. In this case, the haptic application is evident, as doctors would be able to feel and practice with their hands what the actual surgery would feel like, only without the presence of a real patient. On the other hand, the project also has applications in the field of actual surgery. As technology progresses, haptics is a bigger and bigger part of biomedical engineering, as the combination of a haptic device with a graphical display of the area of surgery allows doctors to perform surgeries with reduced scarring, as their visual ability is enhanced by the graphical display. Although our project is only a model of this, it allowed us to learn a great amount about a field that we all found interesting.
Background
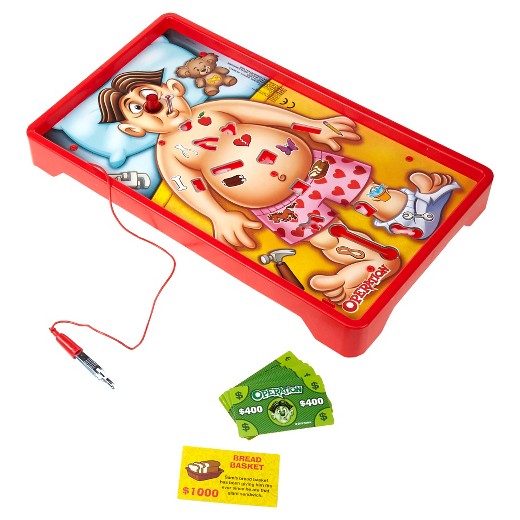
Our project was inspired by two main sources, existing haptic devices and the board game "Operation." Haptic devices like the ones linked below are used by real doctors to perform surgeries and practice for them, and we used them as a source of ideas for our project. On the other hand, we thought that enhancing the game "Operation" (example also linked below) would be a good application of all the research that we had done: it was fairly simple, but it still conserved the essence of medical haptics that we had aspired to learn about. The game operation is a board game in which users have to try to remove different objects from a body dram on a board without touching the rest of the body, as the game vibrates when this happens.
Force Dimension Haptic Device

Operation
In order to implement our project, we used the device Hapkit, particularly the Haplink and its corresponding hardware, which we enhanced in order to better suit our project and improve user experience. Further, we based our code on the template coded by Melisa Orta, which we used as baseline and modified to suit our project's requirements.
Design
The design of our project can be described through three main parts: the hardware design, the Nucleo code (software) and the Processing Code for the graphics (software).
Hardware design
The physical design of our project was fairly simple. We took the Haplink that we had already built and modified it to fit the parameters of our project. The basic functions of the Haplink remained the same: with two degrees of freedom, it tracked the x and y positions in the plane and allowed the user to move within the workspace. However, we had to print a new handle for our Haplink, as it would enhance user experience. Thus, we printed out a new handle (the design for SolidWorks is linked in the "Links" section below) that included a pocket for the tweezers that the user would interact to "remove" the bone and the heart, with as well as a pocket to accommodate the vibration motor that would vibrate when the user tried to "pick up" the wrong thing (outside of the heart and the bone). We designed the new handle in SolidWorks based on the original handle's design, and added the features described above. Having done that, we 3-D printed the handle and attached it in the same way that the old handle was attached. We then placed the tweezers in the pocket we had created for them (see picture below for reference).

Software design
Having done the above, we attached a Force Sensitive Resistor (FSR) to the Nucleo board as well as the vibration motor, which we placed in the pocket we had created (see picture above for reference). We then placed the FSR between the tweezers (placed on one side) so that it would respond when the user pressed on the tweezers to pick up the heart or the bone. The next sections explain how we implemented the code both for the FSR and the vibration motor. It is important to remember that although the following two sections of the design process are separate, they were joined together to create the user experience that we wanted to recreate.
Software design: Nucleo Code (Virtual environment) The code we wrote for mBed regulates the behaviour of the virtual environment felt by the user with the Haplink (the entirety of the code is linked below in the "links" section). The basic idea of the code is that, aside from the basic functions of the Haplink (position sensing...etc), it creates two virtual boxes in the workspace that correspond to the graphics' positioning of the heart and the bone. Outside of the virtual boxes, the user would feel a vibration if they pressed the tweezers, indicating that they were attempting to pick up the wrong thing, in the wrong place. The system knows when the user presses the tweezers together through the FSR located between them, which triggers the signal to vibrate when outside of the two virtual boxes. If the user squeezes the tweezers inside of the virtual boxes, this signals the graphics to change, which is described in the following section.
Software design: Processing Code (Graphical environment) The code that regulates the graphical display was written in Processing and is attached to the "links" section at the bottom of the webpage. Its basic functioning simply tracks the location of the Haplink and translates it to movement through a cursor on the screen. What we did, was we modified the code in order to create a graphic like the one pictured below. The code takes in data from the FSR, and thus knows when the tweezers are being pressed. The code then uses this information to allow the user to "pick up" and move the bone and the heart when the user is pressing the tweezers in the area of the workspace that corresponds to the organs in the body. When they correctly tweeze, they are able to drag the heart and the bone, removing them from the body. Thus, the graphical display is connected to the virtual environment, meaning the user interacts with the graphics, but is also getting haptic feedback from the Haplink vibration motor, which enhances the experience.

Functionality
The user interacts with the device in the way that can be seen in the video linked below. It can be seen that the user interacts with the Haplink through the tweezers, which they are able to press in order to try to pick up an object. The user moves the Haplink while looking at the graphics on the screen, where they can see their position through the cursor. If the user attempts to pick up something on the screen by pressing on the tweezers, but are outside of the bone or the heart, they will receive haptic feedback in the form of a vibration. However, if they are within the heart or the bone, they would be able to pick it up on the graphics screen and move it around to simulate the way a surgery would work. Evidently, the device was a lot more simple than we had hoped, as it was a hard project to implement. Nevertheless, the functionality in itself was what we were hoping for when we chose to investigate the field of medical haptics.
Our device could be improved in several different aspects. In the first place, code could be implemented to create a "drop" function, so that the users not only could move the heart and the bone, but also drop them outside of the body. Furthermore, the graphics can be made more complex and more exact to accommodate more organs and make the device more entertaining. We could also use a more sensitive FSR so that the user would not have to press so hard to pick up the objects. Overall however, we are proud of the functioning of our device and excited that we were able to implement our goals.
https://www.youtube.com/watch?v=WwOR1YpyVkE
Acknowledgments
We would like to give a special thank you to Professor Allison Okamura for teaching us the material necessary to build our project. We also would like to thank Melisa Orta for designing the Hapkits and the base code necessary, they were super helpful! Finally, thank you to Tyler Cloyd and Kaitlyn Gee for spending actual hours with us in the lab perfecting both our code and our hardware until it finally worked!
Files
File 1 Mbed code for Haplink functioning with Force Sensitive Resistor and vibration motor. Attach:OperationMBED.zip Attach:OperationProcessing.zip
File 2 Processing code for graphical display.
File 3: Image for body: 
File 4: Image for heart: 
File 5: Image for bone: 
File 6 SolidWorks file for 3-D design of Handle Attach:NewandImprovedHandle.zip
References
https://processing.org/tutorials/
https://www.ncbi.nlm.nih.gov/pmc/articles/PMC4003673/
https://n6-img-fp.akamaized.net/free-icon/heart-outline_318-77483
https://image.freepik.com/iconos-gratis/variante-contorno-del-hueso_318-49587