

2023-Group 3
Haptic Cup Pong with Two Degrees of Freedom

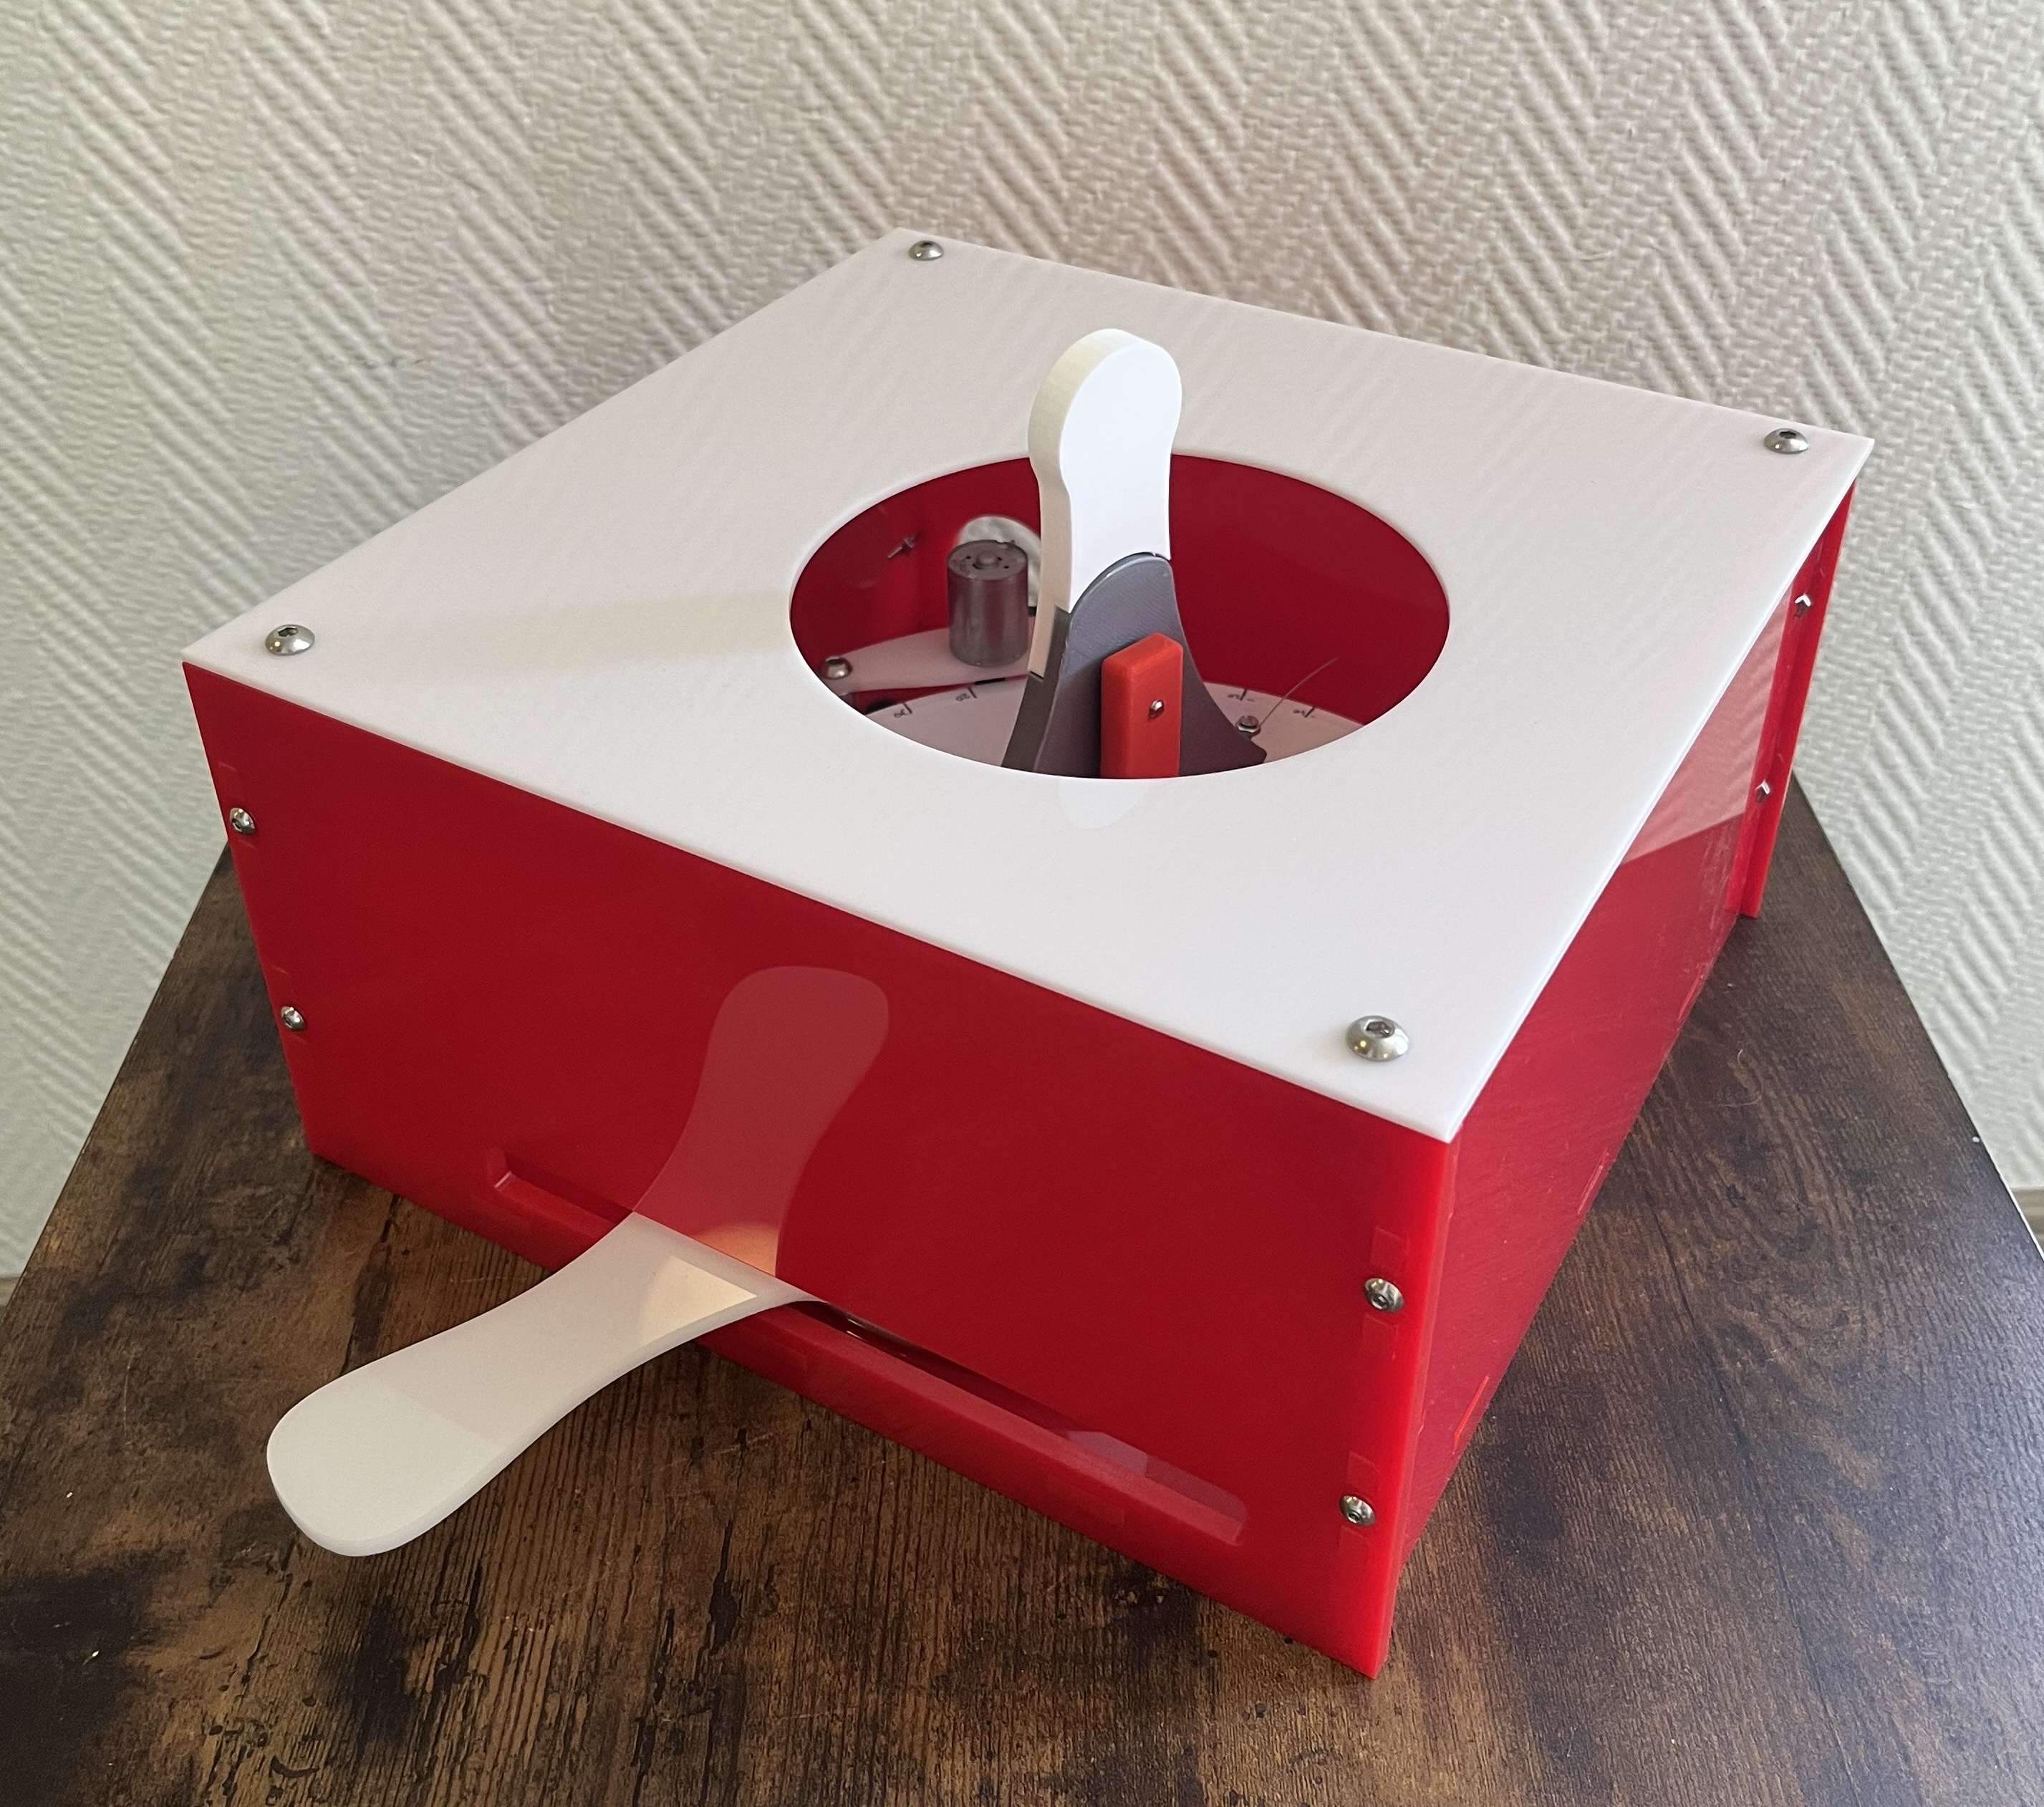
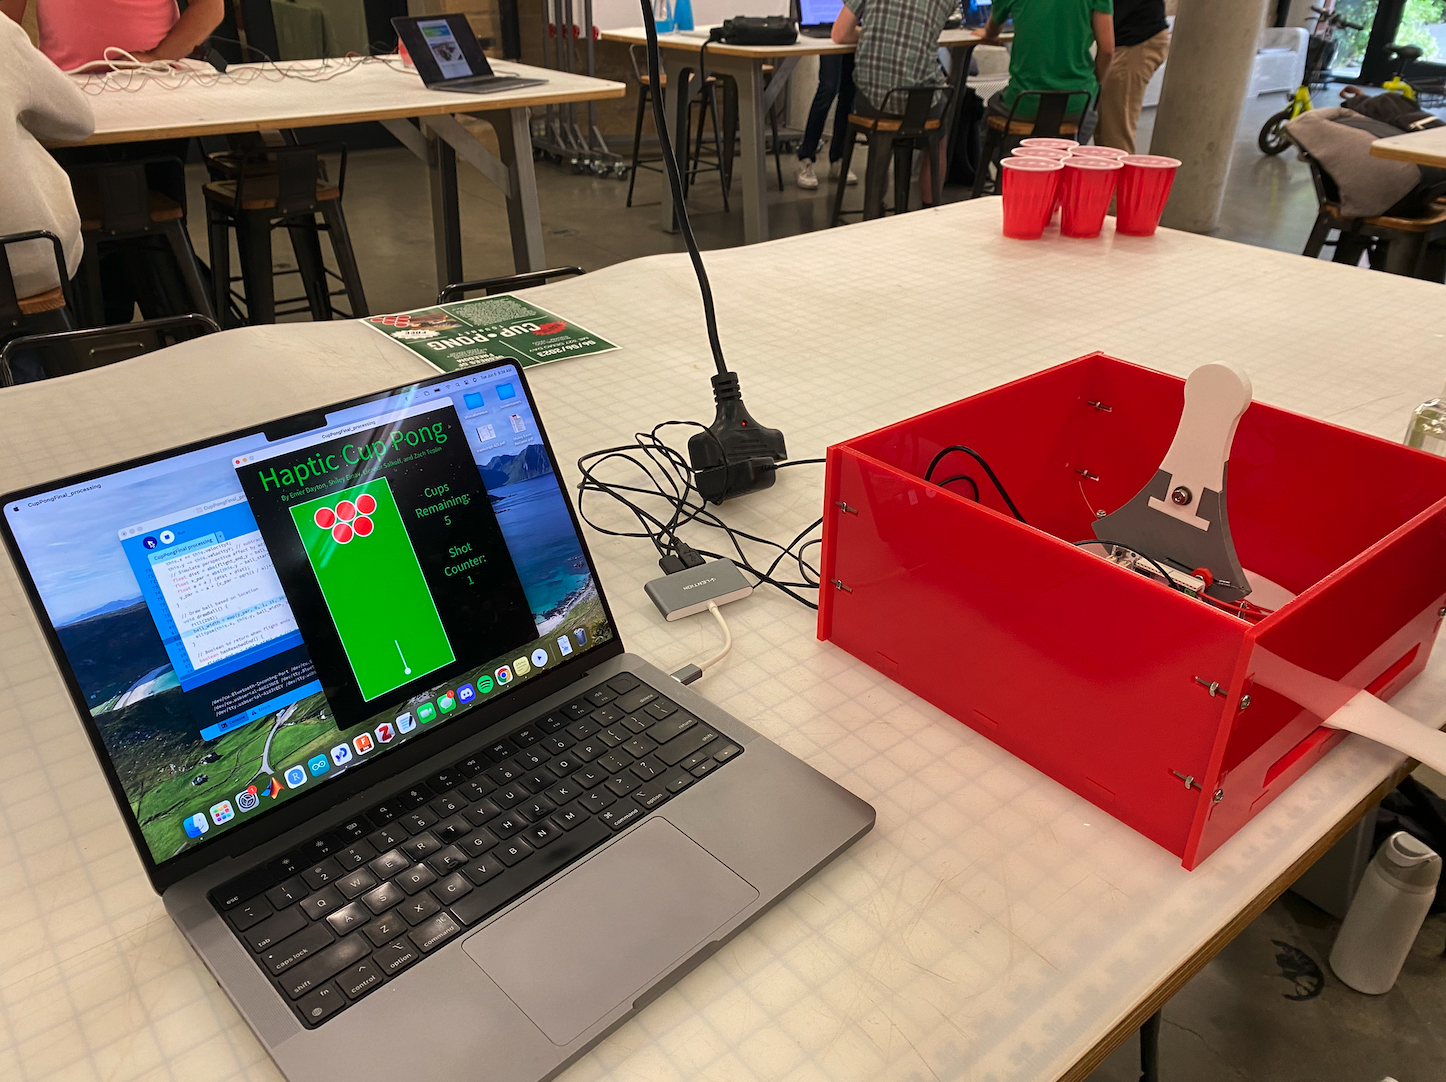
Team on demo day with our haptic cup pong project.
Project team members: Emer Dayton, Eleanor Salkoff, Shiley Einav, Zach Teplin
We created a two degree-of-freedom (DOF) haptic version of “cup pong” using two augmented hapkits. Our goal was to engage users in a fun and challenging game in which they could learn to improve their cup pong skills through haptic and visual feedback. The user first rotates one horizontal hapkit handle to set the angle of their pong ball’s trajectory. Then, the user pulls back the second hapkit handle (oriented vertically) which simulates a slingshot, to throw the ball. The graphics show the ball’s trajectory as it lands in or out of one of the cups. If a ball lands in a cup, that cup disappears, and if a user successfully lands a ball in each of the six cups, the game is over.
On this page... (hide)
Introduction
We chose this project because we were inspired by prior years of students incorporating haptic feedback into traditional games. After thinking through games that we each play, we found that the game Cup Pong that can be played using a widget in iMessages would be interesting to add haptic feedback to. Instead of just swiping your finger up the phone screen to launch a ball, we were curious to see if users enjoy having handles to rotate and pull to create a catapult sensation. Articles we read found that adding haptic feedback and “embellishments” to virtual games can enhance player experience (Singhal), so we were interested to see how it could affect user engagement with cup pong.
Background
Haptic embellishments (HEs) refers to excessive positive haptic feedback that can enhance the user’s experience in games and other interactive media. A publication from 2021 by Singhal and Schneider studies users’ experiences interacting with visuo-haptic content on their phones, with and without HEs [1]. Participants in this study each played two versions of the same game, one with HEs and one without, for a fixed period of time. They were then asked questions on the enjoyability, user experience, and haptic experience (for the game with HEs) on both games. Key findings from the report were that high use of HEs enhanced visual stimuli in four of the six visuo-haptic principles: anticipation, staging, follow-through, and exaggeration [1].
Additional work from Faust and Yoo in 2006 found that vibrotactile feedback and sounds were both positive additions to virtual games, although vibrations were not always the most realistic [2]. Most recently, Kirginas developed a qualitative study with children to understand targeted questions related to haptic feedback in games. He found that adding haptic feedback to games makes them more realistic and engaging without distracting players [3]. Additionally, children believed that the haptics worked best when combined with visual and auditory feedback [3].
We designed our game and modeled our own study based on these articles by having users play the cup pong game with and without haptic embellishments (turning on and off the spring and damper of the horizontal handle). While we would not be implementing vibrotactile or auditory feedback, we believed that focusing on combining haptic force feedback with simple visuals could still uncover a difference in game playing ability.
Methods
Hardware design and implementation
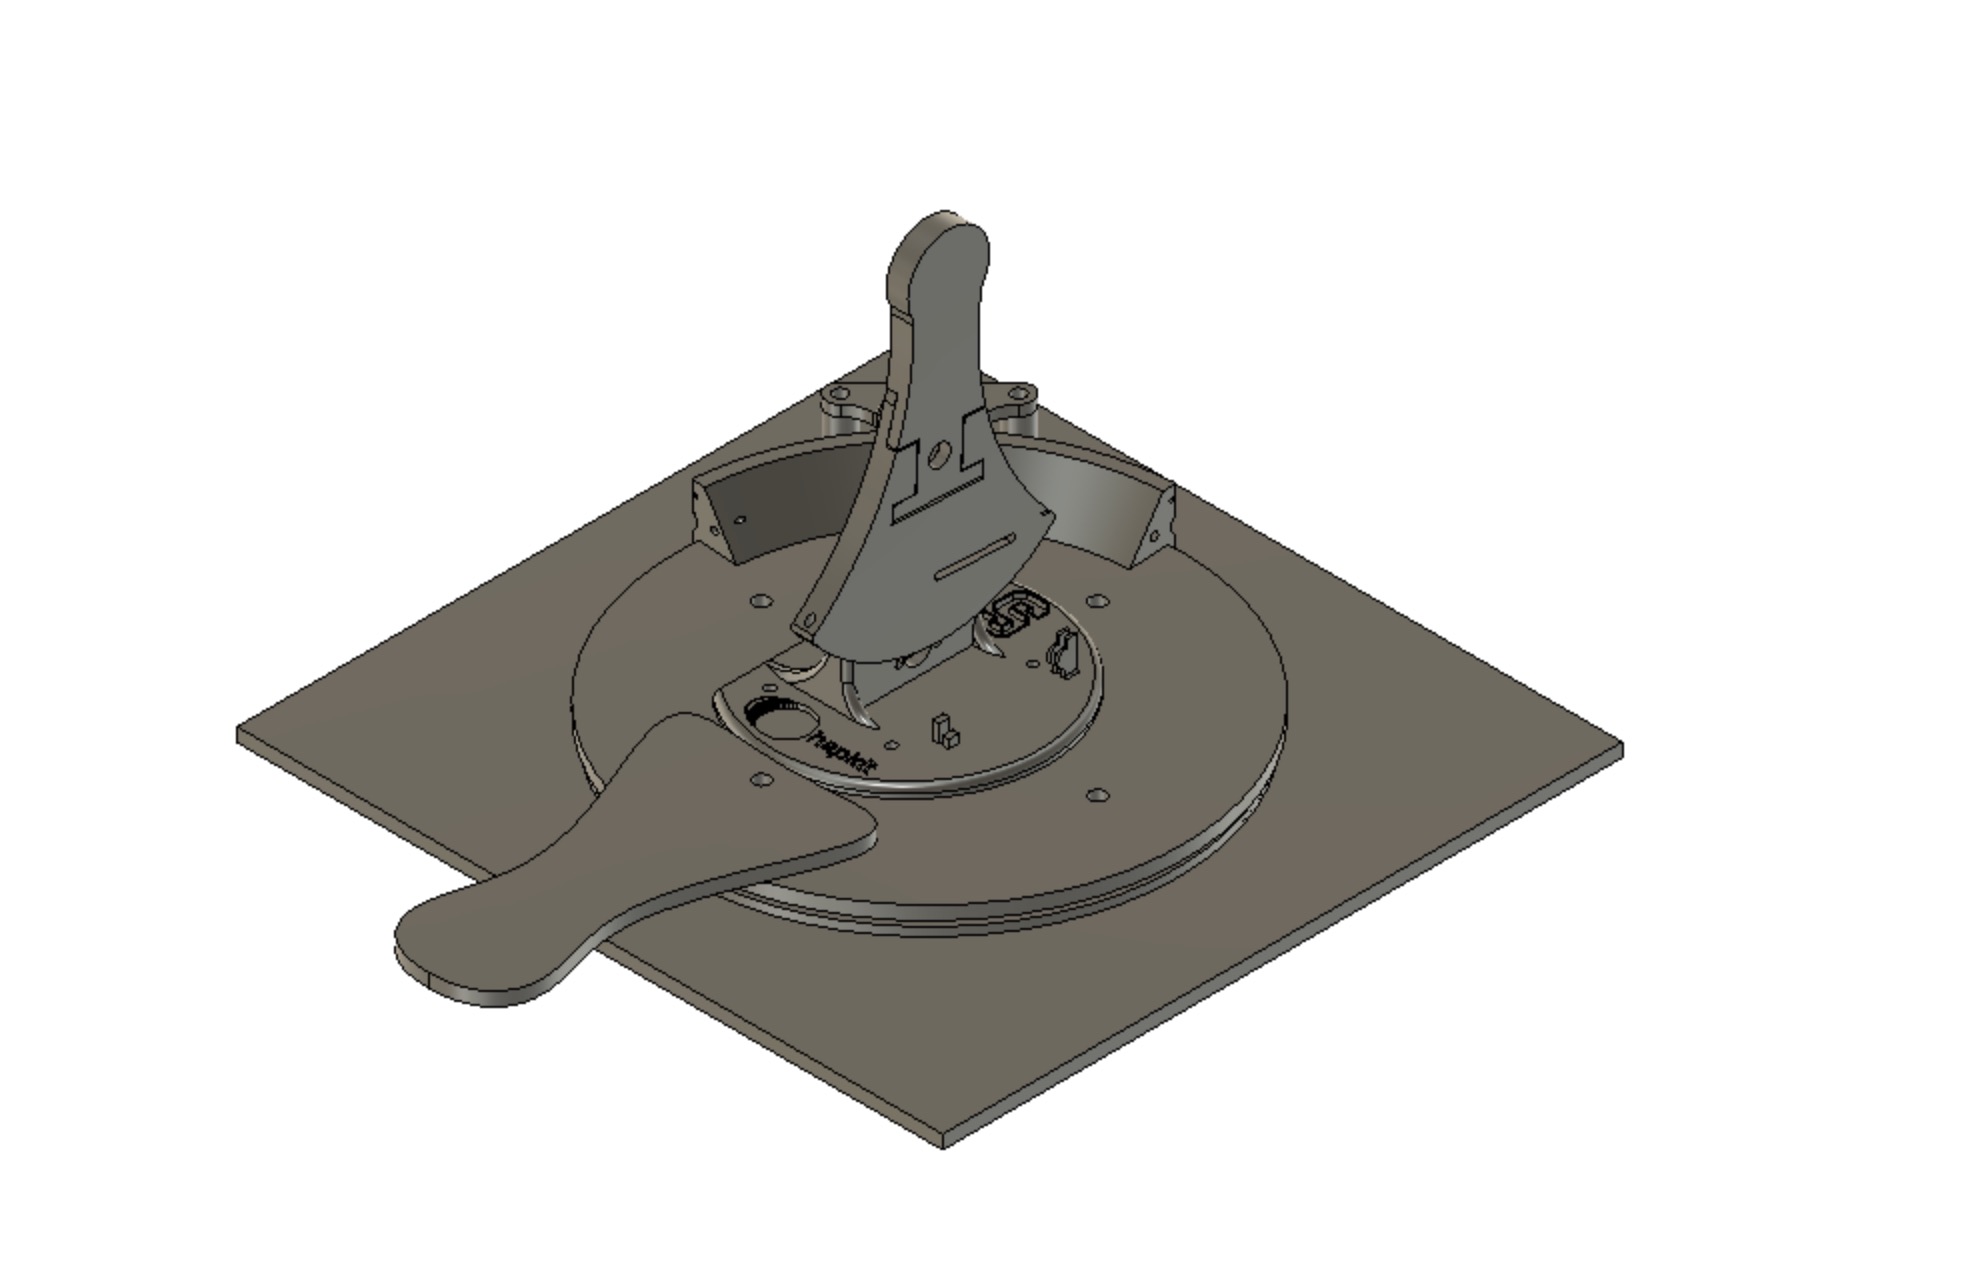
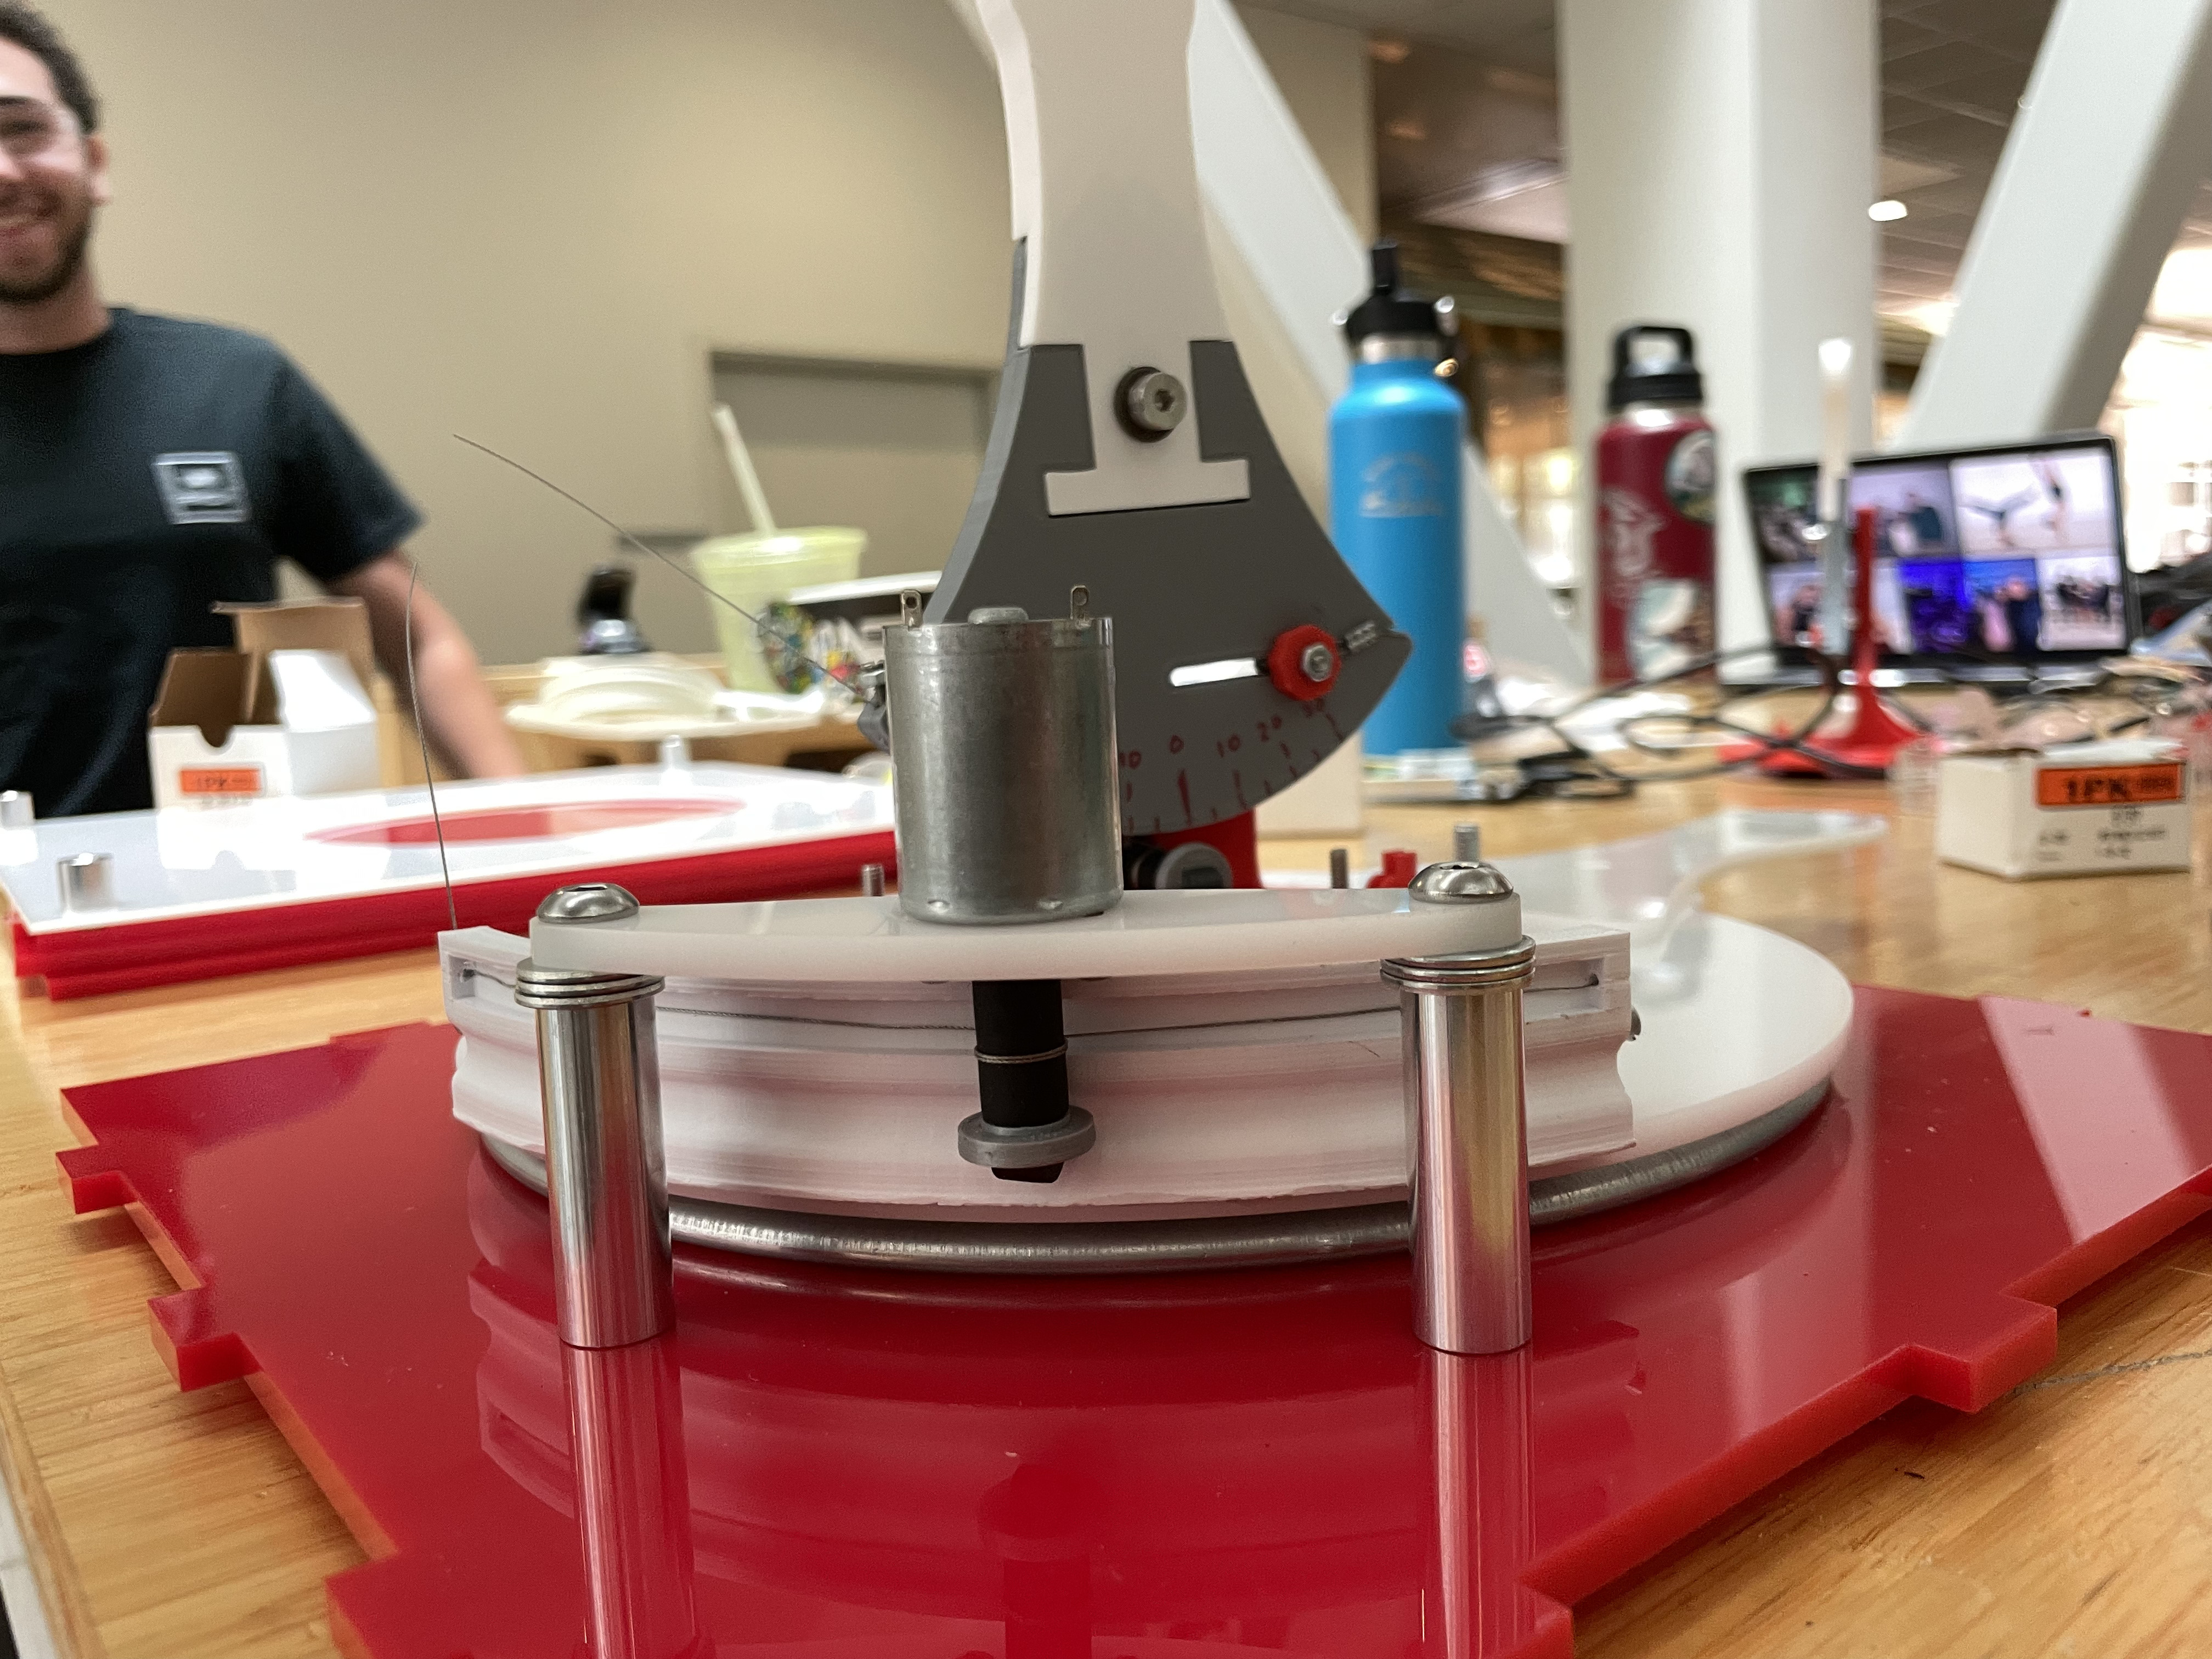
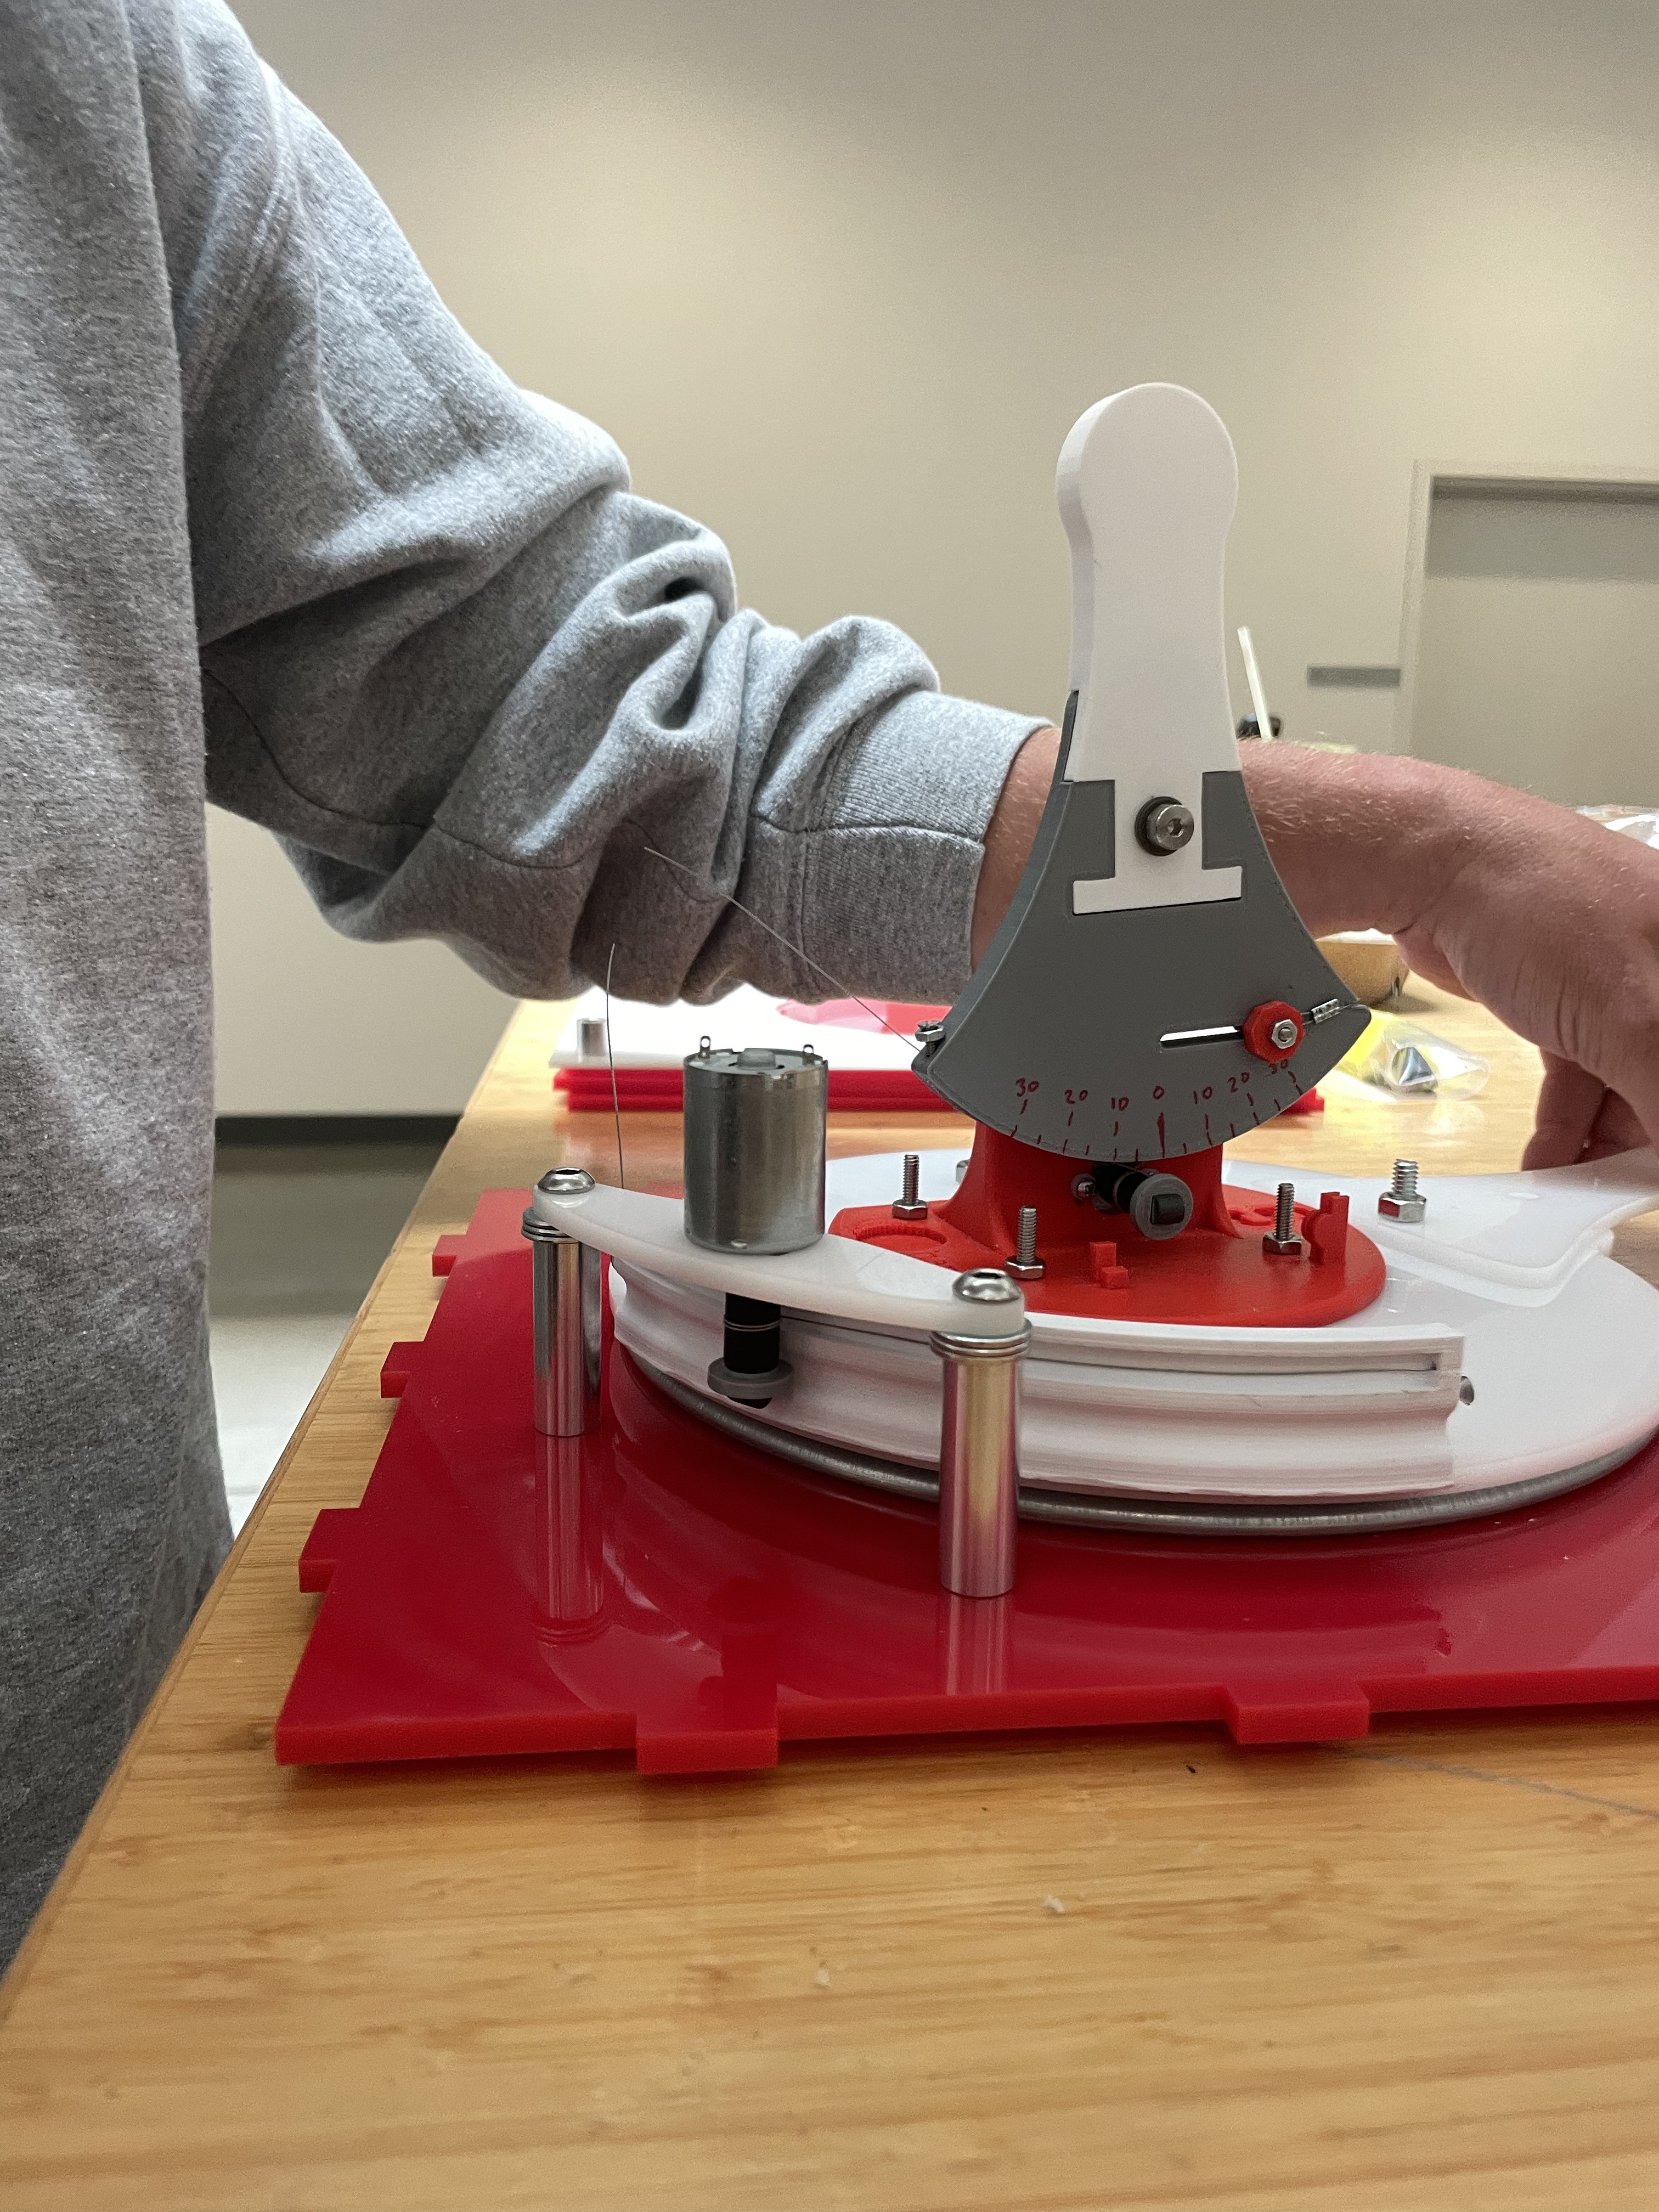
For the 2 DoF system, we used one hapkit in its normal orientation (vertical) mounted on top of a custom hapkit turned 90 degrees to the side. The horizontal hapkit was used to control the ball’s launch angle, and it uses a turntable or “lazy susan” as its central rotary mechanism. The turntable has a laser cut plate with a custom 3D printed part that is an adaptation of the "sector" part of the hapkit that holds the capstan cable and interfaces with the vertical capstan pulley and the motor. The horizontal degree of freedom uses a motor to hold the capstan pulley even though there is no haptic feedback on the aiming as mounting the motor with two bolts to a laser cut part held up by 2 standoffs was the simplest way to mount the capstan pulley without needing to manufacture or purchase more parts. The hapkit board for the aiming degree of freedom was velcroed upside down to the base plate of our box so that the magnetic sensor could read the rotation of the capstan pulley. The vertical, unmodified hapkit was mounted on top of this plate on the turntable and rotated as the user moved the horizontal hapkit to adjust launch angle. Thus, the user uses both hands to play the game. Our 2 degree of freedom hapkit setup was mounted to a box made out of 1/4" laser cut red acrylic and held together by mortise and tenon joints as well as captive nuts and bolts. The front of the box has a wide slot in it that the handle connected to the turntable sticks out through and the back has a small hole that the wires powering the motor and the 2 hapkit boards pass through. The top of the box was a sheet of 1/8" laser cut white acrylic with a large hole in the middle allowing for the vertical hapkit to poke through. The top has 4 standoffs in the corners that fit inside the box ensuring that the lid wouldn't slide off, but allowing for quick removal of the lid. The colors of the box (red sides and white top) where inspired by red solo cups.
CAD without enclosure:
Full system CAD:

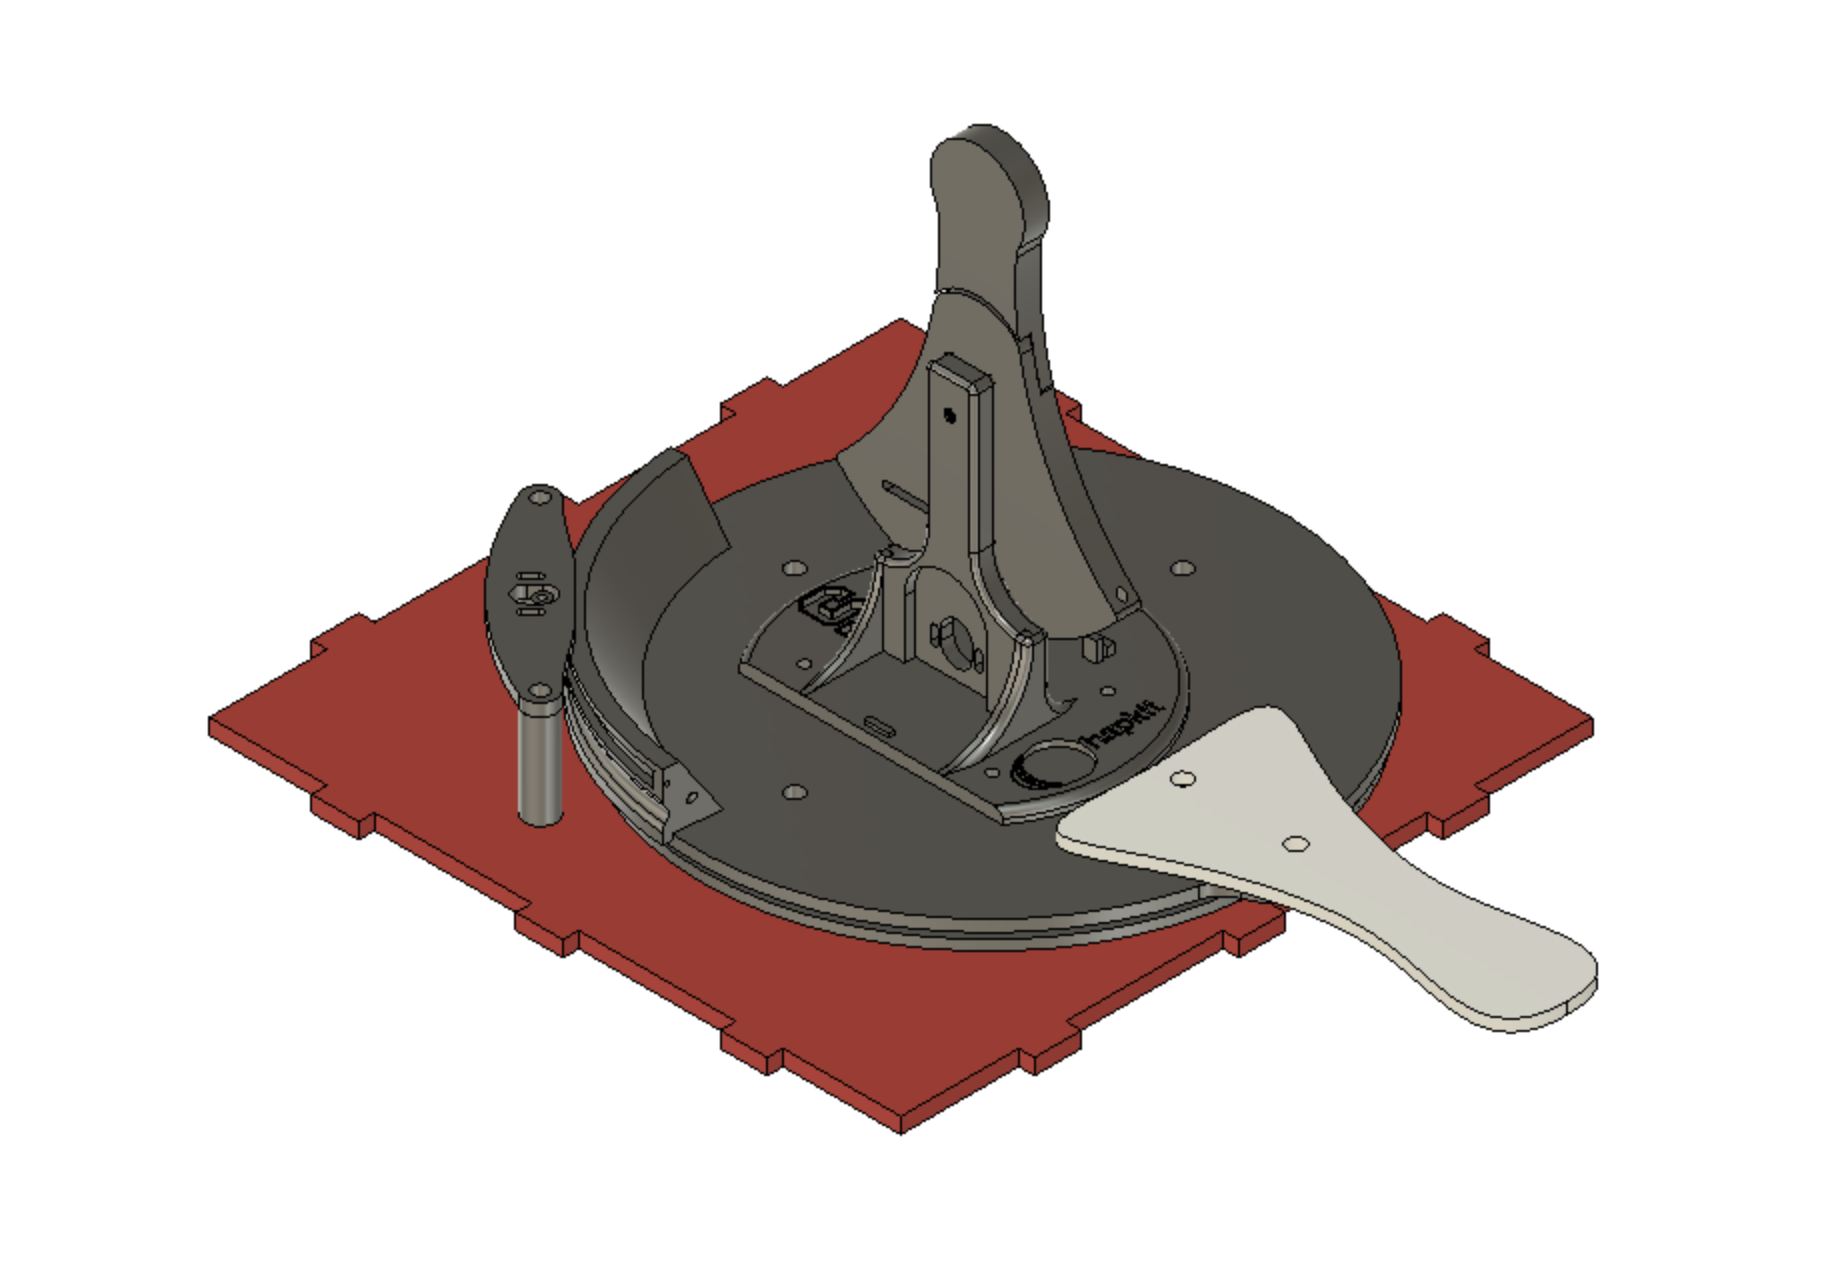
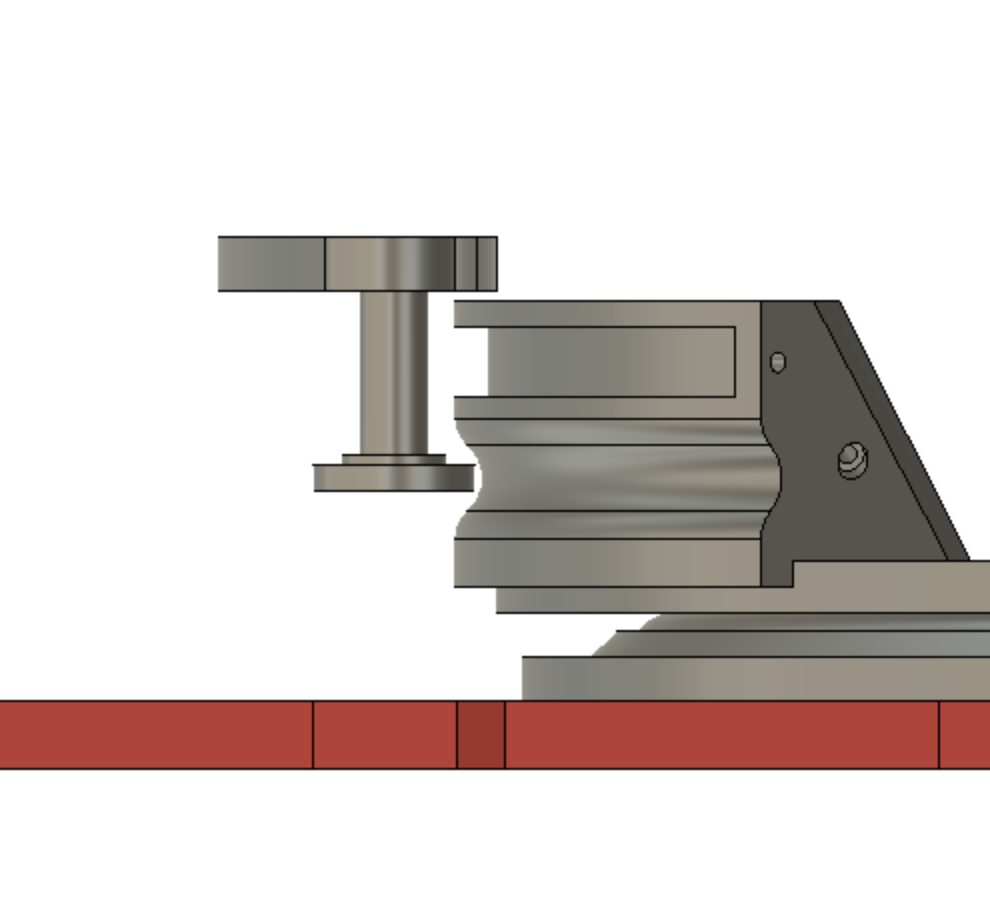
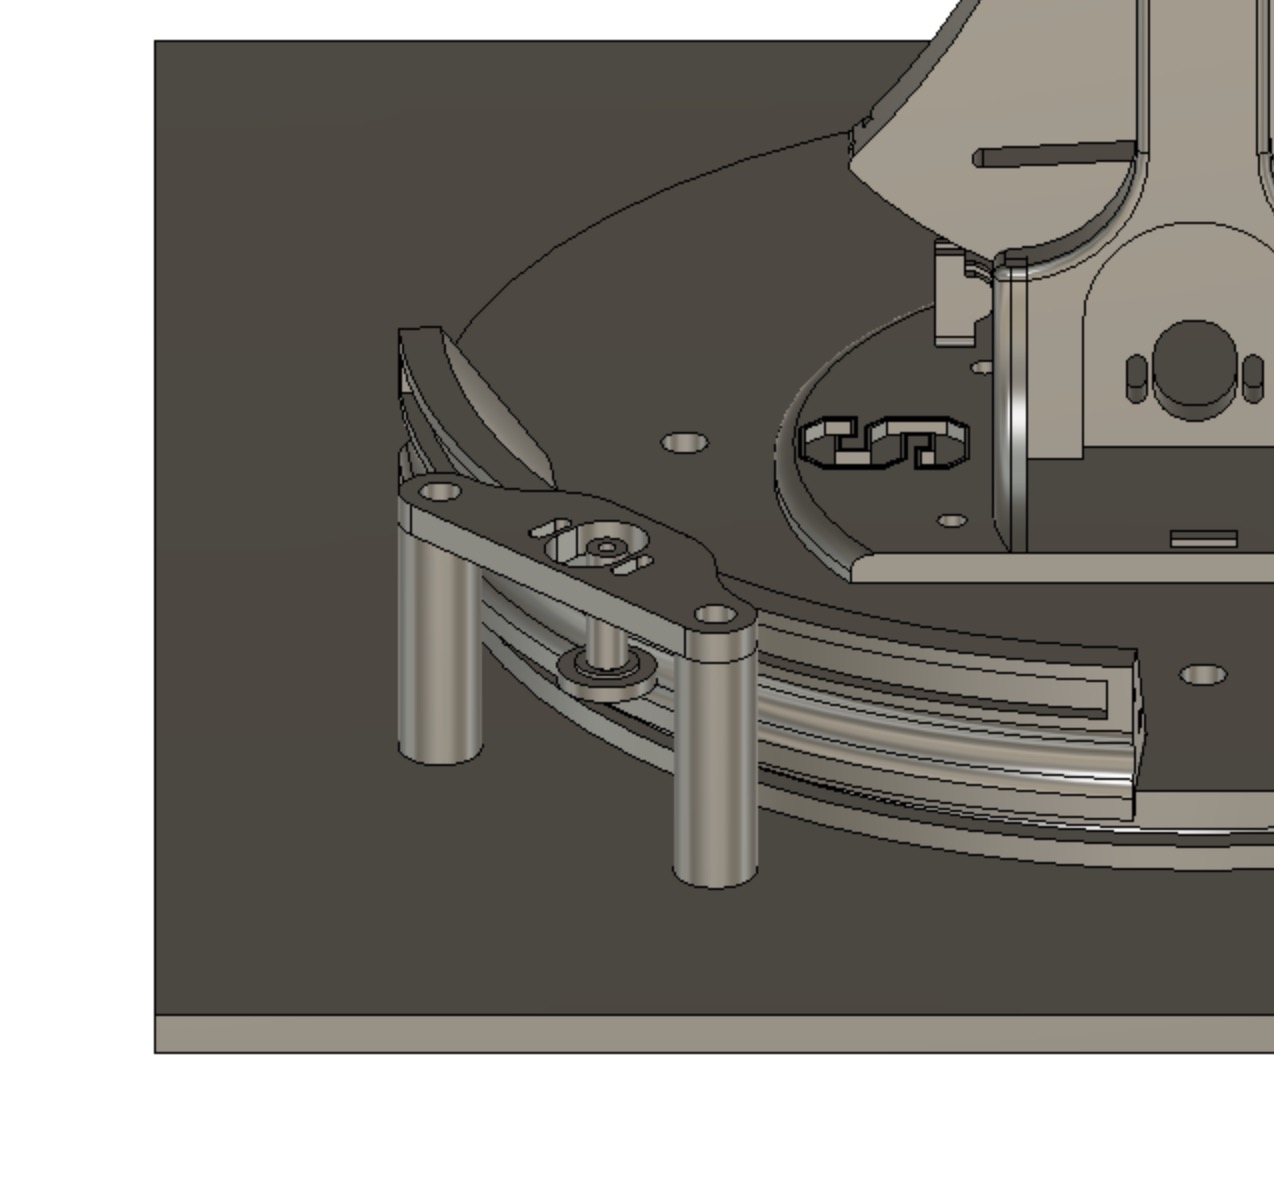
Aiming degree of freedom capstan drive:
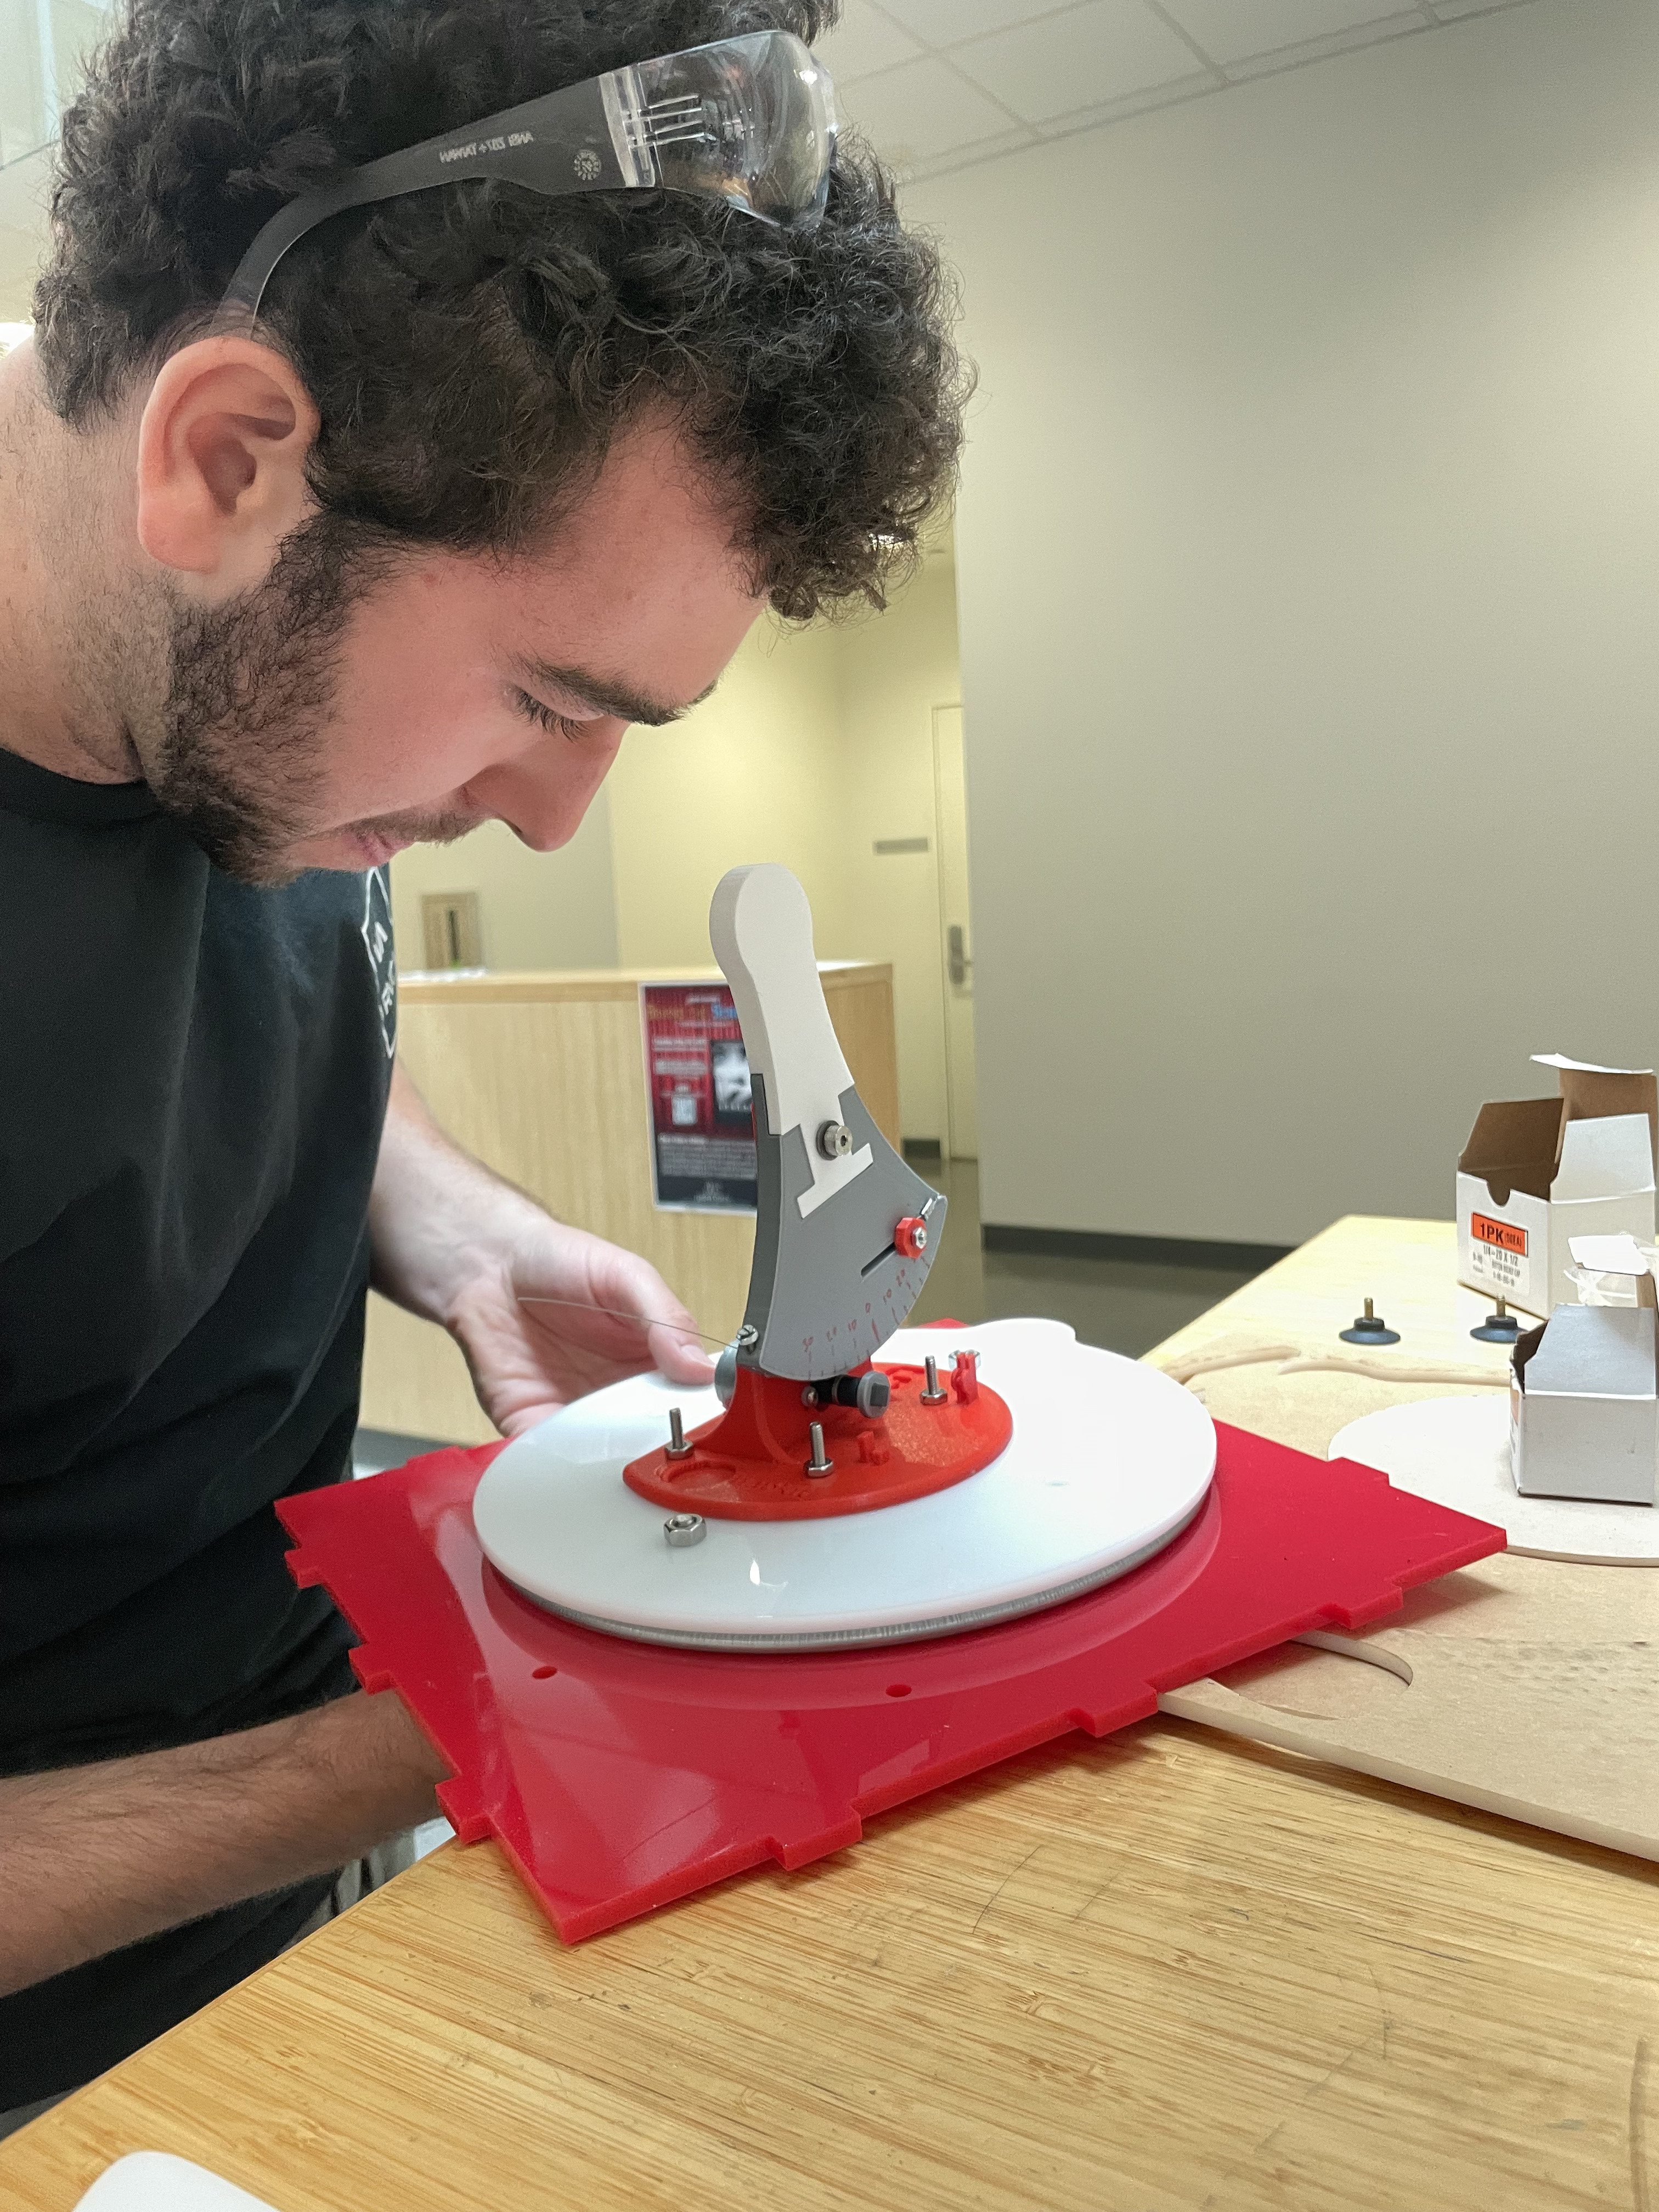
Manufacturing the system was smooth as there was only 1 3D printed part, and 9 laser cut parts that all fit together as designed. We assembled the box with the turntable and hardware purchased from McMaster-Carr and were ready to move onto the programming of the hapkit boards and graphics interface. Below is a series of images detailing the steps in building and assembling the physical system.
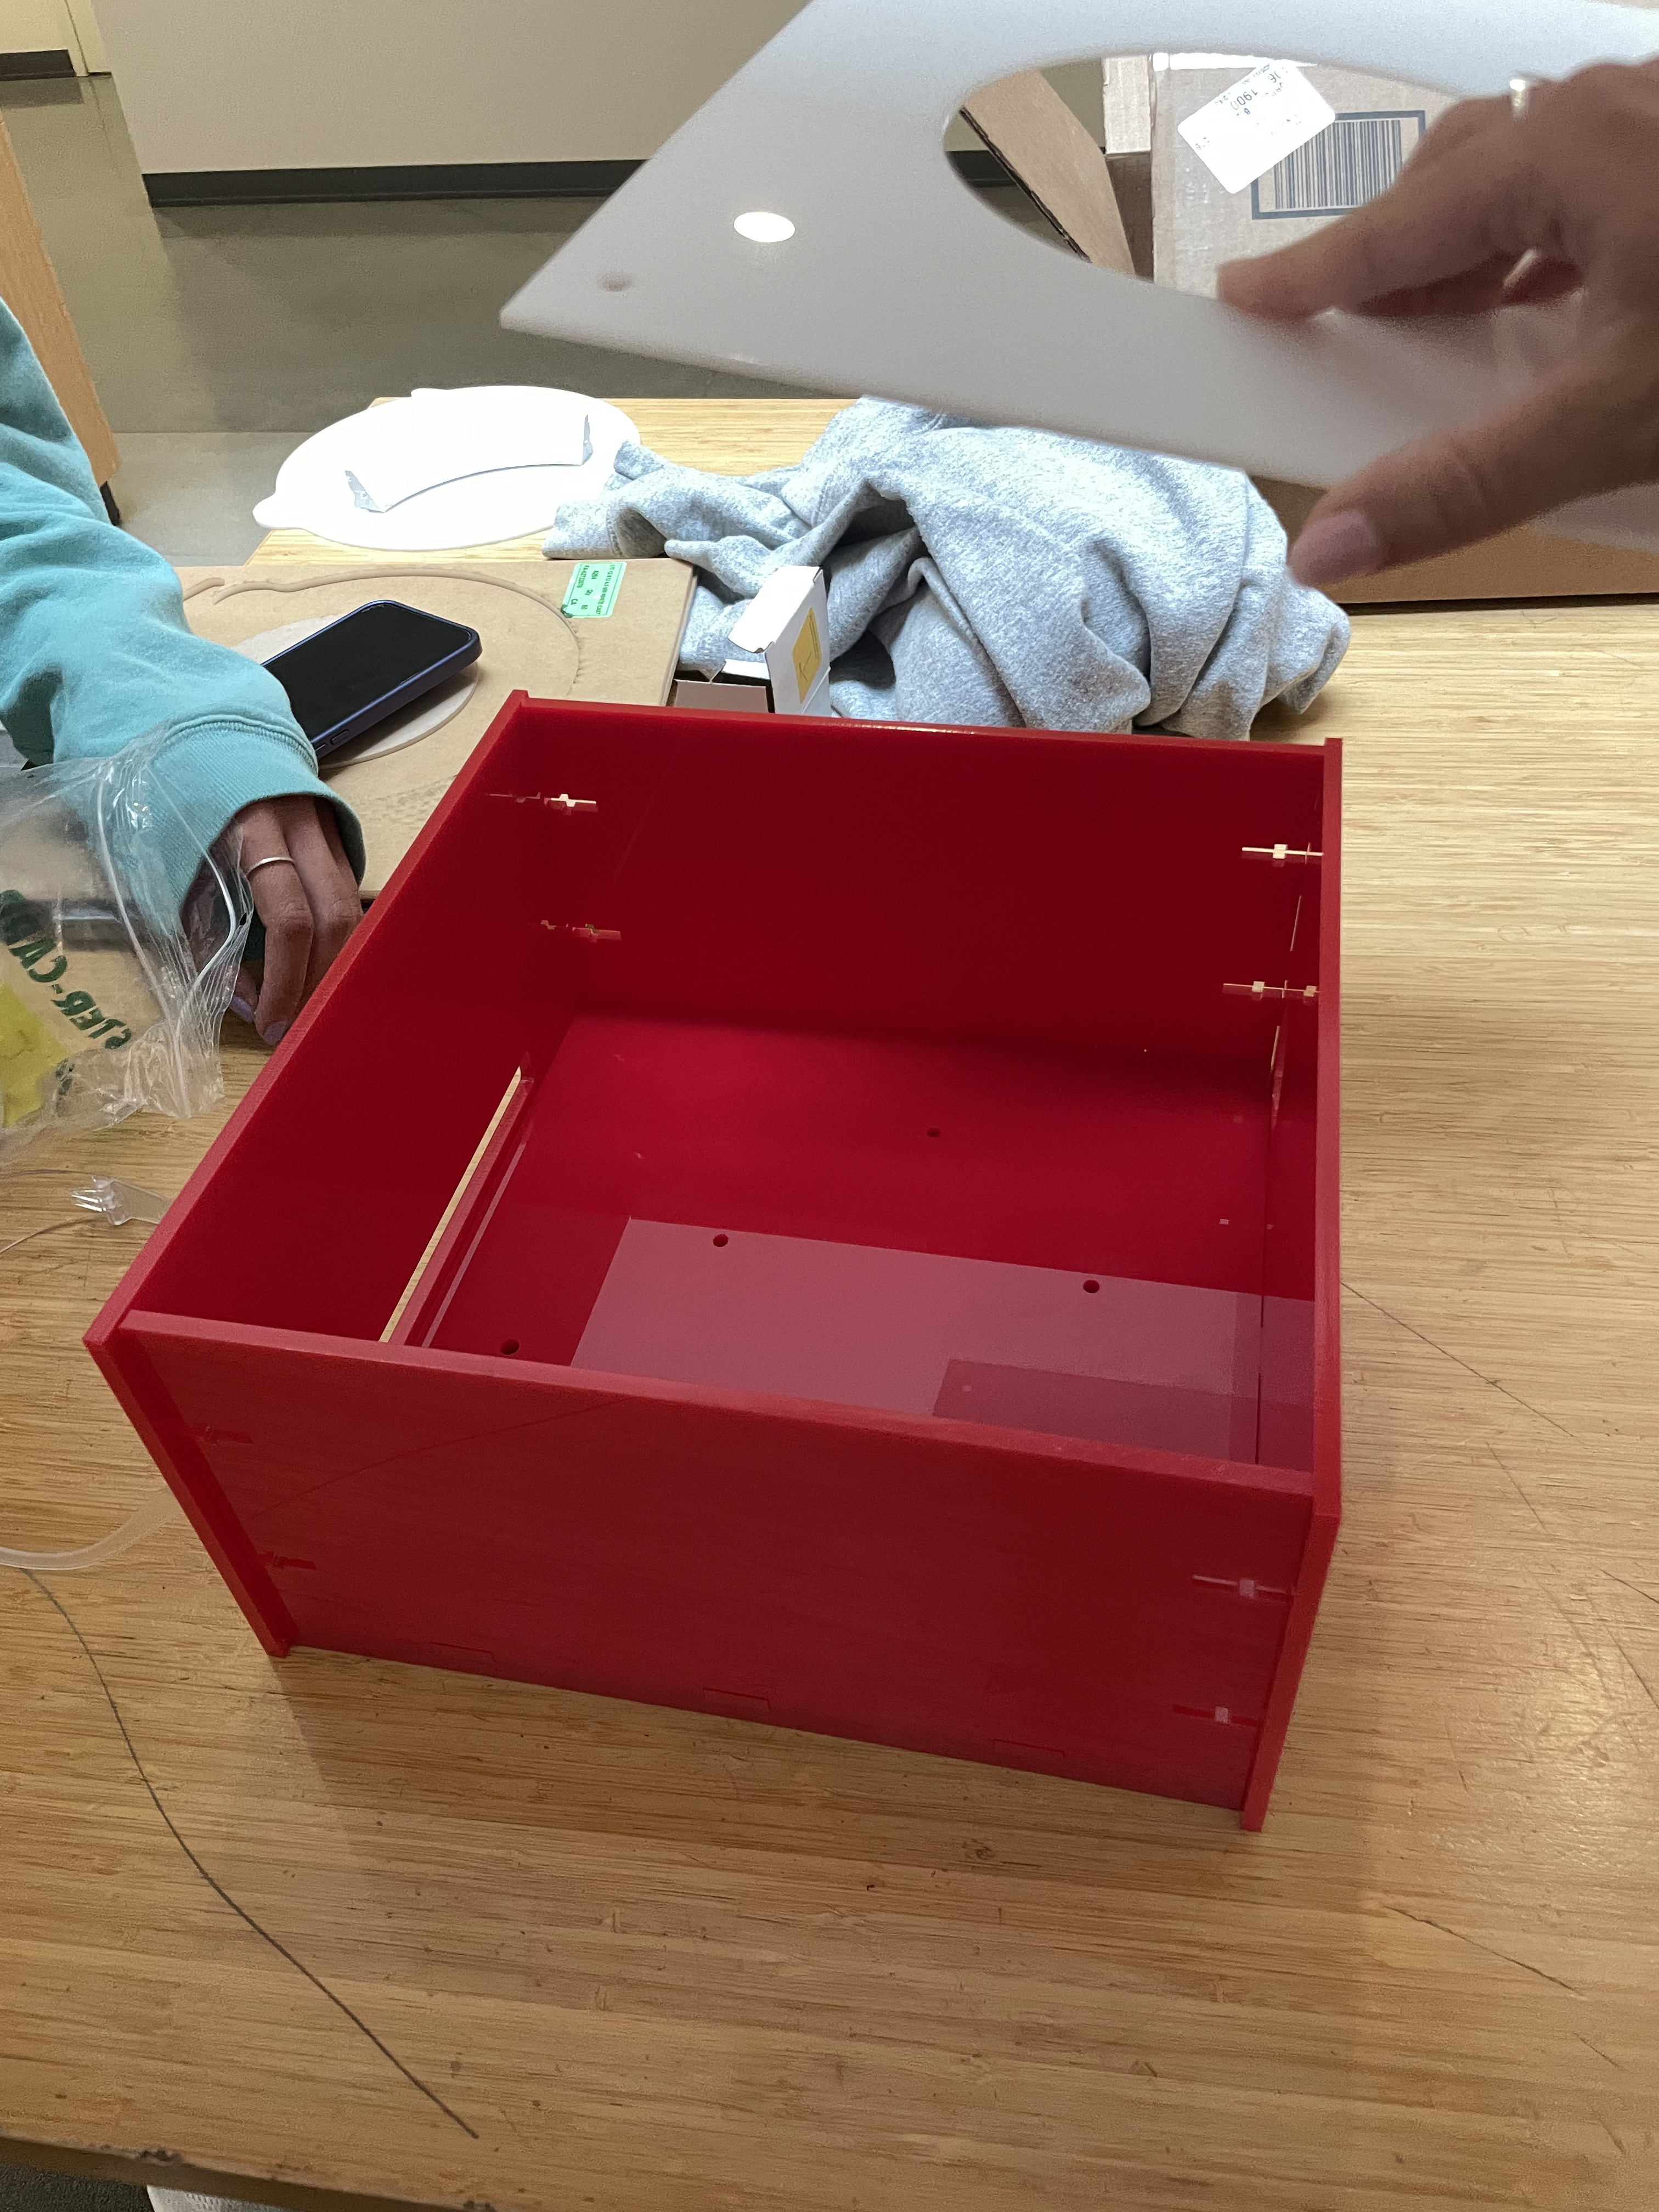
Enclosure of 2 DOF system:
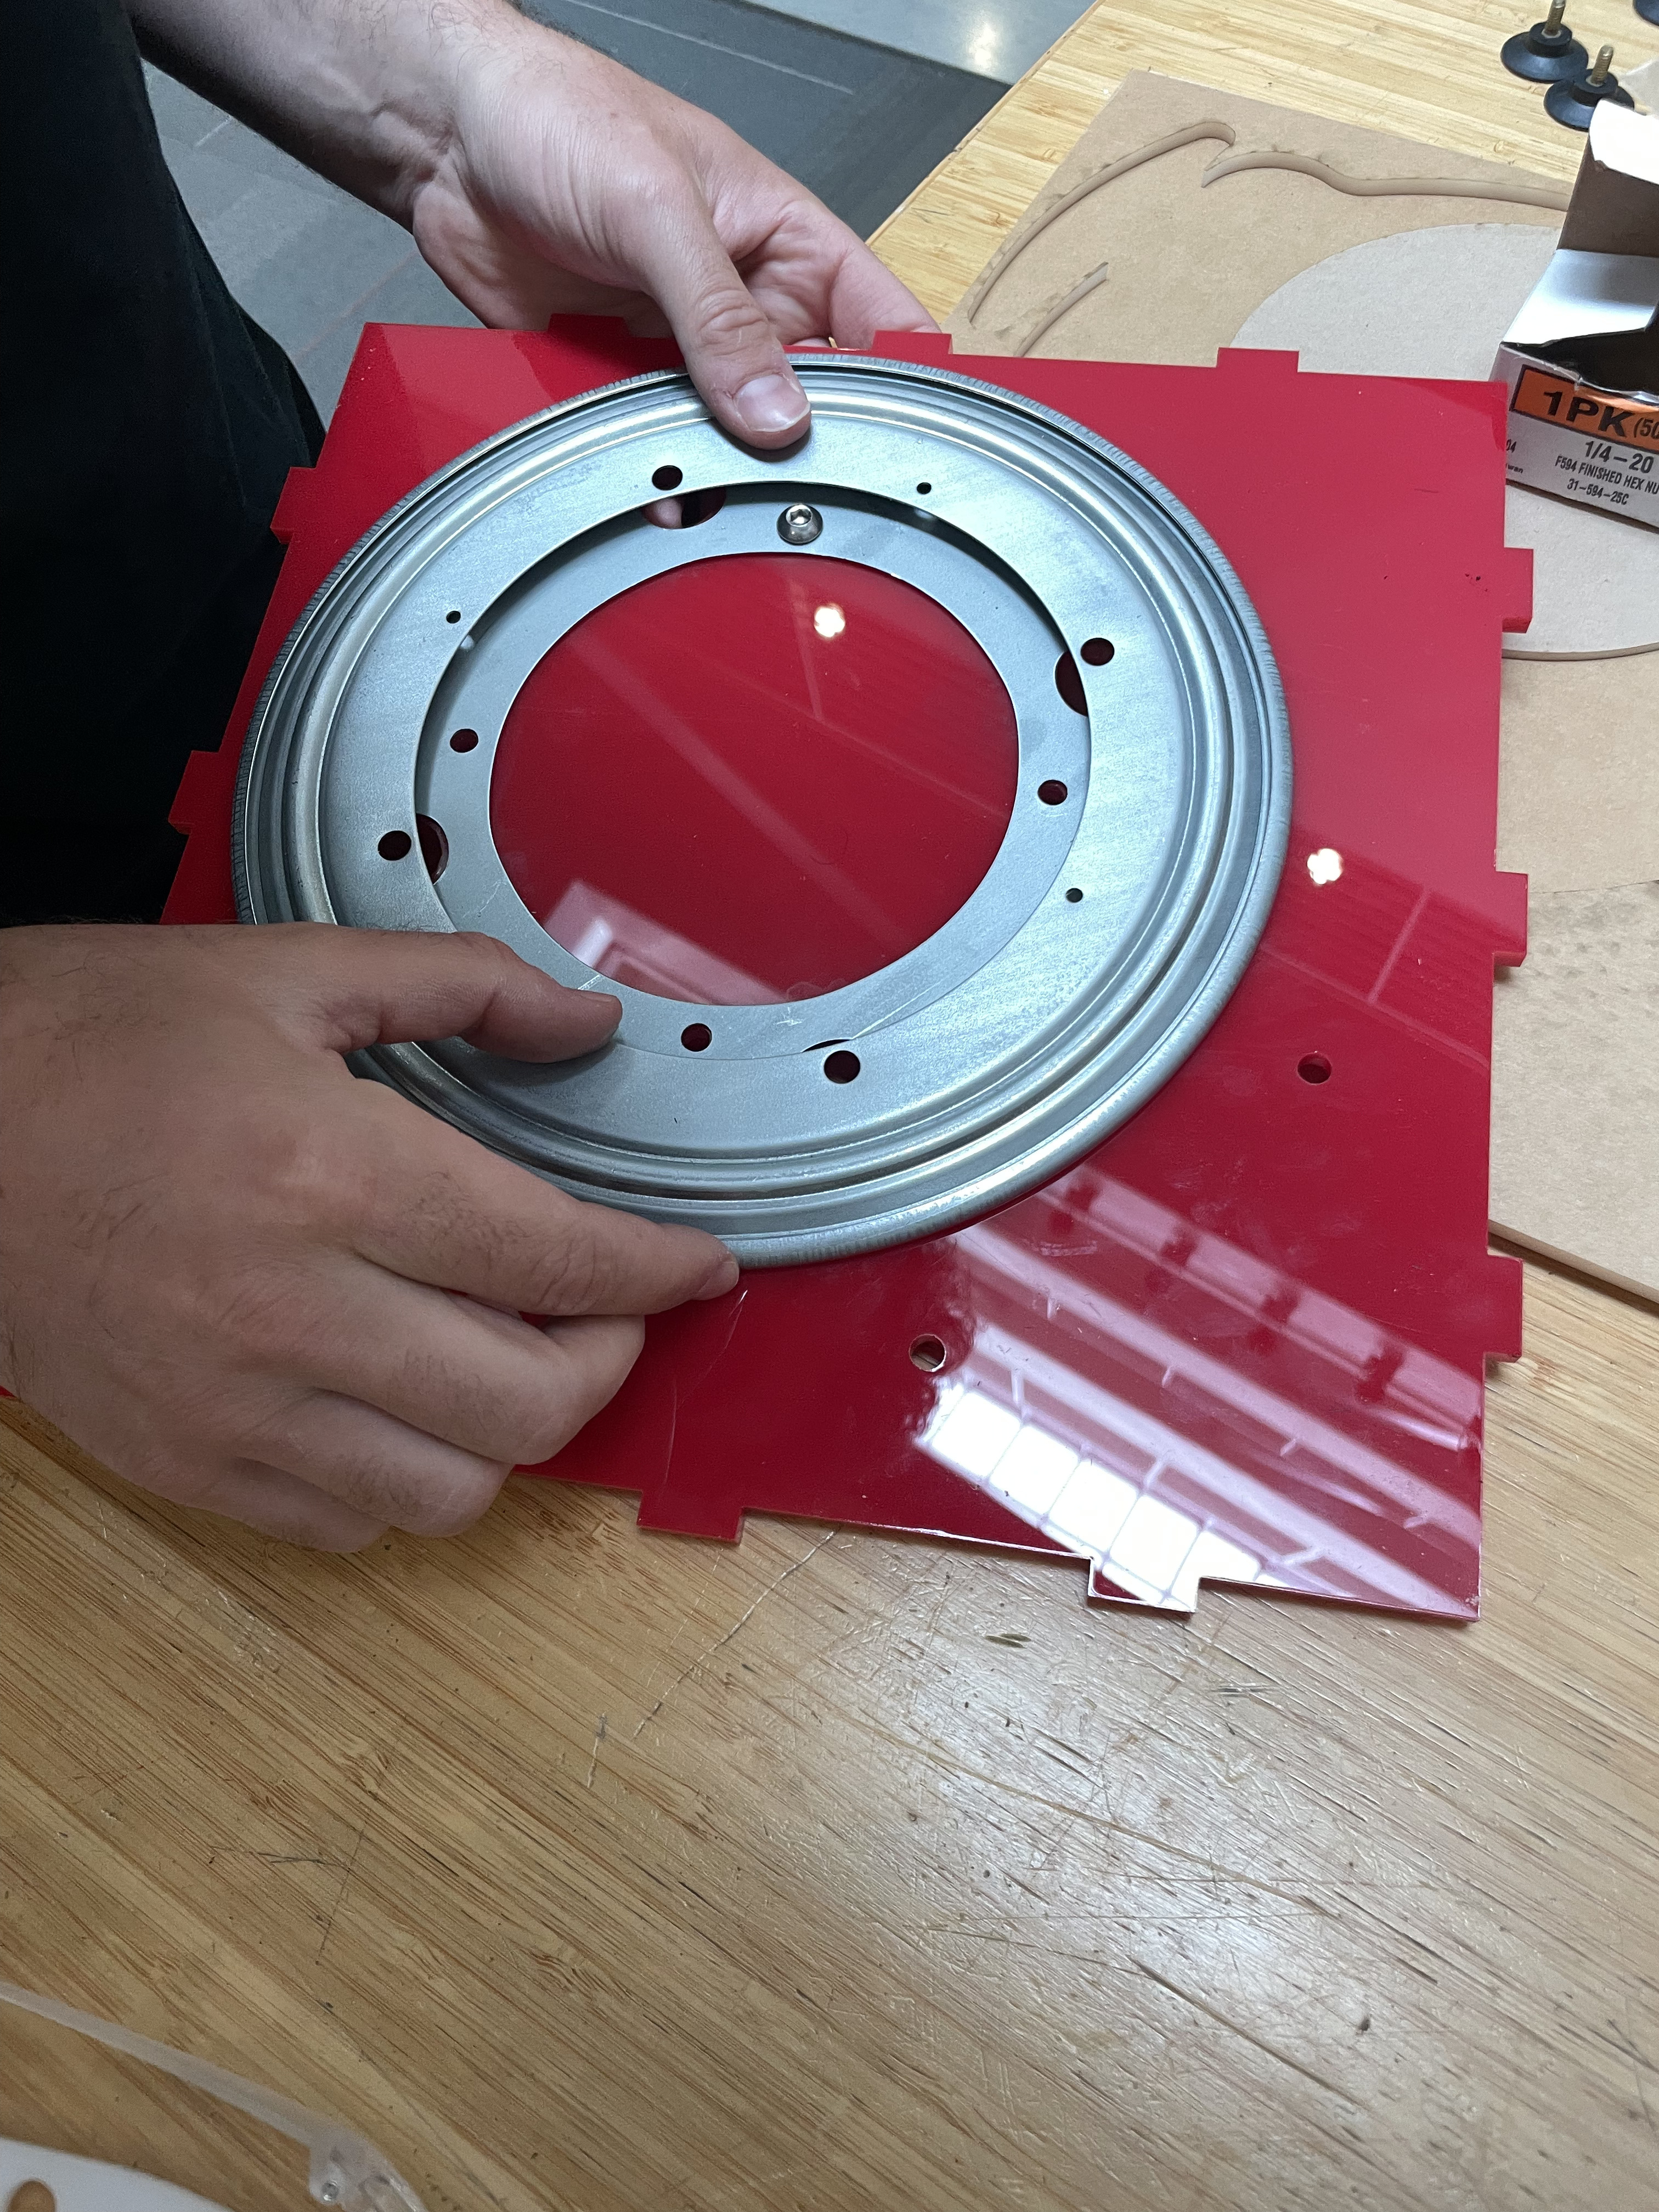
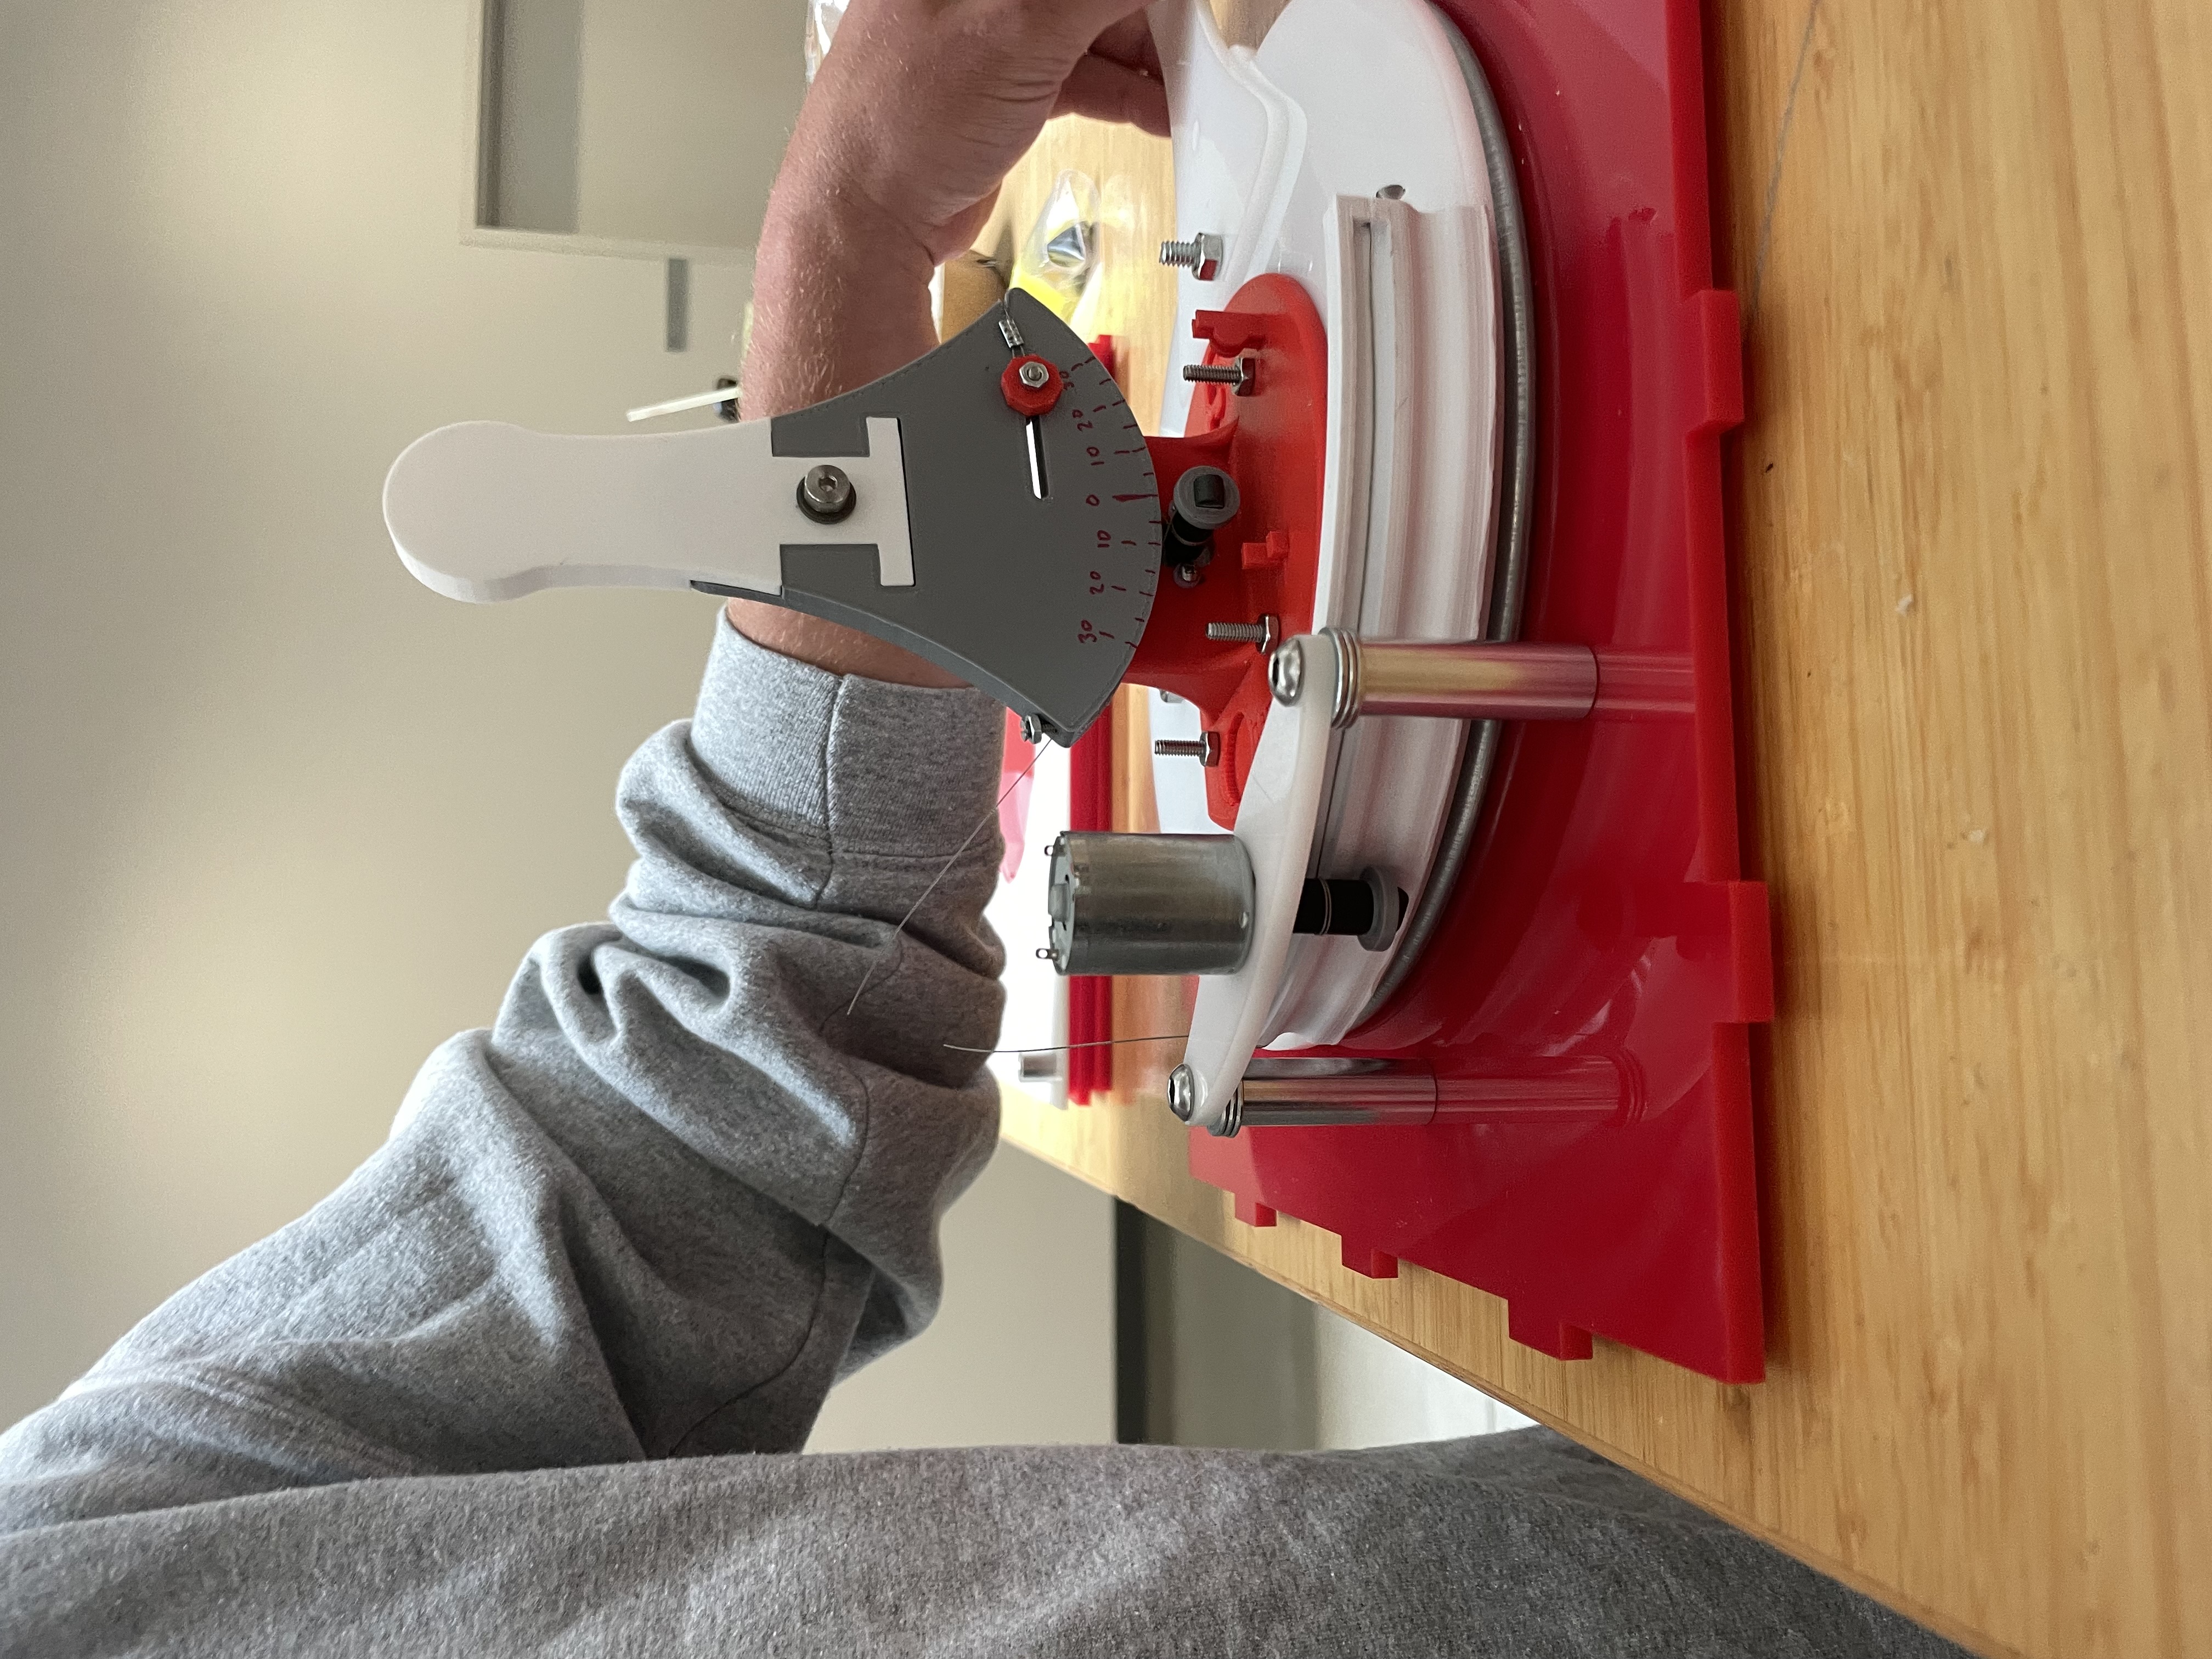
Turntable for horizontal hapkit that changes launch angle:
Shiley assembling the vertical hapkit:
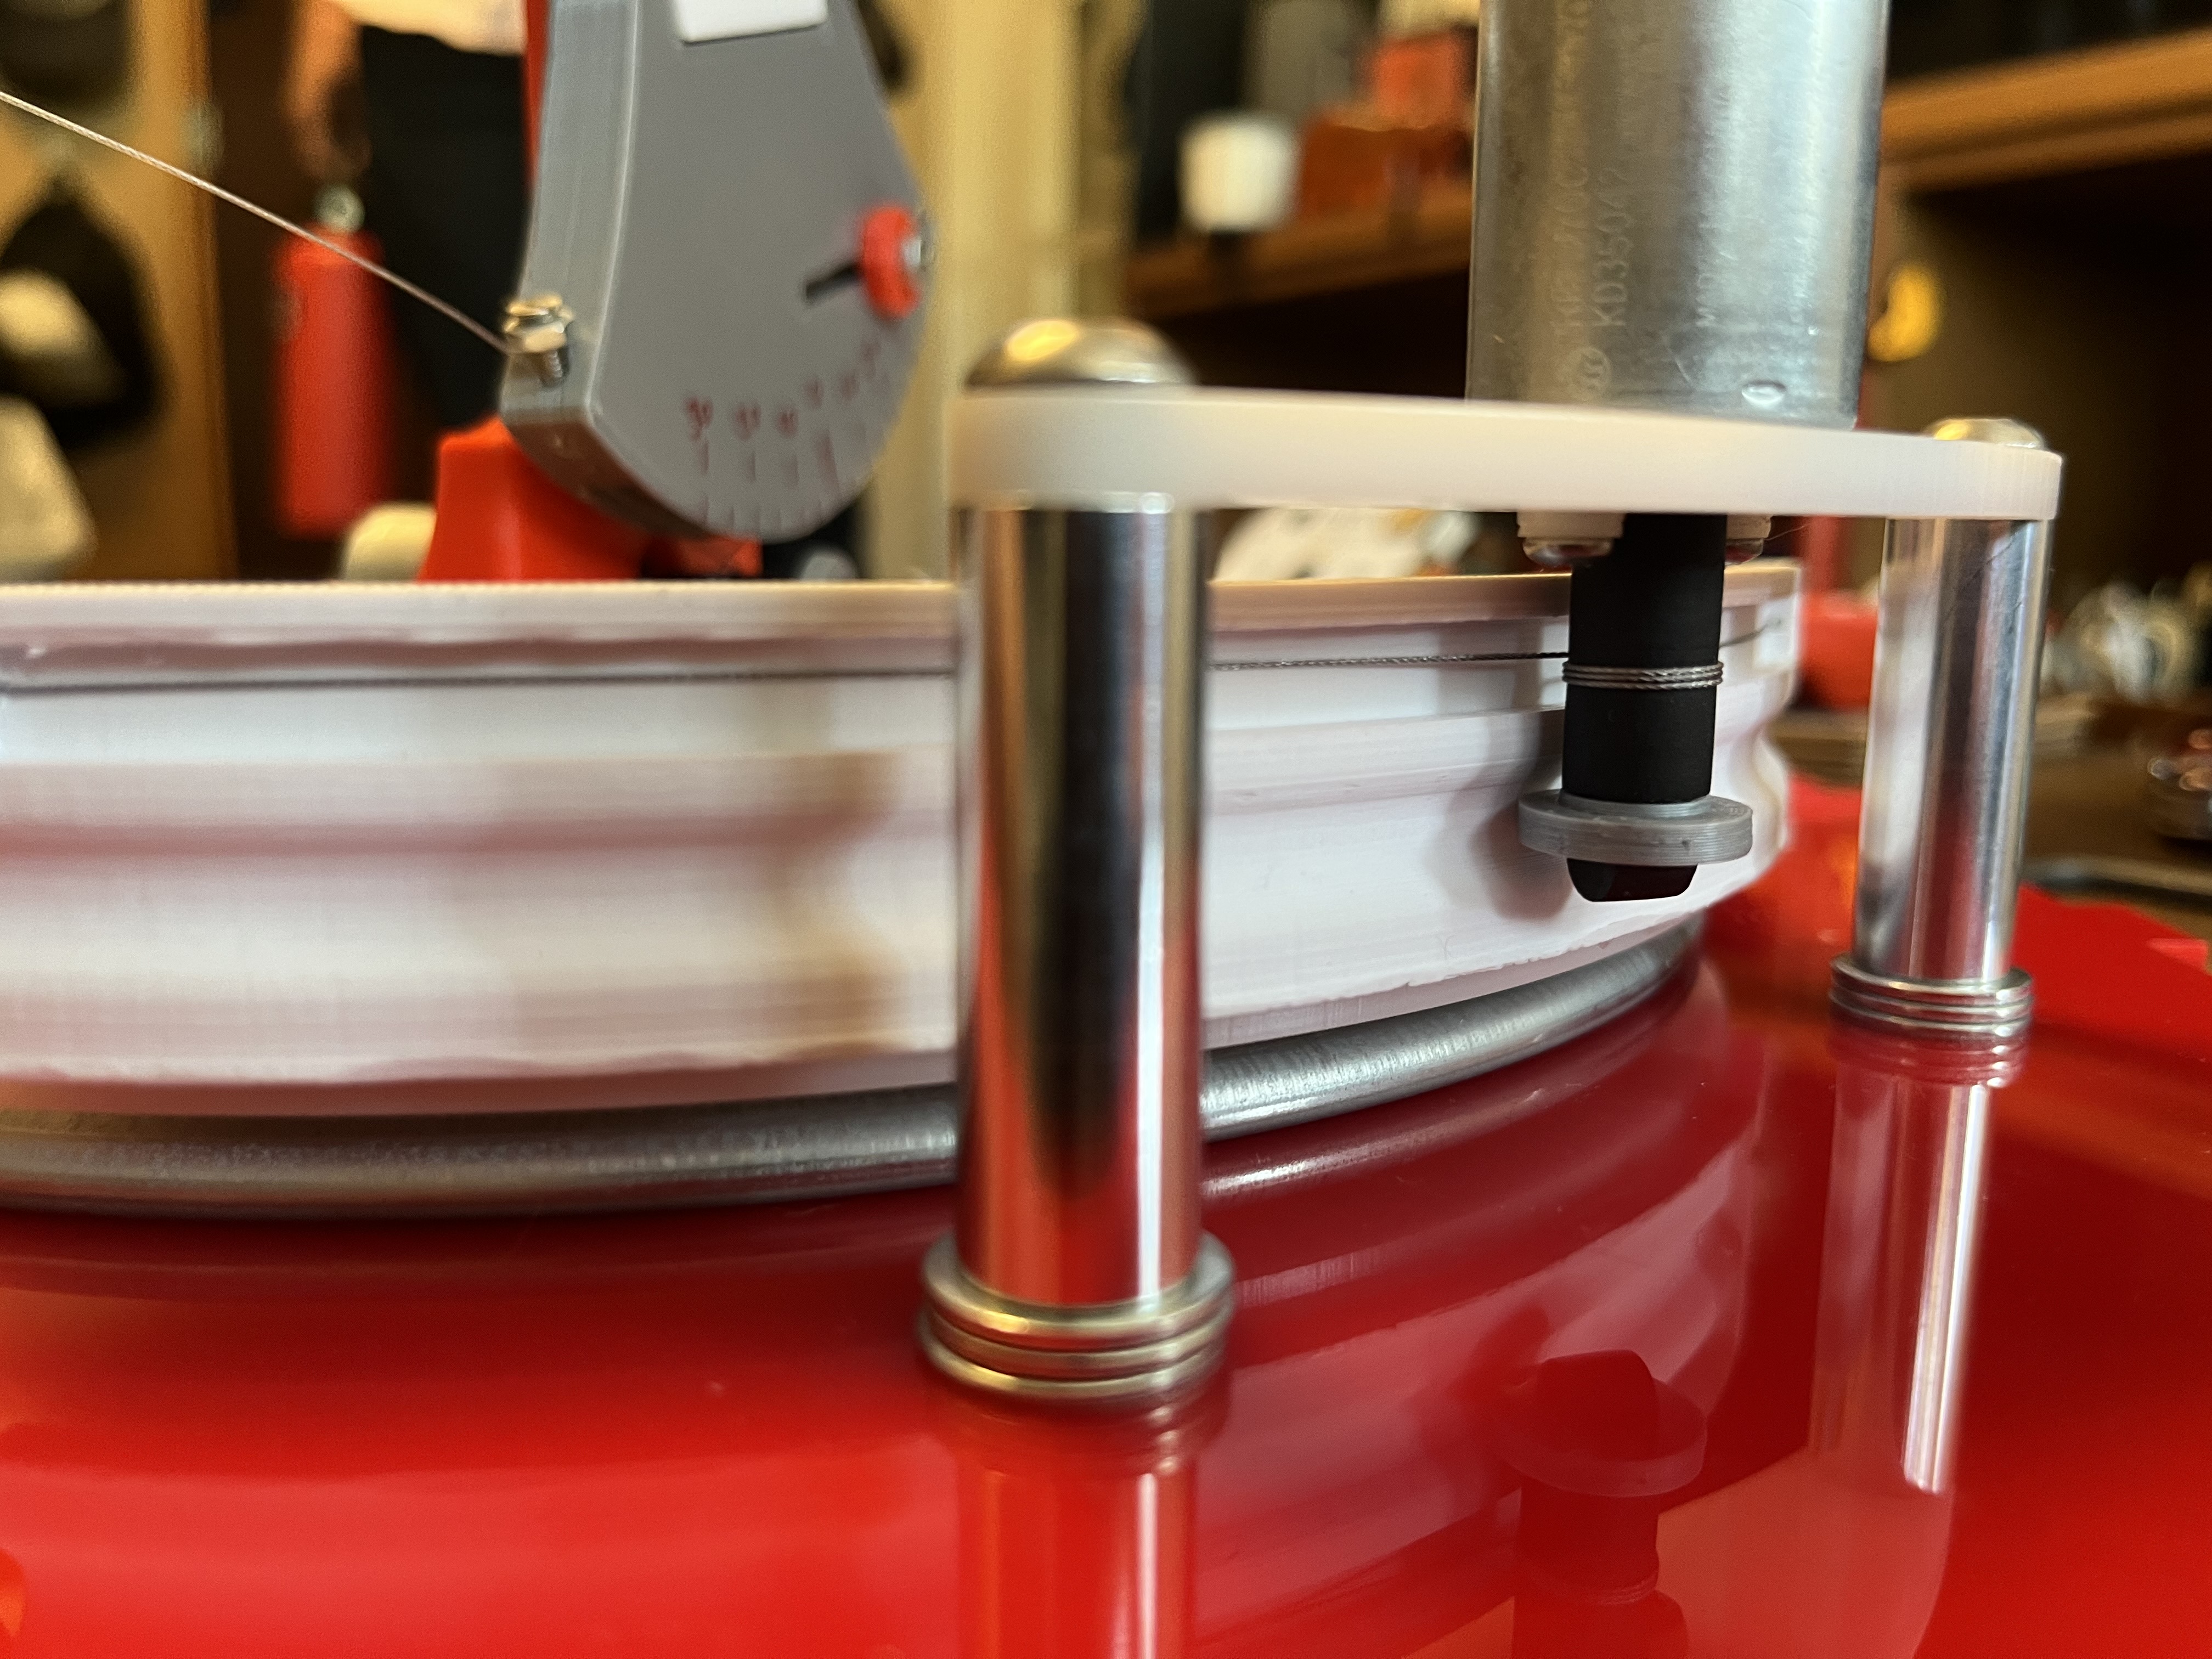
Assembled capstan drive:
Internals of the mechanism without the box:
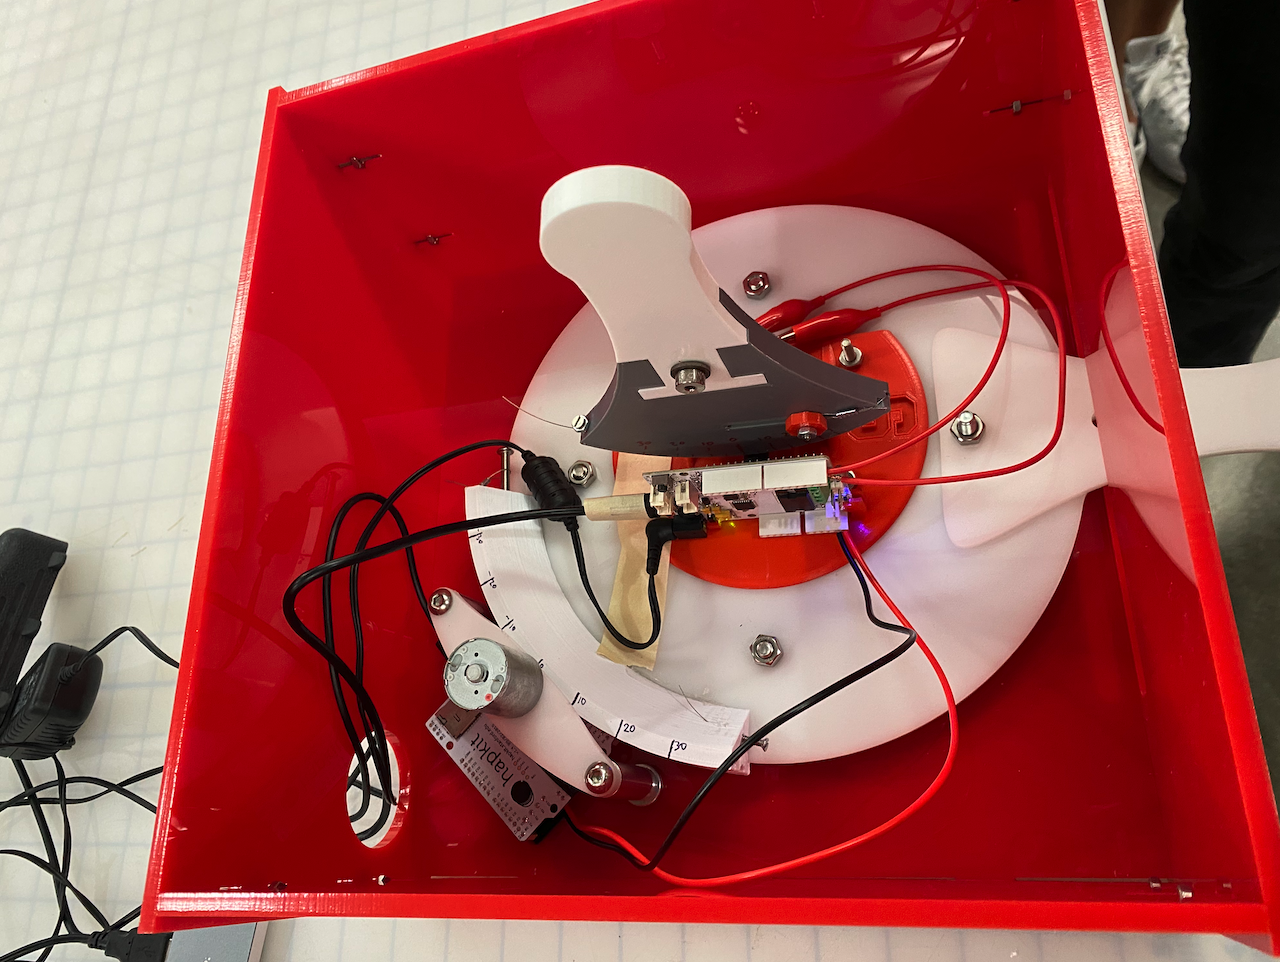
A view of the inside of the enclosure showing the final assembly on demo day:
Fully assembled finished system:
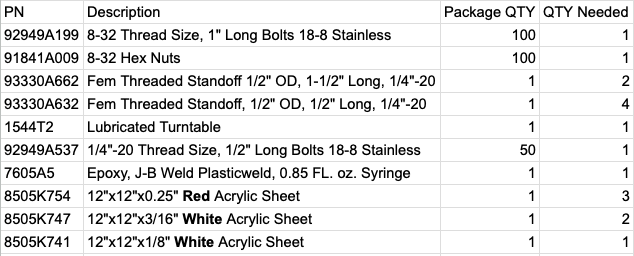
McMaster-Carr Parts List:
The first hurdle we had to pass was figuring out how to send the angle of the aiming degree of freedom to the hapkit board of the launching hapkit. We used I2C communication protocol to send the angle of the aiming hapkit as an array of characters to the launching hapkit. Then, the launching hapkit handle's position and velocity are printed to the serial port along with the aim angle to be read in and evaluated to create the full graphics of the system by Processing.
System analysis and control
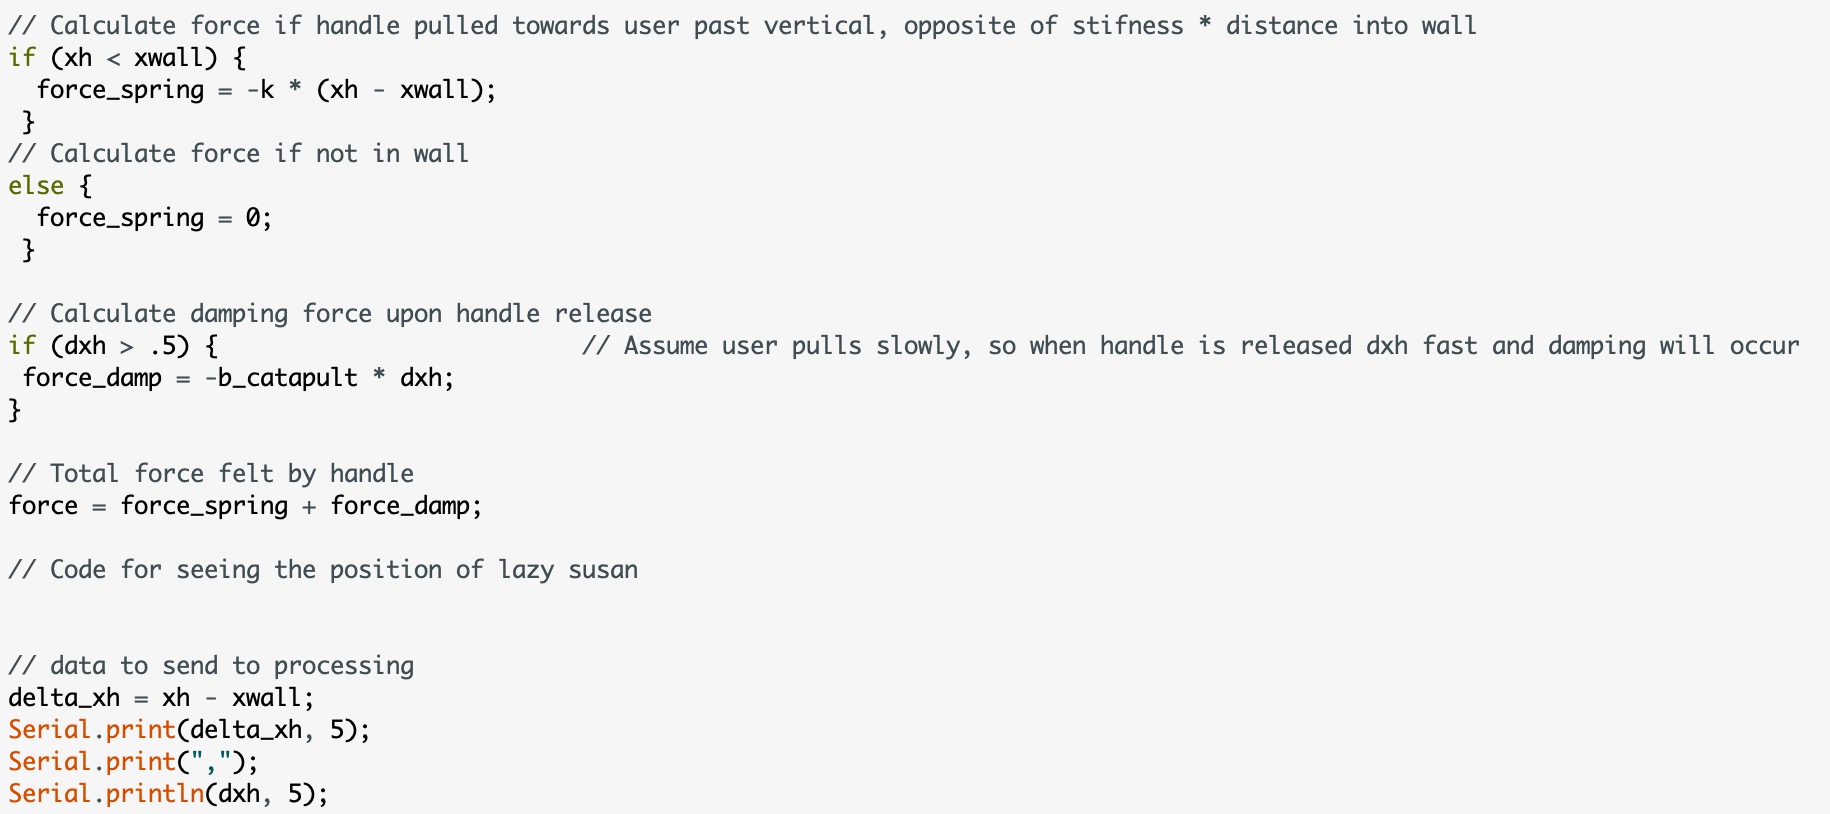
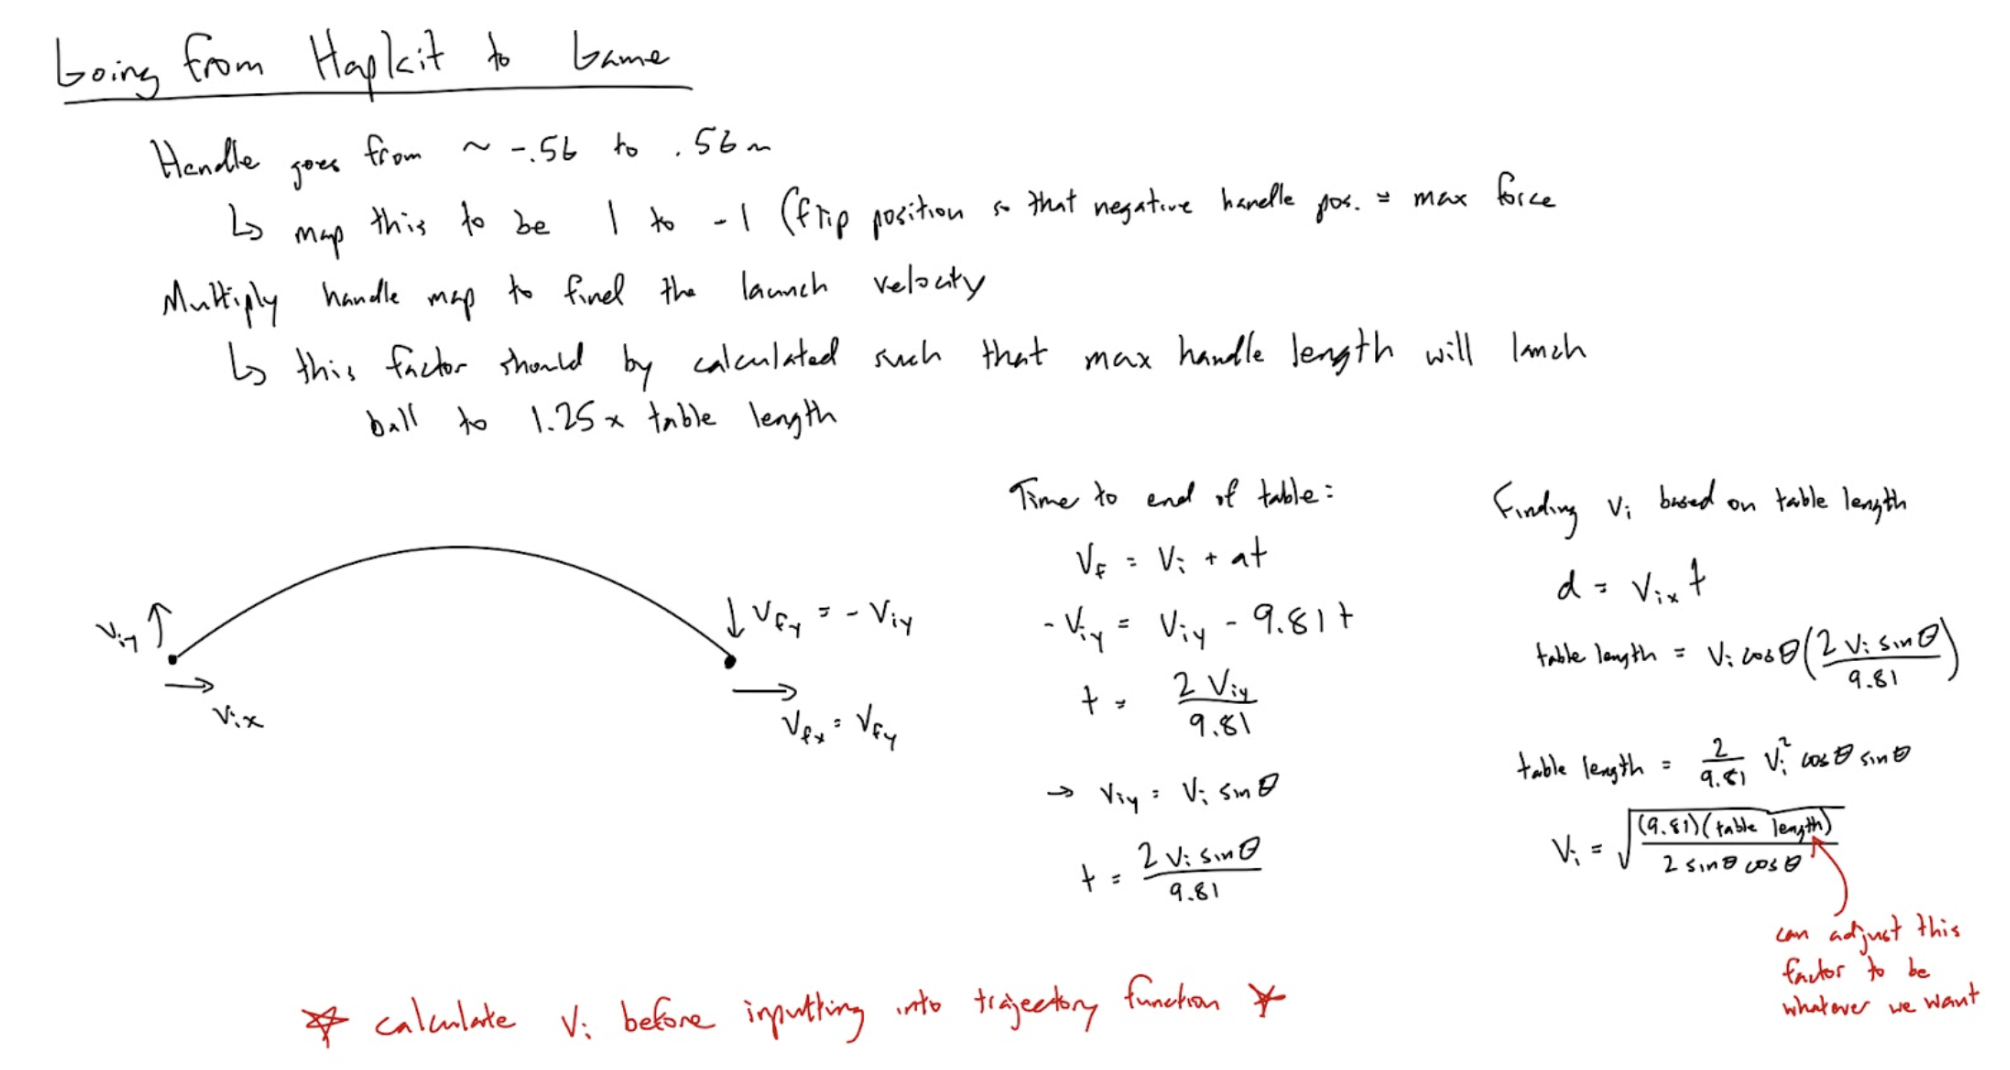
The force feedback in the system is solely from the vertical hapkit, which is the “catapult” launching the ball. As the user pulls back on the catapult loading DoF, they feel a virtual spring acting on them with increasing force as they keep pulling. The force felt by this spring is proportional to the distance into the “wall” that we set. When the handle is released, the hapkit springs back to the spring equilibrium point while a linear damping force is applied to smoothly slow the handle back towards a stop. We designed the code so that the launch angle of the ball will always be the same. However, the ball launch is triggered when the handle passes through a specified point just before equilibrium with positive velocity. This allowed us to only launch the ball when users let go of the handle and it snaps back forward, creating the effect of releasing a catapult. When these launch conditions are met, the handle velocity is recorded and used to determine how far the ball will travel in the visuals.
The horizontally rotating aiming degree of freedom does not have force feedback. It only controls the angle that the ball is launched from.
Processing Graphics
A significant part of our project was creating simple, recognizable graphics that would supplement our physical device. Since cup pong is a well known game in real life as well as virtually as an app, it was important to us to recreate visual experiences people would recognize. This also posed a unique challenge since it would be easy to tell if something felt unrealistic.
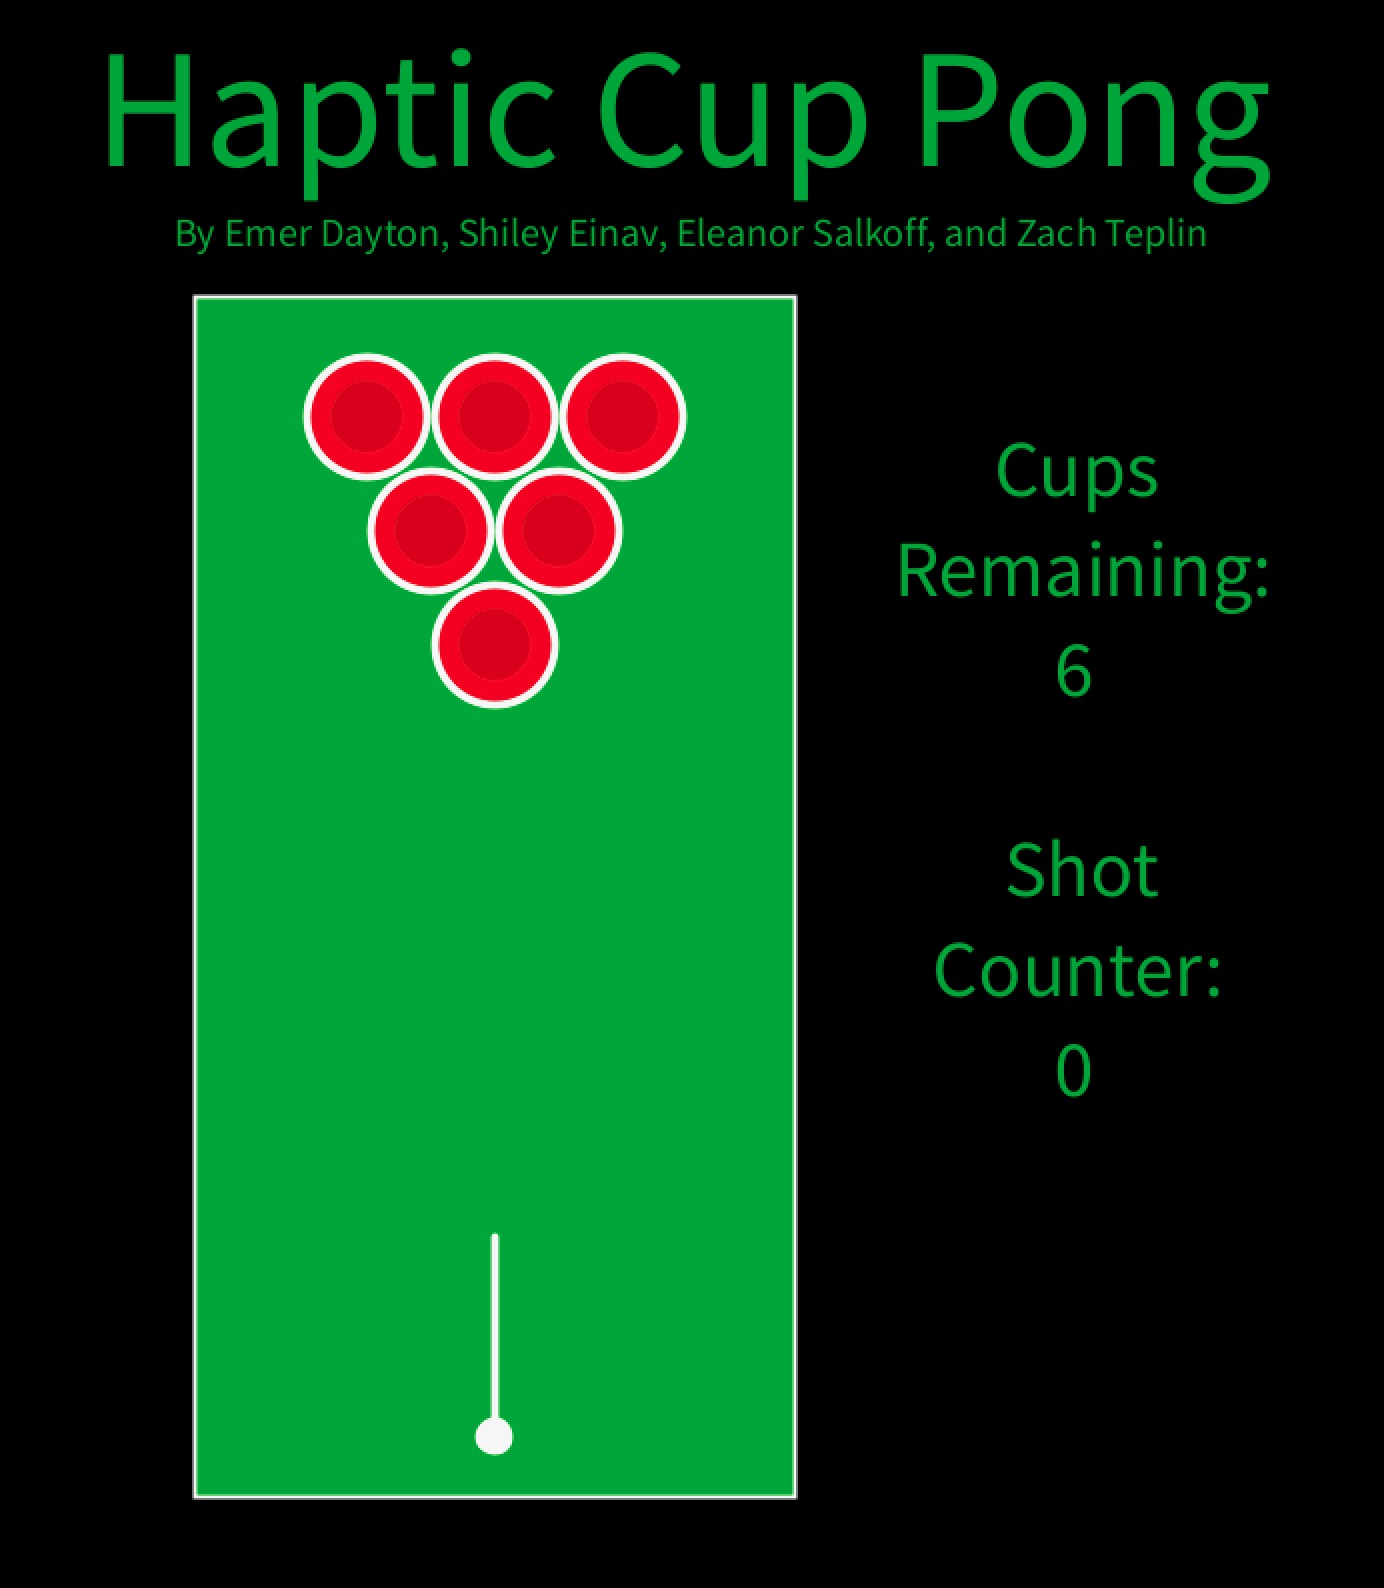
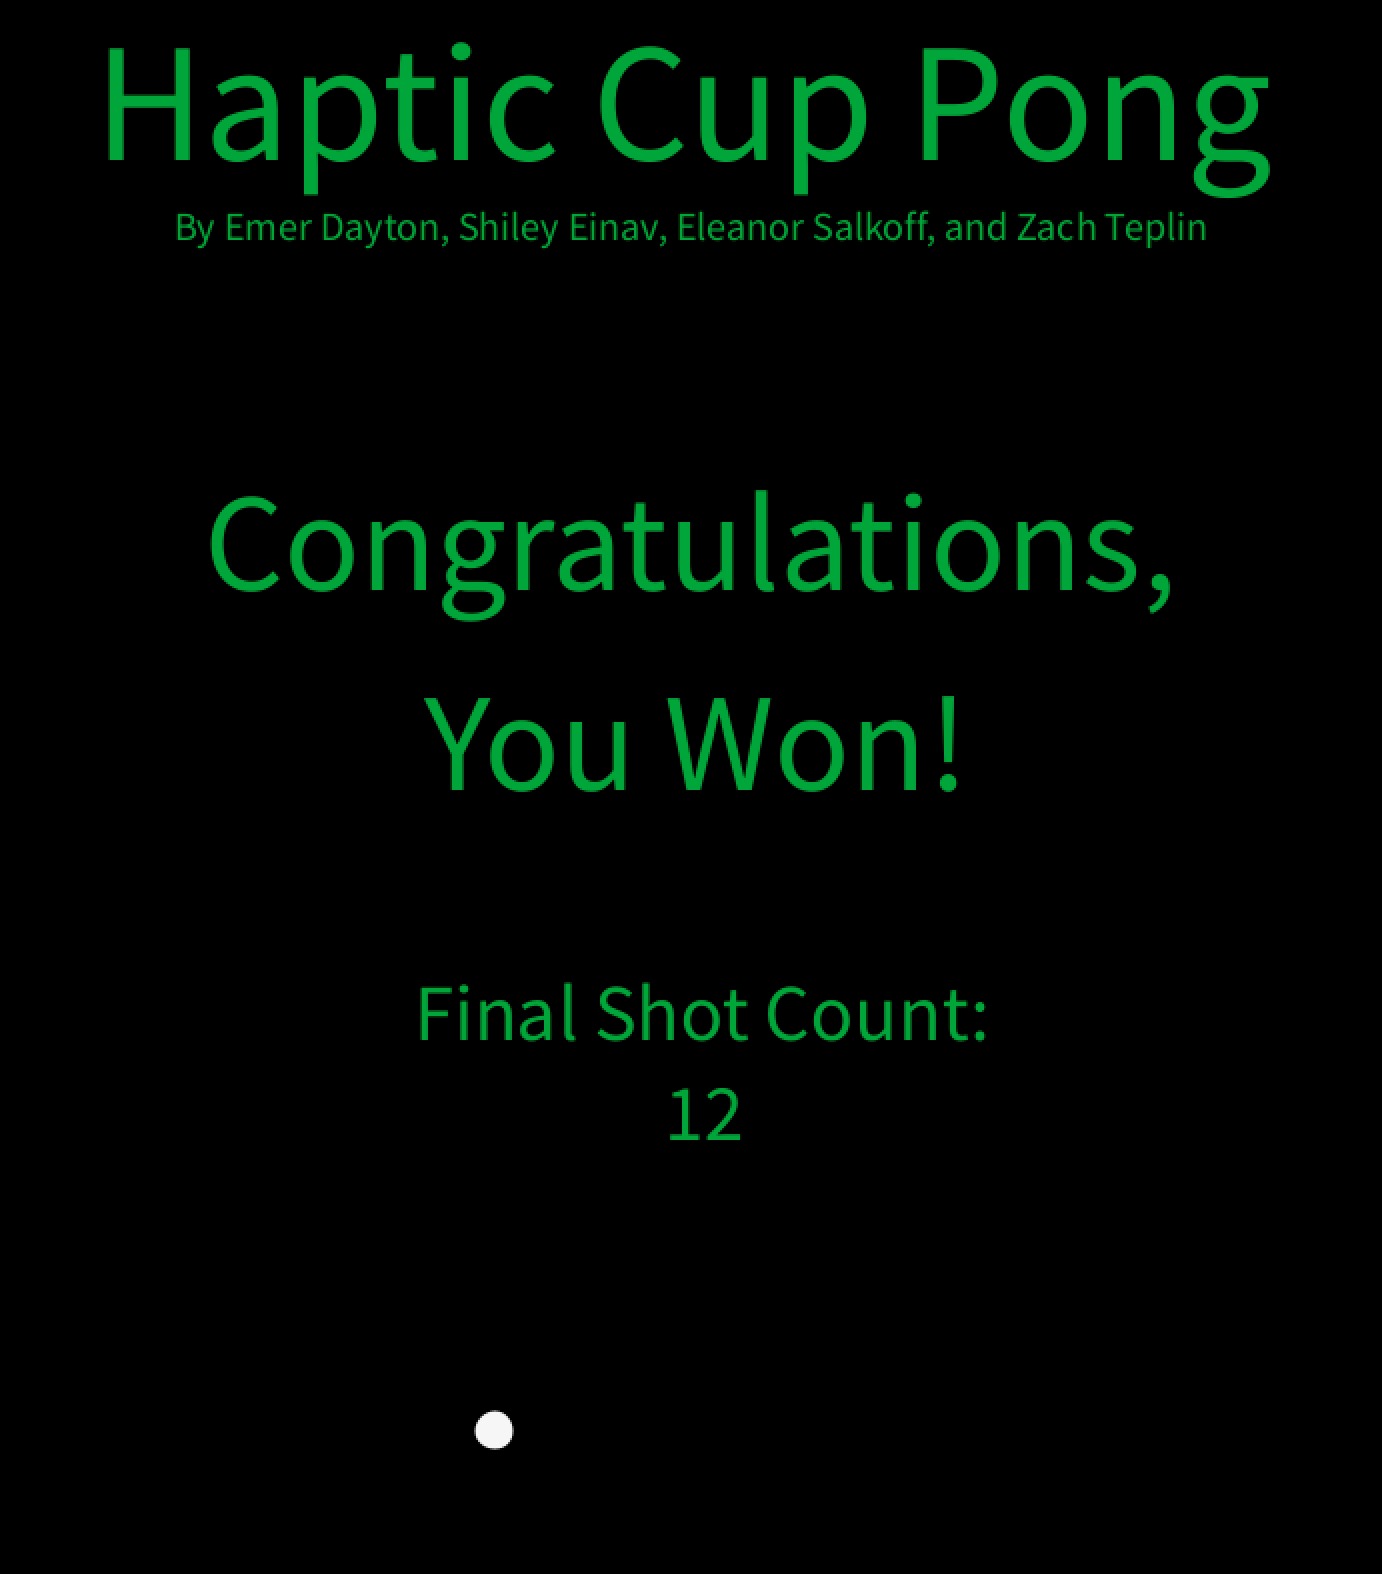
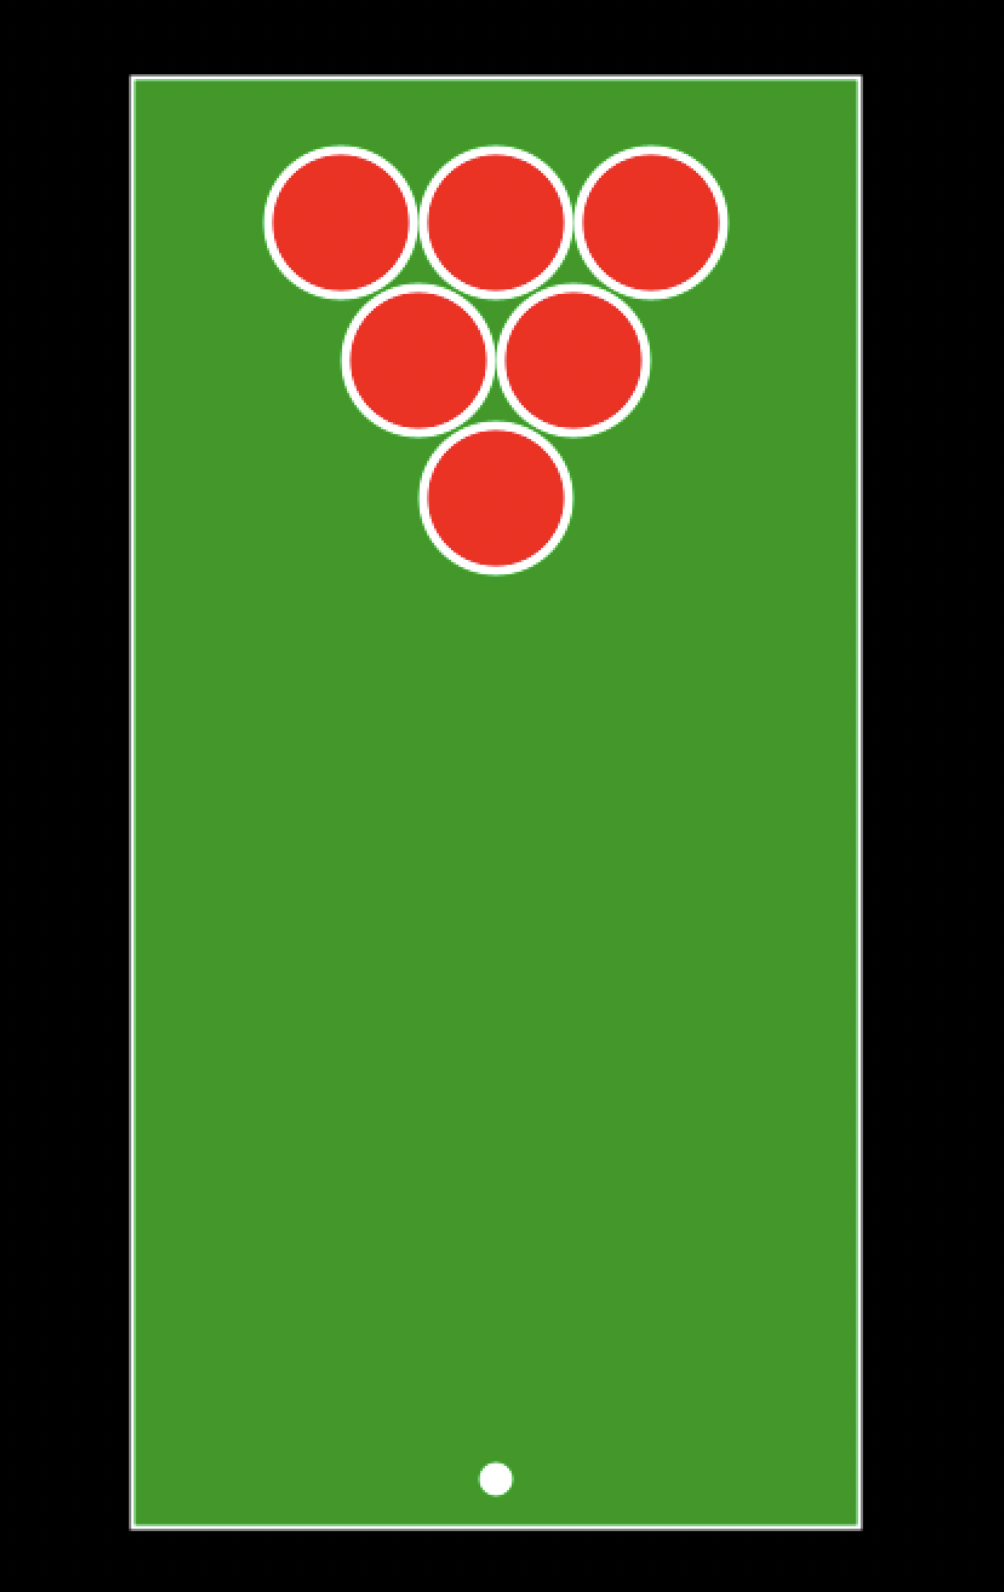
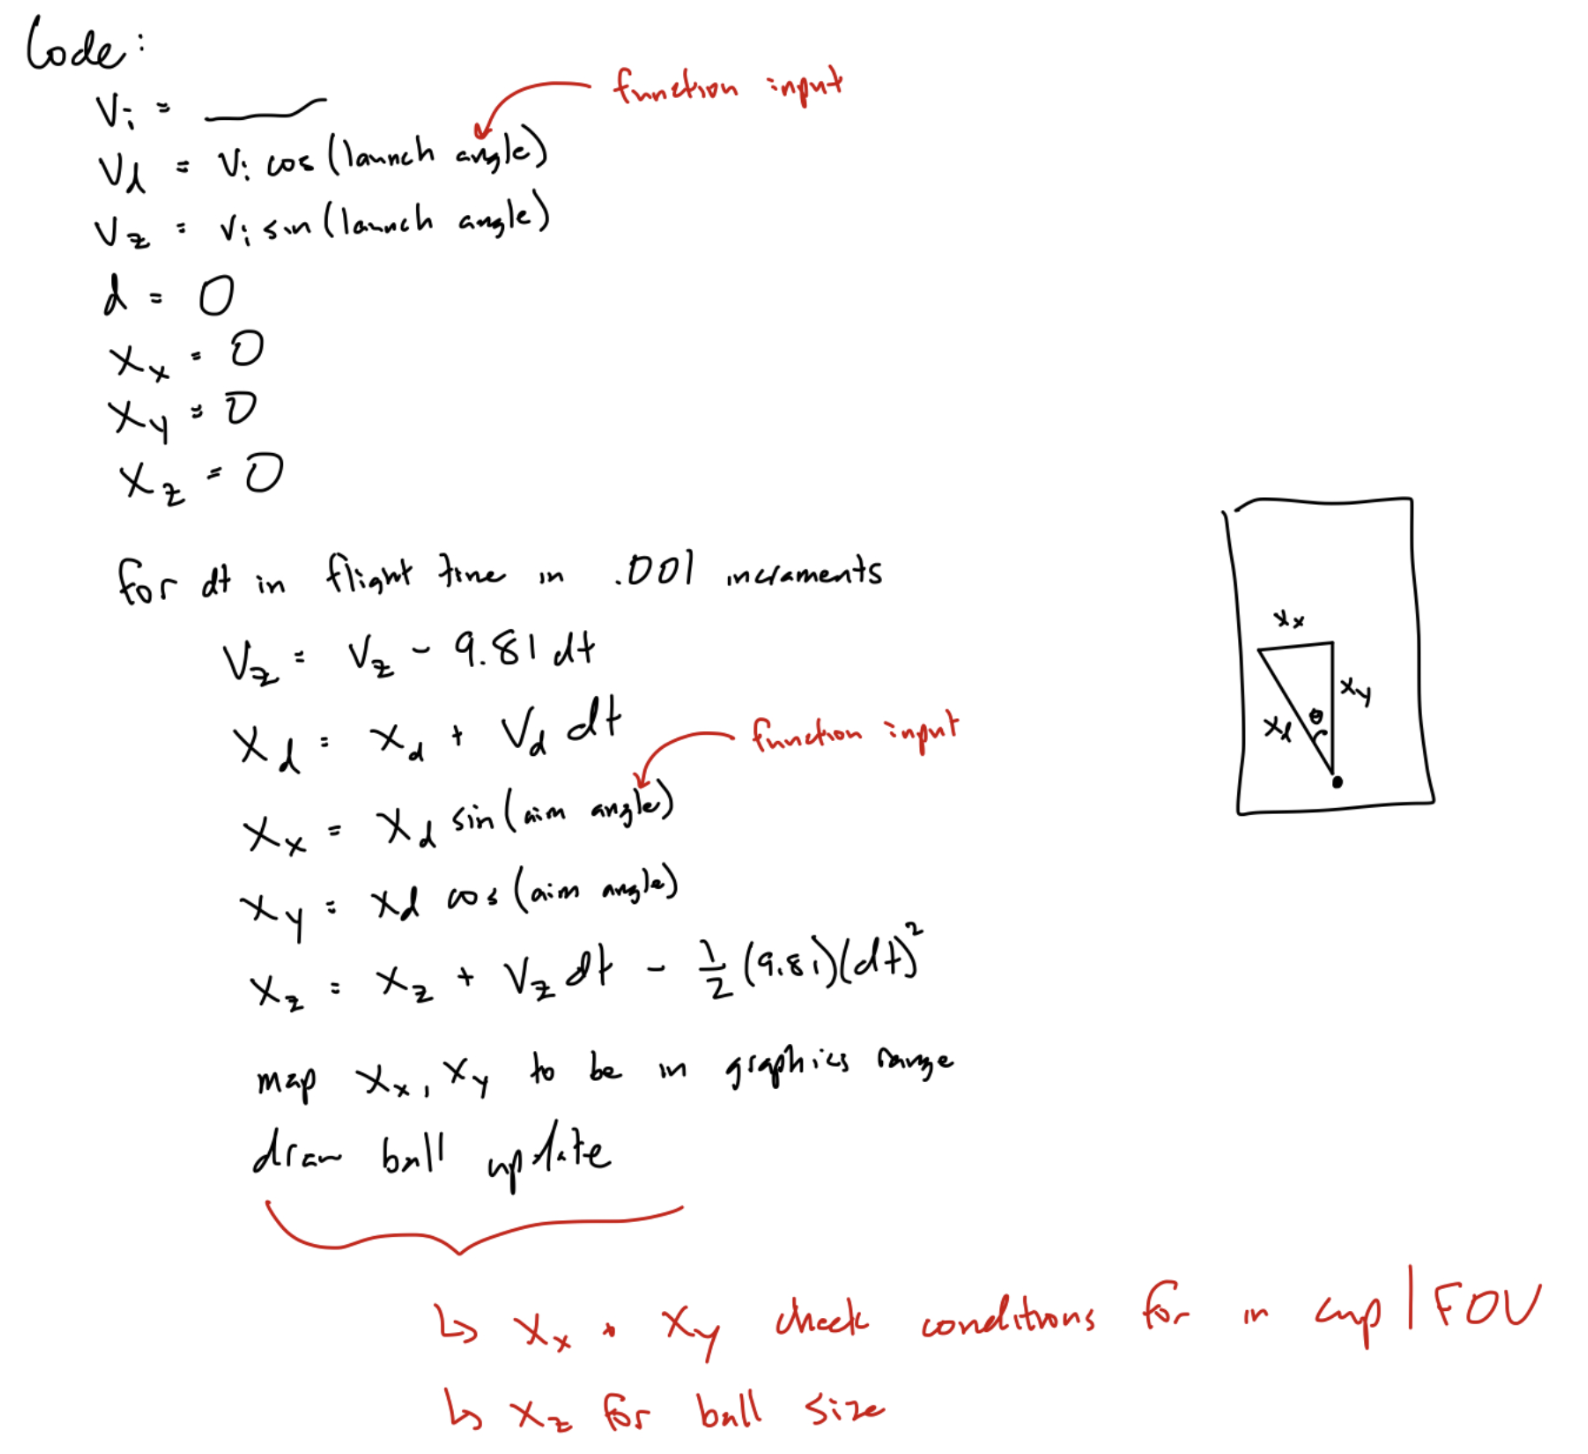
Our processing code reads in three pieces of information from the arduino script: launch handle position, launch handle velocity, and aim handle angle. These three data points are separated out for varying parts of the graphics. The launch handle position and launch handle velocity allowed us to create a trigger to launch the virtual ball, and the aim handle angle set the direction of the launch. We used the handle velocity to dictate how far the ball would travel on the screen. After this final position would be determined, we then created booleans to check flight path to determine when the ball would end as well as conditions for “landing” in the cup. Each cup had its own boolean status to determine if it would be drawn so we could create the effect of removing a cup if it was successfully made. Additionally, knowing the final ball position allowed us to change the ball width as it was in flight to create an illusion of a parabolic motion of a throw. The video in the demonstration section just below shows how this all came together. Finally, we added a counter of cups left and shots launched to keep track of scores for our players. Those who successfully made it in all six cups were then presented with a congratulations screen at the end. Below you can see a few visuals to describe these points.
System Graphics:
Demonstration & Application
For the study portion of our project, we had users play a round of cup pong with no haptic feedback, and then had them play a round with haptic feedback, and we compared their performance in both rounds. In addition to looking at whether the haptic feedback helped them improve, we had a qualitative survey asking them questions about how the haptic feedback changed their engagement with and enjoyment of the game.
Cup pong setup on demo day:
Results
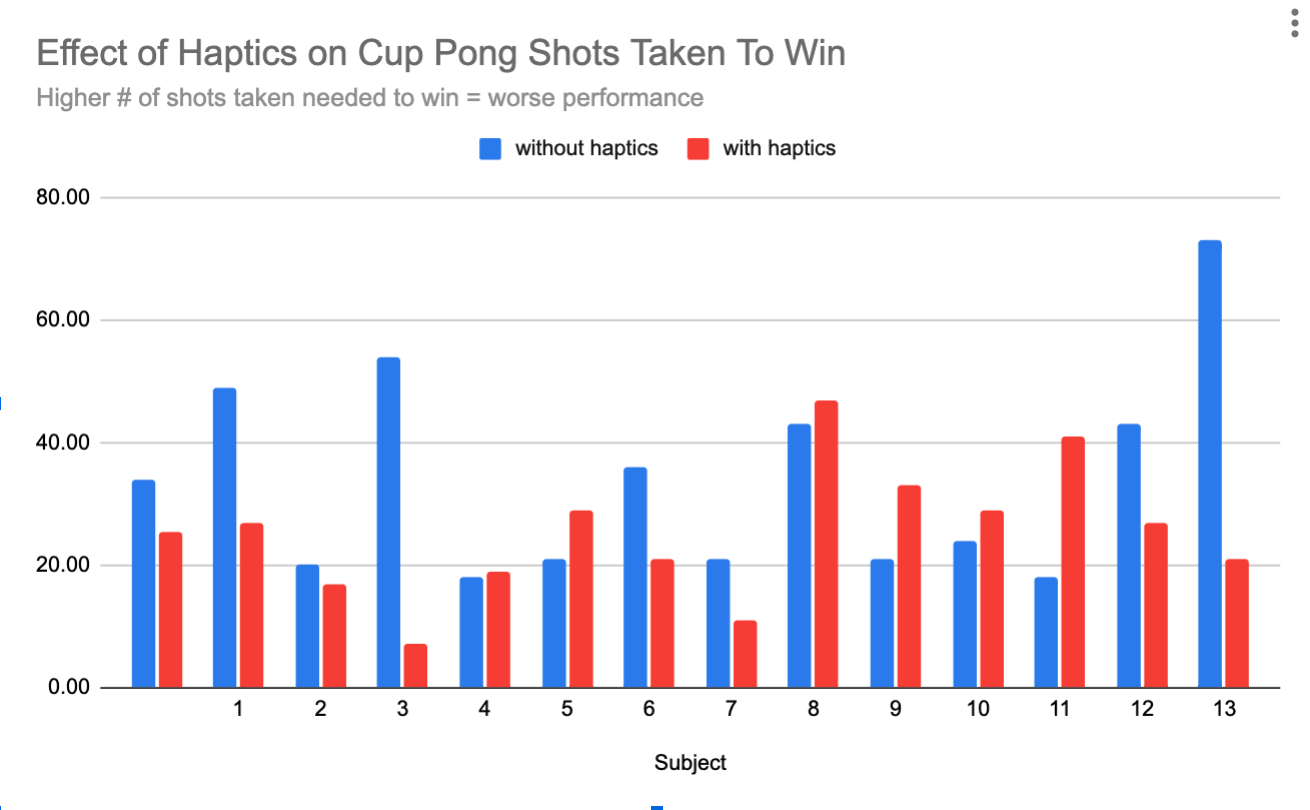
We collected quantitative and qualitative data on 14 study participants. For each participant, individuals played two rounds of the game, once with haptic feedback and once without haptic feedback. In both trials, visuals were still used to display if the ball was successfully thrown into the cup. For non haptic feedback rounds, the motor that normally enacts a force was unplugged. Thus, participants had to manually move the launching handle forward at their own desired speed in order to trigger the ball launching in the visuals. Overall, when participants played the game with no haptic feedback, the average number of shots they needed to take in order to win the game (get all six balls in six cups) was 34. With haptic feedback, the average number of shots needed was 25.
The graph below shows a comparison between the non-haptic game performance and haptic game performance for all 14 participants. The trend shows that with haptics (in red) participants needed to take fewer shots to beat the game, meaning that haptic embellishments improved their ability to use the system.
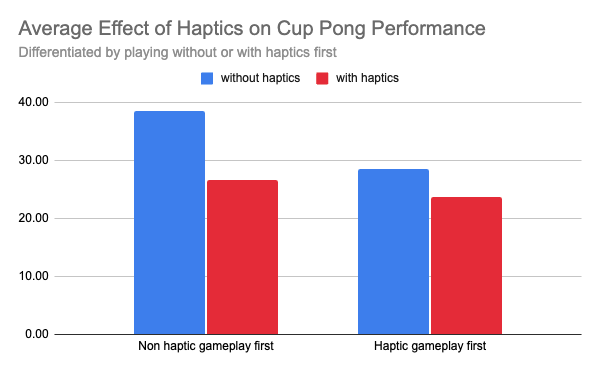
Additionally, we were curious to see how participant performance varied depending on if they played with or without haptic feedback first. Seen in the chart below, we found that improvement with haptic feedback is shown to be independent of order of game style, however there appears to be a greater improvement when haptic feedback gameplay came second. We believe that this demonstrated effect could be a combination of learning how to play the game along with added haptic control. When participants went from haptic feedback to no haptic feedback, they may already have a feel or have seen what handle velocities allow the ball to reach to desired targets, diminishing the perceived aid of the haptics. Still, there appears to be support that haptic feedback adds to game experience and user play level.
In terms of qualitative differences between haptic vs non haptic cup pong, participants said they felt like the control was better with haptics, and that the "slingshot feeling" of the haptic feedback felt "intuitive" and more enjoyable during the game. Qualitative feedback for participants is shown in this Google sheet below.
https://docs.google.com/spreadsheets/d/1lyrWe9eOvDkwgR7ladazNebIsTqnr8v1zR_07goi66Y/edit#gid=0
Future Work
Future work for our system and opportunity for improvement could test whether or not incorporating vibration feedback into the system improves the user’s success in launching the virtual ball into cups. The vibration feedback would guide the user as they launch the ball: to indicate if they are in an ideal “launch zone,” the aiming handle (horizontal handle) and catapult handle (vertical handle) would vibrate.
Vibration feedback in the aiming handle (horizontal hapkit) would indicate to the user an ideal position to launch the ball from, and a scaled vibration intensity in the catapult handle (vertical hapkit) would indicate to the user how far the released ball will travel. For instance, if the user moves the aiming handle (horizontal hapkit) to a zone that will successfully launch the ball into a cup if released, the handle will vibrate.
In our test, we would have two study groups: one set of users who use the system when the vibration feedback is activated, and one set of users who use the system without vibration feedback activated (the control group). We would collect data in the form of the users’ performances in the game, or how successful they are at launching the virtual ball into the cups. The study results would tell us whether providing vibration feedback to the user improves their success at the haptic cup pong game. If the user could be trained on our system and become more successful at it, it may improve user satisfaction and engagement.
Acknowledgments
We would like to thank Allison for teaching us and introducing us to the world of haptics. We would also like to thank all three of the CAs for their continuous support and advice during this project, and Connor for giving us help and suggestions during obstacles we encountered.
Files
CAD and DXF Files:
https://drive.google.com/drive/folders/14vhwyyDlqjMlye1Sk1-ts64Svl_gE_a4
https://drive.google.com/drive/folders/15oTs2x3UnWvXAK-2cRPHzp5r4hYnebmM
Bill of Materials:
https://docs.google.com/spreadsheets/d/1xF9tPxad1ptyGOd6BZ-6nBHMXBO1wRWAw--R3AHWuyU/edit#gid=0
References
[1] Singhal, T., & Schneider, O. (2021, May). Juicy haptic design: Vibrotactile embellishments can improve player experience in games. In Proceedings of the 2021 CHI Conference on Human Factors in Computing Systems (pp. 1-11). https://dl.acm.org/doi/abs/10.1145/3411764.3445463
[2] Faust, M., & Yoo, Y. H. (2006). Haptic feedback in pervasive games. Proc. PerGames. https://citeseerx.ist.psu.edu/document?repid=rep1&type=pdf&doi=2d5568e9cc9d736e8d3449c73c946f1345a79611#page=19
[3] Kirginas, S. (2022). Exploring Players’ Perceptions of the Haptic Feedback in Haptic Digital Games. Journal of Digital Media & Interaction. 5(13), 7–22. https://proa.ua.pt/index.php/jdmi/article/view/30771
Appendix: Project Checkpoints
Checkpoint 1
We were able to meet all of our checkpoint 1 goals:
1) Create a CAD model of our mechanical system The first screenshot shows our CAD model of a horizontal hapkit handle on a lazy susan turntable and a vertical hapkit on the center of the turntable.
A closeup and cross section show the part of the assembly on which a motor and capstan will be placed to sense the rotation of the turntable.
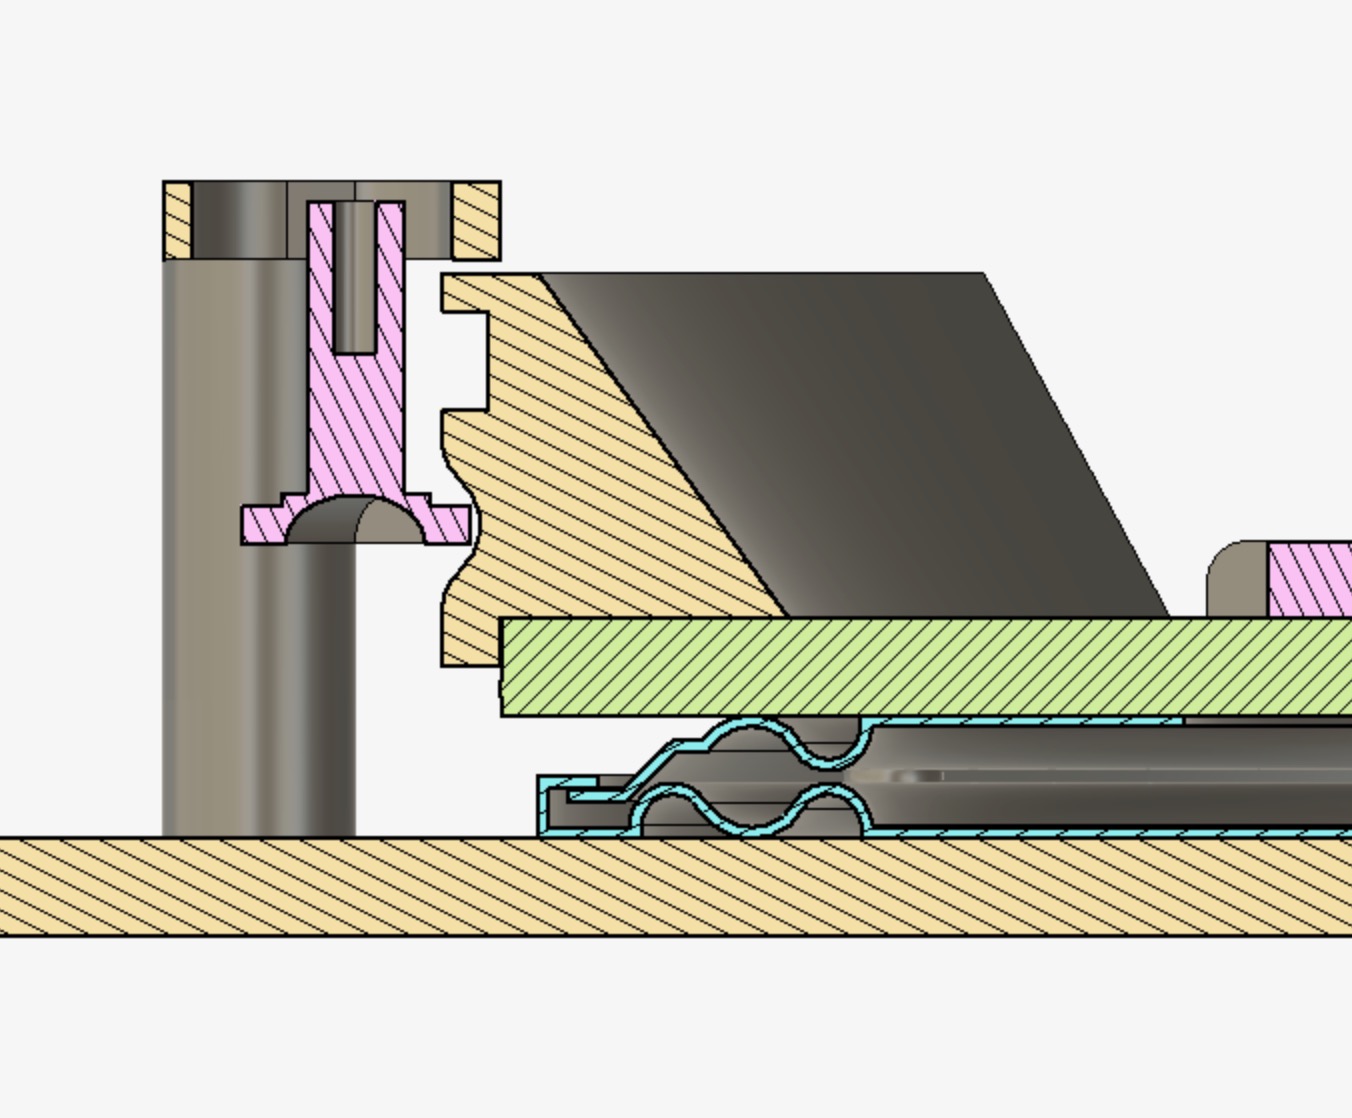
The last picture below shows a concept of what the turntable will look like.

2) Create a first draft of arduino code for the “catapult” hapkit We are using the ardiunos to send the handle position relative to the “wall”, the handle velocity, and (eventually) the lazy susan hapkit angle to processing. So far, we have focused on the vertical hapkit, which acts as a slingshot. To create this slingshot feeling we modeled the vertical hapkit as a mass damper system with a stiffness constant.
3) Set up processing visuals for the game We have preliminary flight kinematics and visuals worked out, showing the cups and ball, but need to tinker parameters and get the ball to “launch." All projectile motion kinematics are being calculated in processing.
Checkpoint 2
We were able to meet all of our checkpoint 2 goals: 1) Finalize the CAD model of 2 DoF hapkit system enclosure
For our first checkpoint, the CAD of the internal structure of the system (both hapkits and the turntable) was completed. For the second checkpoint, the CAD model of the system enclosure (the box shown in red and white below) was completed. The enclosure has a hole at the top to allow the user to interact with the vertical hapkit (shown in dark gray), and a slot on the side to allow the user to interact with the horizontal hapkit (shown in white).
2) Manufacture and assemble all of the physical system components
The subcomponents of the system and system enclosure were laser-cut out of acrylic and 3D-printed in PLA plastic. We assembled the enclosure with nuts and bolts from McMaster.
The enclosure:
The turntable, which the horizontal hapkit (which changes the ball’s launch angle) is connected to, is purchased from McMaster.
The turntable assembly:
3) Finalize code in Arduino that incorporate both hapkits in separate scripts One script reads the launch angle of the horizontal hapkit Second script reads the position and velocity of the vertical hapkit (“catapult”)
A challenge that we faced during this step was how we would simultaneously run both hapkits’ arduino scripts, and also send correctly-packaged information to Processing. We were able to run both arduino scripts at once, but only one script could be sent to Processing. We solved this problem by using I2C communication, which allows synchronous serial communication between “sender” and “receiver” boards. The horizontal hapkit script was embedded in the vertical hapkit script by using functions from the Wire library to allow for communication between the boards. Then, the vertical hapkit script would be sent to Processing, containing information for not only the vertical hapkit (the “catapult”), but also the horizontal hapkit (the “turntable”).
The screenshots below show some of the finalized arduino code for the first and second hapkit, with the I2C communication code added.

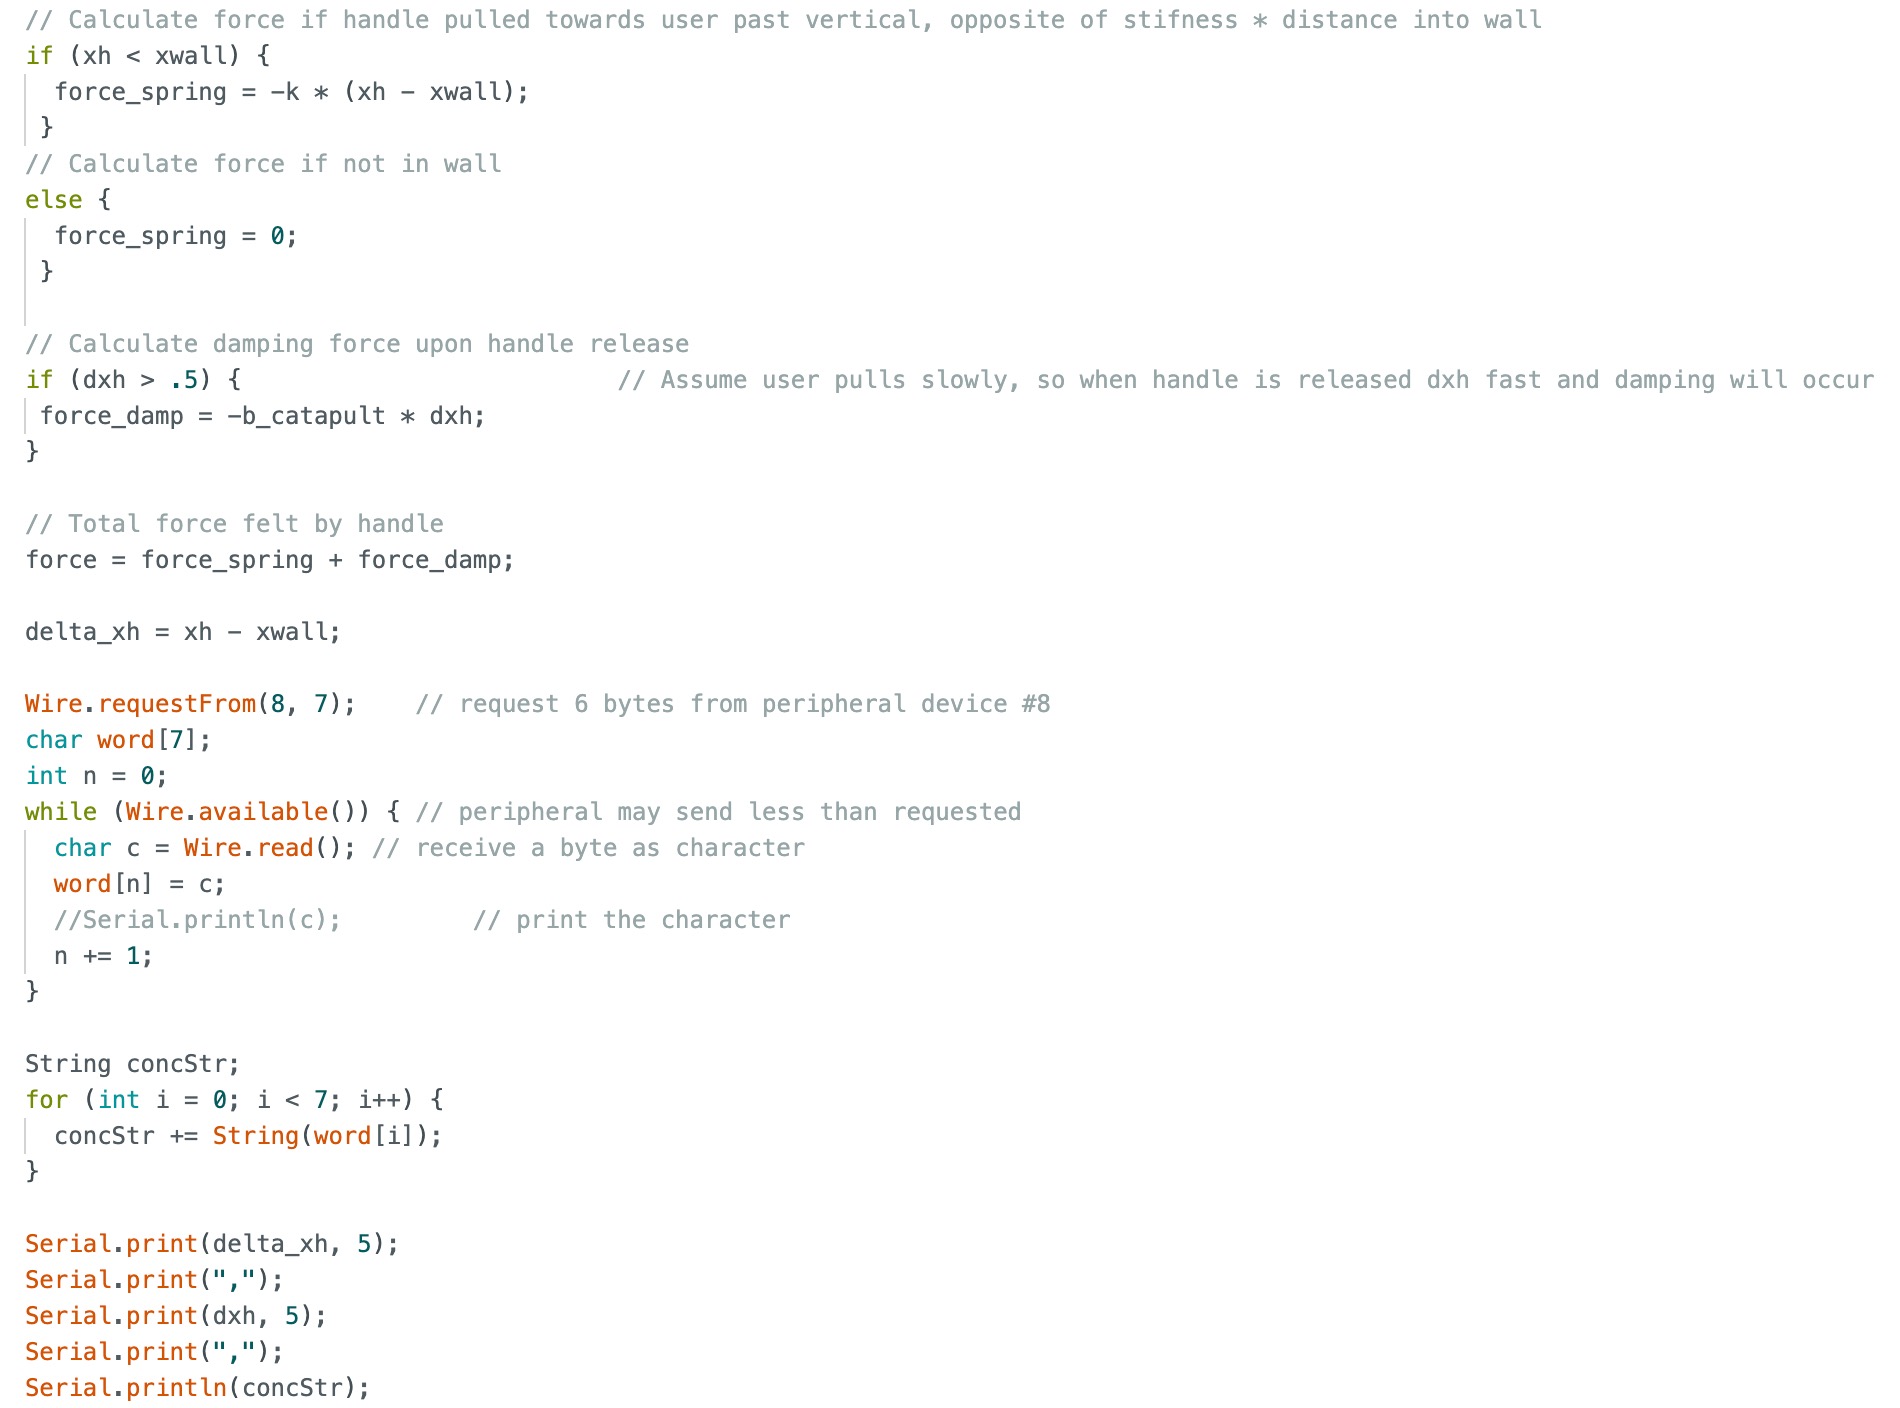
4) Write draft code for the system visuals in Processing for both hapkits
The structure of the Processing code has been set up and it can successfully read in the code from both hapkits in arduino. The ball is able to launch using the vertical hapkit, and it can be aimed using the horizontal hapkit.
The remaining work for the project is to finalize the system graphics in Processing. We are able to show the direction of the ball’s flight path but the movement of the ball itself is choppy, and it does not always reset correctly. Our last step will be to polish the code in Processing and add code to show the ball entering the cup in a realistic way.