

2023-Group 7
Haptic Virtual Claw Game

Virtual Claw Game Project Members
Project team members: Alyk Moomaw, Karina Ting, Heidi Kwong, Rohith Chintala
Our team developed a virtual arcade claw game wherein a user presses keys on the computer to move a claw in 2D space and uses a Hapkit to open and close the claw around an object. We also employ vibration motors to communicate when the object is slipping from their grasp. The use of haptic feedback to inform this process allows the user to intuitively understand the amount of force required to lift an object of a certain mass and to keep a firm grasp on it, finding a sweet spot of force that is neither too small (dropping the object) nor too large (breaking the object). We ran a user study comparing the success rate with and without slip-induced vibration, which showed that the addition of this feedback did not significantly affect performance but did heighten the gaming experience. Continued research in this direction would involve the further development of the hardware to avoid issues like position drifting and to adjust the user grip to be more realistic.
On this page... (hide)
Watch the claw game in action here! Attach:clawgame_demo_video.mov

Demonstration day setup
Introduction
The human sense of touch provides us with a huge amount of intuitively understood information. A vast array of mechanoreceptors, located at varying skin depths with varying surface densities and response times, provide humans with near-instantaneous tactile information on texture, temperature, force, and more. When this sense is removed (i.e. by numbing a person’s fingertips with localized anesthesia), humans struggle with relatively simple tasks like picking up a match and lighting it. Without the tactile information, the process of figuring out the appropriate amount of force and how to apply it is deeply tedious.
Playing an arcade claw game is not dissimilar to using a set of numbed fingertips. Without understanding the weight/texture/shape of the object by touch, nor the force applied by the claw, it requires a huge number of tries to succeed, if a player is capable of succeeding at all. A simple task—picking up a stuffed animal—becomes frustrating. But what if this task could be supplemented by haptic feedback? What if a player could feel the claw closing around the object, or feel the object slipping from their grasp? We sought to answer this question by developing a virtual version of a claw game, supplemented by force and vibration feedback.
We created a virtual claw game paired with a haptic device for two purposes: (1) to improve a user’s performance at a claw game by providing haptic feedback, and (2) to evaluate the effectiveness of conveying a slipping sensation through cutaneous vibration. Force feedback in tasks like grasping and moving objects has the potential to improve performance of robotic arm teleoperation; while conveying slip has particular utility in fields where there is a limit on the maximum force used by the actuator. Conveying slip through haptic feedback allows an operator to maintain the minimum required force to lift an object. Applicable industries include robotic surgery or construction where too high a grasping force may cause damage.
Background
Researchers have previously tested slip feedback conveyed through vibration for the purpose of better performance in grip tasks [1]. Vibration feedback was given to the user on the upper arm with visual feedback from a virtual environment and force feedback from a Sensable Phantom Desktop device. The experiments involved a falling object simulated in the virtual environment. Users would be told to hold the object against a wall with enough force to stop its motion. If the force applied was too large, the user was notified that the object was “breaking” [1]. Users completed multiple trials with variations better being provided visual feedback, force feedback and vibration feedback. It was found that under the no visual feedback condition, the use of vibration feedback resulted in significant improvements of slip recovery.
In “Haptic feedback for improved robotic arm control during simple grasp, slippage, and contact detection tasks” researchers explore whether visual, vibrotactile, and/or pressure feedback improves performance for detecting slip, detecting contact, and controlling grasp for a robotic manipulator [2]. In the context of designing prosthetic devices, vibrotactile feedback was applied on the neck for heightened sensitivity over the arms and pressure feedback was applied to the arm. Slippage of a grasped object was detected best by vision, followed closely by vibrotactile feedback, and worst by pressure feedback. Vibration feedback outperformed visual feedback for identifying the moment of contact between manipulator and object. Controller gripping force and object placement was executed most precisely and quickly with combined visual and pressure feedback. These results are relevant to our decision to integrate vision and vibrotactile feedback which were most useful for the slippage task.
Researchers also studied the connection between the haptic device “SpinOcchio” and visual rendering for a user for the purpose of understanding haptic-visual congruency [3]. The SpinOcchio device simulates slipping on the fingertips by rotating disks held by the user's index finger and thumb. This device allows for the feeling of slip to be controlled through the moderation of the speed of rotation of the device and its direction. The first study conducted was to find the Just Noticeable Difference for the SpinOcchio device. Participants were asked when a feeling of slip was felt with tests conducted on rotation of both the thumb and index finger and just the index finger. It was found that the rotation performed over the index finger had a lower threshold for noticeability than the rotation over both the thumb and index finger. While surprising to the researchers, the explanation for this finding was deemed to be out of the scope of the project. The second study conducted was to compare different directions of rotation for the SpinOcchio paired with a visual rendering of an object. These tests were split into active and passive control where the user's hand would be free to move along an object or the object would move along the user's fixed hand. This study found that congruency between the visual rendering and the haptic slip feedback had the highest degree of realism while other direction pairs were lower on the provided scale. However, the use of haptic slip feedback in all directional cases was found to be much higher than the purely visual case with no feedback. The third study conducted was aimed to quantify the realism that users of the device felt when interacting with a virtual environment through the device. By quantifying user’s thoughts on a scale from 1 to 7, the researchers concluded that participants enjoyed the use of the device with a high degree of immersion and feeling of realism. This paper is relevant to this project as results of studies 2 and 3 indicate the benefits of using a haptic device to replicate slip for a sense of realism of a virtual rendering. Specifically in study 2, it was found that the visual rendering alone had a much lower ranking of realism than when compared to any of the directions of slip tested. This finding can be extended in this project to see if the vibration feedback provides additional information to the user to better understand the gripping of an object.
Methods
Code
The implementation of a virtual environment and haptic device was completed through the back and forth communication between Arduino and Processing. While the Hapkit claw pinch mapping, object dynamics, and force information were calculated in the Arduino code, Processing collected key press information for the display of the movement of the claw. This required information to be passed from Processing to the Arduino and back while both are simultaneously running. This was completed by using a print and wait system where Arduino would send information on the serial port and wait until information was received over serial communication before sending again. Processing would similarly wait to receive information before sending. This allowed information to be passed in both directions while each program could still run other loops continuously. The implementation of this communication was adapted from the one detailed in https://learn.sparkfun.com/tutorials/connecting-arduino-to-processing/all.
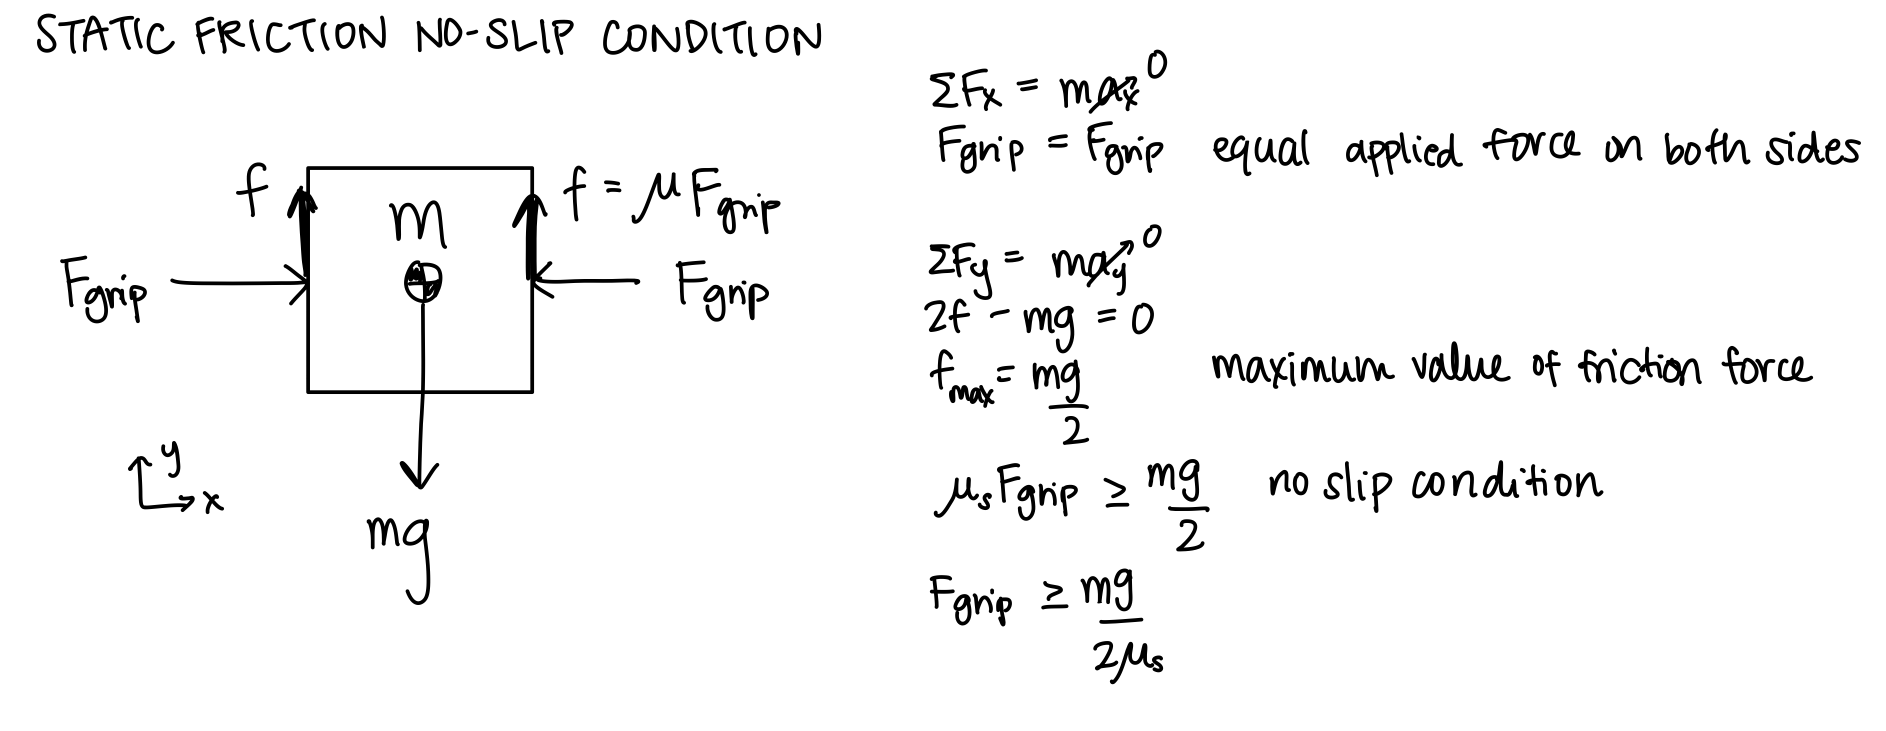
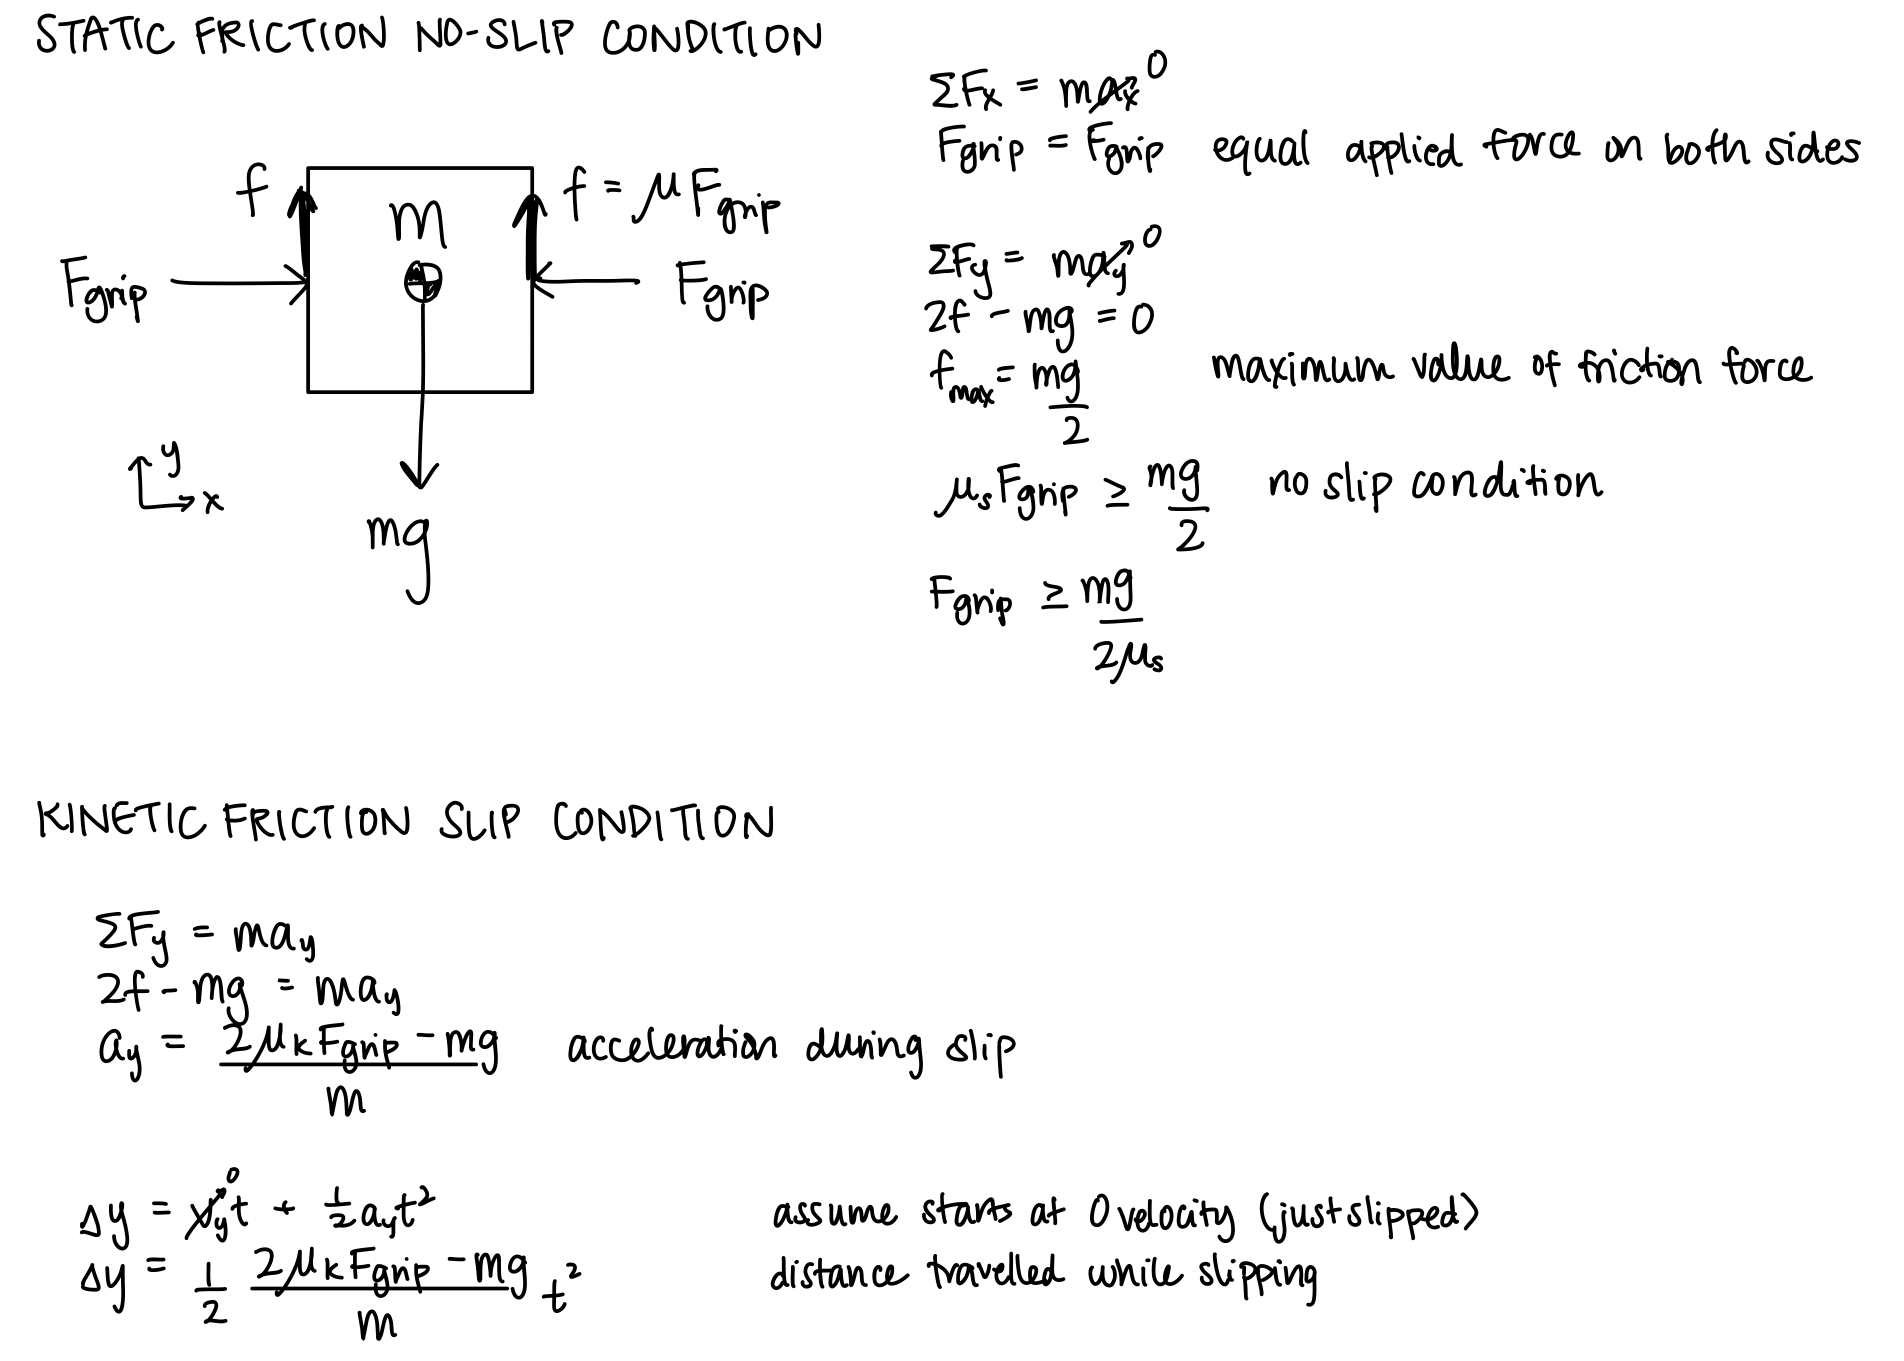
Object dynamics in the vertical direction were simulated using the framework introduced in “Lecture 7: Hapkit Rendering”. The force of gravity and the force of friction were summed to find the total force on the object. The object's acceleration was found by dividing force with the object mass and this acceleration was numerically integrated to find the object velocity and the object's position. This position was then sent to Processing for visualization. This approach is what allows for the object to realistically fall to the bottom of the visualization when the force of friction from the normal force applied by the claw is not enough to keep the object in equilibrium. The calculations of the forces for the object dynamics completed for this project are included below.
The values sent from Arduino to Processing include the X and Y position of the object, the opening amount of the claw mapped from the Hapkit handle, and lastly a boolean value indicating whether the maximum force threshold is reached. From Processing, the X and Y position of the claw, a boolean indicating whether the claw has made contact with the object, and a boolean indicating whether the visualization has been reset is sent.
The Arduino code sets the forces for the Hapkit using the formulas developed in the course homeworks. The object is treated as a virtual wall with a stiffness of 80 N/m which is converted from force to output torque for a Hapkit. This stiffness was found through testing among team members to find the best feeling values for feedback. The force condition to check whether the user has appleid to much force is similarly checked through the position that the Hapkit handle travels through the object. If the users pushed too far into the object indicating that too much force is applied to the object through the virtual wall, then the user will lose and the “broken” boolean value is sent to processing as true. If the reset button is pressed, Processing indicates this through the reset boolean sent to Arduino. This causes the mapping calculation from xh to the claw open amount to be adjusted to account for the new zero location of xh. This was found to be necessary as slip was very common throughout or testing resulting in xh not matching its true value. With this functionality, if slipping occurs, the simulation can be quickly reset without restarting the whole program.
The vibration motors are activated if there is relative velocity between the object and the claw and the applied nonzero contact force is not enough to lift the object. This indicates that the claw is moving without the object. A 59% duty cycle is applied to the vibration motors in this case to simulate slip feedback. This duty cycle was found to feel the best with a balance of being noticeable enough to be felt without being too strong to a point that disrupts the feelings of slip.
All visualization code was completed in Processing. The W,A,S,D keys and arrow keys were enabled as inputs for the movement of the claw to allow the user to choose which feels best for control. By reading these key inputs directly from Processing, the user's inputs are more quickly visualized which helps with the feeling of responsiveness of the claw game. If the R key is pressed, the visualization of the claw gripper is reset to the open position and the Arduino is sent a boolean indicating this reset has occurred. The win condition checks that the object was placed in the goal bin to the right of the screen while the lose condition checks if the user applies too much force as described earlier in the Arduino description. Images for these two conditions in addition to the standard visualization are included below. All code is attached in the files section of this page with comments indicating function.

Game graphics during normal game play, winning, and losing
Hardware design and implementation
The Hapkit was used as a starting point for providing haptic feedback to the user. The main structure of the Hapkit was modified with a new upper handle to accommodate an additional bearing attached to a thumb finger grip. Since the Hapkit handle moves in a curved arc, the bearing allows the user to maintain pinching motion in the plane parallel to the ground. Moreover, its freedom to rotate prevents the vibration from dampening out. During development we discovered such dampening when the vibration motor was compressed between the finger and a grounded surface. Because of this, the vibration motor in the opposing grip is constrained loosely by tape rather than held coincident to the system frame. The grip itself is also kept stationary as we found a unilateral pinching motion to be sufficiently compelling for the game. Each grip houses a vibration motor that rests roughly in the middle of the fingerpad and has slots for hook-and-loop fasteners that secure the finger to the grip. These custom designed pieces are pictured below.


Moving and stationary finger grips
The remaining structure of our design was assembled using 80/20 T-slotted aluminum. The base of the Hapkit, opposing finger grip, and breadboard are attached directly to it. Its modular structure was particularly helpful for tuning the grip positions. The height of the thumb finger grip aligns with the moving finger grip at the closed pinch position. The slight height offset during the remaining range of motion is not uncomfortable when the thumb is strapped to the moving grip. A c-clip that fits around the Hapkit base vertical post was created to reduce flexing of the Hapkit handle out of its plane of motion. It along with the existing bearing constrains the distance between handle and the base. Maintaining a consistent orientation is critical for accurate magnetometer sensing thus measurement of handle rotation. An image of this clip is included below.

C-clip for handle positioning
Images of the fully assembled device is included below.


Final assembly front and right view
Results
We compared user performance with and without vibrational tactile feedback in a user study. We hypothesized that including vibrations would improve the user's ability to complete the placement task without breaking the box since it simulates biological feedback. Nine users each played the claw game six times, where trials for a particular vibration mode were done consecutively. We randomized which vibration mode was applied first to reduce the effects of learning from our results.
Total successes with vibration was 13 and without vibration was 15, corresponding to accuracy of 48% and 53%, respectively. These success rates are marginally different from random results so the effect of vibration is not quantitatively significant. One explanation for the mix of results is that the user would not experience the vibration if they tried to modulate grip force while the object was on the ground without translating up and down. Therefore, variations in task approach affected whether the vibrational feedback was used as a tool. In general, users performed better with more practice playing the game regardless of the vibration mode pattern over time. An interesting observation for the with/without mode is shown by the line graph. There was steady improvement when vibration was first applied followed by decline in performance when the sensation was lost, despite the fact that the user had acquired experience playing the game. For the without/with mode, the average number of successes with vibration was at least par to without vibration. These trends hint at favorability for vibration but require further study. A metric that was not examined but could be more indicative is the time it takes users to complete the task.
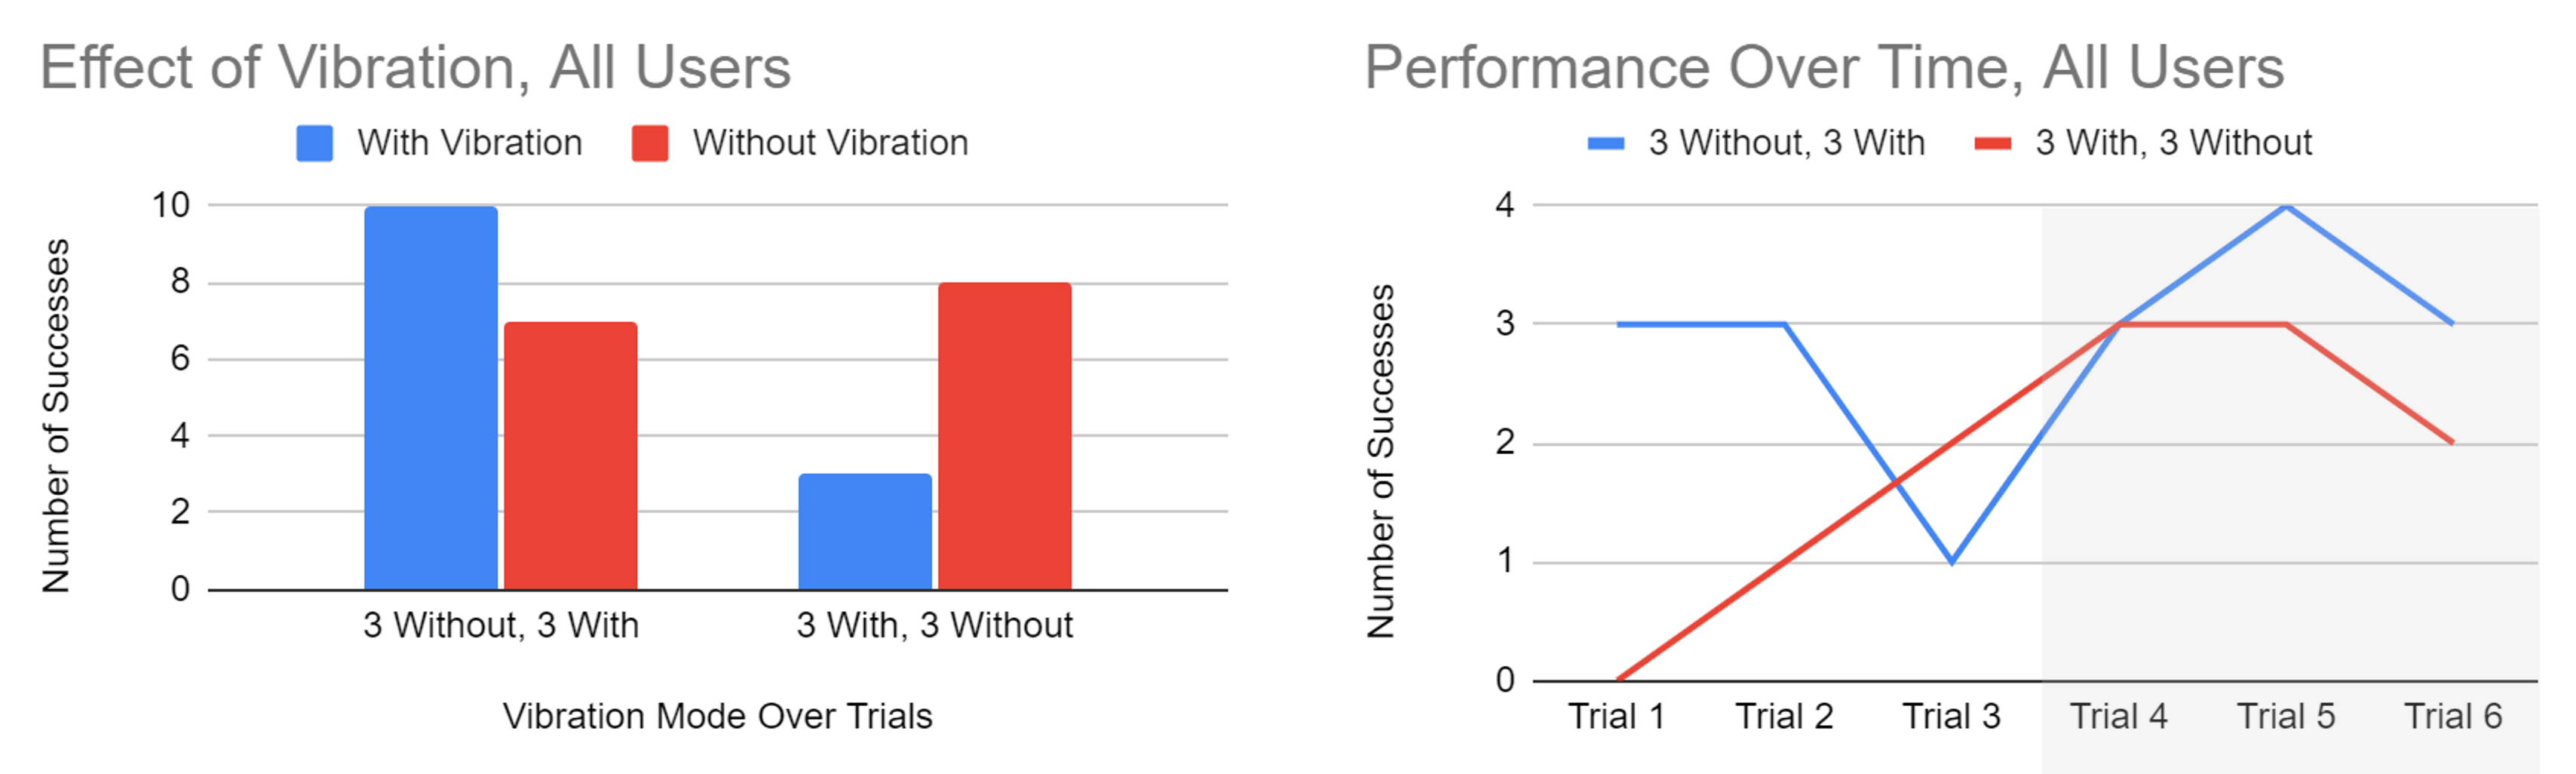
User study results. Gray shading marks change in vibration feedback (With or Without).
While the quantitative study did not have significant results, qualitative feedback was collected from participants of the user study and during the demonstration day. A consistent comment made by users related to the realism of the feeling of slip from vibration. Users believed that this feedback made the claw game not only feel better, but added information to identify when the object was slipping. Additionally, users noted that the feeling of the claw popping off of the object edge was satisfying and made the simulation truly feel like the object was physically losing grasp. The vibration was also complimented as feeling consistent throughout the duration of slipping. Overall, users were impressed with the feeling of slip simulated by the vibration and appreciated its inclusion in the claw game.
Future Work
The realism of the virtual claw game could be heightened on multiple fronts. Mechanically, our current design keeps the thumb stationary during grasping. Developing a linkage to couple the index finger and thumb motions to mimic human gripping motion could make the action feel more natural for the user. Apart from the object grasping interaction forces, effects from collisions between the claw and other game obstacles are not rendered haptically. Horizontal velocity of the claw-object system currently does not affect the trajectory of the object once it is released. Correcting for these details would provide more stimuli to the user that may improve their sense of embodiment of the claw and overall game quality. Additionally, further testing could be done to clarify the usefulness of adding vibration feedback with the addition of time of completion as a variable for further data as stated in the results section.
An application of our claw game that could be implemented with minimal changes is simulation training for teleoperated construction. The object mass, stiffness, and coefficient of friction can be easily tailored to produce the desired object dynamics and the keyboard keys can be mapped to the corresponding machine controls. An interesting modification would be to change the gravity constant to simulate construction in space!
Acknowledgments
Thank you to the teaching staff for all of the debugging help and suggestions on how to improve our device!
Files
Bill of Materials: Link
References
[1] J. M. Walker, A. A. Blank, P. A. Shewokis, and M. K. O’Malley, “Tactile feedback of object slip improves performance in a grasp and hold task,” in 2014 IEEE Haptics Symposium (HAPTICS), Feb. 2014, pp. 461–466. doi: 10.1109/HAPTICS.2014.6775499.
[2] M. R. Motamedi, J. -B. Chossat, J. -P. Roberge and V. Duchaine, "Haptic feedback for improved robotic arm control during simple grasp, slippage, and contact detection tasks," 2016 IEEE International Conference on Robotics and Automation (ICRA), Stockholm, Sweden, 2016, pp. 4894-4900, doi: 10.1109/ICRA.2016.7487694.
[3] Myung Jin Kim, Neung Ryu, Wooje Chang, Michel Pahud, Mike Sinclair, and Andrea Bianchi. 2022. SpinOcchio: Understanding Haptic-Visual Congruency of Skin-Slip in VR with a Dynamic Grip Controller. In Proceedings of the 2022 CHI Conference on Human Factors in Computing Systems (CHI '22). Association for Computing Machinery, New York, NY, USA, Article 433,
Appendix: Project Checkpoints
Checkpoint 1
The goals for checkpoint 1 were: (1) claw and object (with specified size, mass, and coefficient of friction) rendered in Processing, (2) able to move claw side to side and up and down using arrow keys, (3) able to open/close claw and vary gripping force using Hapkit 1 handle position, and (3) rendered object falling out of claw in case of slip.
The project has been redefined slightly based on the feedback received on our project proposal. Instead of using two Hapkits (one for opening and closing the claw and one for moving the claw up and down), we are only using one Hapkit in a device that makes a more compelling simulation of gripping an object. We are using the keyboard key presses to move the claw in all four directions.
For Checkpoint 1, we completed a CAD of our gripping device, as shown below. We will attach one side of the gripper to the Hapkit handle using a bearing so that the gripper can stay vertical while the Hapkit handle moves in an arc. The other side of the gripper will be stationary, attached to a wall that comes up from the base. The slits on the finger pads will be used to loop Velcro, which will be used to secure the user's finger to the finger pad. Each finger pad also has circular cavities to hold the vibration motors for slip detection feedback.

We also completely rendered the claw behavior in Processing. Using the W, A, S, and D keys, a user can move the claw in any direction. At this point, with Arduino code still under construction, we also need to be able to use the keyboard to open and close the claw so that when the Arduino code is ready to be tested, we can easily pass parameters from Arduino to Processing and use the Processing graphics to debug the dynamics code in Arduino. So, a user can now open and close the claw using the L and J keys, but these will eventually not be used.
Object dynamics will also be rendered in Arduino, so the object to be picked up does not move yet. However, preliminary calculations have been made to model object grasping and slipping. Assuming the user’s input force is applied equally to both sides of the object, the vertical frictional force is equal to its value times the coefficient of static friction. The upper limit of the friction opposes the weight of the object, so the force from the user that must be applied to create a no-slip condition is found. If the object does slip, the distance that it falls is calculated using the kinetic friction and kinematics.
The most complicated part of this code was modeling the crash dynamics of the claw. We wanted the claw to not move above the rail or below the floor; we also wanted the claw to hit the object and not be able to move past it when approaching from the top, left, or right. The claw must also hit the object when the object is within it, allowing the object to be grabbed, but also preventing the claw from clipping through the object if the user attempts to move it left or right. See video below for full demonstration. Please note that video was compressed for upload to this website and may be laggy.
Attach:claw_graphics_checkpoint-1-compressed.mp4
The initial draft of the Arduino code was also created for this checkpoint. The main challenge was to allow Processing to send data to the Arduino and the Arduino to send data to Processing. This is necessary as values such as the force being applied to the object are calculated in the Arduino code while the x and y positions of the claw are updated in processing. Reading data from Processing was found to be especially challenging as the Arduino does not have the same string splitting functions that made reading data in Processing simple. After reading the values such as the position of the claw in x and y from Processing, the Arduino code calculates the next position of the object. This is done similarly to the procedure used in Assignment 5 where the forces applied to the object are summed and used to find the acceleration of the object. This acceleration is then integrated to find the velocity and position of the object which is sent back to processing to be visualized. This allows for the object to fall under the force of gravity and be picked up by the force of friction of the gripper. This functionality meets the goals for this checkpoint laid out in our project proposal. Further work is needed to tune values such as the stiffness of the object and acceleration due to gravity to achieve a more realistic effect for the rendering. The video attached below demonstrates the object being grasped and raised when the handle position of the Hapkit is enough to apply the required friction force. When the force applied by the Hapkit is below the threshold to match the weight of gravity, the object slips out of the claw and drops.
Checkpoint 2
Due to changes in the project based on feedback from the project proposal, the goals for checkpoint 2 were updated based on these changes.
The next addition to Arduino was to add movement of the object in the x direction. This was done by initializing the object's position in Arduino and sending it to Processing. This was changed from the implementation for Checkpoint 1 as it was found that the system works best when a value is fully calculated in either Processing or Arduino and sent to its counterpart as opposed to being set back and forth. The checks for the object being grabbed are all still completed in Processing with a flag being sent to Arduino if grabbing has occurred. In Arduino, if the flag is true, the Object's position is set based on the Claw’s position which causes the visualization to show the object is moving.
Additionally, the Hapkit's movement was successfully mapped to the movement of the claw. This was done by reading the Hapkit's position in Arduino and mapping that to the pixel value of the claws end point. This is then sent to Processing for visualization. To improve the quality of the position tracking, we doubled the number of capstan coils to six.
The code to control the vibration motor to replicate slip of the object was also successfully implemented in the Arduino Code. If the force is below the required threshold to lift the object, the vibration motors indicate that more force is necessary. While this is working, more tuning is required to find the optimal duty cycle to power the motors specifically for when they are mounted on the final 3D-printed assembly.
Lastly, a bin was added to the right of the screen to act as a goal for the user to drop the object into with success displaying “You Win!”. The next steps to be completed will be to add multiple object sizes and masses to be tested in the study. This can very easily be done by adding if def statements in Arduino and Processing that define the variables for mass and object size to different values. These can be varied for the study. A video of the updated visualization working is attached below.
We also began developing the final structures of the system. We 3D-printed prototypes of the Hapkit base, as well as the finger pads between the user and the Hapkit. Velcro strips to secure the user’s fingers to the system were ordered and are expected to arrive today or tomorrow. Some necessary improvements to the next/final iteration of the structures include: screw holes for attaching the Hapkit to the base, screw holes for attaching the finger pads to the base and additional support structures for the base. For the final polished project, we’re considering laser-cutting an acrylic box or perhaps just an acrylic wall to block the user’s view of the Hapkit and improve their experience of the simulation.
We have also developed a study procedure. For our analysis, we plan to try different types of vibration and survey users to understand which is the most convincing simulation of a block slipping from the user’s grasp. Using our finalized Arduino/Processing/Hapkit system, users will grasp a block and feel it slip from their grasp, watching graphics of a block falling from a claw and feeling force and vibration applied to their fingers by the system. They will rate how convincing the simulation was from 1-10; they will be able to give comments. This will repeat three times, with three different types of vibration. From this, we should be able to tell which vibration method is the best for our purposes.