

2025-Group 5

B@Home: The Haptic Baseball Experience
Project Team: Sam Boeschen, Chloe Dawson, Nolan Topper, Ethan Whitmer
We created a virtual batting cage that combines a graphic user interface with a haptic baseball bat in order to simulate the experience of hitting a moving baseball. The bat provides haptic feedback for the user when a hit is made between the virtual ball and the physical device held in their hand. The feedback replicates the “thwack” that a person typically experiences when making contact with a ball in a batting cage by implementing a 12 V ERM into the shaft of a regulation wooden baseball bat. A user's swing is tracked by an IMU placed at the top of the bat, while an actual "hit" and subsequent haptic effect is controlled by an Arduino worn on the user's hip. The motivation behind creating a virtual batting cage was the mediocre experience many of the members of the group have had with previous virtual baseball simulation games. It is our belief that by coupling a simulation and haptic feedback together, we have made the simulation environment and game more realistic, as well as more enjoyable for the user.
On this page... (hide)
Introduction
In this project, the group wished to create a virtual batting cage that combines a graphic user interface with a physical baseball bat in order to simulate the experience of hitting a moving baseball. The bat provides haptic feedback for the user when a hit is made between the virtual ball and the physical device held in their hand. The haptic feedback seeks to replicate the sensation that a person typically experiences when making contact with a ball in a real-world batting cage.
The motivation behind creating a virtual batting cage with haptic feedback is the poor experience many of the members of the group have had with previous virtual baseball simulation games. For instance, on the Nintendo Wii’s baseball simulation, the group noted how unrealistic the small vibration in the player’s hand through the remote felt. By employing more realistic haptic feedback to the user, the group sought to create a simulation environment and game that was more enjoyable, as well as more realistic, for the user.

Background
There are many examples of haptic feedback being incorporated into simulations emulating sports where a player swings a bat or racket to hit a ball, such as those simulating tennis, ping-pong, cricket, and baseball. The sensation that a player experiences when hitting the ball is not just the initial impact, but also includes the reverberation of that impact’s vibrations throughout the entire object they are holding.
Sobue, et. al. attempted to emulate the experience of hitting a ball with a racket, like in tennis, by mounting a single traditional DC motor within a headless shaft. The research team found that pulsing the motor both clockwise and counterclockwise at short pulse-widths when replicating a hit produced a realistic haptic sensation [1]. Though b@home did not utilize a traditional DC motor to produce the bat’s haptic feedback, it did take inspiration from the placement of Sobue et. al.’s motor within the bat’s handle rather than its shaft.
White, et. al. sought to explore how application-specific game controllers with haptic feedback affect a user’s gameplay experience. The group chose to focus on a Unity-based virtual baseball hitting game and tested user experience with four types of integrated bats: a commercially-available handheld VR controller, an unweighted bat handle fitted with a position and orientation tracker, a weighted bat handle fitted with a position and orientation tracker, and the same weighted bat handle complete with tracker and a vibro-tactile haptic feedback device [2].
The research group concluded that haptic feedback made no significant difference in user experience or performance in a virtual baseball hitting game is applicable to the proposed project. White, et. al. utilized four small vibration motors at the end of their bat’s stem, which was acknowledged to be a relatively simplistic form of haptic feedback [2]. b@home used these findings to determine that small vibration motors would be inadequate in replicating a hit on a full-sized bat, and thus employed a larger motor instead. White, et. al. also chose to cut down the size of their bat to just the handle, which could have affected user experience and performance differently than the full-size bat designed in b@home.
Chung et. al. sought to characterize how different stimuli utilized in sports simulations, such as haptic and auditory effects, are perceived by users and how they change behavioral intentions [3]. The group administered surveys to over 300 simulation users in order to come to their findings. The different sensory stimuli studied were visual, aural, and haptic. Specifically, the group sought to examine stimuli’s effect on telepresence, which is the ability of a user to interact with a virtual environment as if they were physically present. It should be noted that a greater sense of telepresence is associated with a more positive user experience.
The group’s statistical model essentially studied how visual, aural, and tactile (haptic) stimuli influenced telepresence, how telepresence influenced pleasure, and how pleasure influences whether users are likely to participate in real-world, physical baseball or revisit the simulation after participation. The group found that visual stimuli had minimal effect on telepresence and pleasure. Aural stimuli was found to be ineffective on telepresence, but substantially effective on pleasure. Haptic stimuli was found to improve users’ telepresence, but not affect their sense of pleasure in gameplay. The group found that users that experienced pleasure from the simulation were more likely to want to try the simulation again than they were to go and play baseball in the physical world.
Though Chung et. al.’s study is focused on the field of psychology, it is still relevant to b@home in its specific study of a virtual baseball environment complete with various types of stimuli. b@home is ultimately focused on producing a realistic haptic stimulus to the user through the bat rather than perfecting the visual and aural stimuli that are also present in many baseball simulation games. It is useful to characterize the actual effect that b@home is aiming for: telepresence. b@home aims to create a realistic haptic effect in the bat that makes the user feel like they are hitting a physical ball rather than playing a computer game.
Methods
Our approach to building b@home was three-pronged. We manufactured the physical hardware of the bat, integrated the electronics of the board and motors, and developed the software of the graphics and physics.
Hardware Design and Implementation
In keeping with our goal to provide a more realistic haptic baseball experience, the bat was designed around MLB bat standards [4]. Specifically, a maximum length of 42 inches and maximum barrel diameter of 2.61 inches.
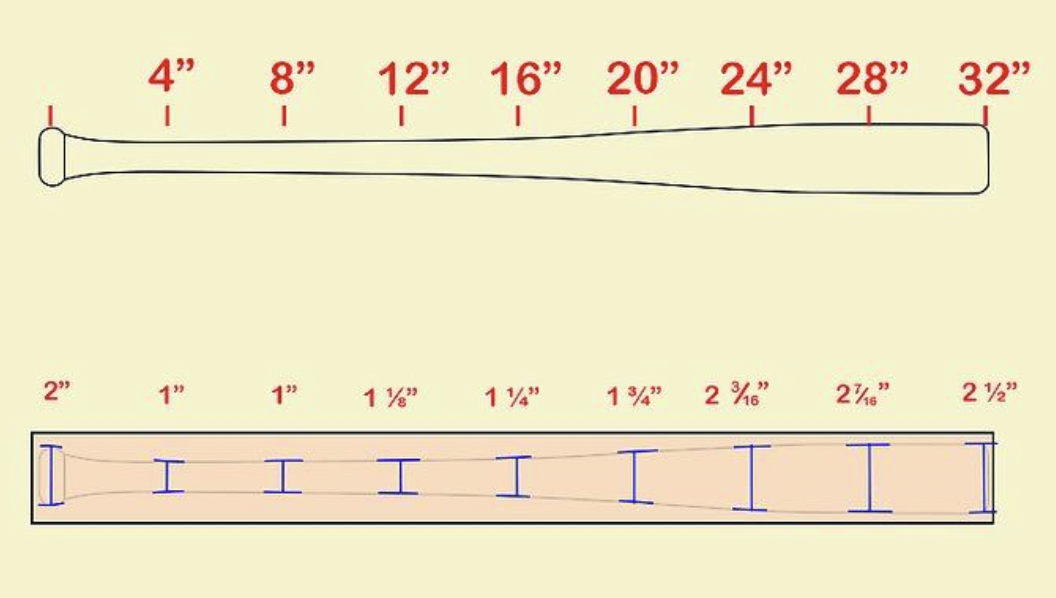
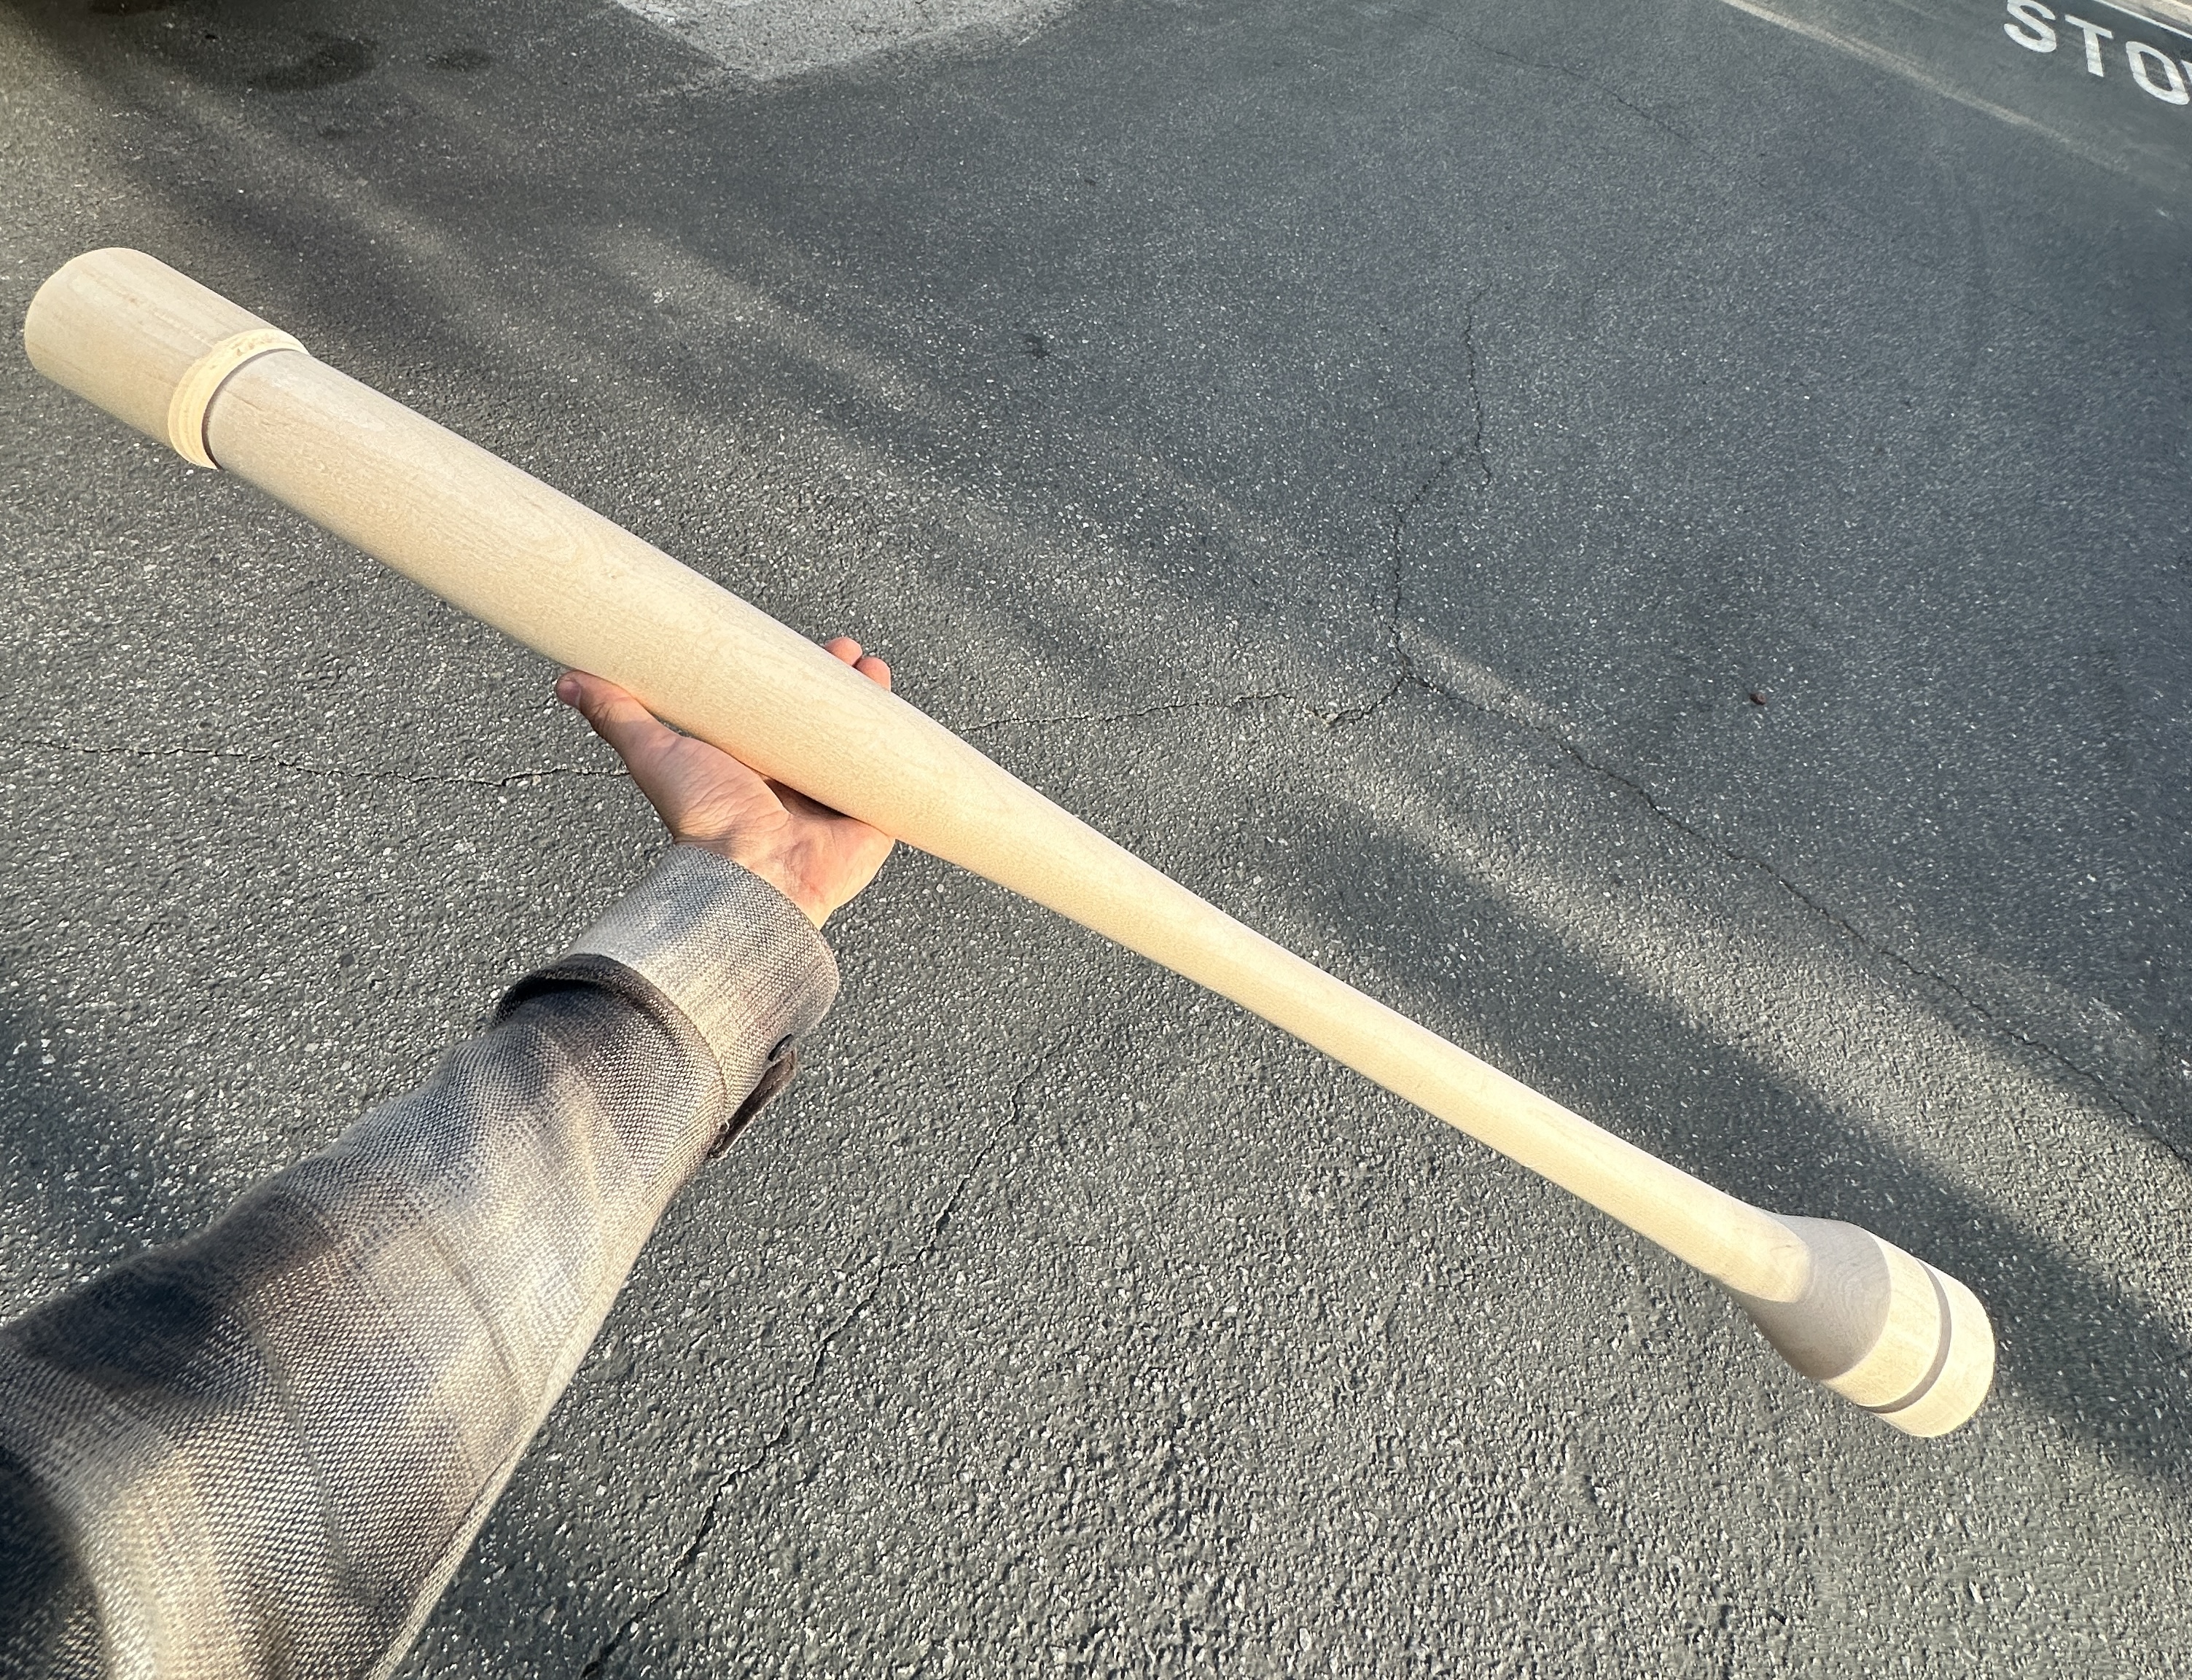
The bat began as maple turning blank, 2-3/4"+ D by 37" [6].

It was then turned down to spec and sanded to 600 grit on a wood lathe. The final bat was 2.6 inches in diameter at the head and 36 inches long. More material was left at the base of the handle to accommodate our motor.


Then began the most difficult process: coring the bat. We wanted to have our IMU in the head of the bat to receive data most accurate to the area where the ball would contact, but our motors and wiring needed to be by the handle, so we needed wires to be able to run through the bat. With this in mind we purchased an 18 inch drill bit [7] and attempted to connect two holes, one drilled from each side of the bat. Though the holes were long enough to intersect, they were misaligned (despite various problem solving initiatives, including re-drilling with a larger 18 inch bit) and thus we had to drill an additional small hole into the side of the bat to connect the two.


This z-shaped core path made threading the wiring difficult. Our eventual solution was to put a length of thin chain into each end of the bat and connect them at the side hole via a jump ring. We then wound each wire (one at a time) into the chain and used the chain to pull it through the bat.


This wiring process had to be redone as we realized we needed to core out wider diameter holes on either end of the bat. For future makers, double check the sizing of all electronics in advance! However, our workflow was smoother at this point and rewiring was not particularly challenging after coring out the bat ends with Forstner drill bits.

We then integrated the electronics, starting by soldering in the IMU and testing its reactions to inputs.
We also carved a slot for the wiring in the side of the handle-end hole with a small chisel and printed a press fit cover (CAD below) for our ERM. This was necessary because our ERM’s weights rotated at the same diameter as its motor housing (bad design), but it also gave us the chance to add a beveled edge to the print to protect the wiring. The motor was pressed into the cover and then we used an arbor press to push both into the bat with the beveled edge aligned with the carved slot. A press fit was critical in order to fully translate the vibrations of the ERM to the bat handle.

The motor protruded slightly due to an overabundance of caution when boring its larger hole. This was solved by turning a small wooden cap for the end of the bat. The cap was attached with wood glue and dowel joints (toothpicks were used as the dowels). At this time we also created plugs for the other two holes, re-sanded the bat, and oiled it with linseed oil.


Once the bat was complete, we also laser cut and spray painted a home plate out of birch plywood.

Electronics
We used an Arduino Uno coupled with an Arduino Motor Shield to communicate with the IMU and motor. The microcontroller was stored in a 3D-printed hip pack (CAD below) in order to reduce the length of the wire connecting the IMU and Arduino, thus reducing the noise present in the system. Also connected to the Arduino/Motor driver was a USB cable for serial communication between the laptop computer and the Arduino, and also a 12 V power supply for our ERM. Both of the connections from the hip pack to the bat (IMU and Power) were fitted with quick-release connections to prevent damage to mounted electronics inside the bat if someone pulled on them too hard.

Graphics

The graphics were created on Adobe Illustrator, while the physics and GUI were made in Processing. Processing and Arduino communicated with each other via Serial. The IMU data transmitted by the Arduino was received by the laptop, filtered, and processed to determine whether a “hit” was achieved. The criteria used to calculate whether a “hit” happened, and the distance of the hit (single, double, triple, home run) were tuned based on the filtered IMU data. The more exactly that the user’s recorded swing data fell within the valid hit period of the simulation, the higher the distance of the hit.
If a “hit” was recorded, a signal was sent to the Arduino via Serial to pulse the ERM for a certain time period given how far the hit was. For instance, a single would only turn on the motor for 100 milliseconds, whereas a home run would turn on the motor for 600 milliseconds. This increase in motor pulse time with an increase in the distance of the recorded hit was intended to convey the feeling of the ball leaving the bat with more power due to better contact, as would happen with a better hit in real-world baseball.
At the same time that the motor was pulsed, the Processing graphics conveyed the hit that the user achieved. For instance, if the user hit a home run, the graphics showed the ball flying farther than if a single was hit. The Processing graphics also had three game modes: Easy, Medium, and Hard, which varied the speed at which the virtual ball moved across the screen, and thus how short the valid hit period was that the user’s swing needed to fall within.
Link to video of live graphics during demo day: Attach:graphics.mp4
System Analysis and Control
For this project, one of our main concerns was signal attenuation from the IMU. The signal had to be passed through the entire length of the bat, as well as enough wire to allow the user to swing the bat. We considered a wireless connection but ultimately decided against it due to the complexity of mounting an onboard driver and power supply on the bat. To mitigate signal attenuation, we switched from using a 3.3V IMU to a 5V IMU, resulting in a stronger analog signal. We also carefully tared the X, Y, and Z axes against gravity to ensure a consistent magnitude reading, regardless of the bat's orientation, as we only wanted to focus on the movement provided by the user.
Once we had the signal from the IMU on the Arduino, we used a First-Order Exponential Low-Pass Filter (see eq below) on each of the X, Y, Z channels. Using these filtered signals, we then computed the overall magnitude of the acceleration and passed that through one last filter before sending it via USB-Serial to our Processing Code. For these filters, we used α = 0.5, which corresponds to a cutoff frequency of approximately 15 Hz. Two of these in series created minimal amounts of lag (on the order of 50 ms), but allowed us to obtain a usable signal across 6 feet of wire.

The filtered acceleration magnitude was used to determine if a swing had occurred. By looking at the maximum magnitude of the acceleration over a designated ‘valid hit period,’ we estimated the power of the swing. If a powerful enough swing was detected during the valid hit period, a command was sent via Serial to the Arduino to pulse the motor to create the vibrational effect. Stronger and longer pulses were used for more powerful hits.
Demonstration
Link to our TA using the simulator at demo day: Attach:movie.mp4

Results
After outside users tested b@home at the Haptics Open House, they were asked to take a qualitative follow-up survey to gauge their experience with the design. The first question on the survey sought to gauge the realism of the simulation in replicating hitting a baseball with a bat by having users rate the realism of the experience from 1 (unrealistic) to 10 (realistic). Out of the 19 users surveyed, 15 (~79%) rated the simulation at a 7 or higher. This is a positive result and shows that on average, users found the haptic effect produced by the ERM in b@home’s handle to realistically simulate the feeling of a real ball hitting their bat.

One of the main motivations behind b@home was to create a more enjoyable experience of gameplay than other baseball simulation games as a result of the full-size bat complete with haptic effects and the GUI. According to the users surveyed, over 73% of those who tested b@home found the experience to be enjoyable as compared to other baseball simulations they had played in the past. This is a positive result and shows the enjoyability of b@home.

Future Work
There are several avenues for enhancing both the gameplay experience and the quality of haptic feedback in our simulation. Hardware improvements could include integrating a Bluetooth transceiver and rechargeable battery to make the bat wireless, increasing user mobility and ease of use. Additionally, upgrading to higher-torque or multiple vibration motors would amplify the realism of the bat’s feedback.
On the simulation side, we plan to expand the current 2D game into a full 3D environment using Unity, offering a more immersive and lifelike batting experience. By incorporating axial acceleration measurements, we could precisely determine the point and quality of ball contact, further refining the simulation’s realism. Future iterations may also include positional sensors embedded in the home plate area to track bat location in real-time—enabling an augmented reality (AR) experience.
Eventually, this system could be adapted for use with AR/VR headsets, allowing users to practice in highly realistic virtual environments. With these enhancements, the platform has potential applications in professional and elite-level baseball training, offering a novel tool for improving swing mechanics and timing.
Files
All Files: Attach:BaseballGame.zip
References
[1] M. Sobue, S. Kato, I. Mizoguchi and H. Kajimoto, "Presentation of Hitting Sensation to the Racket by a Single DC motor Embedded in a Handle," 2024 IEEE Haptics Symposium (HAPTICS), Long Beach, CA, USA, 2024, pp. 244-250, doi: 10.1109/HAPTICS59260.2024.10520849. https://ieeexplore.ieee.org/document/10520849.
[2] M. White, J. Gain, U. Vimont, and D. Lochner, "The Case for Haptic Props: Shape, Weight and Vibro-tactile Feedback," 12th ACM SIGGRAPH Conference on Motion, Interaction and Games (MIG '19), 2019. Association for Computing Machinery, New York, NY, USA, Article 7, 1–10. doi: 10.1145/3359566.3360058. https://dl.acm.org/doi/abs/10.1145/3359566.3360058.
[3] K. Chung and S. Lee, "Baseball Simulation: How Technology-Mediated Stimuli Affect Telepresence, Pleasure, and Behavioral Intentions," Journal of Global Sport Management, 10(1), 129–146, 2023. doi: 10.1080/24704067.2023.2209870. https://www.tandfonline.com/doi/full/10.1080/24704067.2023.2209870.
[4] https://www.baseballmonkey.com/learn/what-bats-mlb-players-use-rules-regulations
[5] https://www.wikihow.com/Make-a-Baseball-Bat
Appendix: Project Checkpoints
Checkpoint 1
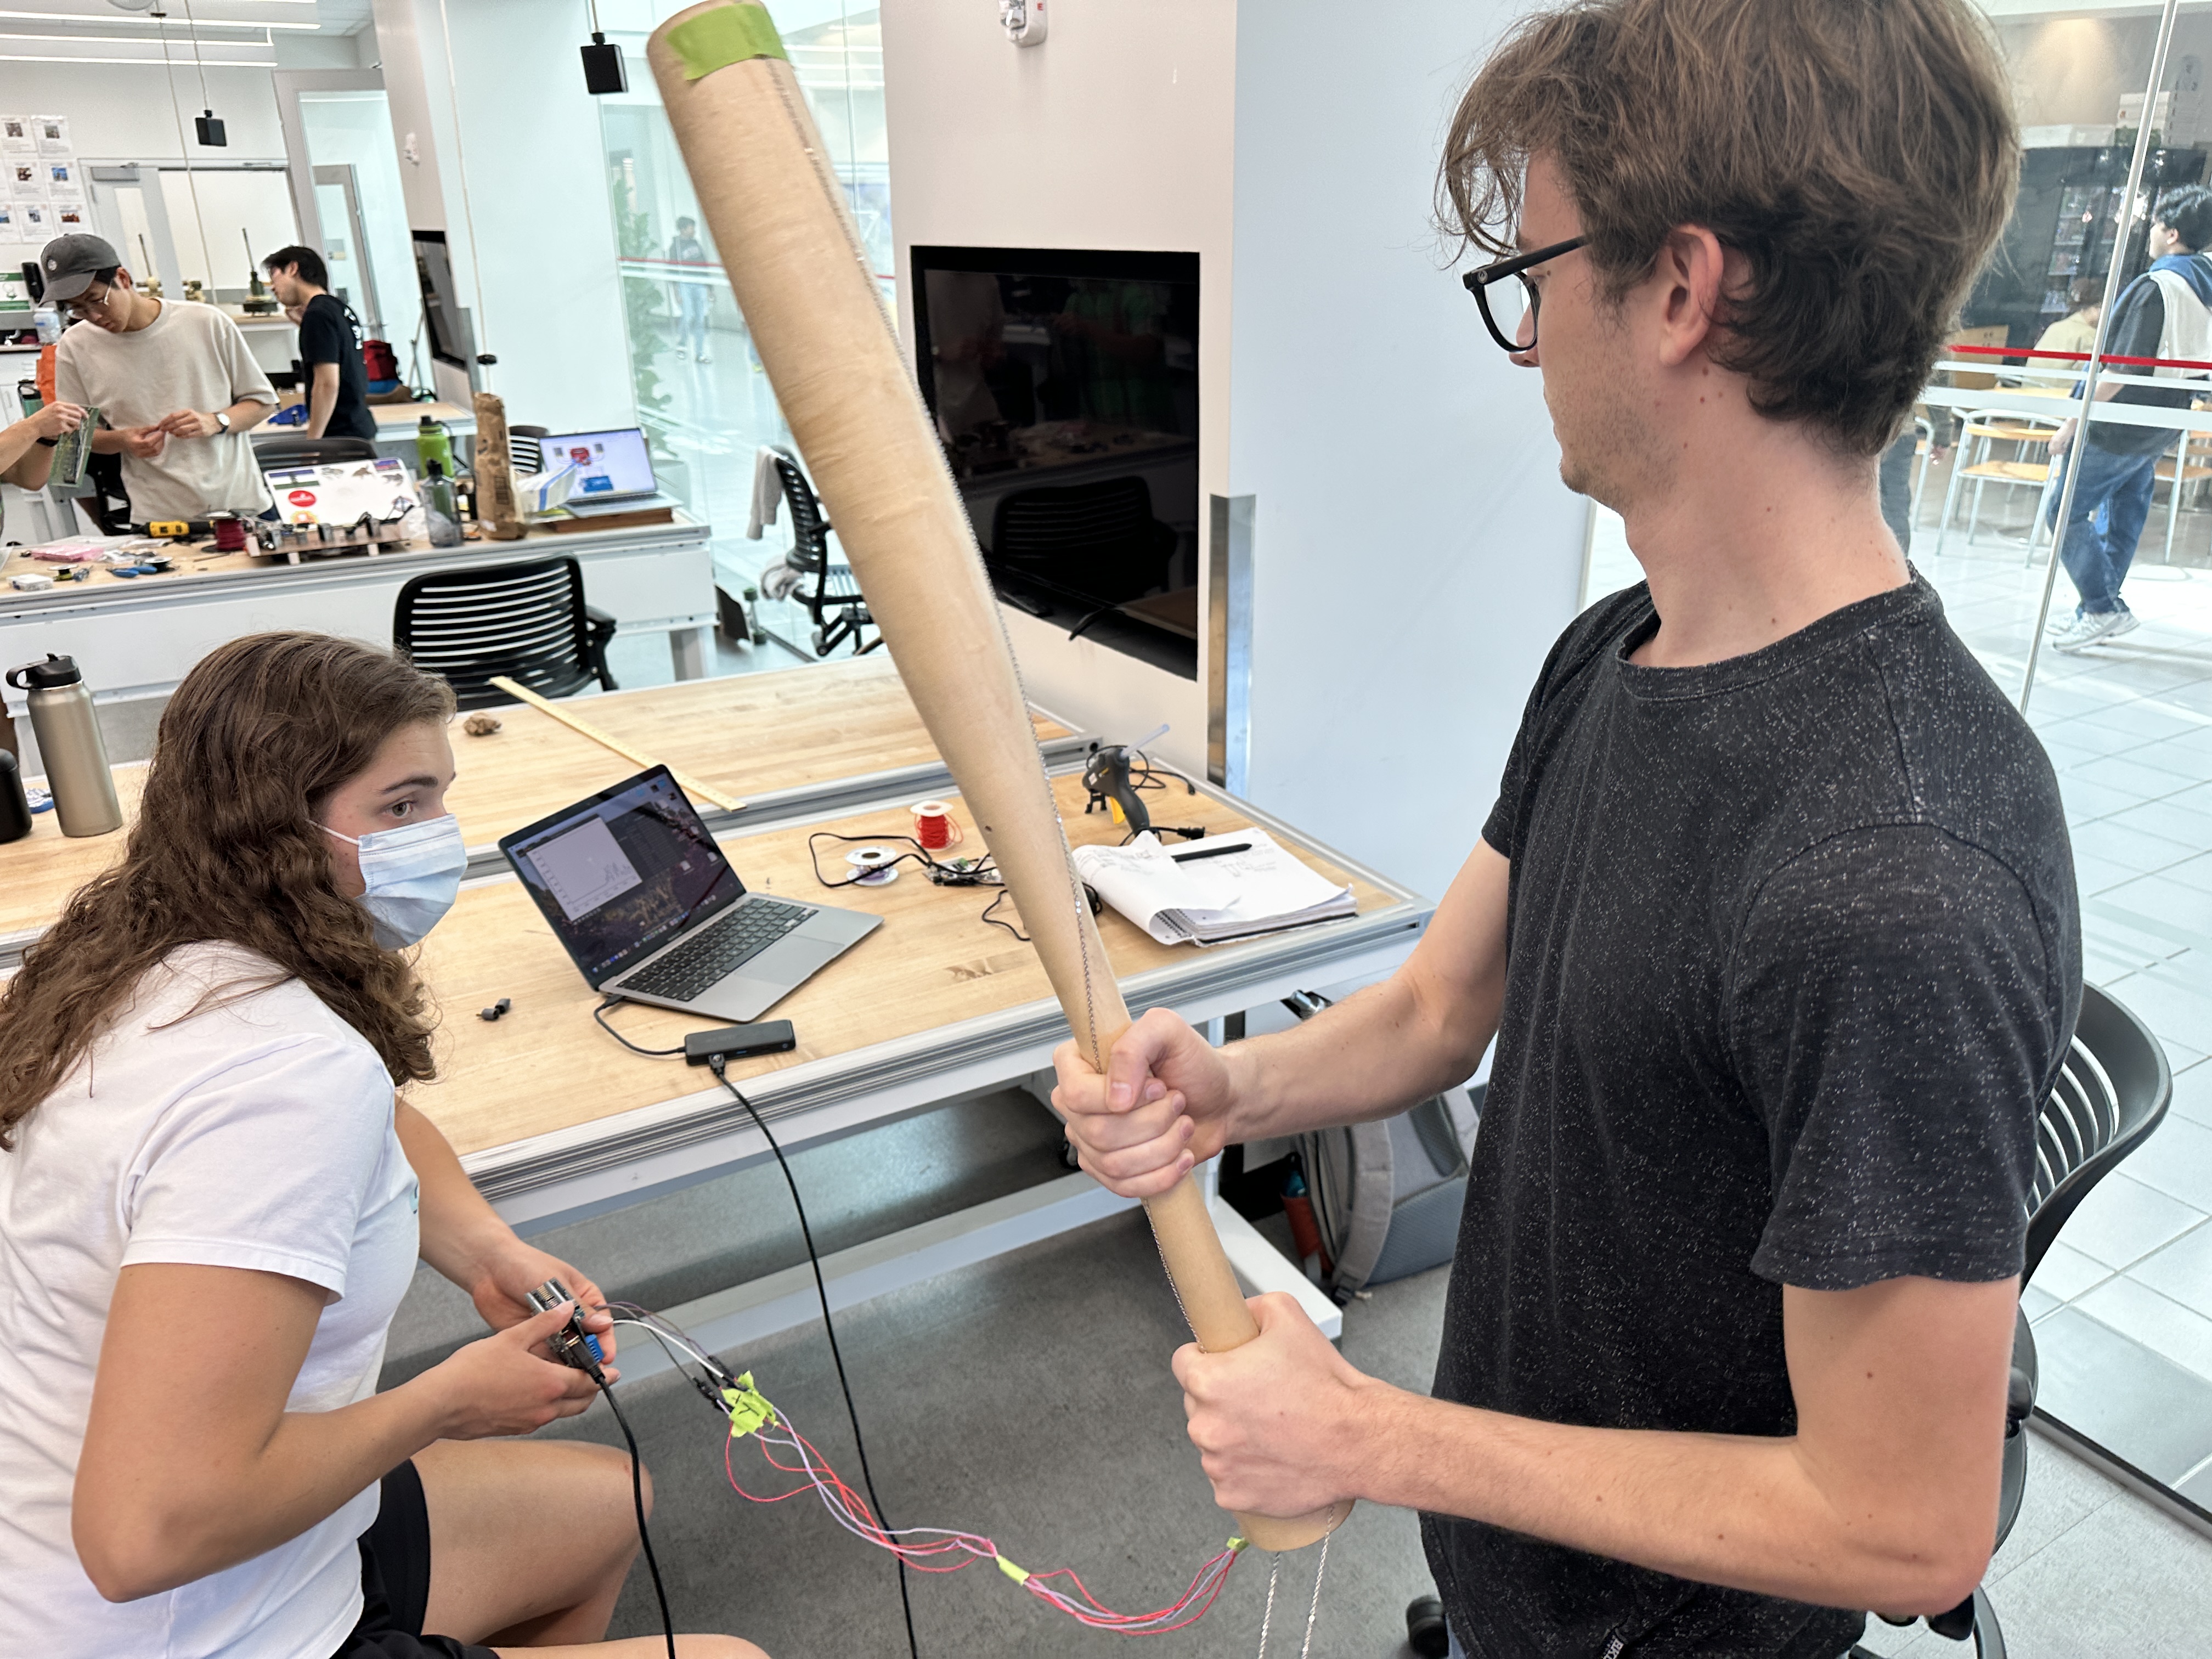
For our first checkpoint, we primarily wanted to test the equipment we had purchased so far, which included both a 12 Volt ERM and traditional 12 V DC motor. It was our goal to see how much vibration each motor could transmit when actuated within the context of our group’s project: a cylindrical bat.
The fabrication of the wooden bat that we will use is ongoing, so we chose to test the motors with a thick, hollow cardboard tube. The motor was mounted into pink foam that was secured to one end of the tube. Once this mounting was complete, we pulsed the motor using a variable power supply while the tester held both the opposite end of the bat (replicating the handle) and the same end of the bat (replicating the barrel). This rudimentary testing leads us to believe that the ERM we purchased is powerful and large enough to generate the desired haptic feedback.
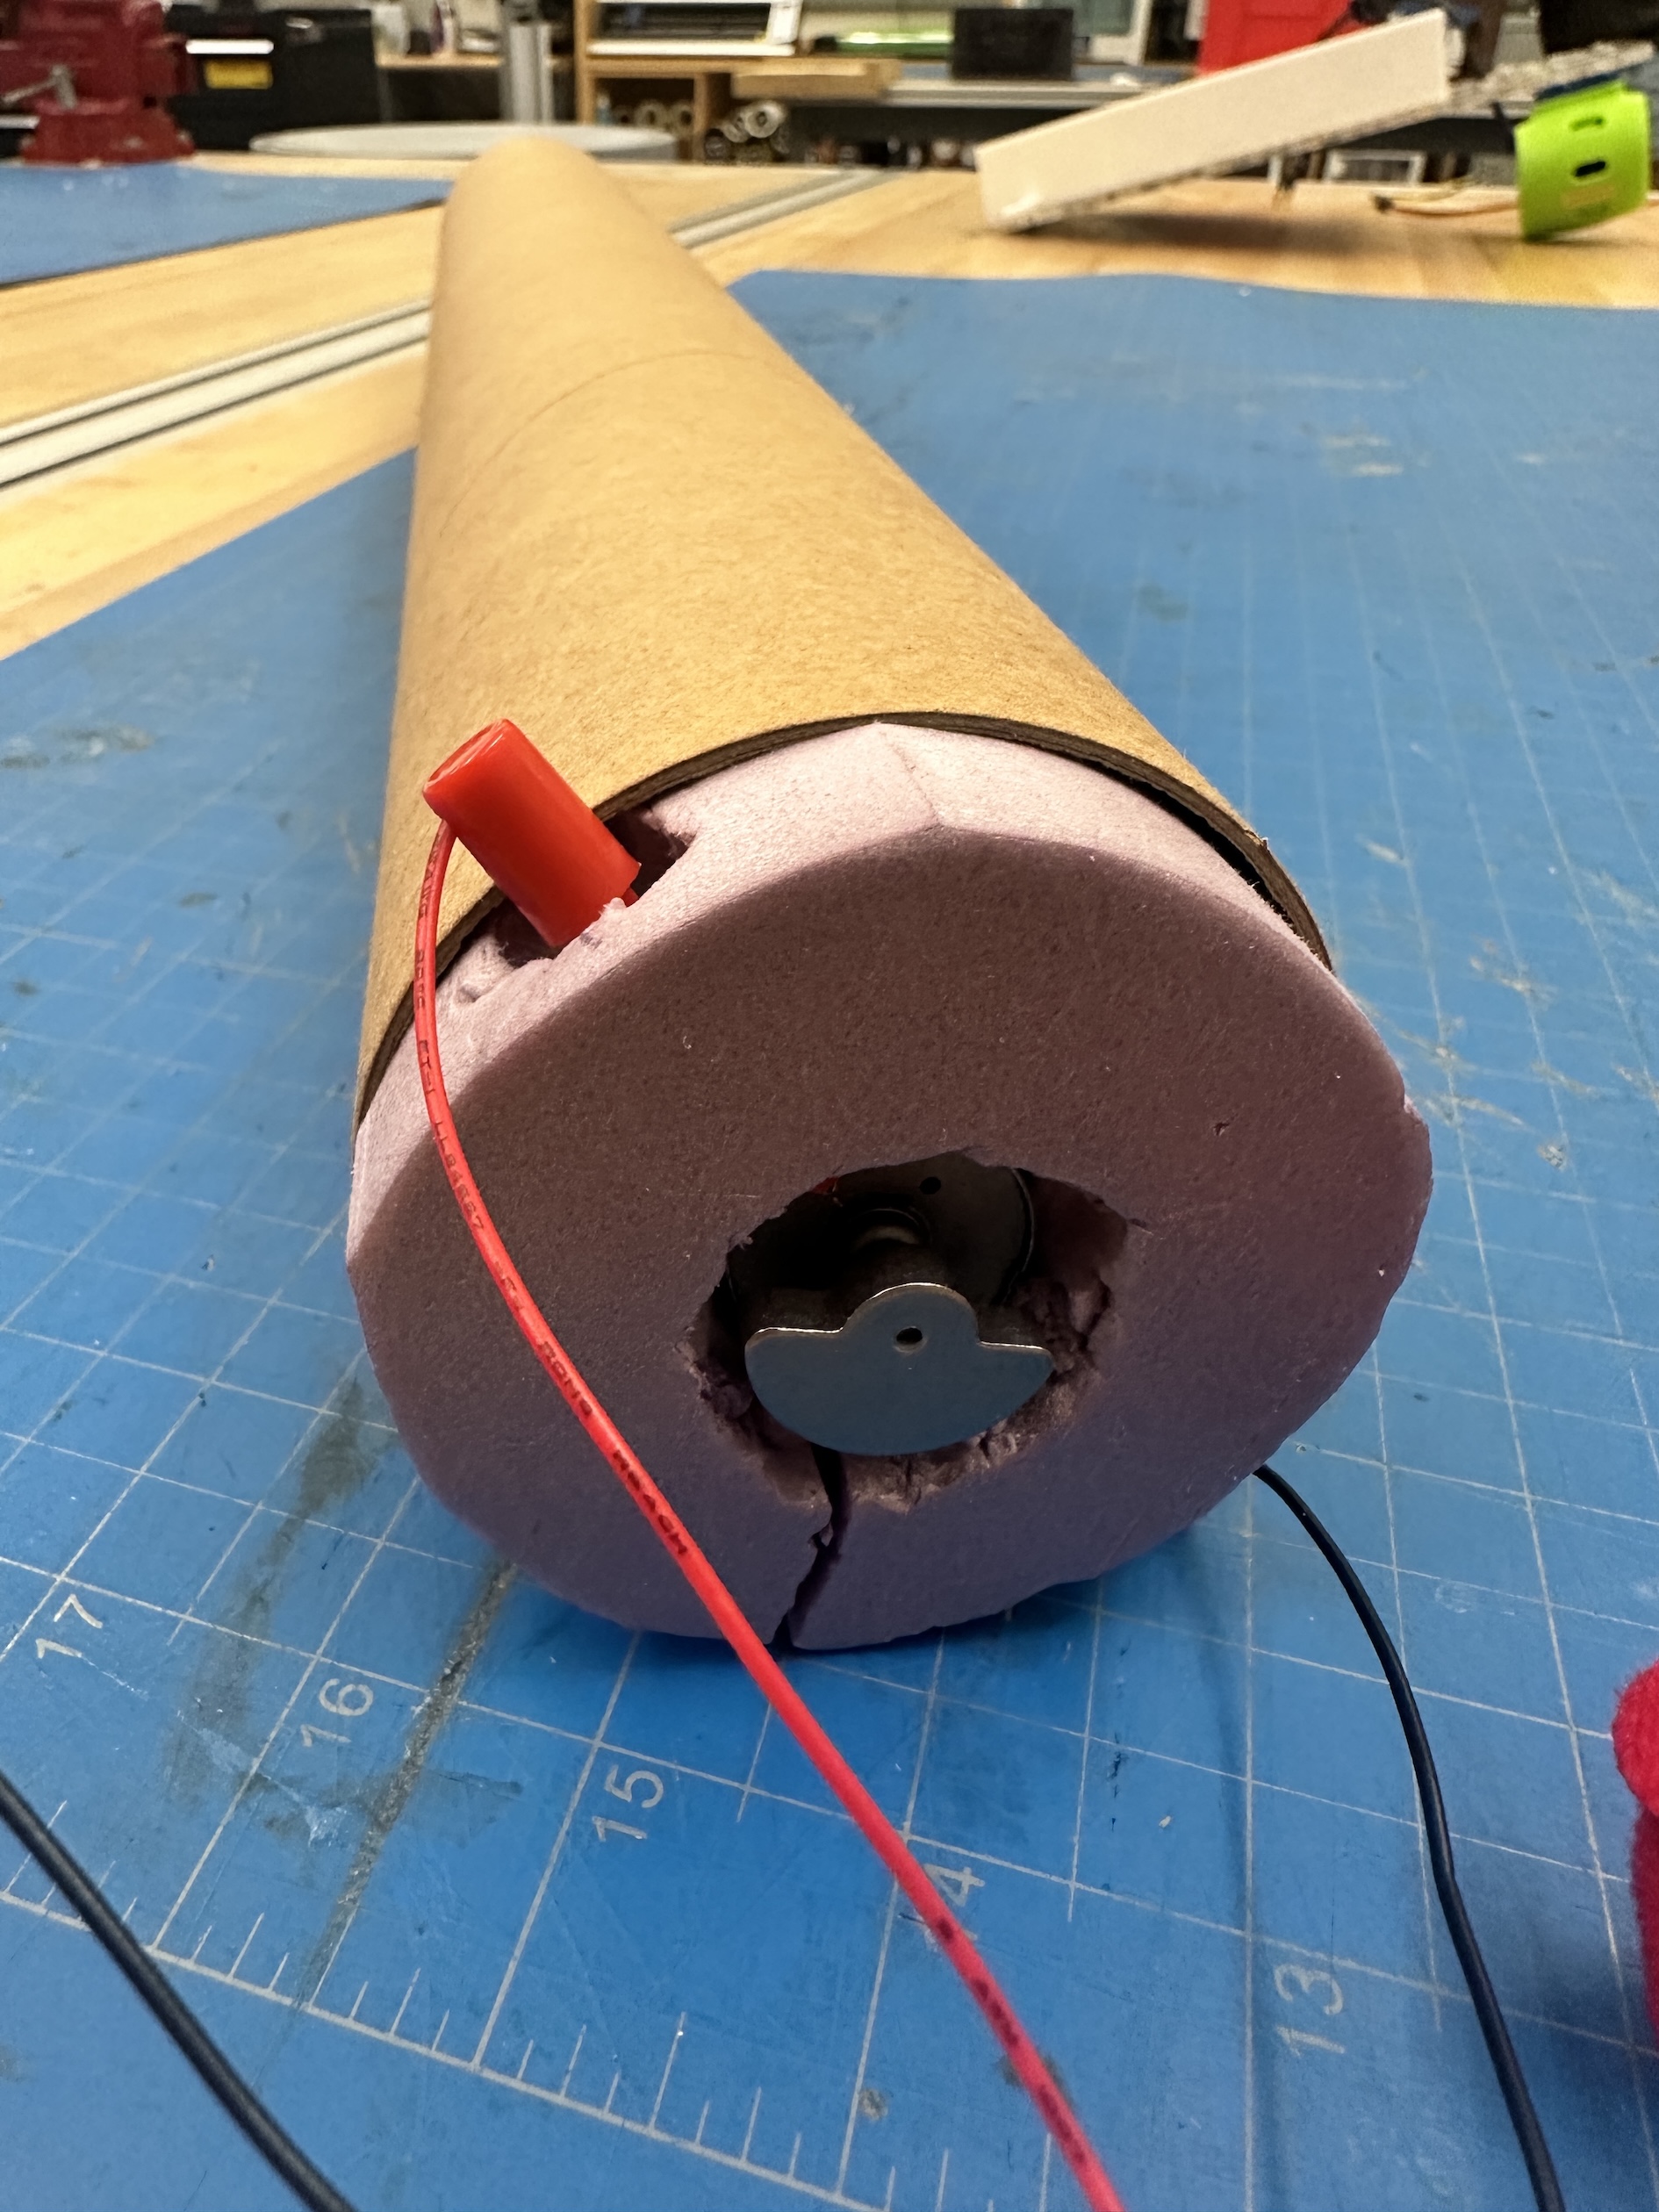
We believe, however, that we can achieve an even more realistic feeling of a ball being hit if there are two ERM’s working in tandem: one in the handle and one in the barrel. There is a distinct difference in the vibration felt by the person holding the tube depending on the end they grasped. Both ends felt accurate to some degree, but we feel that by using both, we will have more positional control over the final haptic feedback generated by our device.
For the other portion of the checkpoint, we wanted to purchase the IMU’s that we will be using to track the bat’s position and plan the graphics engine we will be integrating with our haptic device. We purchased small IMU’s that are readily integratable with the Arduino we already have. We also decided that we will be using Unity to create the graphic simulation and have begun work on the engine.
Checkpoint 2
For our second checkpoint, we wanted to have our wooden bat fully fabricated and ready to be integrated with our motors/controllers. The bat is now fully fabricated and swingable, though we have not integrated it as of this Tuesday afternoon with our larger motors yet. This slowdown in our timeline is due to deciding that our system will be wired instead of wireless in order to meet our motor’s power requirements and utilize electronics equipment that we already own (Arduino Uno instead of Teensy, motor drivers, power supplies, etc.).

We have also purchased four smaller 3 V vibration motors and are waiting for them to be delivered today before deciding on our final layout of motors within the bat. We intend on putting them at the bottom of the bat’s handle to create a haptic sensation with less lag than we experienced when testing the larger ERM.
Our group has made significant progress on our GUI and now have a fully functional visual interface in Processing. We decided to backtrack from using Unity in order to guarantee that we could meet our timeline. The next course of action is to integrate the actual IMU data with the GUI, which is being done this Tuesday afternoon.
