

2025-Group 8
SimuSoccer
Project team member(s): Benjamin Janey, Shannon Li, Kaitlin Leong, Melodie Walla

SimuSoccer Group Photo
On this page... (hide)
Our project centers on designing a 2-degree-of-freedom (2DOF) haptic device to simulate a soccer-style game that incorporates force feedback and visual cues. Motivated by the classic gameplay mechanics of shuffleboard and air hockey, our team aims to recreate these mechanics in a soccer game coupled with the tactile satisfaction of striking and hitting a ball in a compact and intuitive setup. The project targets applications in fine motor skill training and depth-perception rehabilitation through its playful use of haptic effects. By integrating a motorized force feedback system for added realism, along with a visual GUI to track game outcomes, we seek to make an engaging and educational experience.
Introduction
The motivation for our project is grounded in creating an interactive educational tool that merges tactile motor control with visuals. Due to the predominantly virtual nature of our game, the setup is compact and space efficient. Our chosen application, a soccer-inspired game, is well-suited to haptics because it relies heavily on the perception of force and contact. By giving users real-time force feedback when striking and sliding a puck, the device helps reinforce cause-effect relationships between physical input and environmental response. The 2DOF force-feedback design allows for meaningful game play and experimentation that forces users to tune their motor control as they adjust for varying game scenarios. Drawing from prior work on haptic games used for rehabilitation and research into predictive collision rendering, our system serves as both an entertaining and educational device that explores how haptic feedback can enhance user interaction and motor learning.
Background
Haptic devices have had a lot of focus on medical applications. One aspect is for rehabilitation purposes. Our team ultimately wanted to create a game that implemented these techniques, specifically for the improvement of hand-eye coordination. This was based on past studies on the effectiveness of games that provide haptic feedback on rehabilitation.
A paper by Tokuyama et al. from 2016 discusses the application of haptic feedback for rehabilitation in the form of a Whack-a-mole minigame because of its simplicity and accessibility. The game was built using the PHANTOM Omni to combine visual and kinesthetic cues. Force simulation is the most important aspect to improve the realism of the game, since it�s critical to determine what the user is doing. This was done by splitting a �hitting� cycle into three states: 1. moving and locating the hammer, 2. swinging downward with normal force, 3. swinging downward with strong force. The method of determining the state is by setting a distance limit between the current position and the position one second before. Once the second or third state is determined, a force feedback is applied to simulate hitting a mole. Lastly, to reduce discontinuities in the game the graphics of the hammer follows the motion of the device. The paper was used in our force feedback logic in our project, namely position tracking.
Furthermore, past studies showed the advantages of multimodal feedback systems. This 2019 paper by Park et al. proposed a hybrid system combining vibrotactile and impact stimuli to render virtual collisions. The system includes a voice-coil actuator for vibrotactile feedback and a one degree of freedom impact actuator, which consists of a permanent magnet and three solenoids. A user study was conducted using their system and consisted of 18 participants. In this study, there were three different scenarios for the user to try: scenario 1 was a steel ball and a steel plate, scenario 2 was a wooden ball and wooden board, and scenario 3 was a rubber ball and concrete block. A graphic was also shown to the user, but the users wore noise cancelling headphones to block out any extra noise from the actuators. After each trial, the users rated the haptic stimulus on a scale from 0-100 on realism, unnaturalness, and liking. From the data, the authors were able to determine that the participants� overall evaluations were highly positive for the proposed multimodal hybrid system. Our main takeaway was to develop our multimodal feedback, which implemented audio, visual, and force feedback.
To develop the smoothness of our visual and force coupling, we took ideas from a 2009 paper by Vogiannou et al. that presented a novel collision detection method designed for haptic simulations for virtual environments of both static and moving objects. This method utilizes an algorithm to predict the time of proximity between pairs of objects, creating real-time haptic feedback through the PHANToM Desktop device. A key aspect of the proposed method is the use of approximate collision prediction, which relies on geometry, like bounding spheres, to determine potential collisions. Although we will not work with algorithms for our project, it can be useful to see how this study geometrically represents collisions in order to map out the striker hitting the soccer ball in our game. We used the same logic and integration to refine our impulse-based force feedback when the user �hits� the virtual ball.
Methods
Hardware Design and Implementation
Our hardware consists of a pantograph mechanism which allows for 2 degrees of freedom for the user to easily move around an aim to kick the soccer ball. Building off of the modified graphkits of years prior, we decided to use a pre-existing design that would remove unnecessary friction and pain points compared to the graphkit. We decided that for the game experience we wanted to create, the dimensions and usability of the design were fitting. A custom handle end-effector was designed with a rounded bottom that interfaces with a table surface to prevent putting moments on the handle, keeping all forces in a single plane of action while minimizing any potential moments on the linkage system. Initially, we had the handle bottom interface with a rollerball bearing as we though this would allow for smoother contact with the table surface. But after testing it, the noisiness of the ball bearing and the weight of the attachment detracted from the overall experience of using the handle, so we opted for the 3D printed design. The handle grip was designed to be ergonomic and balanced, taking inspiration from a computer mouse in terms of the orientation of the hand when holding. We ran into some issues with the thin shaft breaking off and getting stuck in the links when the tolerancing was off, but after about 3 trials of different diameters, we settled on a shaft diameter of 9.58 mm.
To create the parts, we 3D printed the sector, hubs for mounting, four links, a mounting cross, mounting attachments for the Arduino boards, and the two parts of the handle that loose fit together. We laser cut the four walls of the enclosure from 1/8" clear acrylic and connected them with nuts and bolts fitted into built-in slots.
For assembly, we used an assortment of washers, shaft collars, and bushings to make sure the sector is level with the capstan drives so that the cable rolls without slipping. It took some trial and error in order to get the heights of each link level and the handle properly resting on the table.
Assembly in progress:

CAD Assembly:


Real Assembly:


System Analysis and Control
The system was made using the geometry and kinematics of a pantograph to achieve the two degrees of freedom. Because the system requires two sensors and two motors to control the linked arms, two Hapkits were used. One purely as a magnetoresistive sensor used to capture the raw position readings of one of the two sectors. The main Hapkit received the raw position sensor of the other sector. These were converted to angle readings in degrees by calibrating the raw positions.

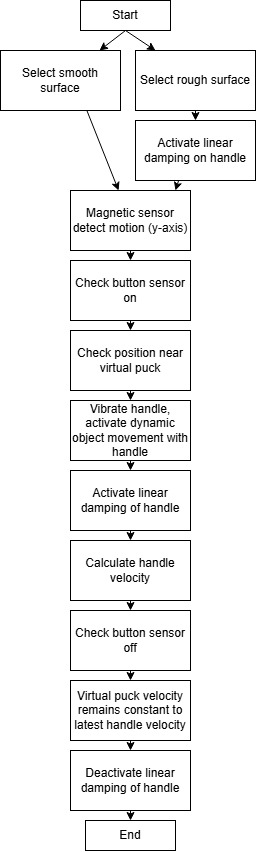
The system has some complexity with three different environments, which mainly adds damping to the handle movement. Regardless of environment, the logic flow of "kicking" the ball in each cycle is quite straightforward. Logic Flow Diagram:

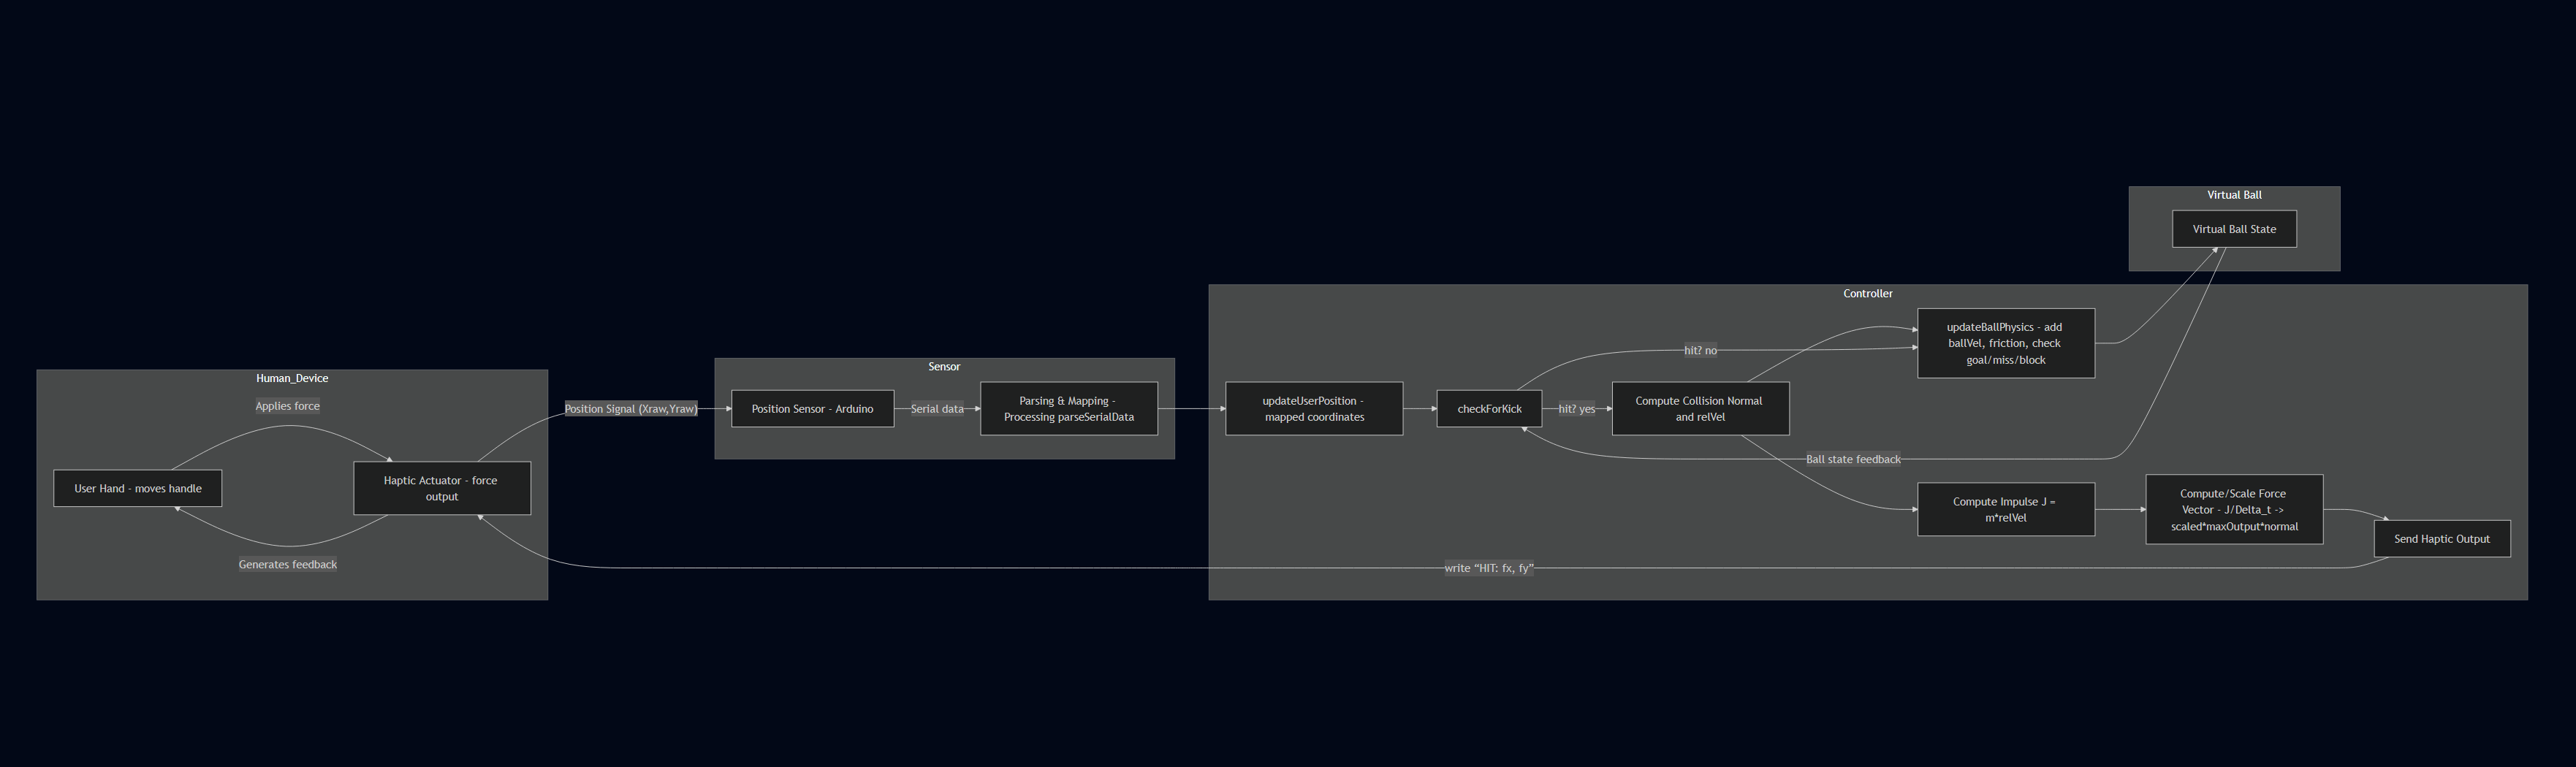
All the kinematics and force calculations were uploaded to the main Hapkit, which output the forces to both motors. The flow between the hapkit's arduino and processing is shown below. Essentially only user position is handled by arduino and output to processing. Processing keeps track of the virtual ball state and has basic collision detecting logic. On collision we get the normal vector between the user and the ball's position. We grab the user's velocity by subtracting the user position from the user's previous position (as this function is called once per frame, we are essentially identifying the velocity in pixels per frame). We then get the relative velocity by projecting the user's velocity onto the unit normal. This velocity is then added to our ball. When creating our force, we calculate the impulse based off of an artificial ball mass in kg that we tune for feeling. We always enforce a minimum impulse such that the ball will always move/be felt despite how slow the user is going. Lastly because we are calculating forces in a "pixel" and "frame" unit, we needed a way to convert this into the Newtons our arduino would be using.
To maintain realism we took the impulse and converted it into a force. We scaled this force nonlinearly from 0 to 1 such that our final output force could be capped at a maximum force factor. We then output the force components calculated to arduino to add this force to the user with an exponential decay, such that the force felt is the peak amplitude and it decays over 100ms. Impulse Force Decay Plot:

The kinematics of the system shown in the equations diagram below are from Campion's paper from 2005. It allowed us to calculate the forward kinematics from the sector angles. The main idea was to calculate the handle position from the known link paramters and angles. This can then be used to calculate the velocity of the handle along with the forces using a Jacobian.


Jacobian Calculations:

While there are some limitations, the design was effective for our system. The workspace limits are shown below. However, our workaround was to create soft wall limits by applying force feedback.
Workspace Analysis:

Demonstration / Application
Video demonstration https://drive.google.com/file/d/13RkTziyes3WvWykORr7S4I91T0-Hb5JJ/view?usp=sharing
Results
Our user study consisted of 12 participants who attempted to score as many points as possible before the end of the game. Our participants were asked to complete a survey consisting of six questions. The first two questions addressed the noticeability of the active forces for both the kicker and the randomized surfaces. The next two questions addressed realism of the force feedback for the kicker and the surfaces. The fifth question addressed the difficulty of the game from the participant perspective and the final question addressed the overall user experience. These questions allowed us to gather insights into the unbiased user experience and overall system functionality. The data that we gathered is shown in the two bar charts below.

Bar chart summarizing individual results from questions 1 through 5

Comparison of average responses from all survey questions
The top chart shows the number of individuals who had a ranking of 1, 2, 3, 4, or 5 for each of the questions. The main insight gathered from this chart is that most people evaluated our system at the higher end of the spectrum. However, there were also a few individuals who felt the system did not feel real enough compared to a traditional soccer kick. This can partially be due to the setting up of our system as a hand-controlled device instead of a foot-controlled device. Another reason for this could be that our force feedback was not strong enough, but other users rated the realism higher, so we could potentially gather a more accurate consensus if our participant group was larger.
The second chart shows the average rating we received for each question. Overall, the survey feedback was very positive, but there are several insights we can take from the data moving forward. The first insight is that overall surface realism was rated the lowest. The surfaces were meant to randomize, but as we were presenting our final project, we noticed that certain surfaces were either appearing multiple times in a row or not appearing at all. With, it is possible that some of the users did not have the opportunity to try all the surfaces. Additionally, the surfaces are not necessarily ones that might be felt in a soccer environment, so the users may not have thought that the surface was realistic in that sense. Another insight that was gathered from this chart is that difficulty is rated high (above the middle value of 2.5). On the survey, if the game was easy, the users would give a 1 as the difficulty rating and if it was hard, a 5 would be given. Since the average from this question is 3.75, the difficulty of this game was high. There are some benefits and downsides to this insight. If the game was a general arcade game than the difficulty of the game is a bit unrealistic for a user just trying to enjoy the game. However, if this game was being used for training or rehabilitation simulations then it would be very beneficial for the user to struggle throughout the course of the game.
Future Work
Future Testing
If this project were to continue, we can further test our system with a larger number of participants consisting of different demographics. It can be beneficial to gather data from a wide range of ages because hand-eye coordination and tactile sensory skills may change with age. It could also be very interesting to test our system with athletes to further understand the realism of the system and how our system may help a person�s rehabilitation/training. Additionally, since this system may also be used to train fine motor skills, it would be helpful to gather data from children who have not fully developed these skills yet.
Improvements
There are several improvements that can be made to our system. One of them being, the surface rendering. For our final result, the surface rendering that was created was very well done in the time we had. If we had the time to continue this project, we would like to amplify the surface feedback and add additional surfaces that can help to train different motor skills. Additionally, we would like to upgrade the screen size to be larger, so that there is a larger goal and more space to score. On the same lines, we would like to increase the workspace of our current pantograph, to make it easier for the user to move around the field. Additionally, we can further improve the game style itself, by having different difficulty levels for the user to choose from, so that the difficulty is decided by the users and not by the computer. Lastly, we would like to implement a teleoperation system, which can involve two players or more trying to score on each other, which can make the game more interactive and exciting for the users.
Applications
Our haptic system can be utilized in several different applications. One application for our system is for physical therapy, when retraining people how to use their arm and hand muscles, our system can help to recover faster. Another application for our system is soccer training. Although our system is hand-controlled, our system can be used to train soccer players in how the ball moves around the field depending on different weather conditions and how to properly read the goalie reactions.
Acknowledgments
We would like to thank the entire ME 327 Spring 2025 teaching team (Allison Okamura, Ryan Nguyen, and Teo Ren) for their support ant constant efforts to help us create the best product possible! All sound and art sources during demo day were modified from royalty free sources or were the sole creation of the creators. To respect licensing policies, no assets have been distributed with the game files. Our design was heavily reliant on the work of our predecessors to improve the open source graphkit design. Special acknowledgement to the work on design from the 2023 Group 1 project.
Files
Mockup File: Attach:soccer_game_mockup_team8_2025 (PROCESSING FILE. PLEASE APPEND .pde TO THE END TO USE)
Hapkit Arduino Code: Attach:hapkit_code_team8_2025 (ARDUINO FILE. PLEASE APPEND .ino TO THE END TO USE)
ZIP Folder for Parts and Assembly: Attach:assembly_CADfiles.zip
Bill of Materials: Attach:BOMgroup8.xlsx
References
Campion, G. & Wang, Qi & Hayward, Vincent. (2005). The Pantograph Mk-II: A haptic instrument. 2005 IEEE/RSJ International Conference on Intelligent Robots and Systems, IROS. 193 - 198. 10.1109/IROS.2005.1545066.
C. Park, J. Park, S. Oh and S. Choi, "Realistic Haptic Rendering of Collision Effects Using Multimodal Vibrotactile and Impact Feedback," 2019 IEEE World Haptics Conference (WHC), Tokyo, Japan, 2019, pp. 449-454, doi: 10.1109/WHC.2019.8816116.
Vogiannou, Athanasios & Moustakas, Konstantinos & Tzovaras, Dimitrios & Strintzis, Michael. (2009). Enhancing Haptic Rendering through Predictive Collision Detection. 5622. 394-402. 10.1007/978-3-642-02771-0_44.
Y. Tokuyama, R. P. C. J. Rajapakse, S. Miya and K. Konno, "Development of a Whack-a-Mole Game with Haptic Feedback for Rehabilitation," 2016 Nicograph International (NicoInt), Hanzhou, China, 2016, pp. 29-35, doi: 10.1109/NicoInt.2016.6.
Appendix: Project Checkpoints
Checkpoint 1
In the first phase of the project, our team successfully finalized the conceptual design and selected the components needed to begin construction. Initially we decided on a 1DOF device but found it to be ineffective for our needs as explained further in this milestone. Therefore we shifted to a 2DOF mechanism. We chose to utilize existing hapkit materials such as the dc motor, hapkit microcontroller, etc. to minimize design cost. Additionally, we outlined our mechanical architecture and explored several options for handle design, ultimately narrowing it down to a few feasible prototypes. We also mocked up a graphical user interface (GUI) that visualizes puck movement and scoring zones, laying the foundation for the game�s visual feedback system. It is essentially fully functioning for score tracking, round tracking, position tracking, etc.
We discussed several rendering algorithms to simulate the most realistic shuffleboard haptic system. To do this, we created the block diagram below. To start, there are two different surfaces we want to render (smooth vs. rough surface). The only difference between the two surfaces is the rough surface will present linear damping of the handle. We also decided to realistically rendering the task of picking up the shuffleboard puck and sliding it along the surface until a final release. This will be rendered using a button, which will activate force feedback, dynamic feedback, vibration feedback, and linear damping. Lastly, once the button is turned off, the puck will be released in the GUI and the velocity of the handle will be translated into the simulation. This rendering plan will be further developed in the following checkpoint and will aid us in realistically simulating shuffleboard.
Our checkpoint goals were to finalize the mechanical design, choose the motor and sensors, order parts, and create an initial GUI design all of which were met. However, challenges included determining the best way to integrate optional vibration feedback into the striker without adding excessive mechanical complexity or wiring bulk. Further it is unknown if the coin motors we plan to use can achieve large enough amplitudes to transmit through a custom handle design. Therefore, due to this uncertainty coupled with the mechanical complexity/novelty of our initial designs we shifted to forego our 1DOF mechanism for a 2DOF pantograph-style device. This would have better force feedback and ultimately produce a more intuitive user experience for our purposes. We also began to realize that force rendering would require careful calibration and tuning to balance realism with the limits of our actuator.
Based on these early experiences, we refined our plan to place greater emphasis on fine-tuning the force feedback algorithm early. This phase provided clarity on how to structure the force interaction loop and highlighted the importance of smooth communication between the physical system and the GUI. Going forward, we are prepared to begin mechanical assembly and motor control setup as well as finishing our core haptic rendering algorithms.


Checkpoint 2
Since Checkpoint 1, we decided to pivot to a more interactive soccer style arcade game that introduces more skill requirements and creates a great and interactive experience. The game mockup had to be redesigned from the ground up but is now fully functional and ready to interface with the physics engine and rendering from our modified GraphKit and Arduino. A lot of work was spent identifying how to make satisfying ball physics and simulate various frictions artificially. A fully working sound event system, lose menu, pause menu, leader board, and score system has been put in place. Further through virtual com port simulation we have verified all mechanics work through serial parsing.


Design started of the pantograph device. We opted to use the existing hapkits and the graphkit conversion design we printed and set up a model for calibration and testing of force rendering functions. Building off of the modified graphkits of years prior we began working on a V2 design simultaneously that should remove unnecessary friction and pain points of the existing model. A custom handle end-effector was designed with a roller ball bearing that interfaces with a surface to prevent putting moments on the handle, keeping all forces in a single plane of action while minimizing any potential moments on the linkage system.


From a rendering standpoint, we were able to set up pin communication between the two hapkits. This is done using one hapkit purely as a MR sensor and connecting it to the other hapkit, where all the rendering is done and torque is output to the two separate motors. Development of the rendering will continue alongside building v2. The next steps would be to optimize calibration to determine wall limits and ball position, and connect position and velocity outputs to gui.
We were also able to determine the required equations necessary to compute the pantograph point positions, torques, and forces as shown below.


Overall we managed to meet all of our goals for this week which included basic serial communication, motor control and feedback, and a fleshed out gui. From here on we will work on converting to the modified v2 graphkit with custom end-effector and flesh out our rendering parameters to allow for full game realism.