2026-Group 3
Caption:
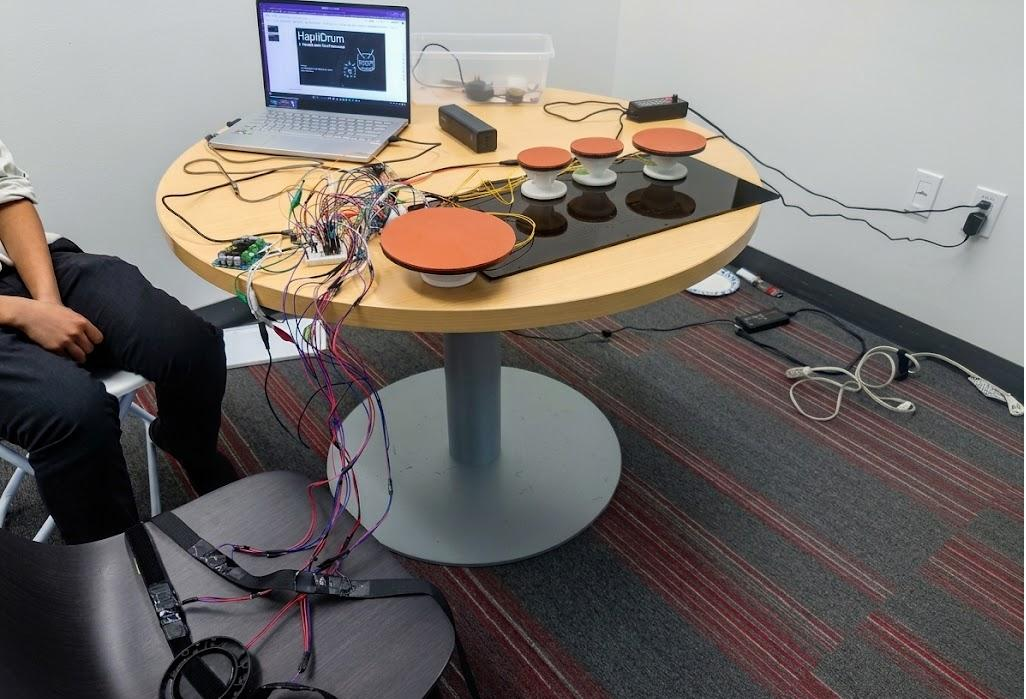
Full setup of HaptiDrum System, including
electronics, user haptic straps, and computer.
HaptiDrum
Project team member(s): Joseph Garcia, Jolene Lee, Ali Mohd, Dylan Win
HaptiDrum is a haptic drumset system that lets a player physically feel the impact and bass of their own drumming through a wearable vest. The system consists of two main components: a set of drum pads on a table, each equipped with a force sensor underneath, and a vest worn by the drummer that contains multiple vibration actuators. When a pad is struck, the controller reads which pad was hit and how hard, and drives the corresponding zone of the vest with a vibration whose intensity scales with the force of the strike. The wearer feels a heavy chest pulse when they hit the bass drum pad, a sharp sternal tap on the snare, and subtle upper-body buzzes on the hi-hat and cymbals. While our sensing system and mechanical elements could be refined to improve stability and responsiveness, we were able to demonstrate a working prototype that had drums that were clearly differentiable solely based on the haptic response.
On this page... (hide)
- Introduction
- Background
- Source 1: Feeling the beat where it counts: fostering multi-limb rhythm skills with the haptic drum kit
- Source 2: Piano Duo: Haptic Sharing System Supports Two-Piano Practice
- Source 3: An enhanced musical experience for the deaf: design and evaluation of a music display and a haptic chair
- Source 4: Vibrotactile enhancement of musical engagement
- Methods
- Results
- Future Work
- Acknowledgments
- Files
- References
- Appendix: Project Checkpoints
Introduction
The core motivation is recreating the complex nature of playing the drums which provides a full bodied experience. Usually, when a drummer wants to practice, they need to play on synthetic drums to limit the noise from practice. While this is sufficient for practicing rhythms, the typical vibration response is missing from the drums being static pads. As such, we wanted to see if systems like HaptiDrum would be to add that tactile feedback back for drums that have reduced tactility or drums that purely rely on visual feedback (i.e. in VR).
To recreate this feedback, we focused on placing a central bass module right over the chest, with 4 different ERM motor zones: two flanking opposite sides of the bass module and two zones lower down near the abdomen (also on left and right sides of the body). The placement of the bass module was to simulate the feeling of bass that comes from within the chest cavity when playing or listening to bass heavy music. Meanwhile, the ERM motors are used to simulate the high frequency "shock" that passes through the body when a hit is made.
Background
Source 1: Feeling the beat where it counts: fostering multi-limb rhythm skills with the haptic drum kit
https://dl.acm.org/doi/10.1145/1709886.1709892
The Haptic Drum Kit attaches four computer-controlled vibrotactile actuators (one to each wrist and ankle) and uses haptic pulses to guide multi-limb rhythmic patterns on a physical drum kit. Rather than simple stimulus-response cuing, the system exploits human entrainment: the involuntary tendency to synchronize body movements with an external rhythmic source. A design study with beginning drummers showed that participants could learn complex polyphonic drum patterns guided entirely by haptic stimuli, with no audio or visual feedback. The authors ground the design in Dalcroze eurhythmics theory, which holds that rhythmic understanding is fundamentally embodied and that movement and touch are primary channels for internalizing rhythm.
Implications for HaptiDrum: This is the closest prior art to our system and confirms that vibrotactile feedback placed on the body is an effective channel for communicating drumming information and that users respond to haptic rhythmic cues as naturally as to audio ones. The key difference is that the Haptic Drum Kit delivers cues to guide performance on a real acoustic kit, whereas HaptiDrum delivers feedback to reflect the player�s own strikes back through their body. Our system represents a closed-loop physical augmentation of the drum-playing experience rather than a guidance system.
Source 2: Piano Duo: Haptic Sharing System Supports Two-Piano Practice
https://ieeexplore.ieee.org/document/11123339
Piano Duo addresses the synchronization problem in two-piano performance, where musicians cannot see each other clearly due to music stands and instrument placement. The authors embed a 36-element load-cell pressure array into a piano bench seat to record the lead pianist�s center-of-gravity shifts, body sway, and rhythmic weight transfers. These signals are transmitted to a skin-stretch haptic feedback device with a second bench equipped with 36 rotating actuators worn by the second pianist during solo practice, so they can physically feel the rhythmic body habits of their partner. A month-long study with three pianist pairs showed measurable reductions in timing discrepancies for pieces practiced with the system, and qualitative reports indicated the haptic cues helped pianists internalize each other�s phrasing and breathing tendencies. The system validation revealed individual variability in how participants perceived haptic intensity, which suggests the need for per-user calibration.
Implications for HaptiDrum: Piano Duo establishes that body-contact haptic feedback driven by live musical force signals can successfully encode rhythmic and dynamic information in a way that transfers to a musician�s physical understanding. This validates our approach of using real-time force sensor readings to drive vest vibrations. The individual variability in their study also directly informs our design: we plan to include a calibration step in which the user strikes each pad and adjusts the vest�s vibration intensity for each actuator zone before the session begins.
Source 3: An enhanced musical experience for the deaf: design and evaluation of a music display and a haptic chair
https://dl.acm.org/doi/10.1145/1518701.1518756
This paper describes a system designed to enrich the musical experience of deaf users by routing live music signals into body-contact haptic feedback. The �Haptic Chair� houses vibrotactile transducers that deliver music-driven vibrations through the seat surface directly into the user�s body, supplemented by a synchronized visual display. The system was developed with input from profoundly deaf musicians and validated in a formal user study with 43 deaf participants. Results showed significant improvements in musical engagement and reported enjoyment compared to a silent baseline, with participants able to perceive rhythmic patterns, instrument entries, and dynamic changes through tactile sensation. The authors note that bass and low-frequency percussion instruments were the most clearly conveyed, since their vibrations fall in the most sensitive range for whole-body vibrotactile perception (below 100 Hz).
Implications for HaptiDrum: This is the foundational work for using body-contact vibrotactile feedback to convey the physical sensation of music. Two specific findings directly shape our design. First, bass and percussion instruments are the most effectively communicated through touch because their frequency content (kick drum fundamentals typically fall between 50-100 Hz) falls squarely in the range where whole-body vibrotactile sensitivity is highest. This motivates our choice to focus the vest�s most prominent actuator zone on the lower chest and solar plexus, mapping to the bass drum which is the instrument most physically felt in a real drum kit. Second, the paper found that a single transducer could not convey the spatial richness of a full band; multiple spatially distributed actuators were needed to differentiate instruments. This means that our vest will require multiple zones to result in a representative mapping.
Source 4: Vibrotactile enhancement of musical engagement
Vibrotactile enhancement of musical engagement | Scientific Reports
Siedenburg explores the ability for experienced vibrations to improve on a music listening experience. They set up a chair that is able to vibrate points of contact independently that can be synced with played music. They set up different conditions, a normal no-haptic listening experience, a full body synced haptic experience, a sectioned vibration experience based on instruments played, and a desynced experience when the chair vibrates for a song not playing. Their results show pleasantness and liking, metrics they defined which may be useful for us, for both the mono and whole body increased compared to the baseline and the desynced version was worse. Adding congruent vibrations increased engagement (Cohen�s d > 1.3), which indicates vibrations add to the immersion of music, which is helpful for us.
Implications for HaptiDrum: The results from this study corroborate what we�ve seen with our other research in that vibrations will be able to enhance experience with music. Aside from the obvious results, something relevant for us is the insignificance between the whole body and sectioned vibrations, which we will cite in case the sectioned vibrations don�t feel right when testing. Something interesting is making a chair instead of a vest, which we may consider since a vest could feel unnatural but a chair vibrating could feel similar to a drum chair. This is a seamless transition, if needed, once the drum kit and vibration assembly has been made.
Methods
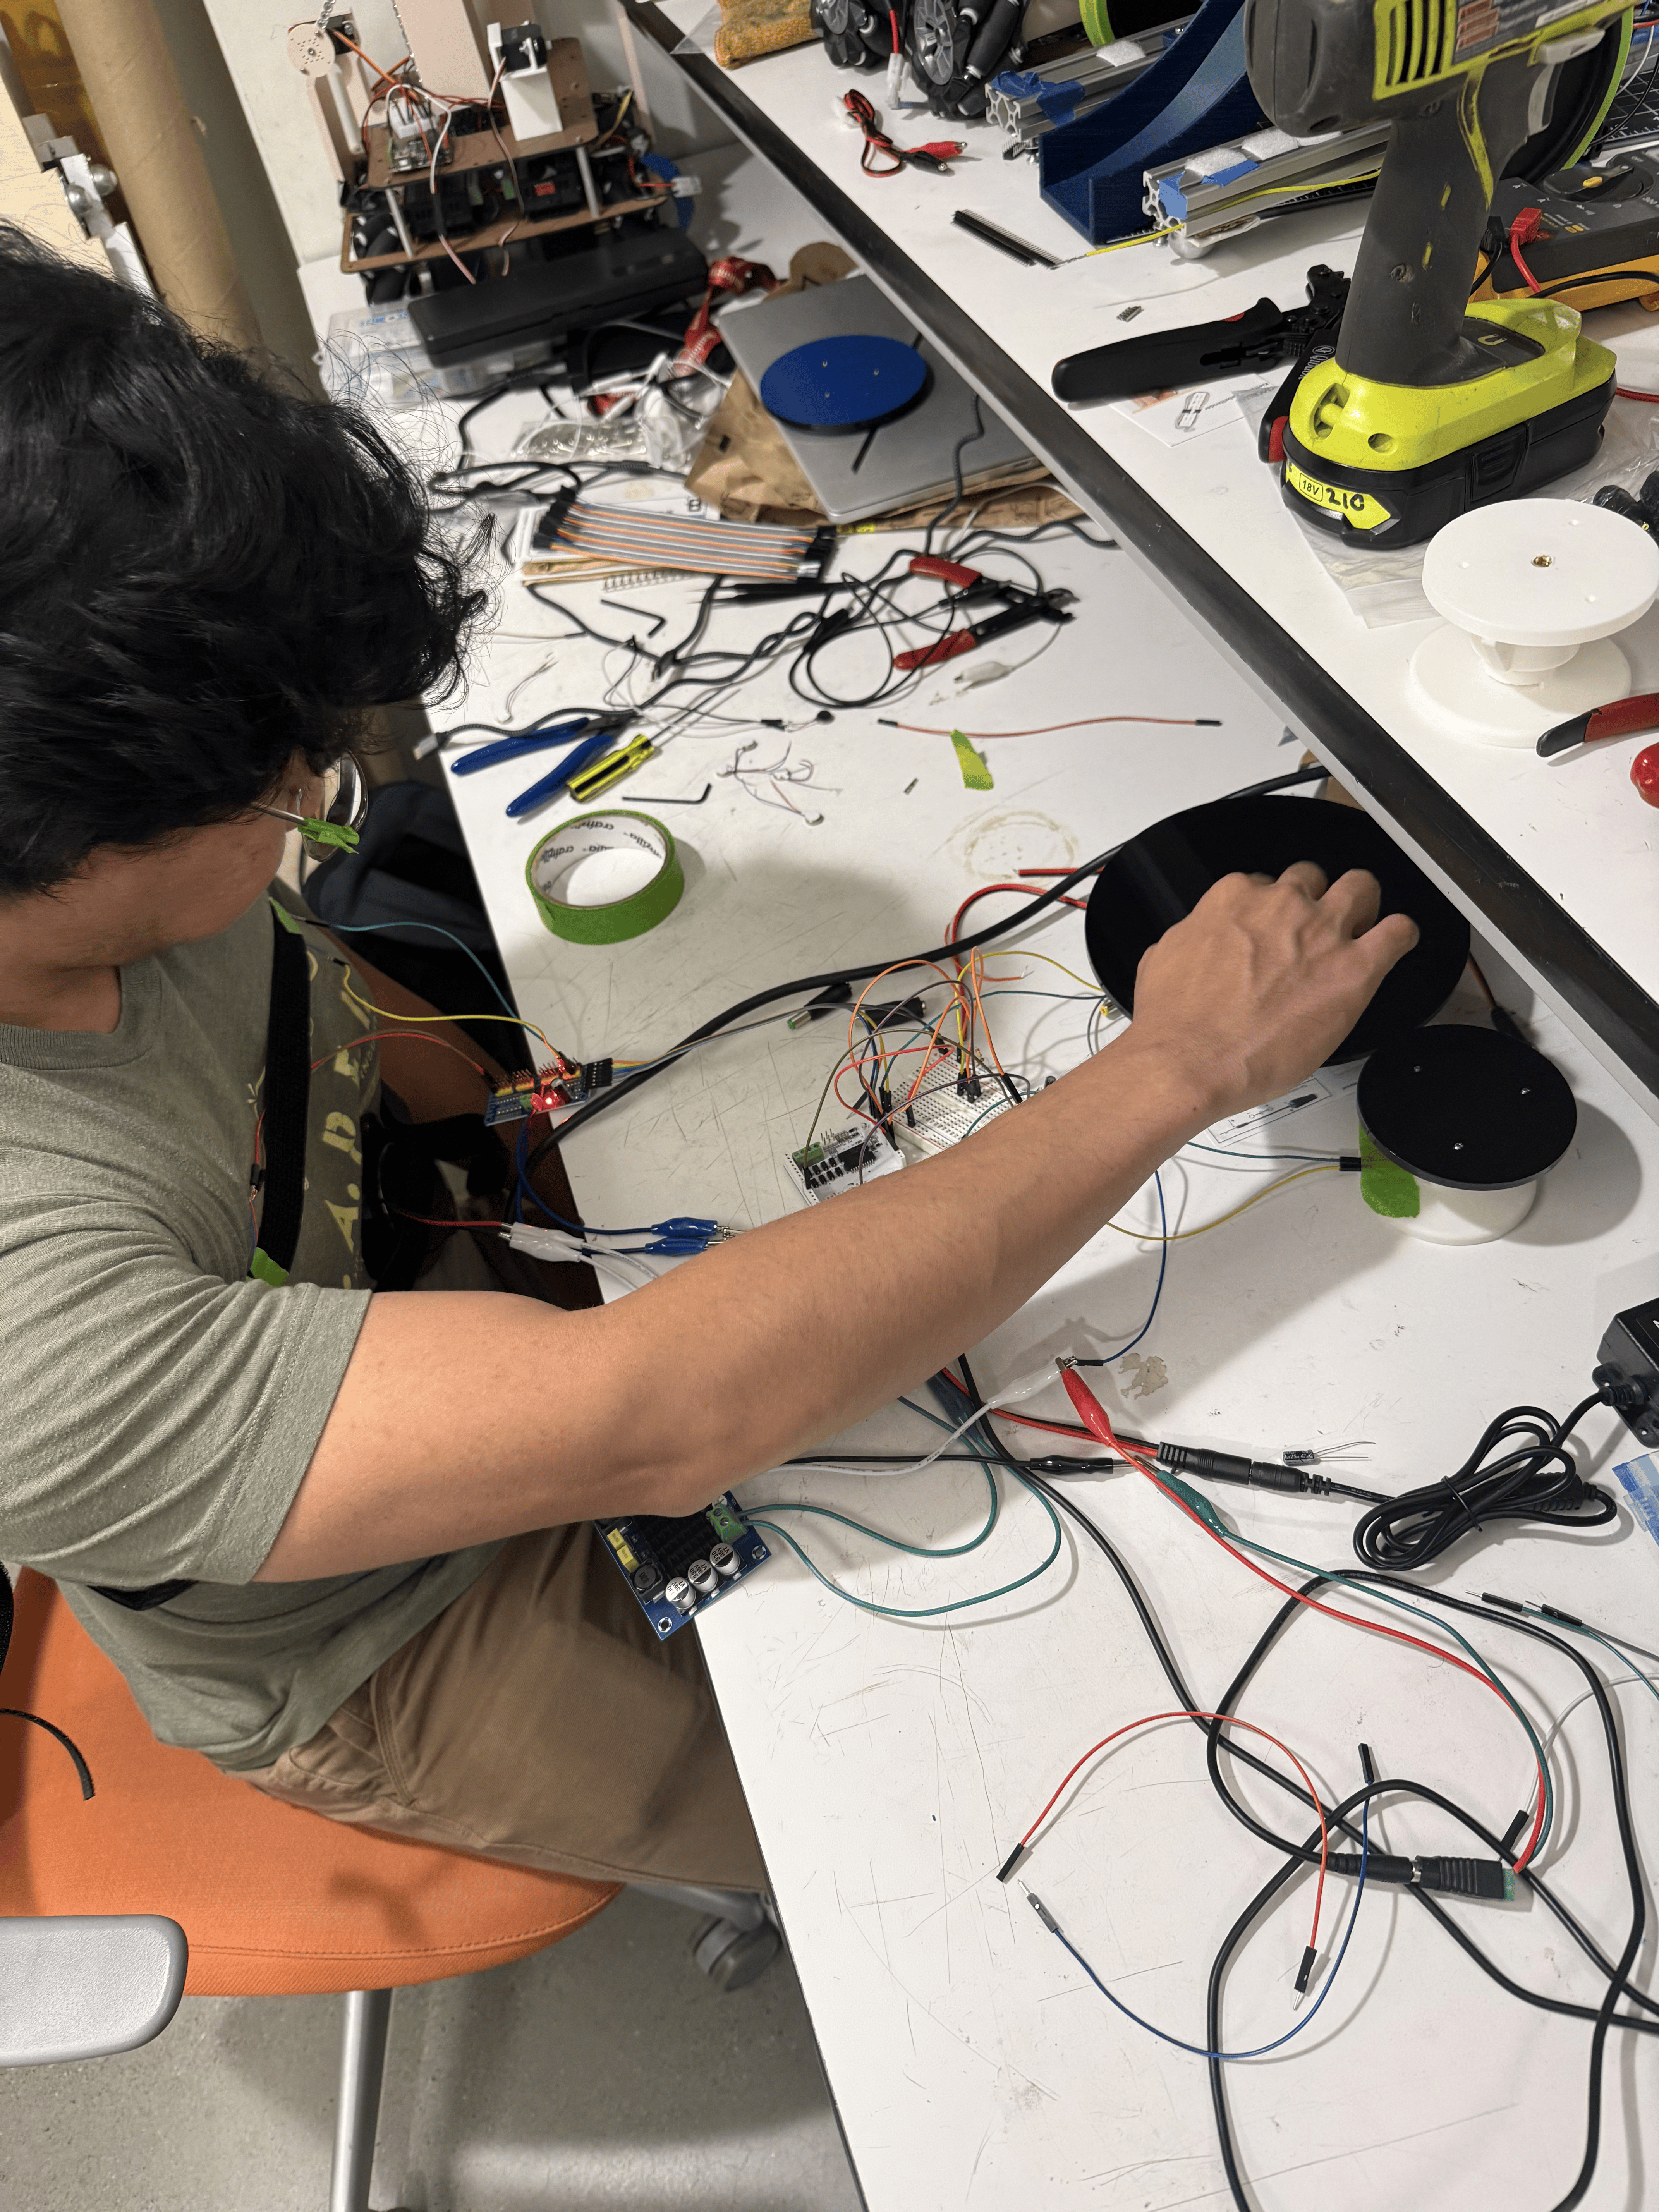
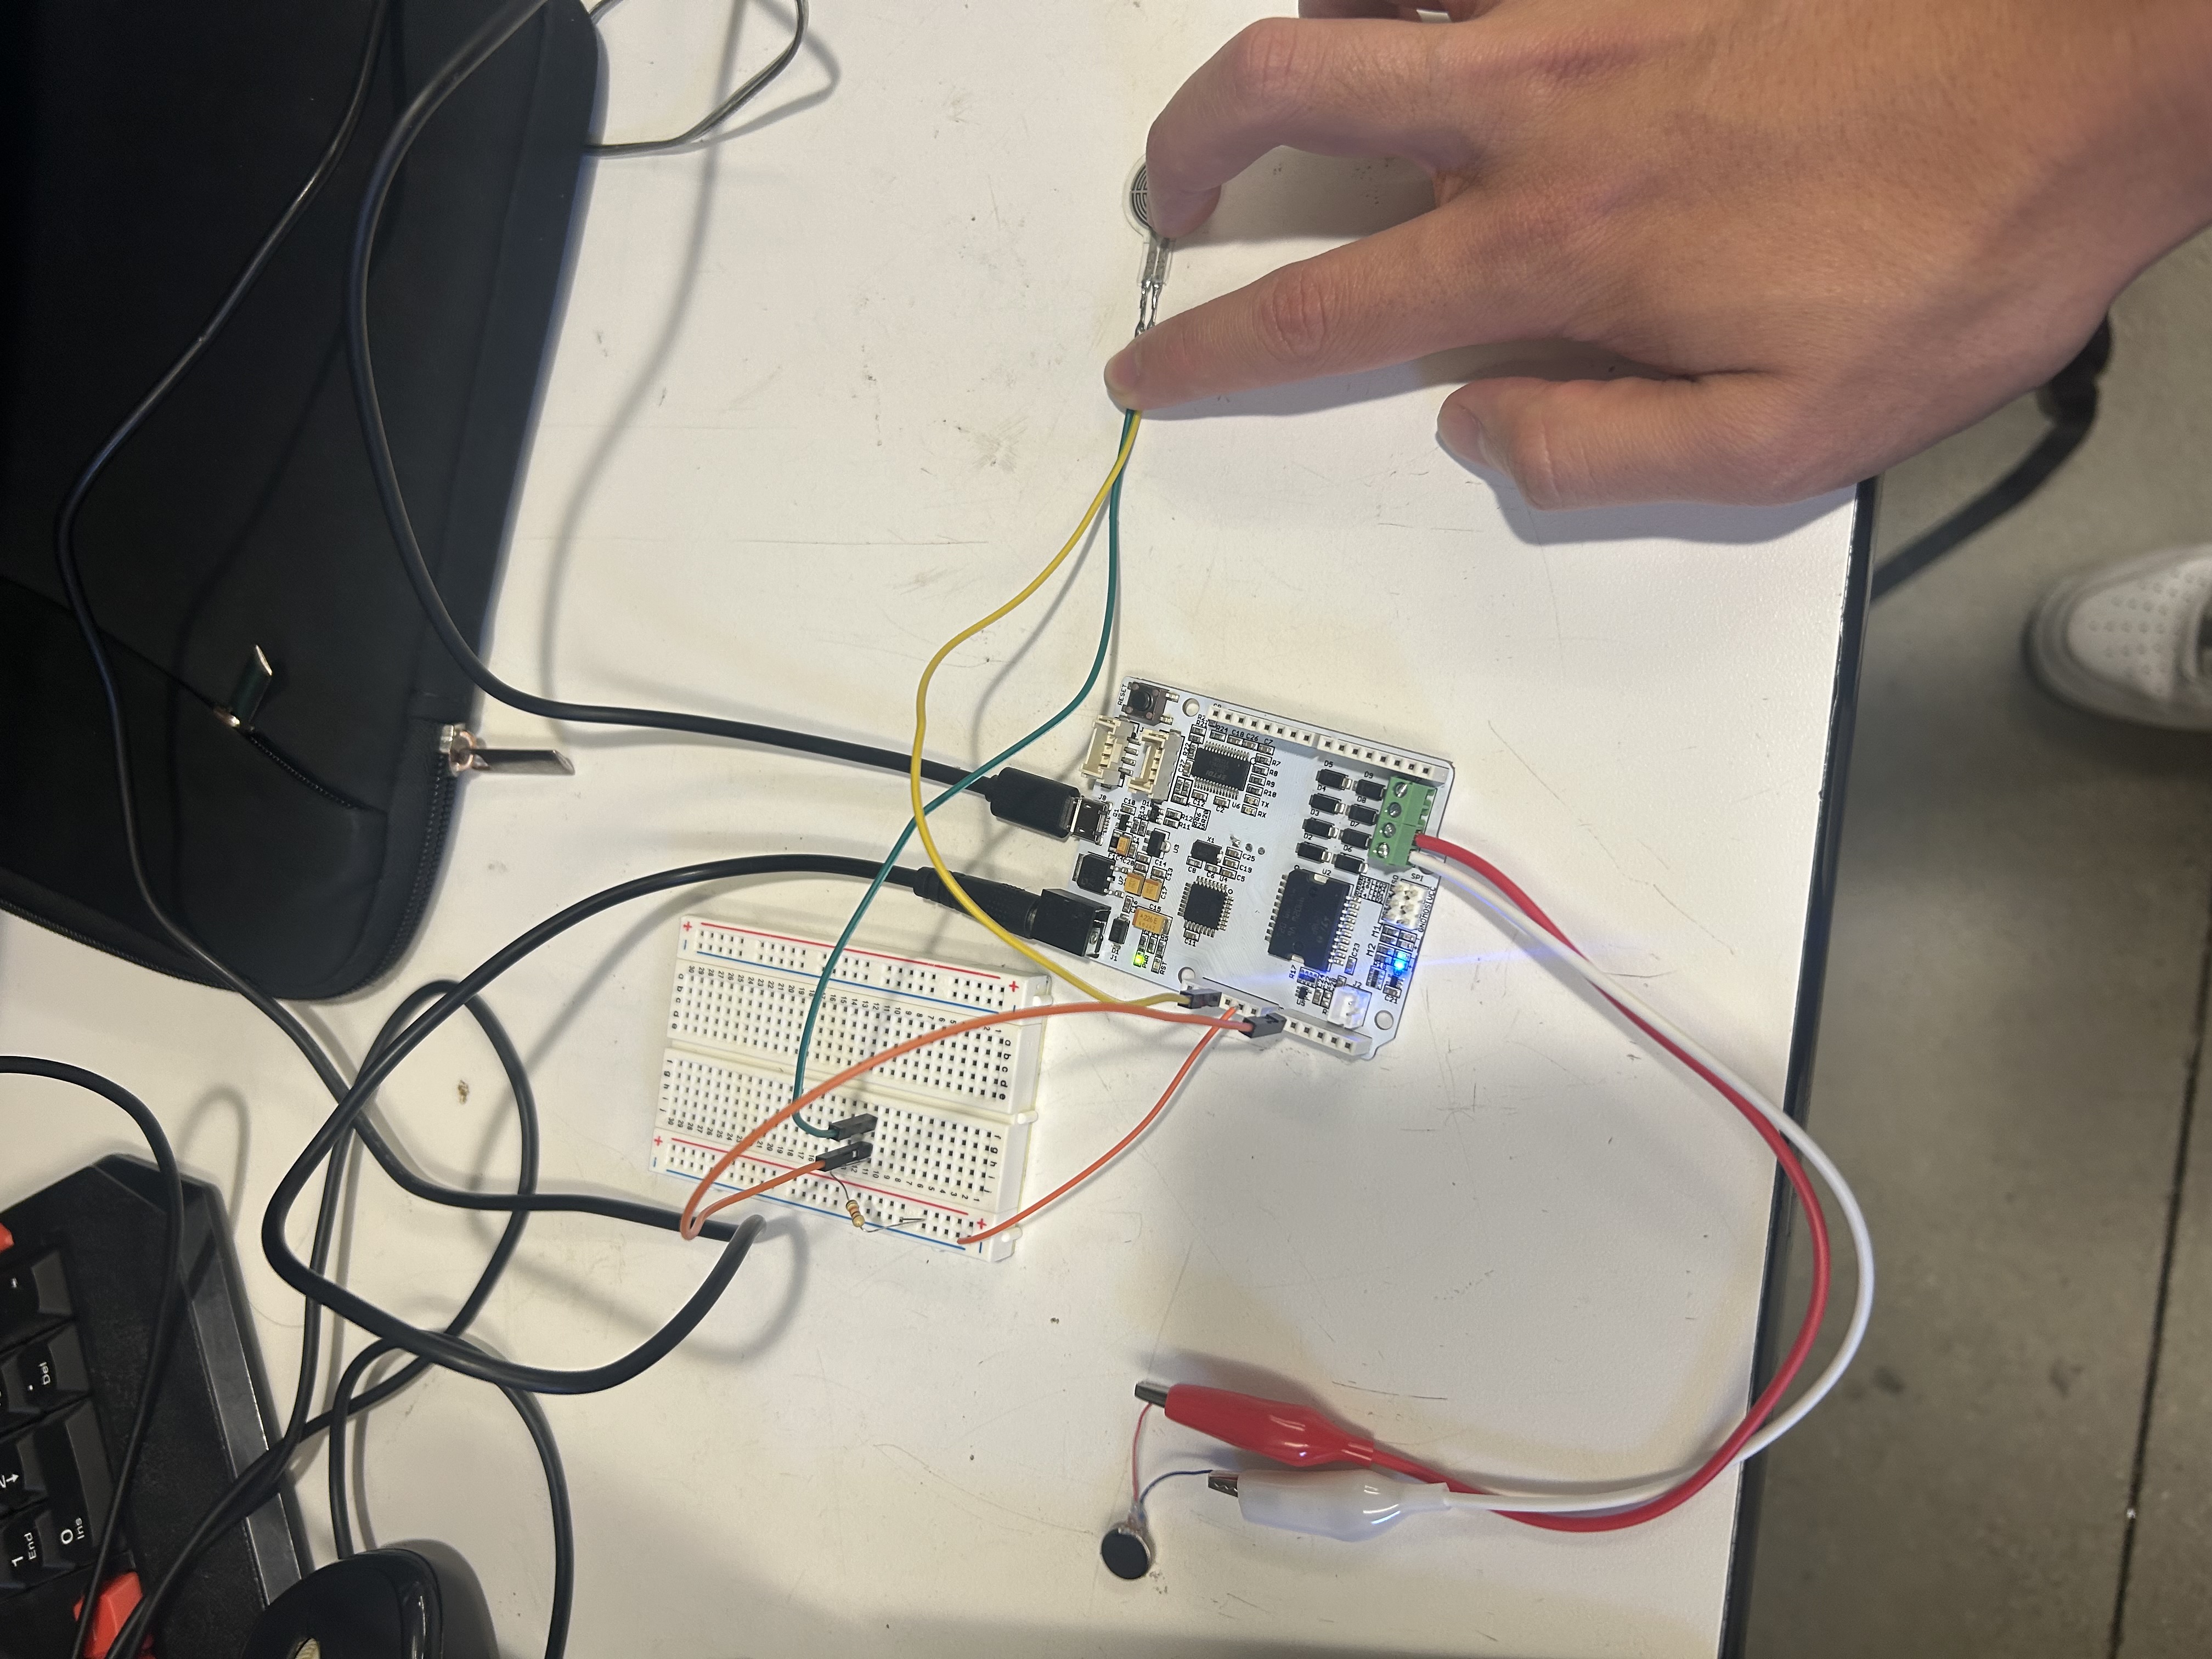
The HaptiDrum consists of three main subsystems: the drum played by the user, the electronics/computer assembly, and the wearable haptic straps. The drum are made of 3D printed material designed such that the impact the user creates on the drum is focused onto the smaller area of the force sensitive resistors (FSRs). These FSRs send a signal to a Hapkit Board (Arduino Uno) which gives an analog value based on how hard the FSR, and thus the drum, is hit. The haptic response of the wearable portion of the device depends on how fast and hard the corresponding drum is hit. For example, there will always be a little bit of signal the FSRs collect passively, so we had to strategically choose a minimal force over a certain amount of time that would register as a proper hit. This is elaborated upon in the System Analysis and Controls section.
The electronic hardware was chosen to create the proper signal to drive the bass module and the coin ERMs. A simple noise filtering circuit was made for the bass module and the ERMs were controlled via a central PWM module via I2C. In order to drive the ERMs to a strong enough vibration, a transistor array was also implemented. Additionally, a Python script ran a code to play the drum sound corresponding to the drum that was played in order to sell the illusion. Specifics will be elaborated on in the Hardware Design and Implementation section.
The wearable haptic straps were made of two strap assemblies. The top one would go under the arms with the bass module on the upper chest and the bottom one would go slightly higher than the waist, around the stomach area. The top one had two sets of two ERMs at the auxiliary around the upper outer pectorals (or lower outer pectoral/ribs if more comfortable for the user) and a bass module at the center that would be pressed against the sternum. The lower one had two sets of two ERMS at similar distances as the top one that would press along the sides of the lower torso. Each drum had a specific vibration profile that would distinguish them from each other and create the haptic illusion.
Hardware Design and Implementation
The hardware is made of three subsystems:
Drums: Each drum pad uses a rubber top surface to create a more natural drumming feel, with interchangeable mounting plates that allow for four different pad sizes. A shared top adapter connects each pad to the same core mechanism, using a heat-set insert and shoulder screw as both the main assembly feature and the motion transfer element. The shoulder screw sits close to the FSR sensor and is supported along its length, allowing light taps, edge presses, and full strikes to transfer directly into the sensor with minimal travel. The FSR is held in a constrained slot in the base for consistent alignment, while spring-back foam helps the pad reset quickly and reduce false or double presses. The final assembly attached the four drum pads with Velcro to a folding acrylic base with engraved team branding and indexed locations, allowing the pad layout to be adjusted for different users and setups.
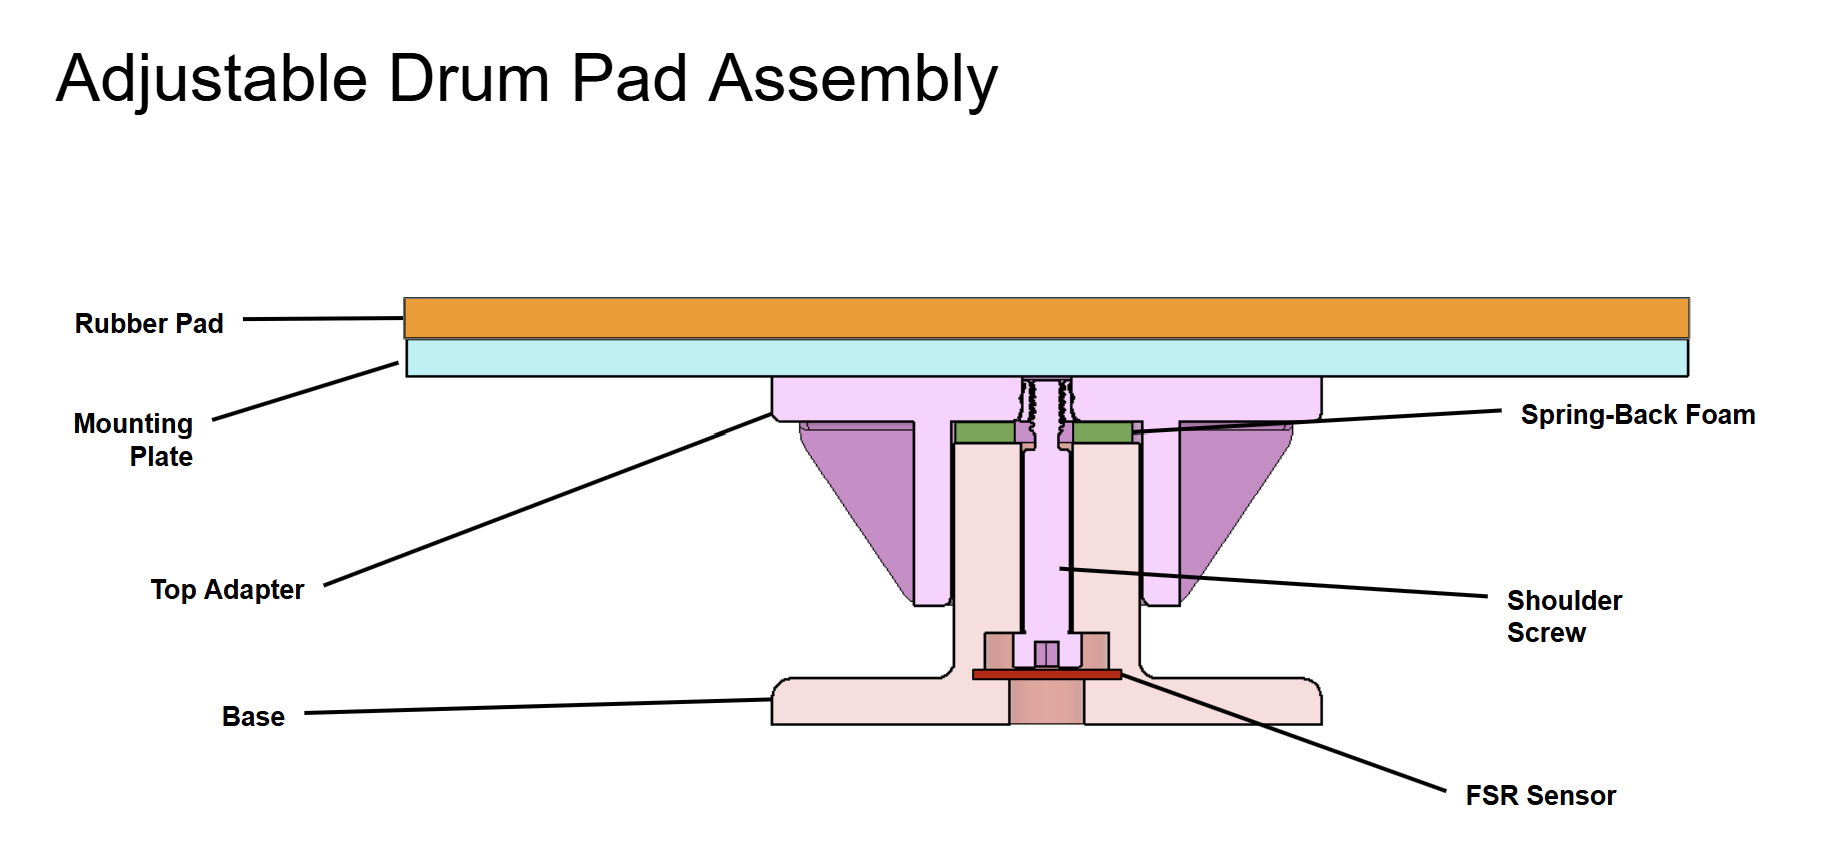
Cross-sectional view of the drum pad assembly
Electronics: The electronics consists of a few main components: the Hapkit microcontroller, the FSRs array, the ERMs array, a transistor array (ULN2803), a PWN I2C driver for the ERMs (PCA9685), a bass module (TT25), and a driver for the bass module (TPA3116). The FSRs are connects to a circuit with 24k Ohm resistors into the analog pins of the microcontroller for input. The PCA9685's I2C connectors are appropriately connected to the microcontroller's I2C connectors. The PCA9685 is directly connected to an adjustable power source set to 7-8 V. The ULN2803 transistor array's V+ pin is also connected to the same V+ as the PCA9865, and the PCA9685 PWN pins are connected to the corresponding input pins of the ULN2803. For each ERM, the V+ wire connected to the V+ lines on the PCA9685, and the input wires connected to the corresponding output pins of the ULN2803. The bass side has its own 12V power source connected to the TPA3116, with the controller pins connected to a noise dampening circuit which connected to a digital pin in the microcontroller. The TT25 bass module directly connected to the TPA3116 driver. All grounds were shared.

Electrical schematic of the Arduino controller, motors, sensors, and amplifier
Haptic Straps: The haptic straps were created by taping the ERMs to the auxiliary positions with electrical tape. Two ERMs placed one inch apart formed a group. Two groups of ERMs were taped onto each strap, located such that they would interact above/below the user's chest and waist, respectively. The upper strap was equipped with the TT25 bass module, attached using the included plastic base plate that we threaded the strap through then clamped tight with the provided screws. To attach the two straps onto a user, we simply wrapped the straps around the chest and waist and used the Velcro to affix the straps until it was tight enough such that the motors were pressed against the user's body.

Front view of the straps after installed
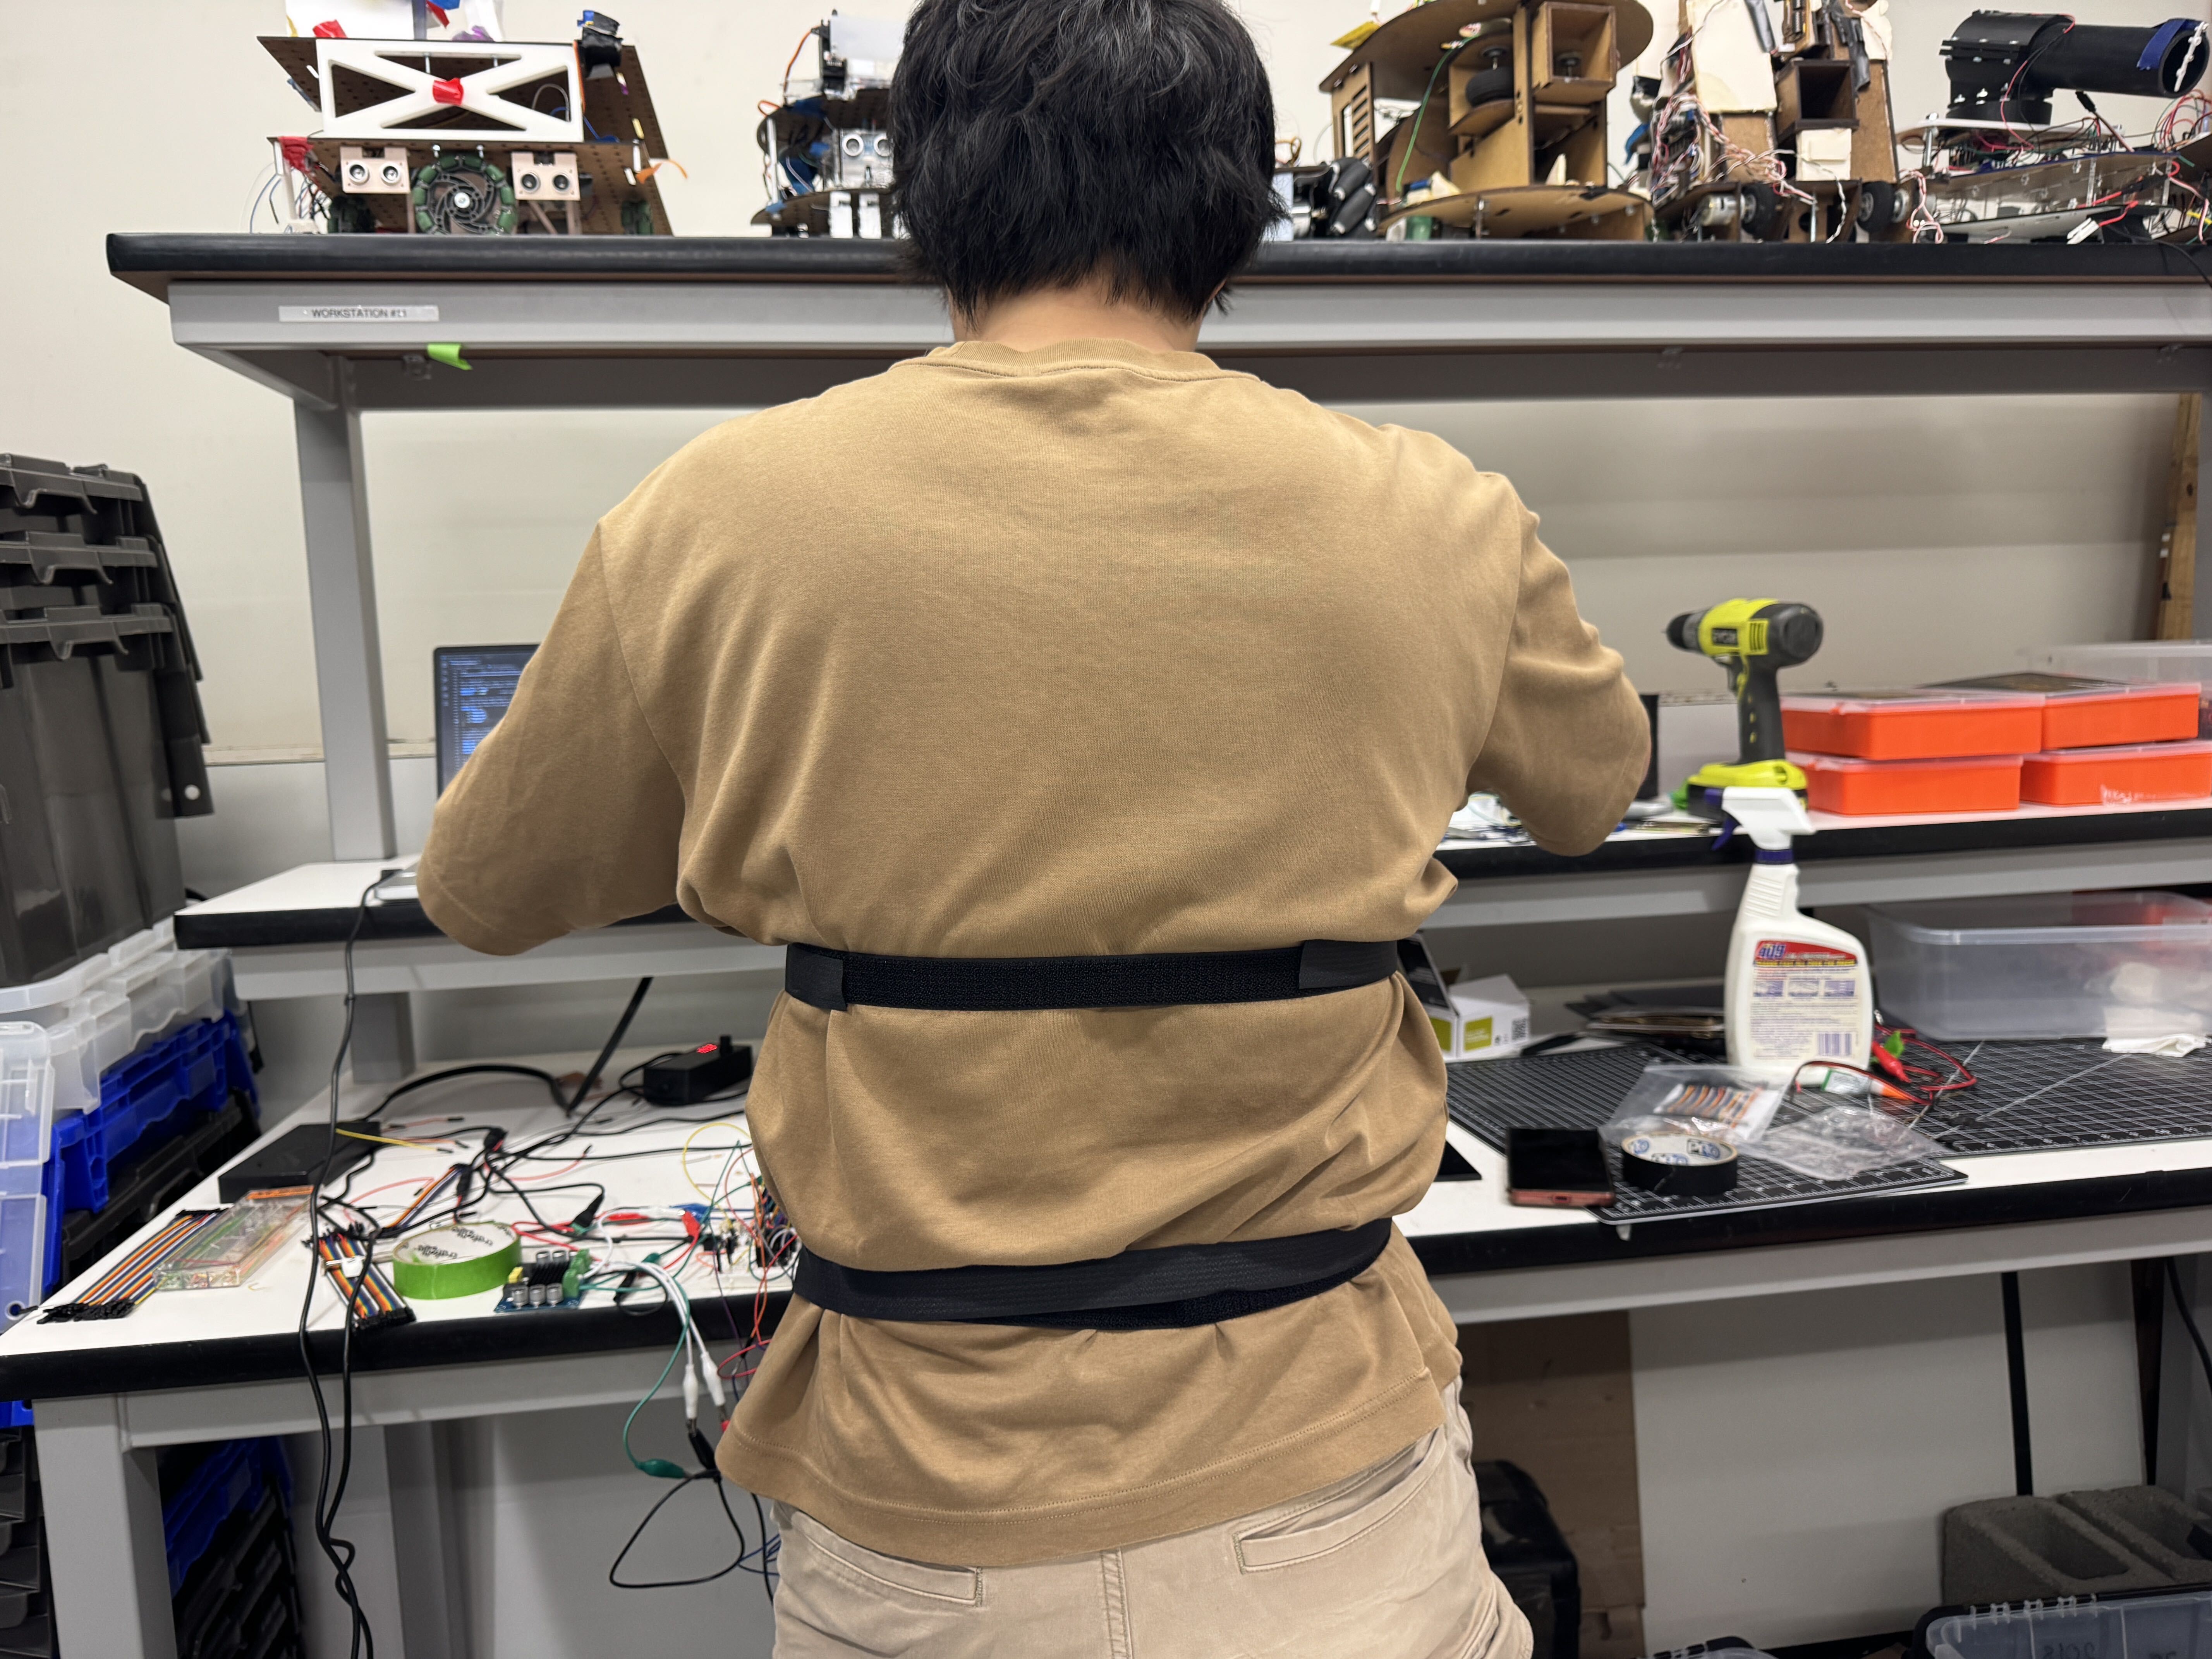
Back view of the straps after installed
System Analysis and Control
With the FSRs hooked up each giving signals in parallel to the microcontroller, four subtasks are constantly running while the system is on:
Strike Detection: Each FSR is read at a 10ms tick rate. The detector compares the rate of change between successive samples. This essentially means that it looks for impulses rather than purely creating a hit region via force output. When this difference in the analog signal is larger than 150 counts between samples, it is registered as hit. This prevents the drum from being played when a slow increase in force is applied and stops the drum from repeatedly registering hits if the drum is held down. This makes the drum more realistic as this behavior matches that of a real drum, where sound is only played when a high impulse is applied, not necessarily high force.
Bass Actuation: The chest transducer (Dayton TT25) is driven by a 25 Hz square wave on pin 10, gated by an amplitude envelope that decays exponentially after each strike. Because the TT25 is a voice-coil transducer with negligible mechanical inertia, it tracks the commanded envelope precisely, producing a sharp onset and a smooth, natural feeling tail. Each drum carries its own independent bass envelope with its own decay rate and overlapping strikes sum on the shared transducer (clamped at maximum). This means two quick hits on different drums layer their amplitudes rather than cutting each other off, producing a thump that builds when multiple drums play together which matches how a real bass heavy kit feels when several drums are struck at once.
ERM Actuation: The 8 ERMs on the vest are grouped into four spatial regions on the torso, and each drum has its own profile that specifies how strongly it drives each region. Hitting a drum actuates all four at the per-region strengths defined for that drum, producing a distinct spatial signature for each drum across the body. Like the bass, the ERMs use an exponentially decaying envelope after each strike, with the initial intensity and decay rate both tunable per drum. Overlapping strikes from different drums layer in each region, so multiple drums hit in quick succession build up rather than canceling each other.
Output: The PCA9685 16-channel PWM driver, connected to the Arduino over I2C, controls the ERMs through a ULN2803 driver chip that supplies the actual motor current. The PWM duty value for each channel is only written when it changes: once at the start of a strike and again as the envelope decays past discrete steps. The chest channel uses Arduino pin 10 configured for 31.25 kHz PWM via direct Timer1 register configuration, smoothed by a RC low-pass filter into an audio-band signal, then amplified by a TPA3116D2 mono Class-D amplifier driving the TT25. Additionally, the microcontroller writes the drum number and intensity each hit registered to the 9600 baud serial monitor, which is read by a Python script running on a laptop alongside the whole setup which plays the corresponding drum sound assigned. The volume played scales with the intensity of the hit. If using the code provided, also download the provided drum sound files for the code to use.
Tuning
To create distinct haptic signatures for each drum (bass, tom, snare, and hihat, ordered from lowest to highest frequency sound profiles), we first matched the motor's primary frequencies to the frequencies of the real life instruments as measured and analyzed in Checkpoint 1 and 2. Then, we tuned five primary parameters within its code: FSR strike sensitivity, ERM vibration profile, ERM decay rate, bass peak amplitude, and bass decay rate. Strike sensitivity determined how much force was required for a drum hit to register, allowing us to balance responsiveness across different pads. The ERM vibration profile controlled the intensity distribution across the vest�s vibration motors, while the ERM decay parameter governed how quickly these vibrations faded after a strike. To further differentiate drums, we incorporated a low-frequency bass component whose initial amplitude (bass peak) and exponential decay rate were adjusted independently for each drum. Together, these parameters enabled the bass drum to produce a strong, sustained chest pulse; the tom to have a moderate bass and strong distributed vibration; the snare to generate a sharper and shorter feedback; and the hi-hat to have a sharp but more sustained force. Through iterative user testing and parameter adjustment, we were able to create haptic responses that users could reliably distinguish and match to the real life instruments.

Screenshot of code used to tune our four drums taken from our uploaded Final Code.
Results
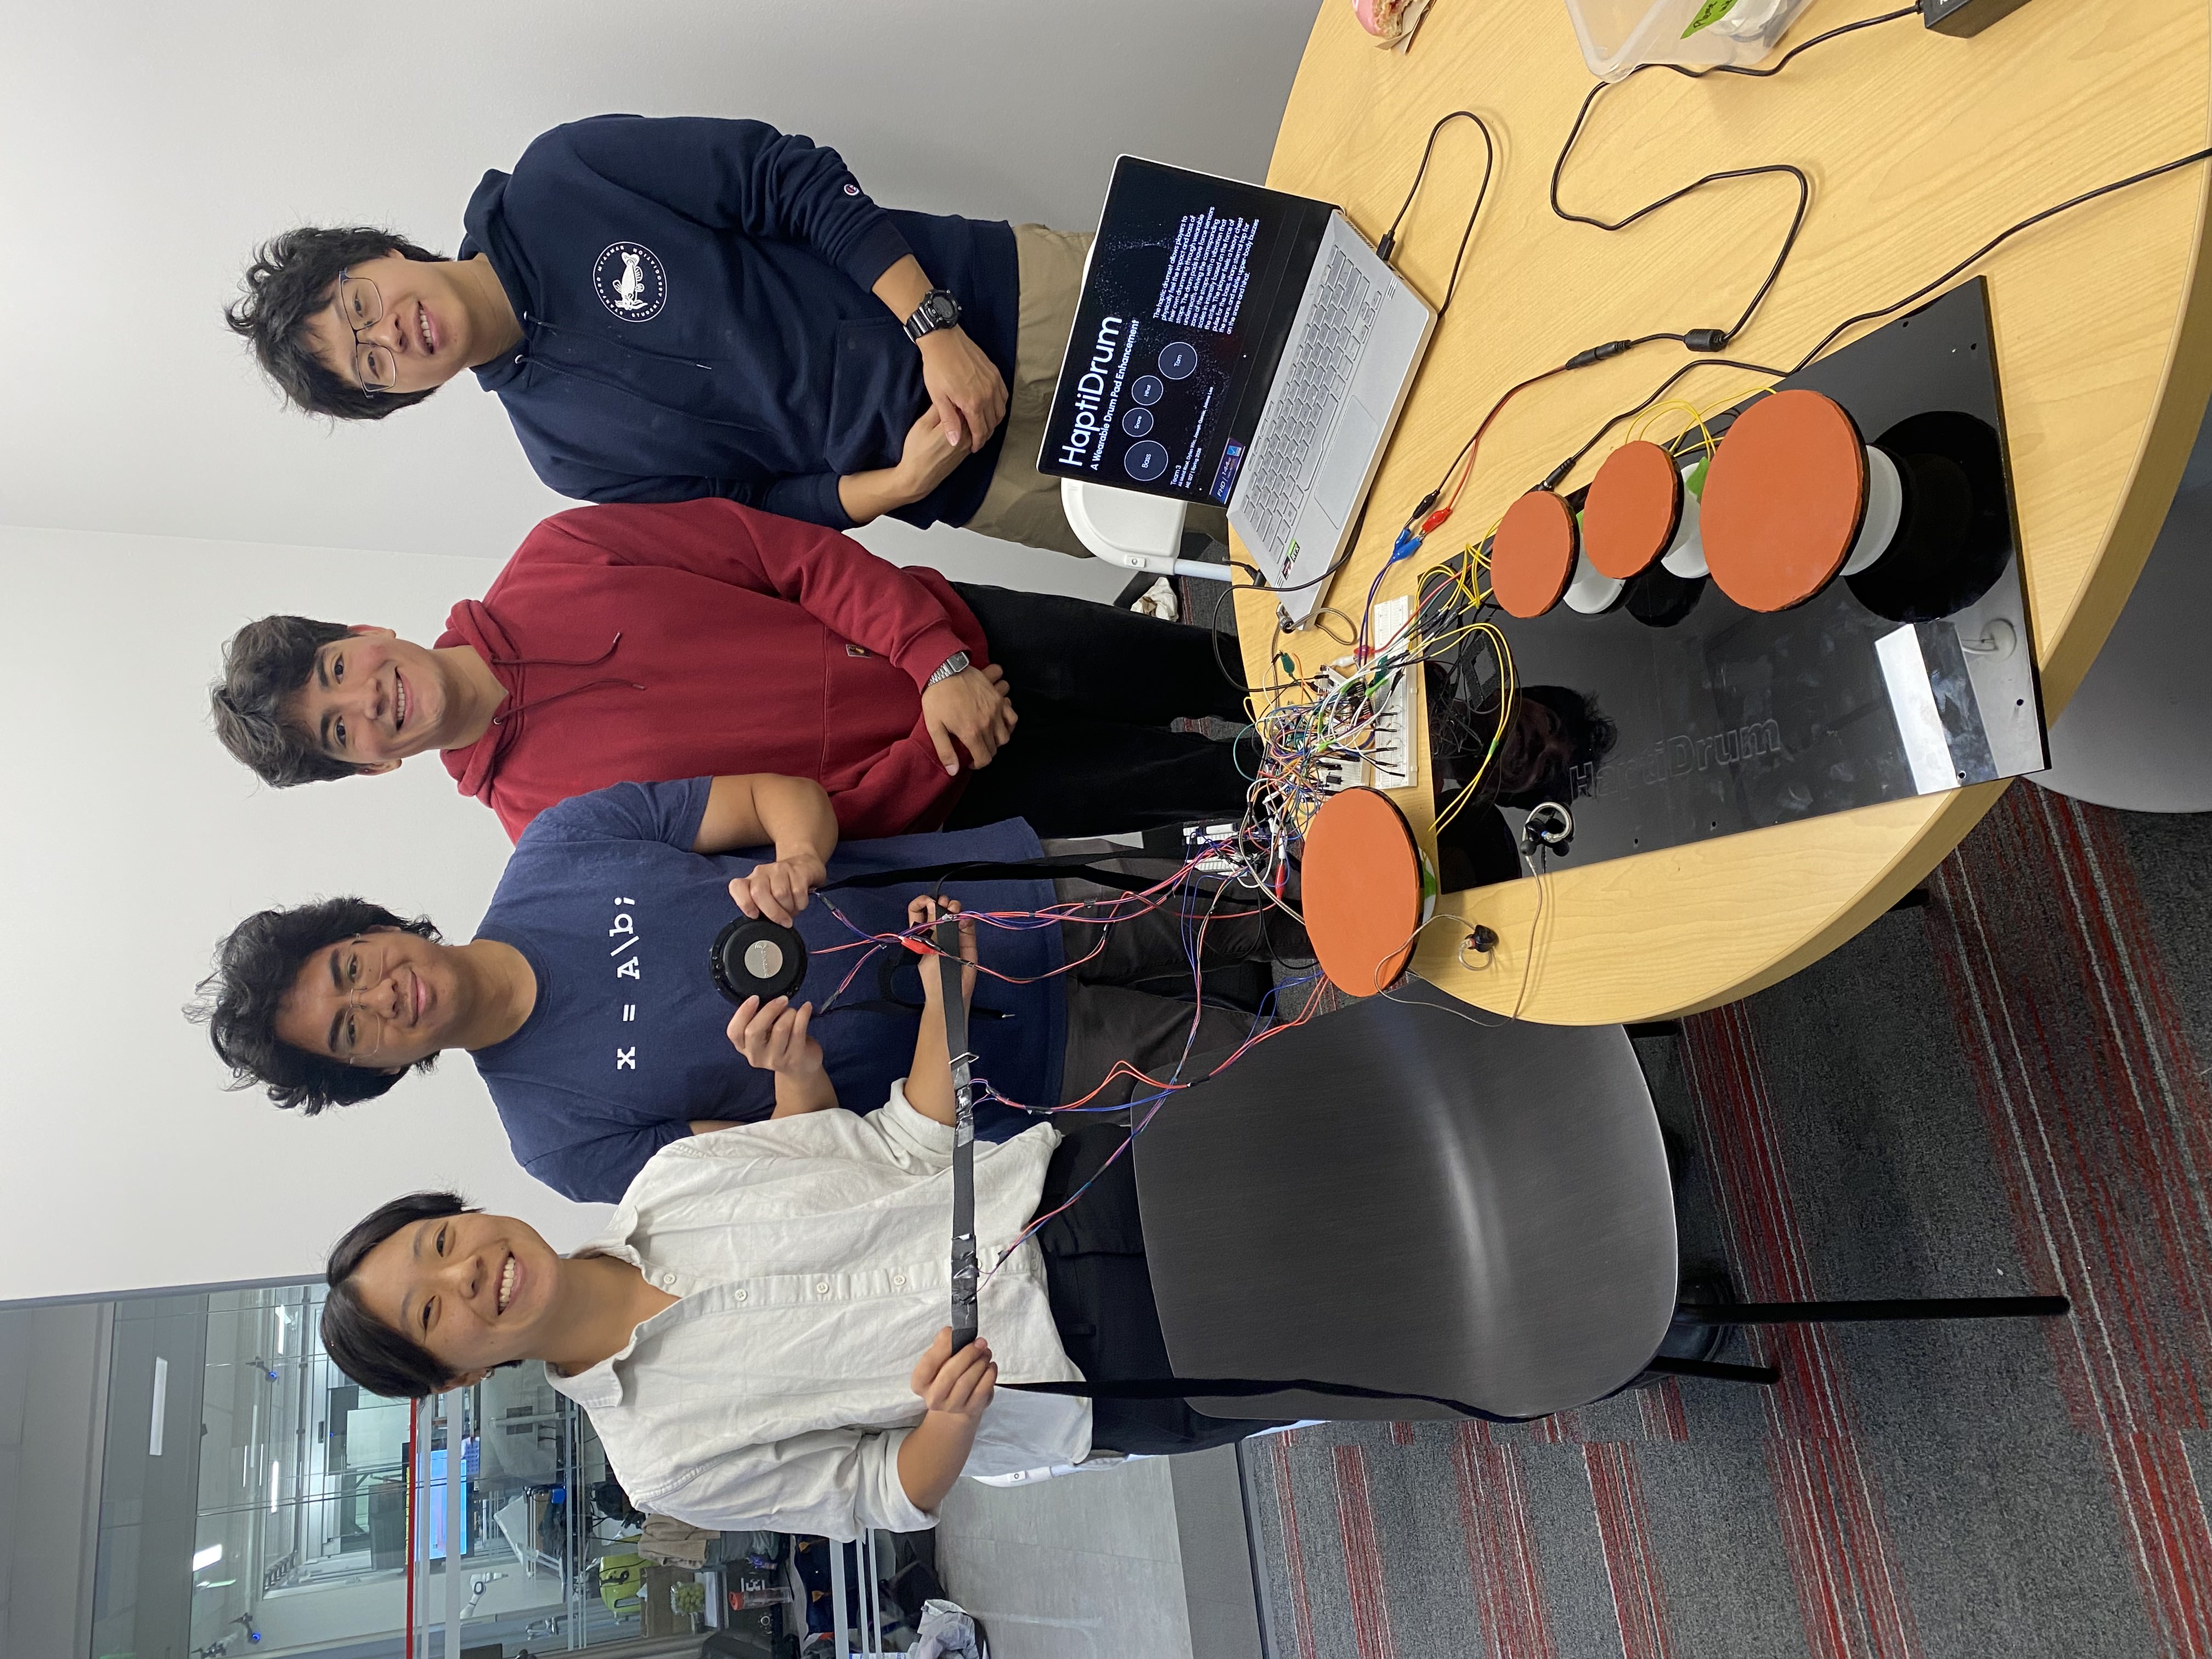
Team photo with the two straps and drum pads in view
At the open house, users responded strongly to the bass feedback, with many surprised by how clearly they could feel the bass module through the wearable strap. It was very common to have people's first responses after the first touch be an audible "Oooh". Several users were able to use the audio feedback to develop simple drumming patterns, and many commented that the drum pads felt responsive and satisfying to play.
The FSR-based pads reliably captured light taps, edge presses, and stronger hits, which helped make the interaction feel more natural. The adjustable straps also made it easy to tighten the ERMs and bass module against different users� bodies, improving contact across different body types. Feedback on the ERM motors was more mixed. While some users noticed the different vibration patterns, others had difficulty distinguishing between the smaller drums, especially when wearing thicker layers. This suggested that the ERMs may work better with stronger contact or closer-to-skin placement. Overall, the bass module and responsive drum pads were the strongest parts of the experience, while the ERM feedback would benefit from stronger separation between vibration patterns and more consistent contact with the body.
The headphone audio further enhanced immersion by synchronizing the user�s auditory and haptic feedback. By matching what the user heard with what they felt through the vest, the system created a more realistic soundscape and increased the overall perceptual realism of the drumming experience.

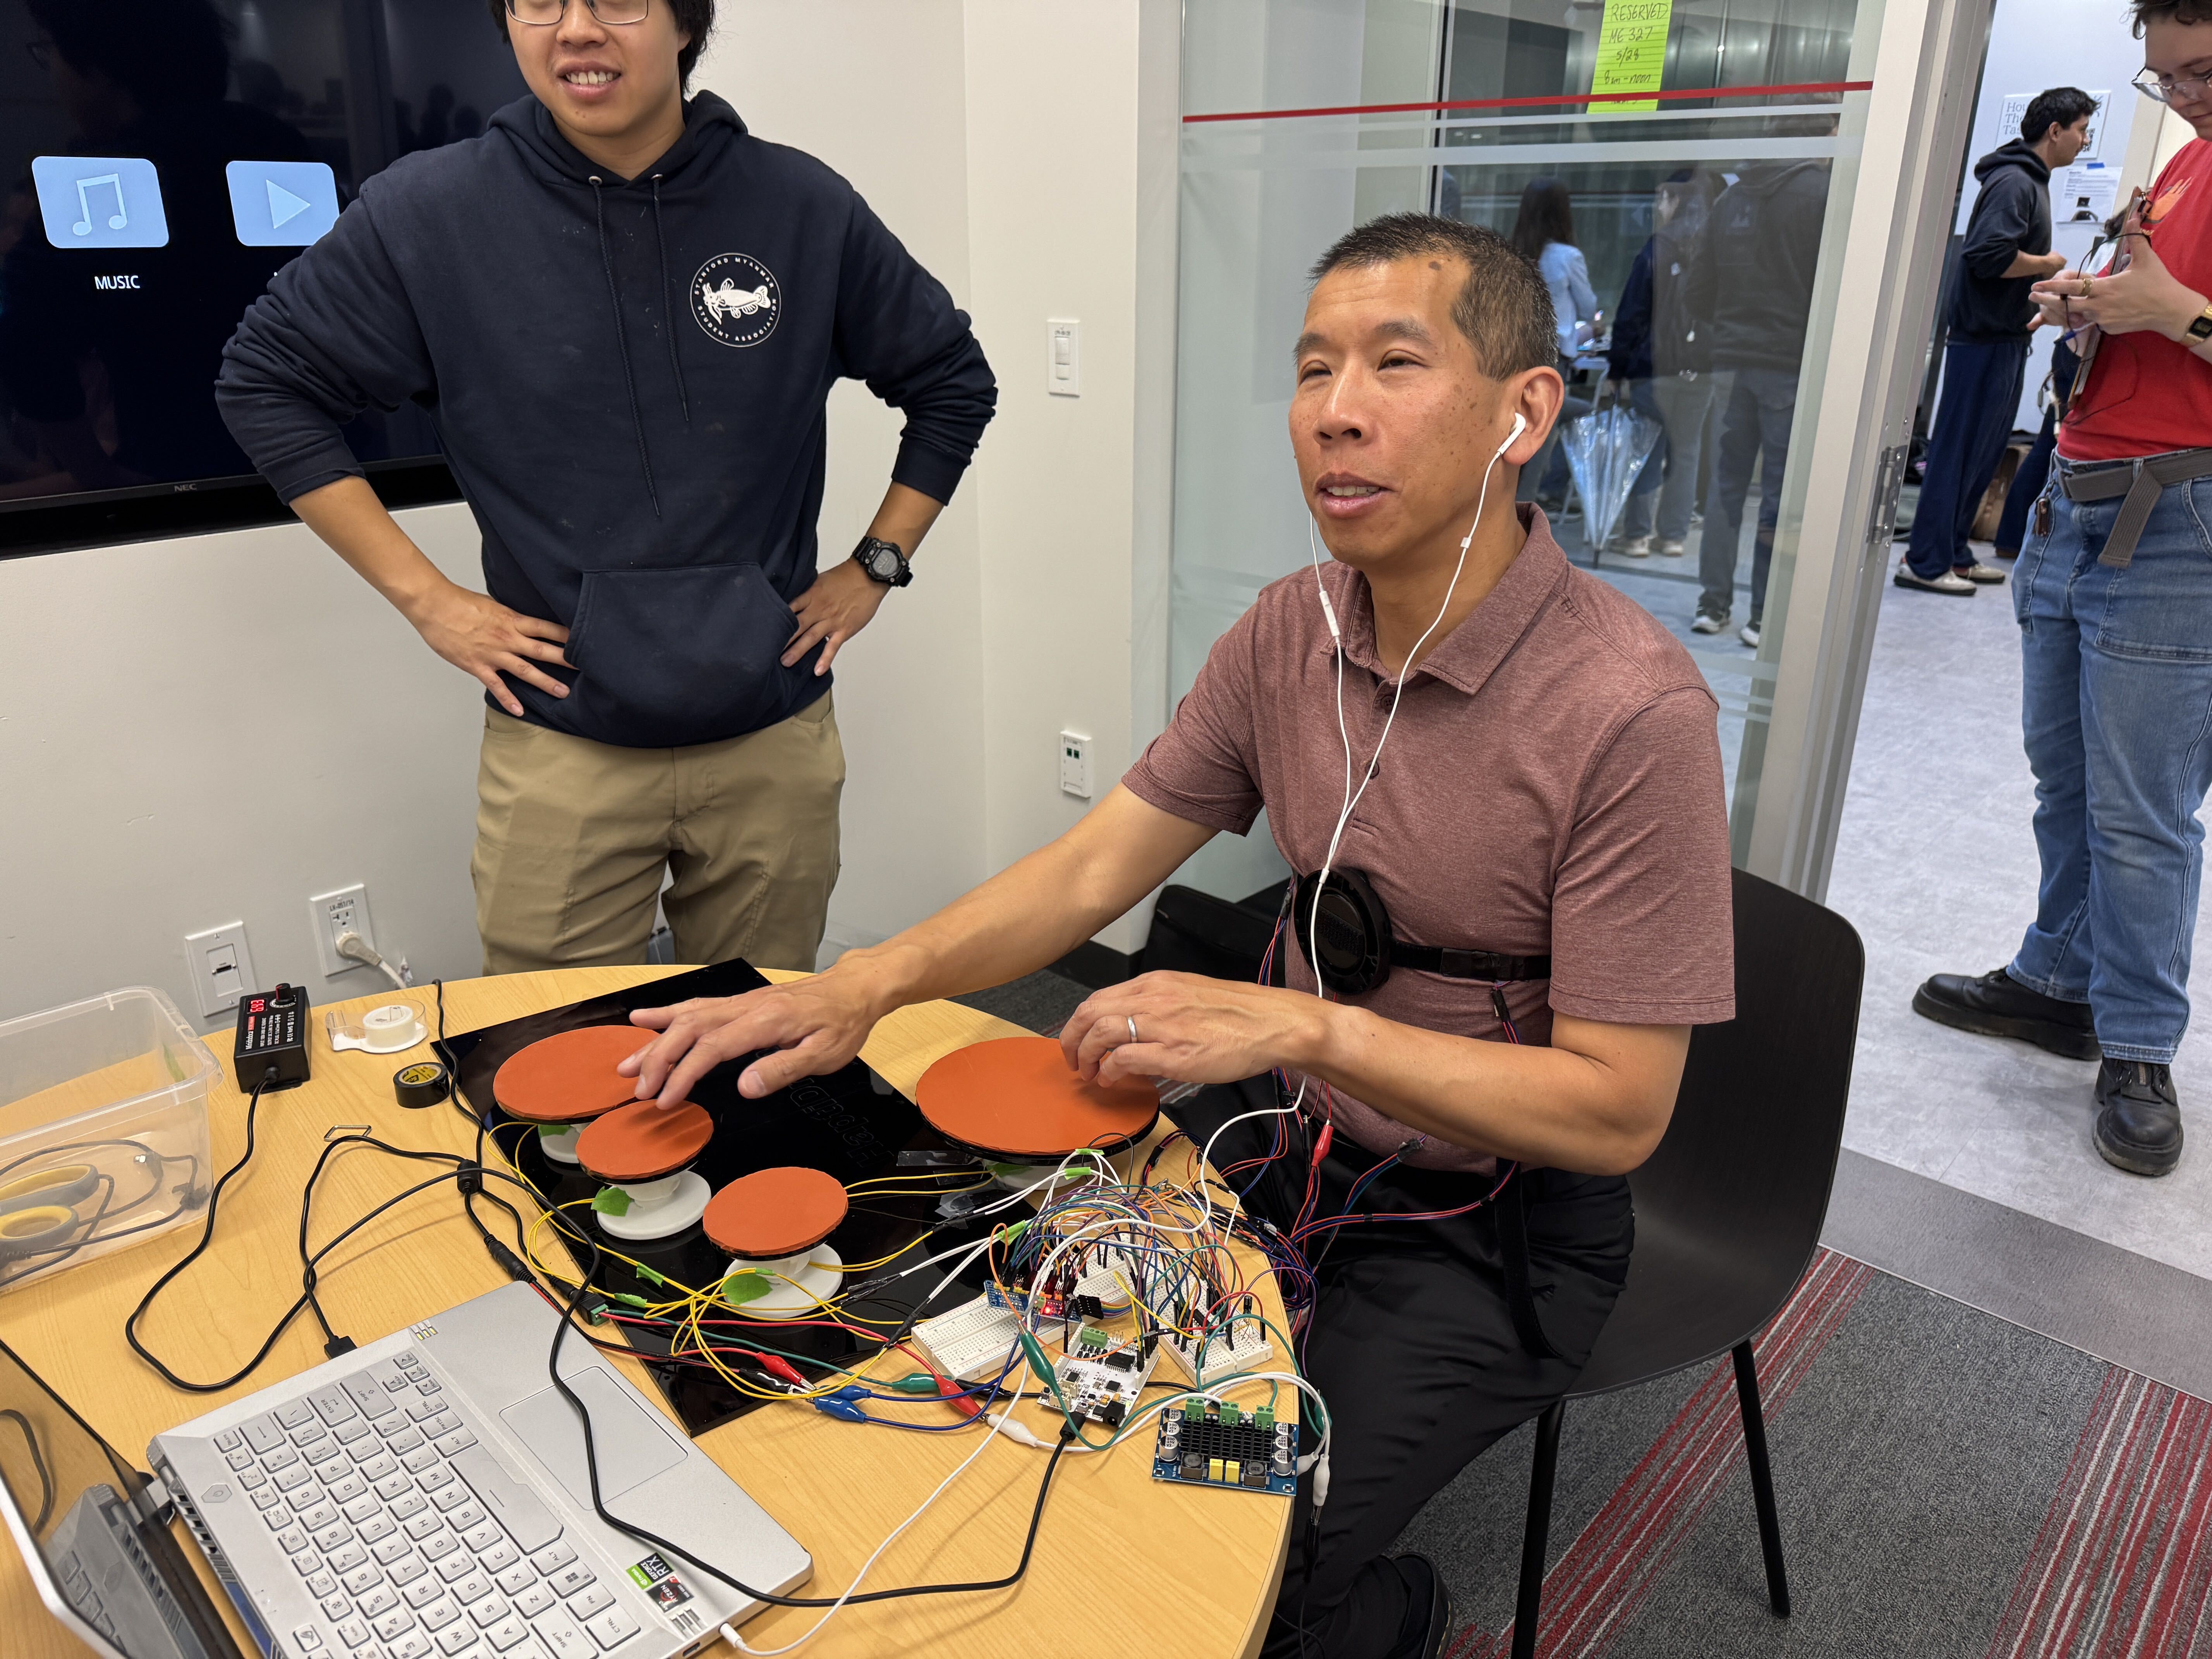
Images of users testing out HaptiDrum
Future Work
Future testing should include more structured user experiments, especially with participants who have drumming experience. Real drummers could compare HaptiDrum to a traditional drum kit, electronic drum pad, or silent practice setup and describe how well the haptic feedback matches the feeling of playing real drums. These tests could measure how accurately users distinguish between different drums, how quickly they develop rhythms using the audio and haptic feedback, and whether the system improves the experience of practicing with reduced sound.
The setup could also be improved by having users wear higher-quality headphones to block out some of the direct sound from the bass module, making the haptic feedback feel more intentional and immersive. The ERM system could be expanded by adding motors to the hands and arms to better mimic the vibrations that travel through drumsticks and the player�s body during real drumming. A vest-style wearable with fixed haptic zones would also improve consistency by keeping the ERMs and bass module in reliable contact with the body while making the system easier to put on and adjust.
Electrically, we could use higher-quality FSR sensors with a higher sampling rate and lower trigger threshold to better capture rapid drumming hits. The wiring could also be improved by consolidating individual connections into more robust wire harnesses and integrating the electronics into a dedicated enclosure. This would reduce the risk of cables becoming unplugged, snagged, or damaged during user interaction, improving both the reliability and durability of the system.
Mechanically, the large drum should be redesigned to reduce interference from nearby drum hits. During testing, the large drum had to be moved away from the main drumming surface because it was picking up unintended inputs. Adding damping beneath the drum or around the sensor would help isolate each pad and prevent false triggers. With these improvements, HaptiDrum could be applied as a silent practice tool for drummers, a more immersive haptic interface for virtual drumming, or an accessible music interaction system for users who benefit from stronger tactile feedback.

Acknowledgments
Thank you to the ME 327 teaching team and the Stanford PRL CAs for their guidance in completing this project.
Files
Final Code: Attach:final_code_Team3.pdf
Sounds for code:
Bill of Materials: Attach:Team3_BOM
References
Holland, S., Bouwer, A. J., Dalgleish, M., and Hurtig, T. M. �Feeling the Beat Where It Counts: Fostering Multi-Limb Rhythm Skills with the Haptic Drum Kit.� In Proceedings of the 4th International Conference on Tangible, Embedded, and Embodied Interaction (TEI �10), pp. 21�28. ACM, Cambridge, MA, 2010. ISBN: 978-1-60558-841-4. https://doi.org/10.1145/1709886.1709892
Yorioka, E., Zhu, Y., Morita, J., Yoshida, T., Wakisaka, S., Horie, A., and Minamizawa, K. �Piano Duo: Haptic Sharing System Supports Two-Piano Practice.� In 2025 IEEE World Haptics Conference (WHC), pp. 621�627. IEEE, 2025. https://doi.org/10.1109/WHC64065.2025.11123339
Nanayakkara, S., Taylor, E., Wyse, L., and Ong, S. H. �An Enhanced Musical Experience for the Deaf: Design and Evaluation of a Music Display and a Haptic Chair.� In Proceedings of the SIGCHI Conference on Human Factors in Computing Systems (CHI �09), pp. 337�346. ACM, Boston, MA, 2009. https://doi.org/10.1145/1518701.1518756
Siedenburg, K., B�rgel, M., �zg�r, E., et al. �Vibrotactile Enhancement of Musical Engagement.� Scientific Reports, vol. 14, article 7764, 2024. https://doi.org/10.1038/s41598-024-57961-8
Appendix: Project Checkpoints
Checkpoint 1
Our original Checkpoint 1 goals were to record drum sounds and vibrations, test whether those vibrations were distinct enough using small vibration modules, and test the force sensors to see if they could capture the input from being struck under the foam padding. These goals were meant to validate the basic signal chain of HaptiDrum before committing to the full vest and multi-pad system. In our proposal, the system was planned as a set of 4�6 force-sensing drum pads connected to a controller that would trigger spatially mapped vibration feedback on a wearable vest. The checkpoint goal was to have the drum measurements completed and to verify that the force sensors and vibration outputs could work together as a functional system.
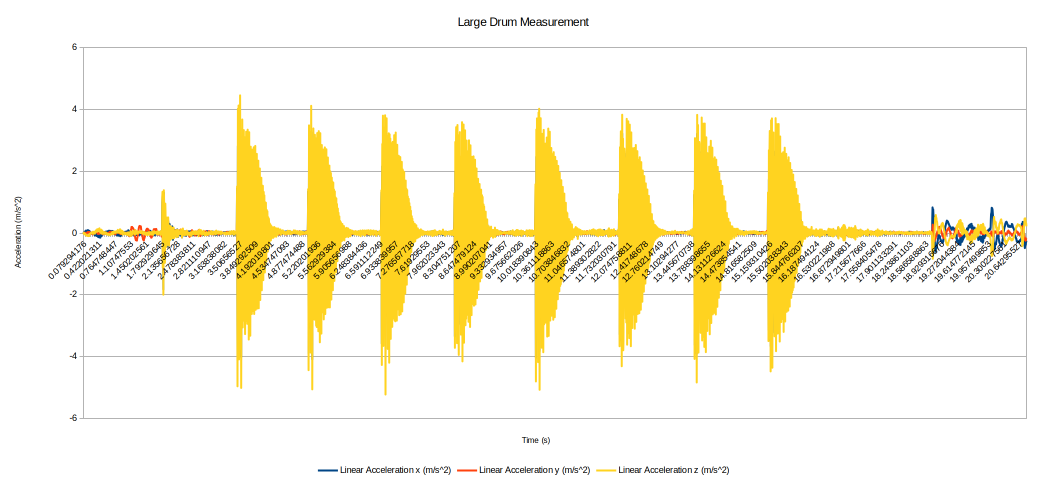
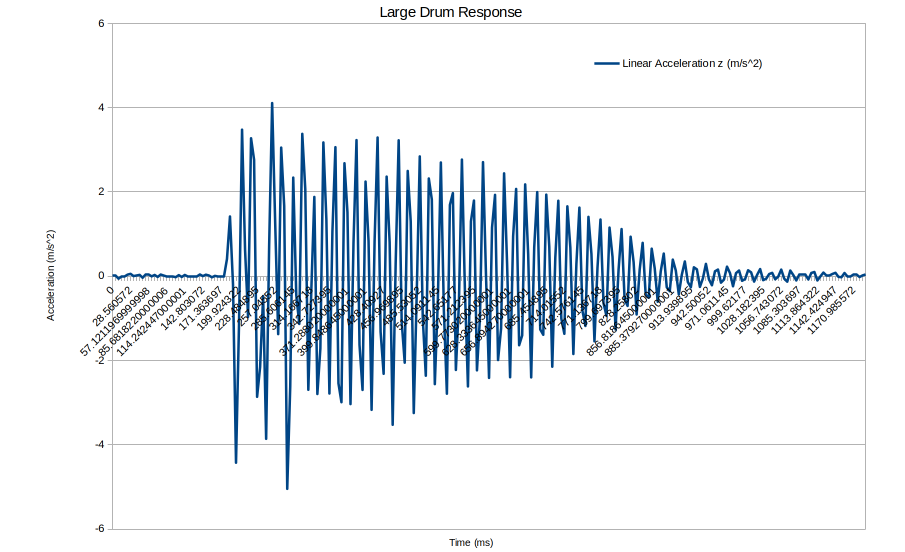
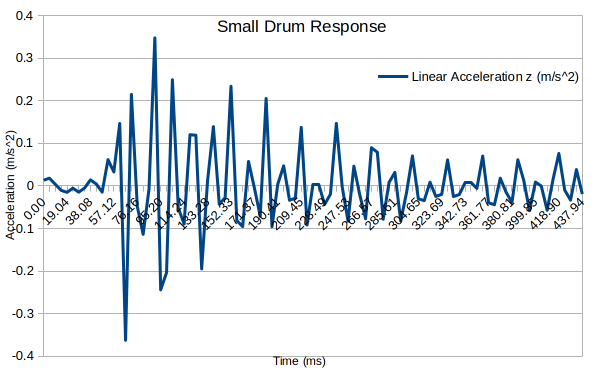
We were able to record some drum sounds and vibrations, specifically using taiko, and focusing on the difference between small and large drums. In order to record the vibrations, a basic testing setup was created with a stand, a phone, and some string. The string was used to suspend the phone from the stand and isolate it from the ground as much as possible. Then, the stand was placed near the drum and the phone�s accelerometer was used to measure the vibration caused by each drum as it was hit.
Example Measurement:
We then isolated one of the hits for both:
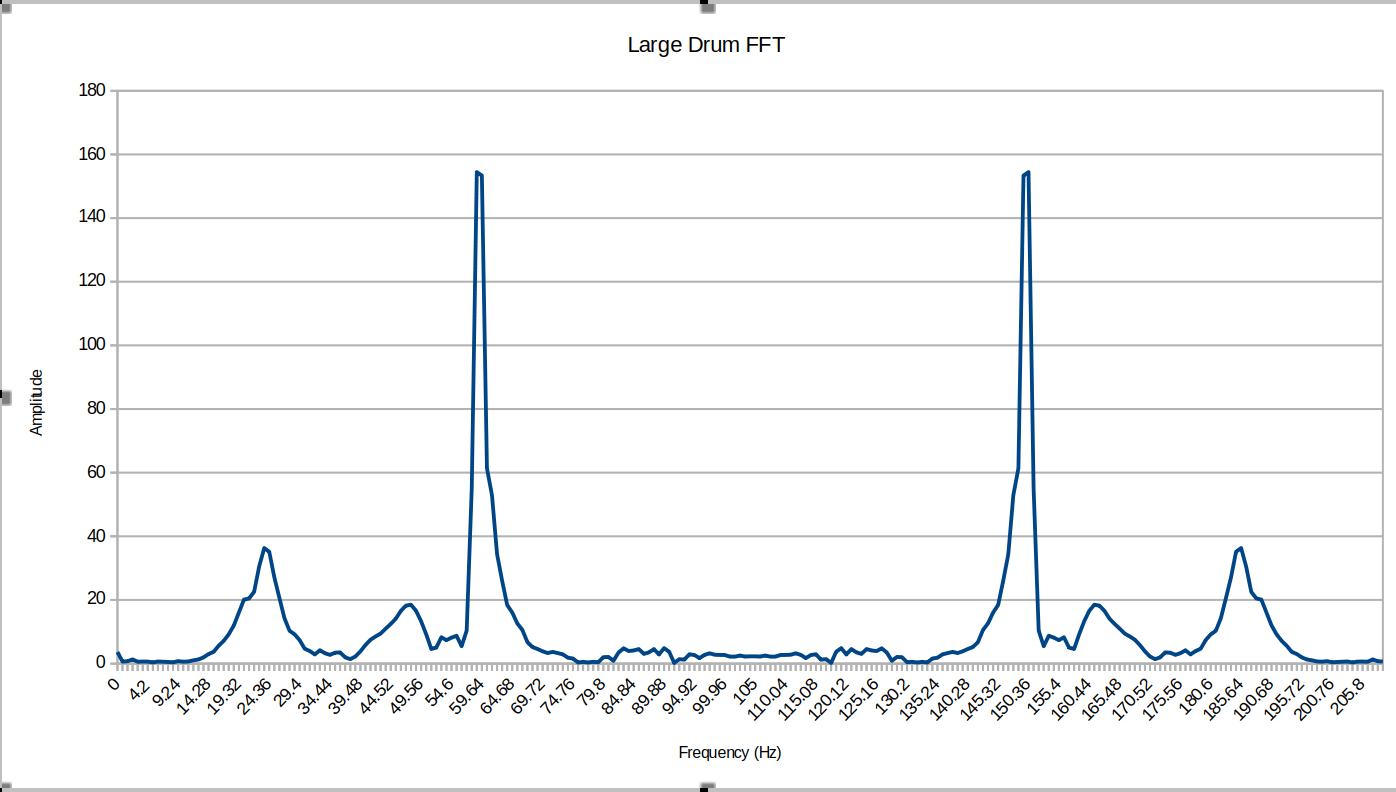
Then, we took a FFT for both and noted which dominant frequencies were present in the graph:
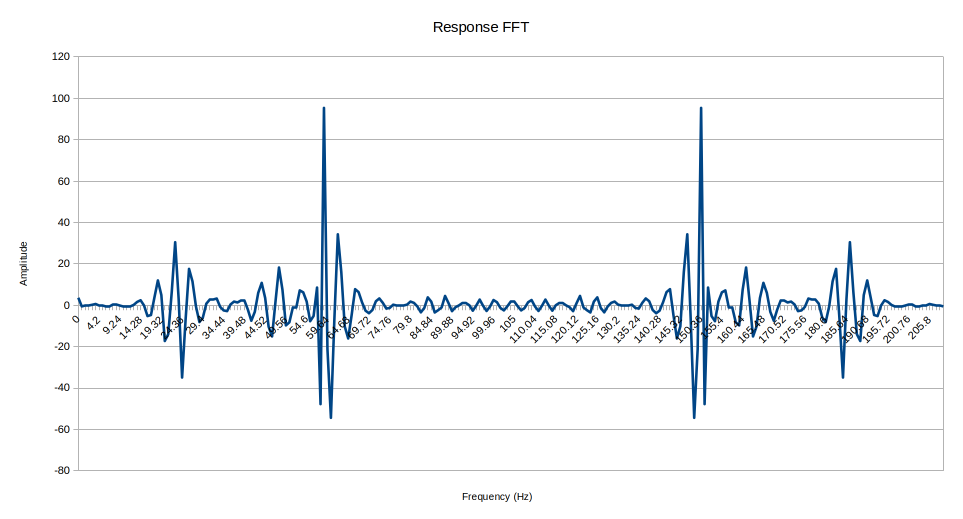
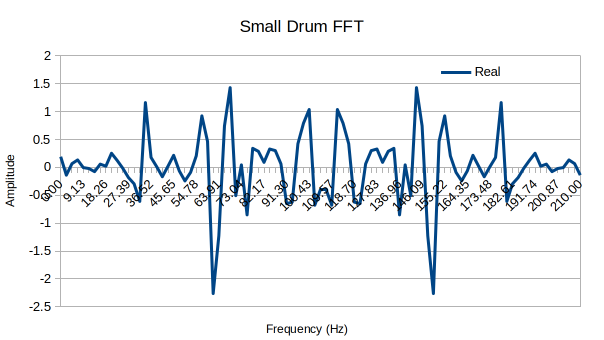
It appears that the large drum requires a much more significant force output at around 25 and 60 Hz, while the small drums requires a force output around 70 and 100 Hz.
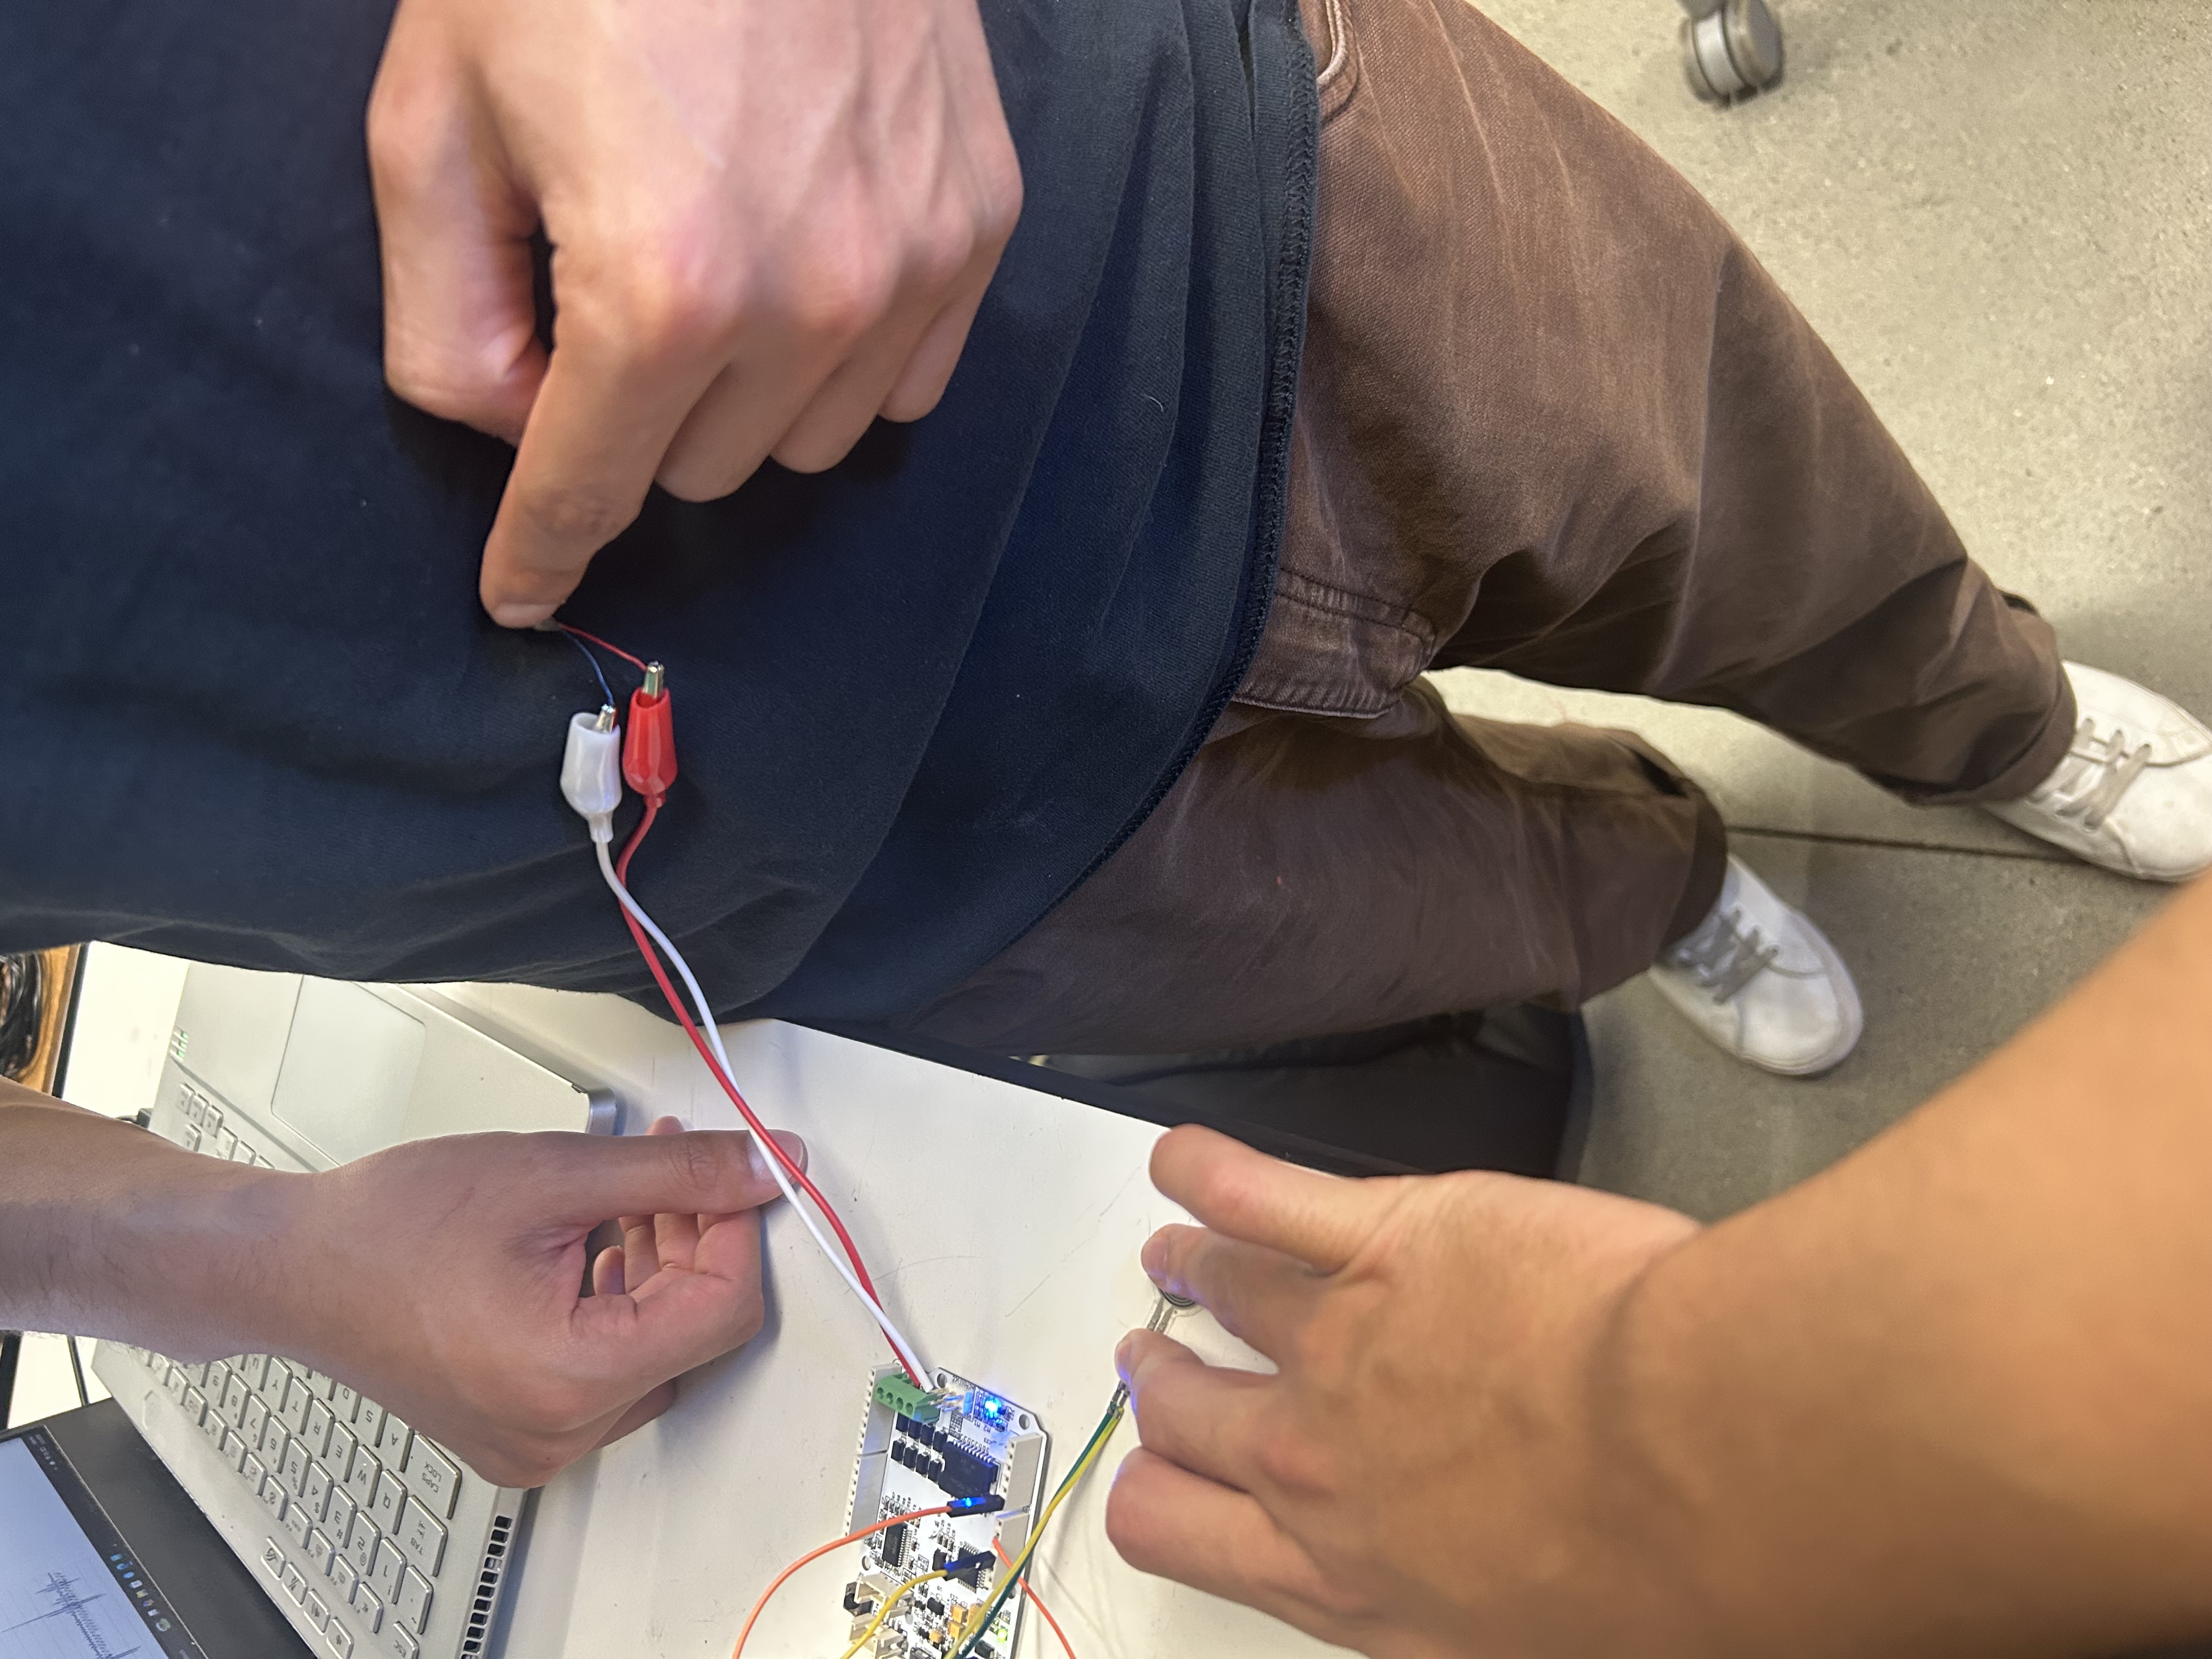
So far, we have purchased and tested several of the key materials needed to validate the system. We connected a force sensor and a speaker/vibration module to a Hapkit board and experimented with mounting them into foam board structures to simulate a drum pad surface. This helped us test whether a pad strike could be detected clearly and whether the resulting vibration output was strong enough to feel through a body-contact surface. From these early tests, the force sensor appears usable for detecting impact events, and the vibration output is noticeable enough to continue developing the system. However, more work is still needed to tune the mapping between strike force and vibration intensity so that light, medium, and hard hits feel meaningfully different.
We have met the original goal of testing the force sensors and vibration modules, but we have a lot of work to do on actually developing representative drum profiles. The vibration output does not automatically feel like a realistic drum impact; it will take calibration and experimentation to make each drum type feel distinct. This connects directly to our proposal: different drums should produce different haptic responses, with larger drums mapped more strongly to the chest and smaller drums potentially mapped to the arms or upper body.
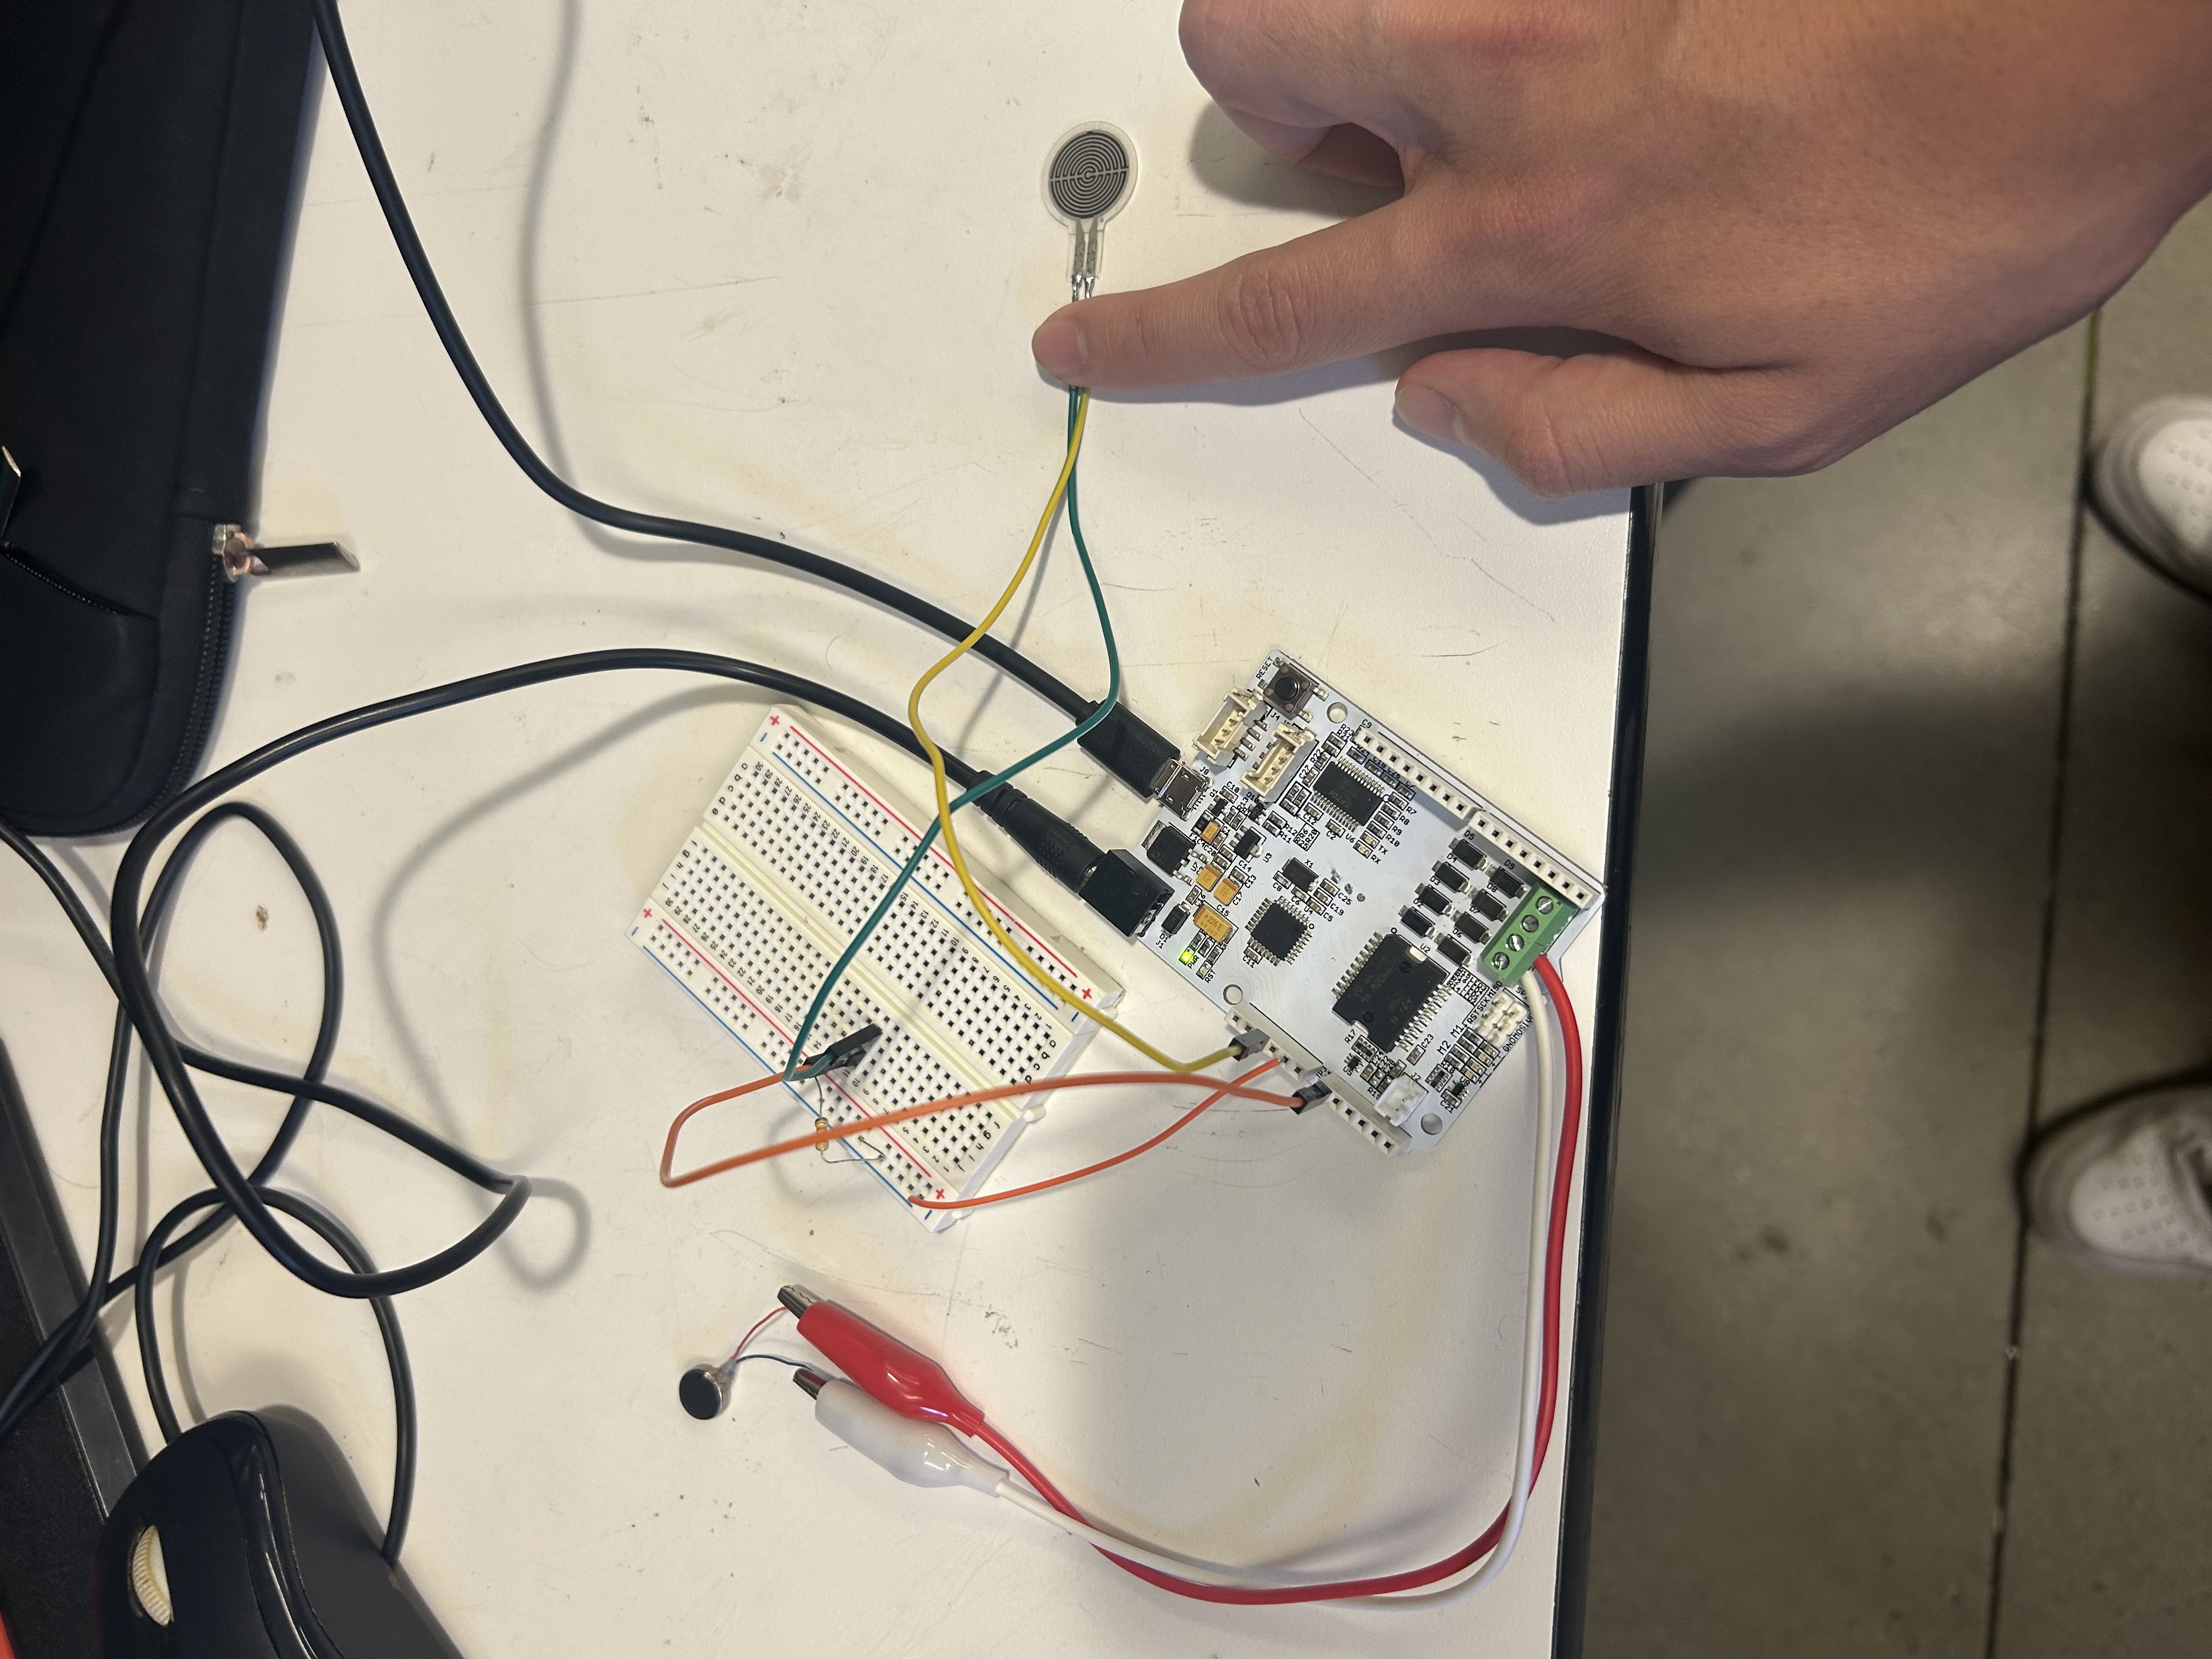
Above shows the FSL and coin motor circuit we made, touching the FSL cause the ERM to vibrate, fulfilling one of our requirements for checkpoint 1. We currently have it coded such that the duty cycle amplitude increases linearly with the force applied, which we may change for the final product depending on the sensation we wish to achieve.
Above shows us testing if the motor can be adequately felt on the user if pressed into the body properly. We experienced that yes; the motor can be felt with the right amount of pressure which motivates our next steps of getting straps to hold the motors to the body. We also discovered here that many motors together would be adequate to produce the vibrations we need, which is an easy to produce and cheap option. We ordered a PWM driver with I2C communication in order to be able to control all these motors at once.
Based on what we learned, our current plan is to move toward a parent-board system. The force sensors will likely connect to one Hapkit board or sensor board, which will communicate strike information to a parent Hapkit board. The parent board will then trigger the speaker/vibration modules based on which pad was hit and how hard it was hit. This should make the system easier to organize because the sensing and actuation logic can be separated. Going forward, we expect a significant amount of testing and experimentation to be focused on matching the haptic output to what a user would expect from a drum performance. In particular, we need to tune the vibration profile, intensity scaling, and physical placement so the feedback feels intentional rather than just like a generic buzz.
For Checkpoint 2, our next steps are to wire more of the system together, test multiple sensors, and begin developing the control scheme for proportional haptic response. We also need to compare different actuator placements and output profiles to determine whether each drum type can be distinguished through touch alone. Along with tuning this performance, we are looking to develop the hardware for the vibration motors to ensure good contact on the users body and develop robust drum kits which ensure consistent force readings. This will help us prepare for the final prototype, where the main goal is to make the haptic feedback feel convincing, responsive, and musically meaningful.
Checkpoint 2
Our goals for checkpoint 2 were to have the control scheme set up, the physical prototype assembled, incorporate proportional response, basically a working but not calibrated project. Additionally, we got feedback from checkpoint 1 to fix some errors with the FFT model we will use to set the frequency. We were successful in achieving all of these objectives, and we are at a good trajectory for finishing by demo day.
Correction to Checkpoint 1: We made an error with the FFT graphs, where only the real part was used. The corrected graphs, which takes the proper magnitude of both real and imaginary components is seen below (the main frequencies haven't changed though).

Since Checkpoint 1, we have made custom drum tapper that focus the force onto the force sensor area to create a consistent input no matter where you tap on the drum. Further iterations can be seen in the videos later in this checkpoint.
On the electrical side, we were able to implement a bass module, which allows us to provide a better response (higher amplitude) at the lower frequencies expected for large drums. The bass module comes with a motor driver module, so after ordering an adjustable power supply, we were able to drive the module. Finally, to smooth out the PWM square waves, we put a low-pass RC circuit in front of the output to make it more smooth (1kOhm, 10 uF). See the following video for our first test with the module. Attach:prelim_bass.MOV
Additionally, we were able to add an PCA9685 module to our circuit, which is a 16-channel, 12-bit I2C driver. The purpose of this is to be able to control multiple ERM Motors without the need for multiple, dedicated motor drivers and multiple PWM pins. Since it communicates over I2C, we only need 5 pins (Power, GND, SCL, SDA, EN) to control many motors.
In terms of software, we were able to start working with implementing both the bass module and ERM motors. There is a "spike detection" mechanism that is able to reject any force increases that take too long to increase or are too small in magnitude to be considered an actual hit.
With the dedicated bass driver and the PCA driver to control the ERMs via I2C, we were able to discriminate controls, so one drum has a different output from another, as shown in the video below. The large drum is set to high bass output and actuating one ERM and the small drum is set to lower bass output and actuating the other ERM. This proves we can have each drum provide a different haptic output, which fulfills the prototype and controls requirements we set out for checkpoint 2. Attach:whole_system_test.MOV
We have the following picture showing a crude strap setup for the motors in the approximate positions with the motors actuating as expected. With all this collective work, we prove the ability to have different drums appropriately respond to the inputs wanted, so we are on track to finish by demo day. We just need to create more drums and tune the motors accordingly.