

2026-Group 4
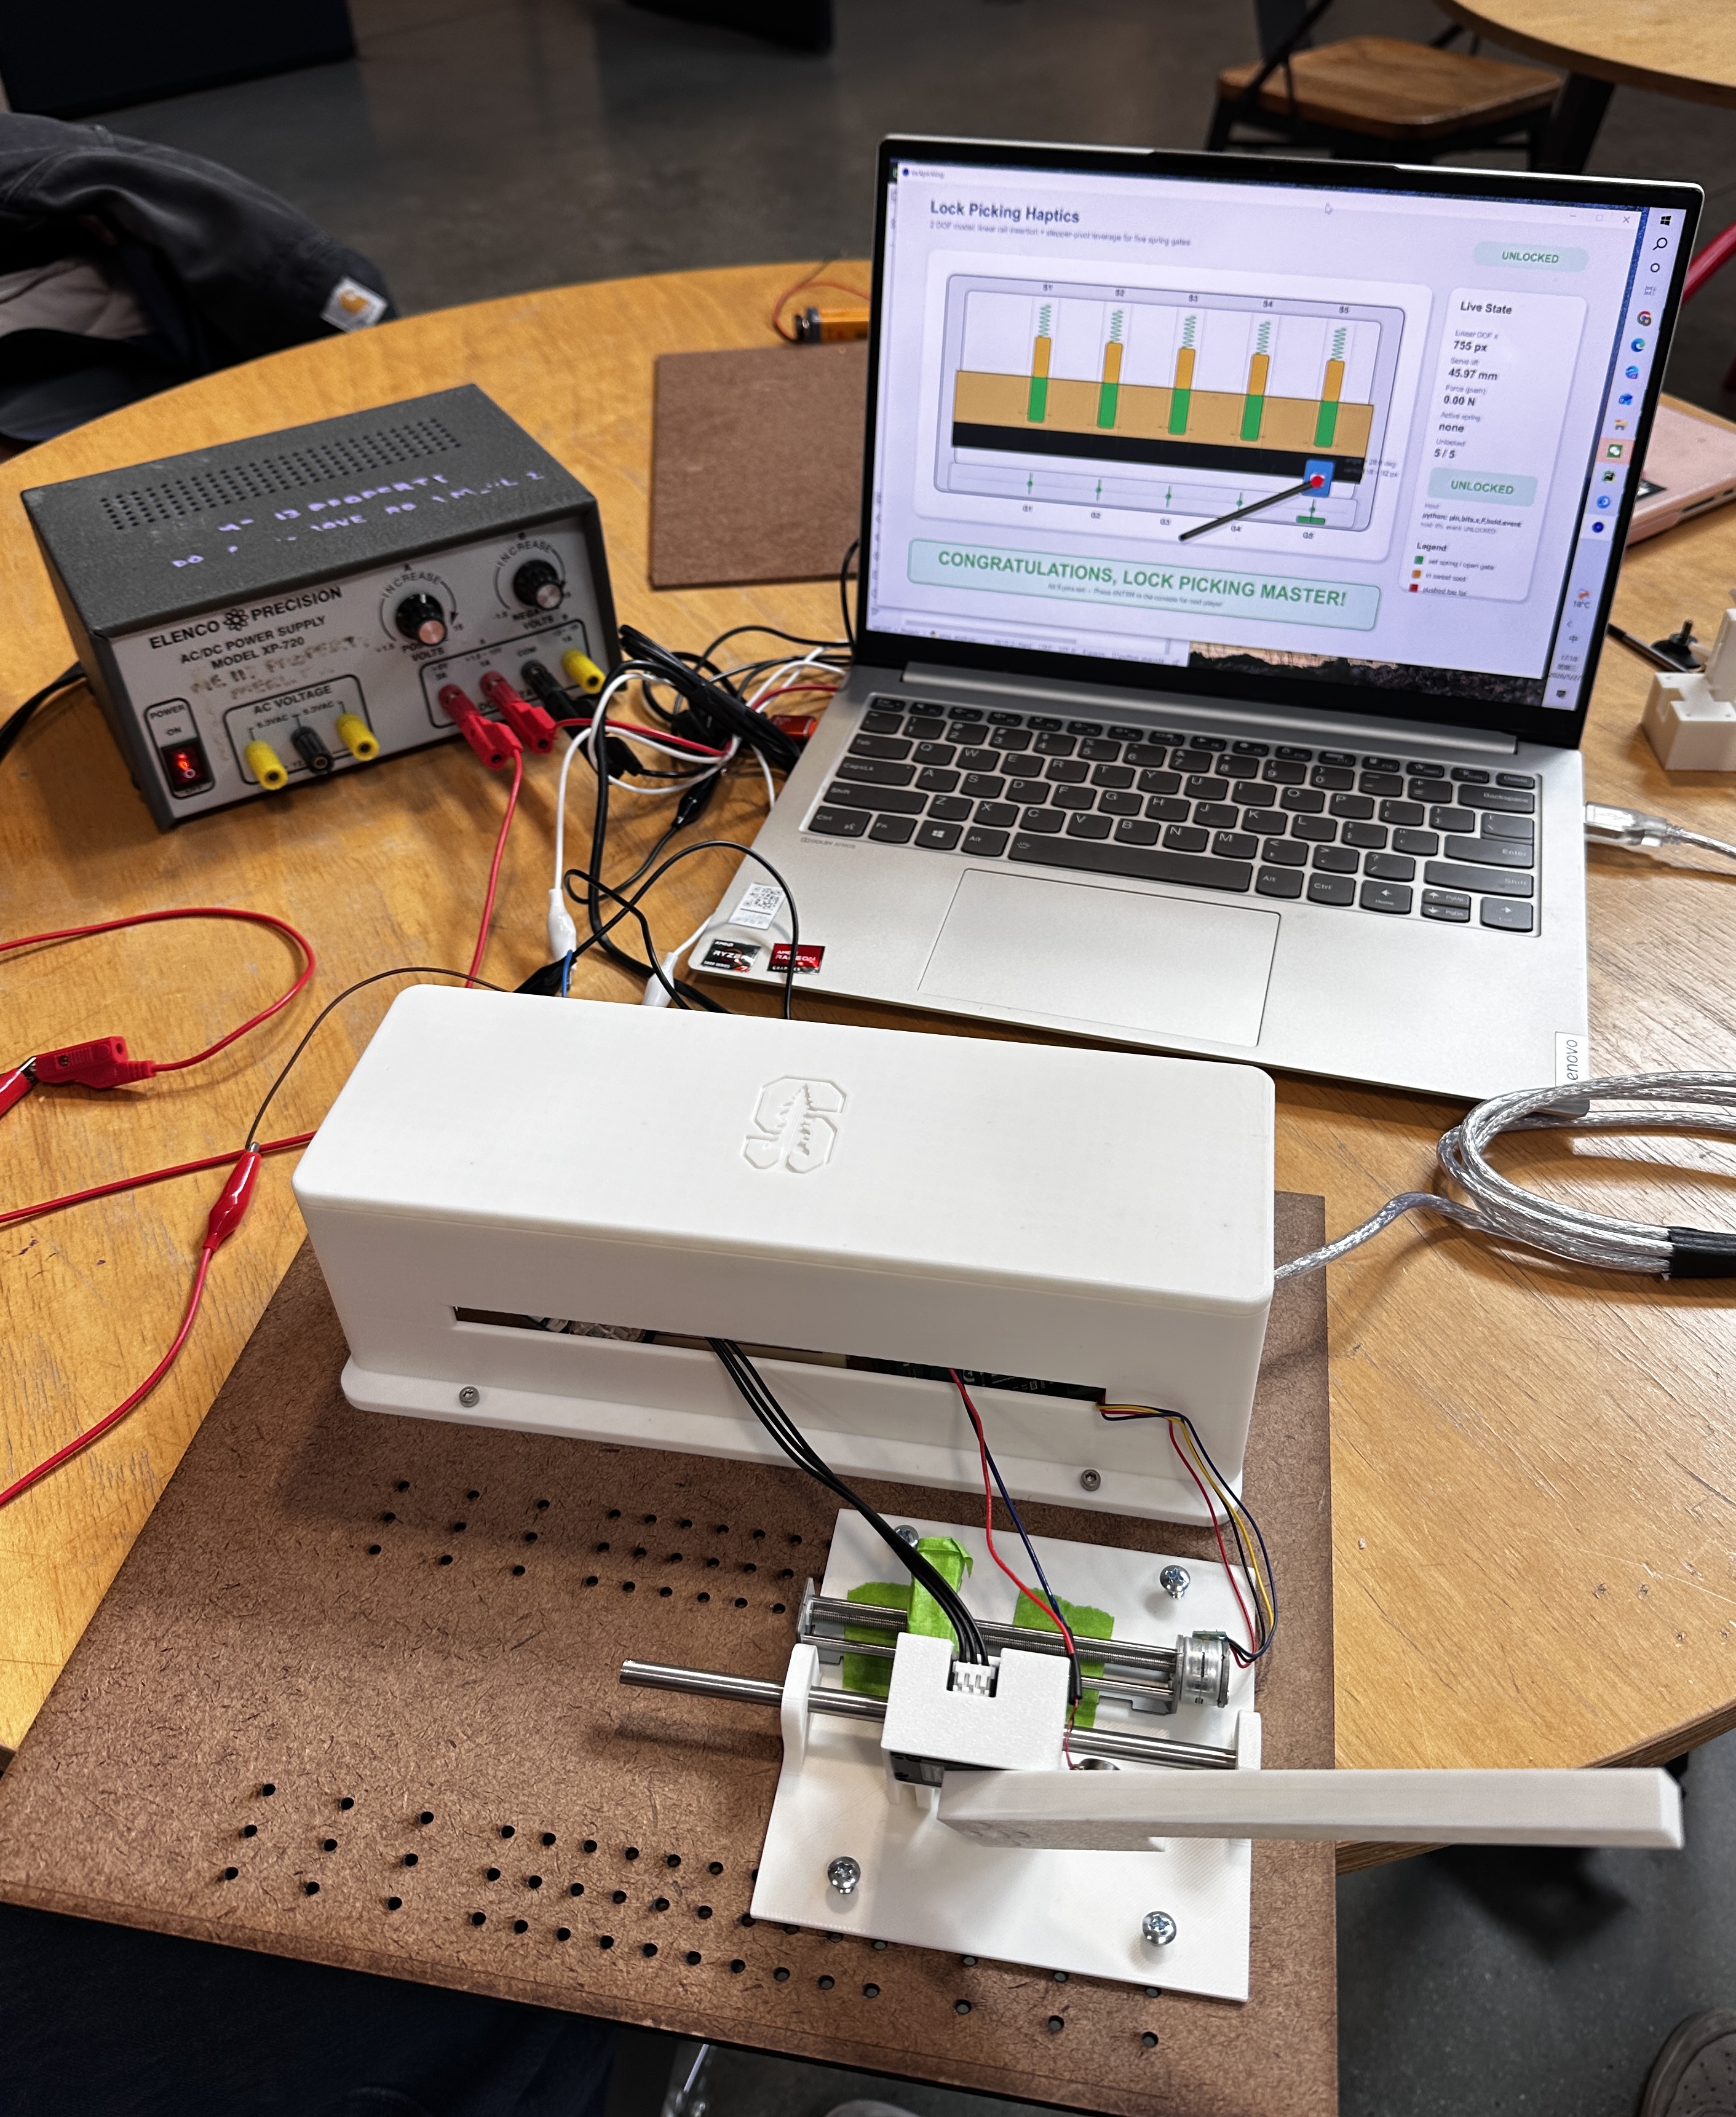
Final Lock Picking Master prototype
demonstrating the integrated hardware and
software system.
Lock Picking Master: A Haptic Lock-Picking Simulator
Project team members: Serena Liu, Liwen Fan, Run Shi, Chia-Ling Weng
Lock Picking Master is a haptic lock-picking simulator designed to recreate the tactile experience of manipulating a pin-tumbler lock. The project was motivated by the observation that lock picking relies primarily on haptic perception rather than visual information, making it an ideal application for studying force-feedback interfaces. Users interact with a custom-built 2-DOF device that allows them to select and lift virtual pins while experiencing varying levels of resistance rendered through a motorized haptic interface. The system combines mechanical hardware, embedded sensing, force rendering, vibrotactile feedback, and a real-time graphical interface to simulate the process of setting pins and unlocking a lock. The final implementation successfully allows users to feel differences in pin stiffness, detect overshoot conditions, receive click feedback when pins are set, and experience a multimodal lock-opening event through force, vibration, and visual feedback. User demonstrations showed that participants could quickly learn the interaction and reliably distinguish different lock states through haptic cues.
On this page... (hide)
Introduction
Lock picking is a highly tactile task that depends on subtle variations in force and stiffness rather than visual feedback. Inspired by this interaction, our project explores how haptic feedback can be used to recreate the experience of manipulating a pin tumbler lock in a virtual environment. The goal of this project is to design and implement a haptic lock-picking simulator that allows users to feel different pin resistances and interact with a simulated lock through real-time force feedback and visualization.
The system uses two degrees of freedom: insertion depth of the pick to select pins and rotational tilt of the pick to lift them. Each virtual pin is modeled with a different spring stiffness and target height, allowing the user to experience varying resistance while interacting with the lock. The project combines mechanical design, embedded sensing, haptic rendering, and graphical simulation into a single interactive platform. Through this project, we aim to demonstrate how haptic devices can create immersive and intuitive interactions for virtual mechanical systems.
Background
In force-feedback systems, user motion is measured and used to compute a response force from a virtual environment model. This is especially useful for tasks that require fine tool manipulation, where users rely on small changes in resistance to guide their motion.
Our project applies this idea to a pin-tumbler lock simulation. The lock pick is modeled as a tool that interacts with four virtual pin stacks, each with a different spring stiffness. As the user inserts and tilts the pick, the system renders continuous resistance from the active pin and discrete vibration cues when a pin is set or when the lock opens. Prior haptics work shows that combining kinesthetic feedback, tactile cues, and visual feedback can help users interpret hidden mechanical states during interactive tasks.
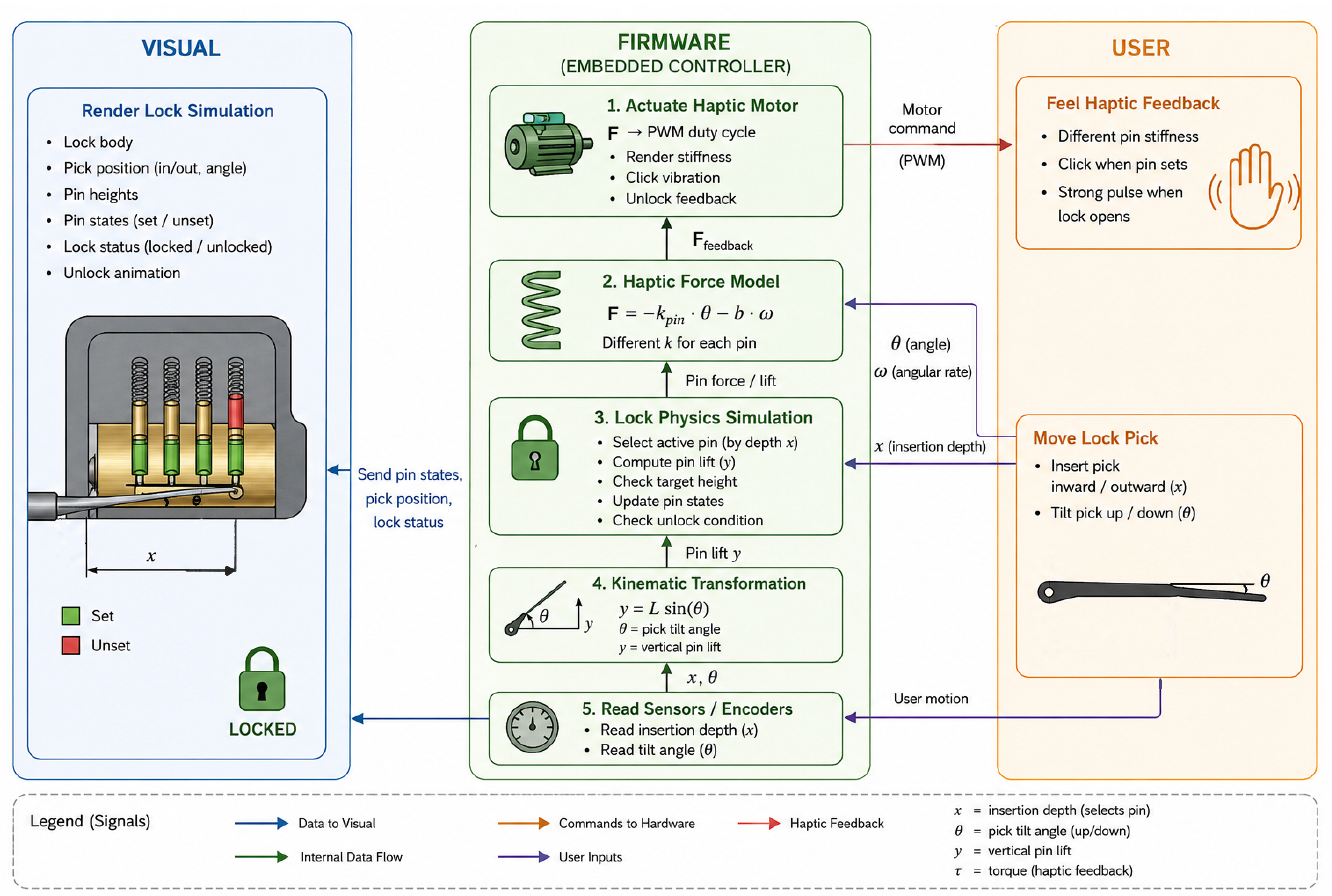
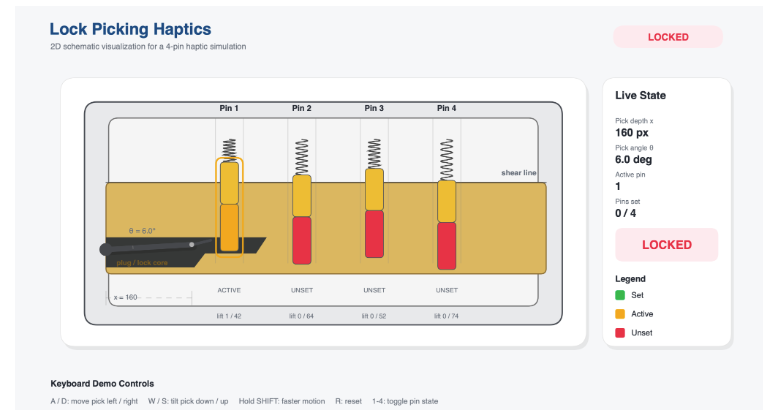
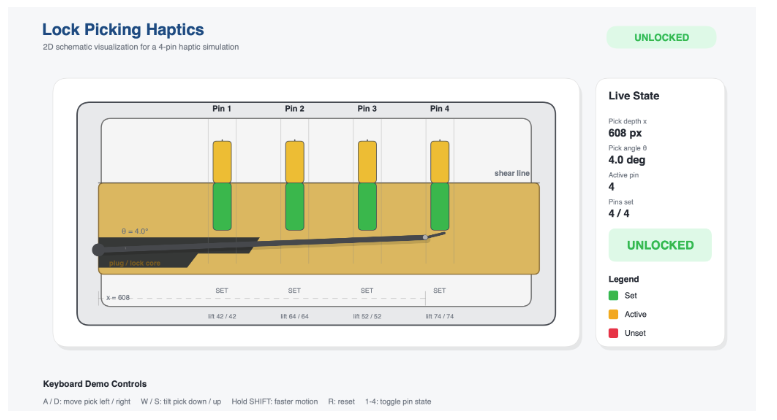
In this project, the 2D visualization displays the pick position, pin height, spring compression, and lock state in real time. The visual interface supports the haptic feedback by making the internal lock mechanism understandable to the user.
Methods
Hardware Design and Implementation
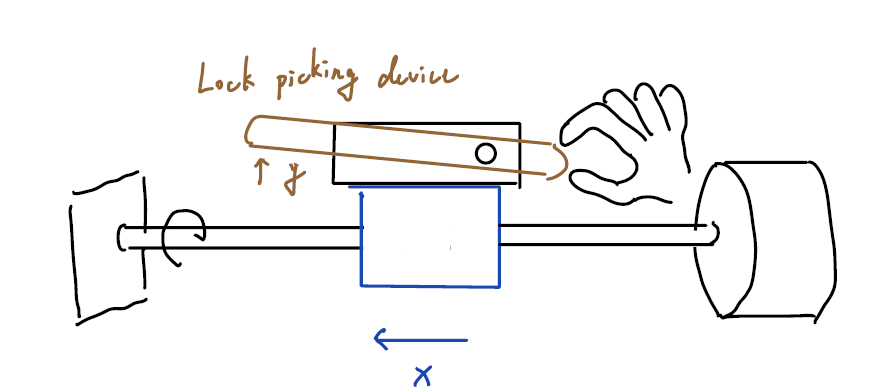
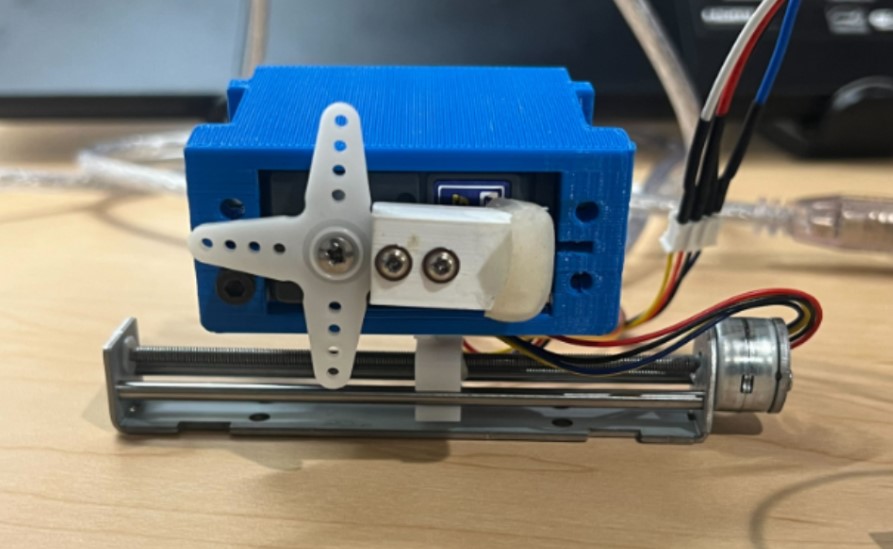
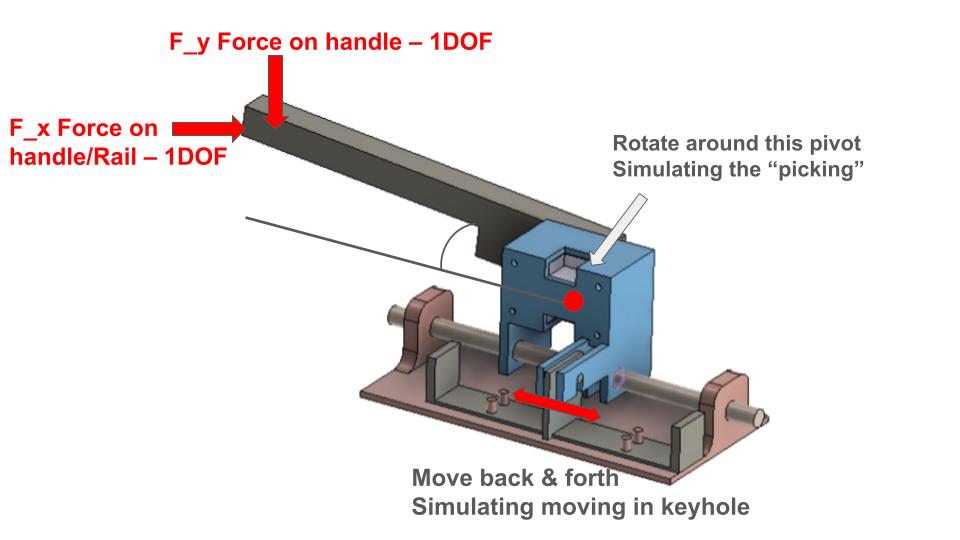
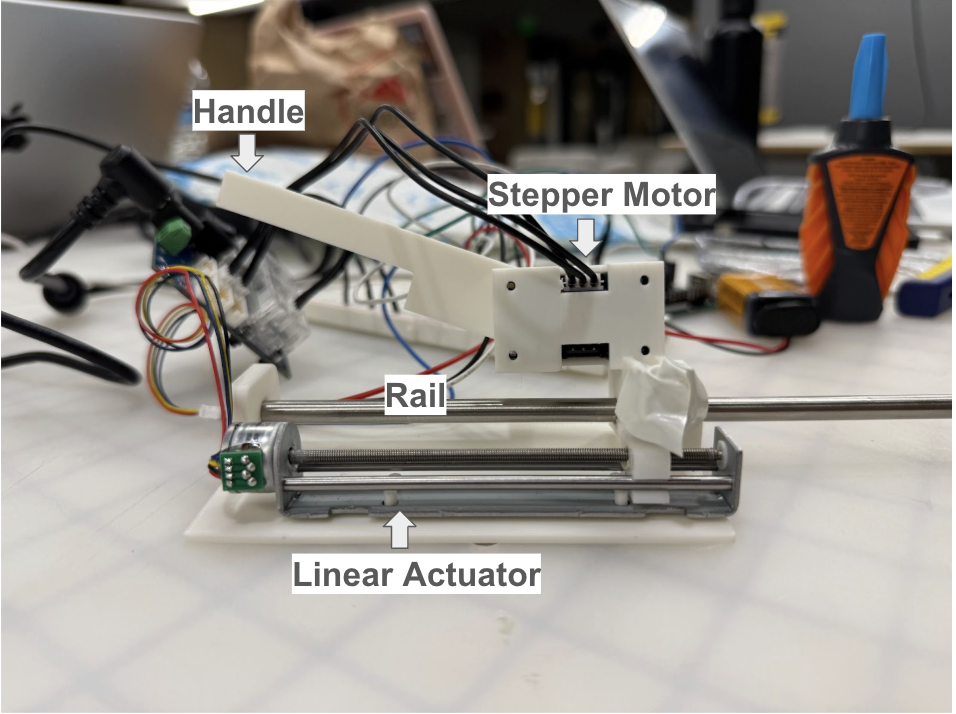
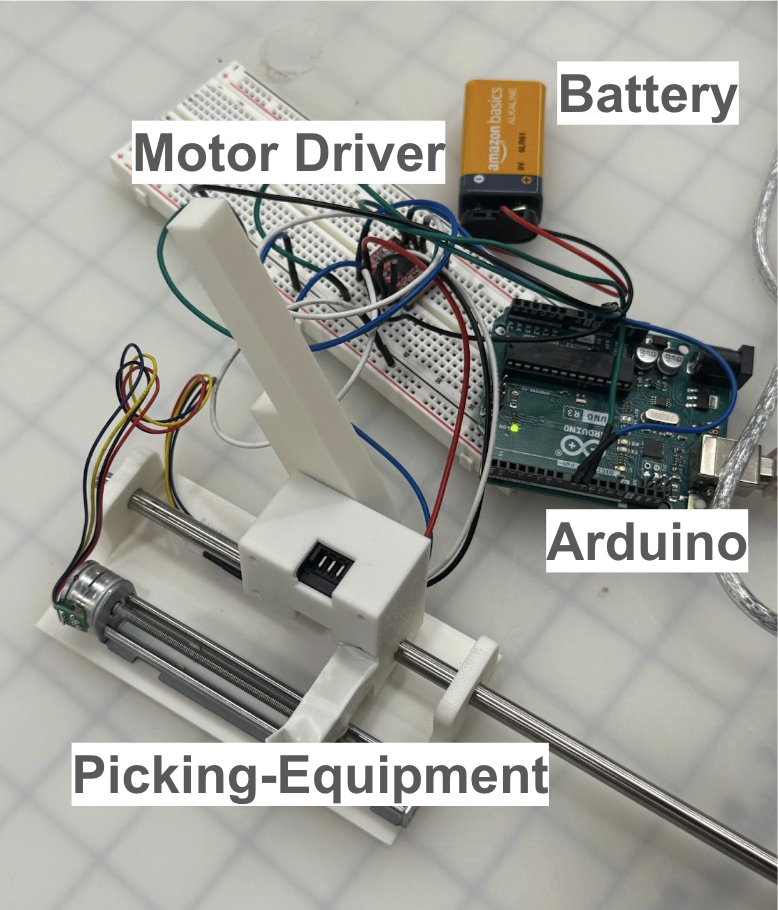
The simulator consists of a custom-built two-degree-of-freedom input device designed to emulate the motions used during lock picking. The first degree of freedom controls the insertion depth of the pick and is implemented using a linear rail and carriage assembly driven by a stepper motor. This mechanism allows the user to select different virtual pins by moving the pick horizontally through the lock. The second degree of freedom controls pin lifting and is implemented using a motorized rotational handle equipped with an encoder. This rotational motion is measured in real time and translated into virtual pin displacement.
The structural components of the system, including the lock housing, rail supports, pick handle, motor mounts, and electronics brackets, were designed in CAD and manufactured using 3D printing. Multiple design iterations were performed to improve stiffness, alignment, and ease of assembly. The final design provides smooth linear motion, reliable sensing, and sufficient structural rigidity for repeated user interaction.
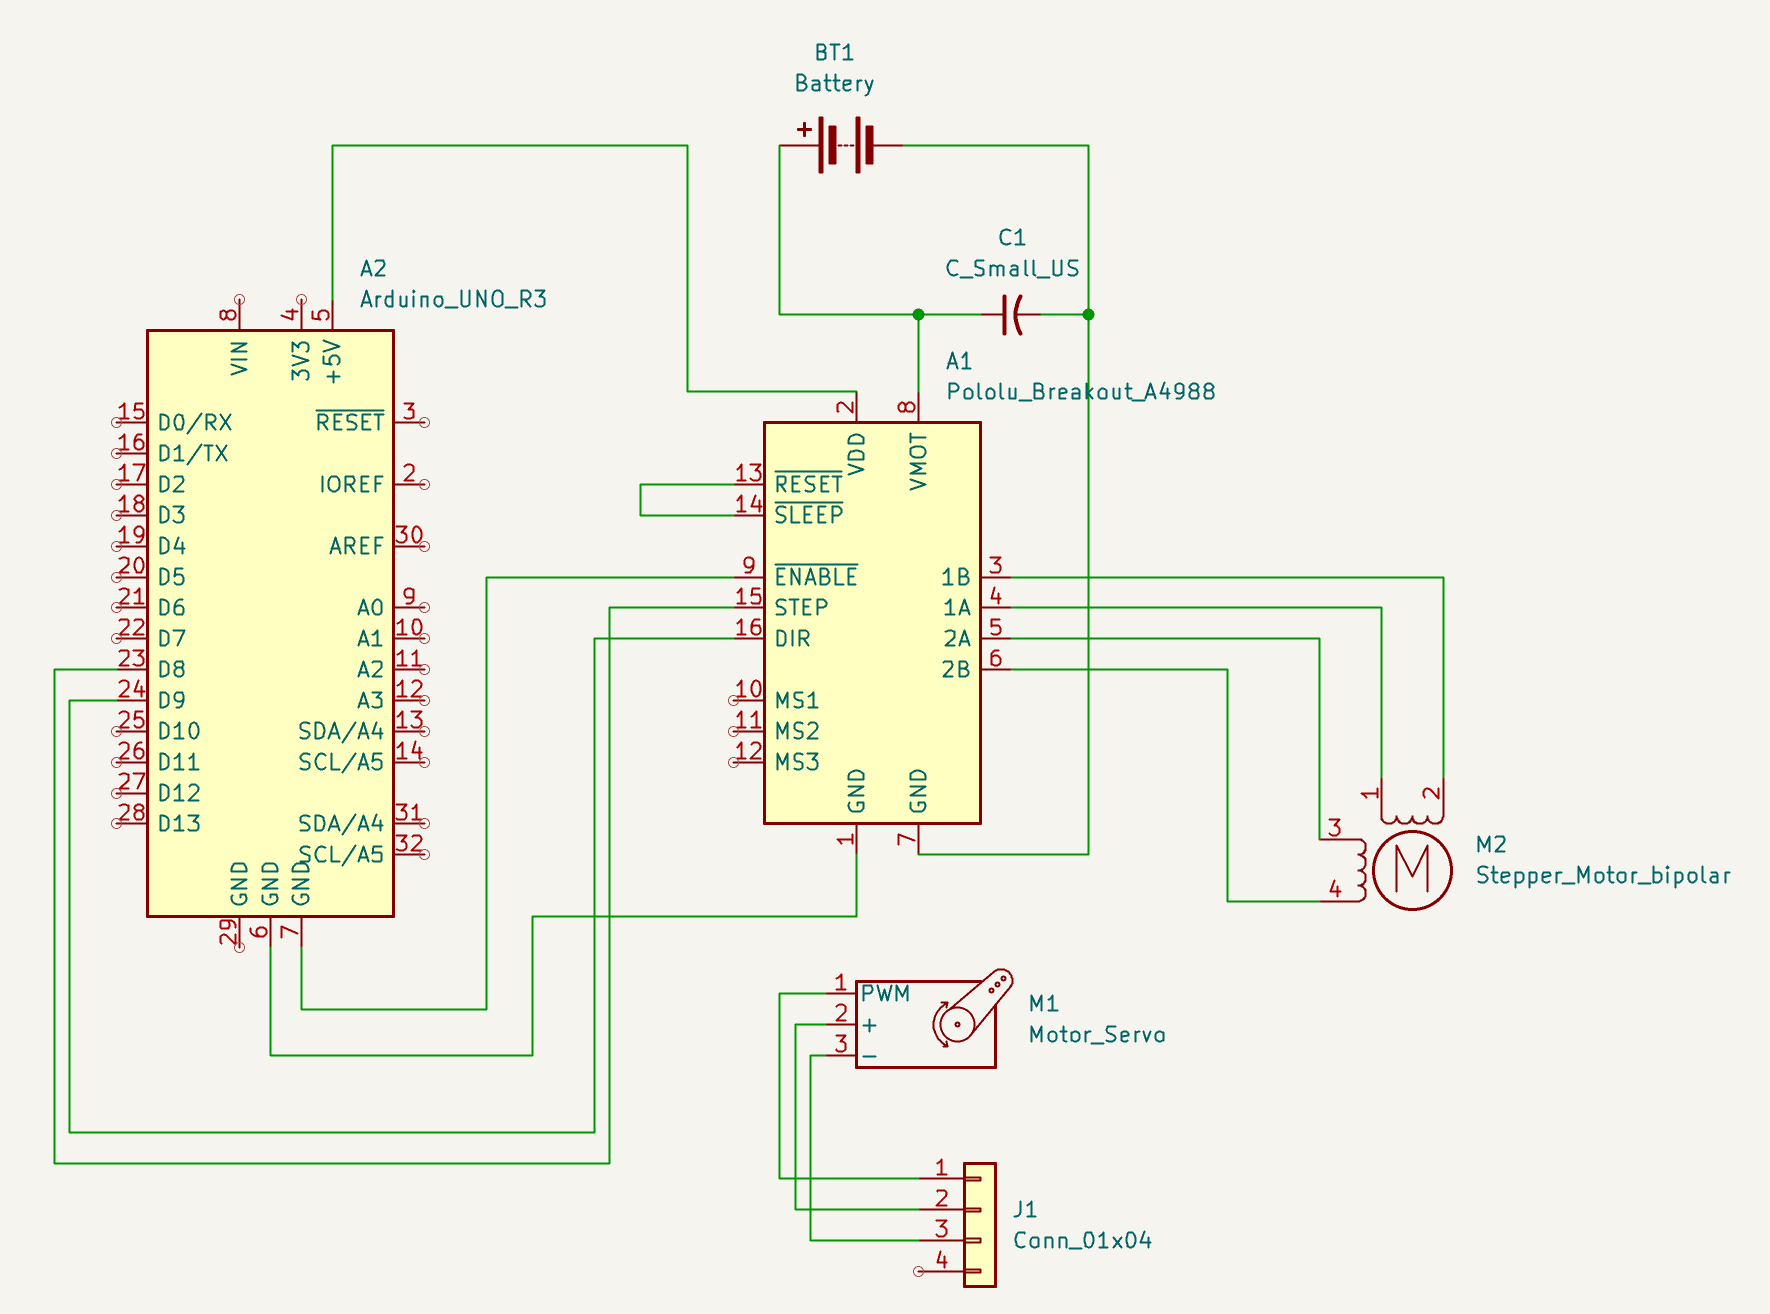
The electronics system consists of an Arduino microcontroller, an A4988 stepper motor driver, a Dynamixel XL330 actuator used for force feedback rendering, and an ERM vibration motor used for tactile event notifications. The Arduino controls the stepper motor positioning and vibration motor, while a host computer executes the virtual lock simulation and communicates with the hardware through serial interfaces. The system architecture separates low-level motor control from high-level lock simulation, resulting in a modular and reliable design.
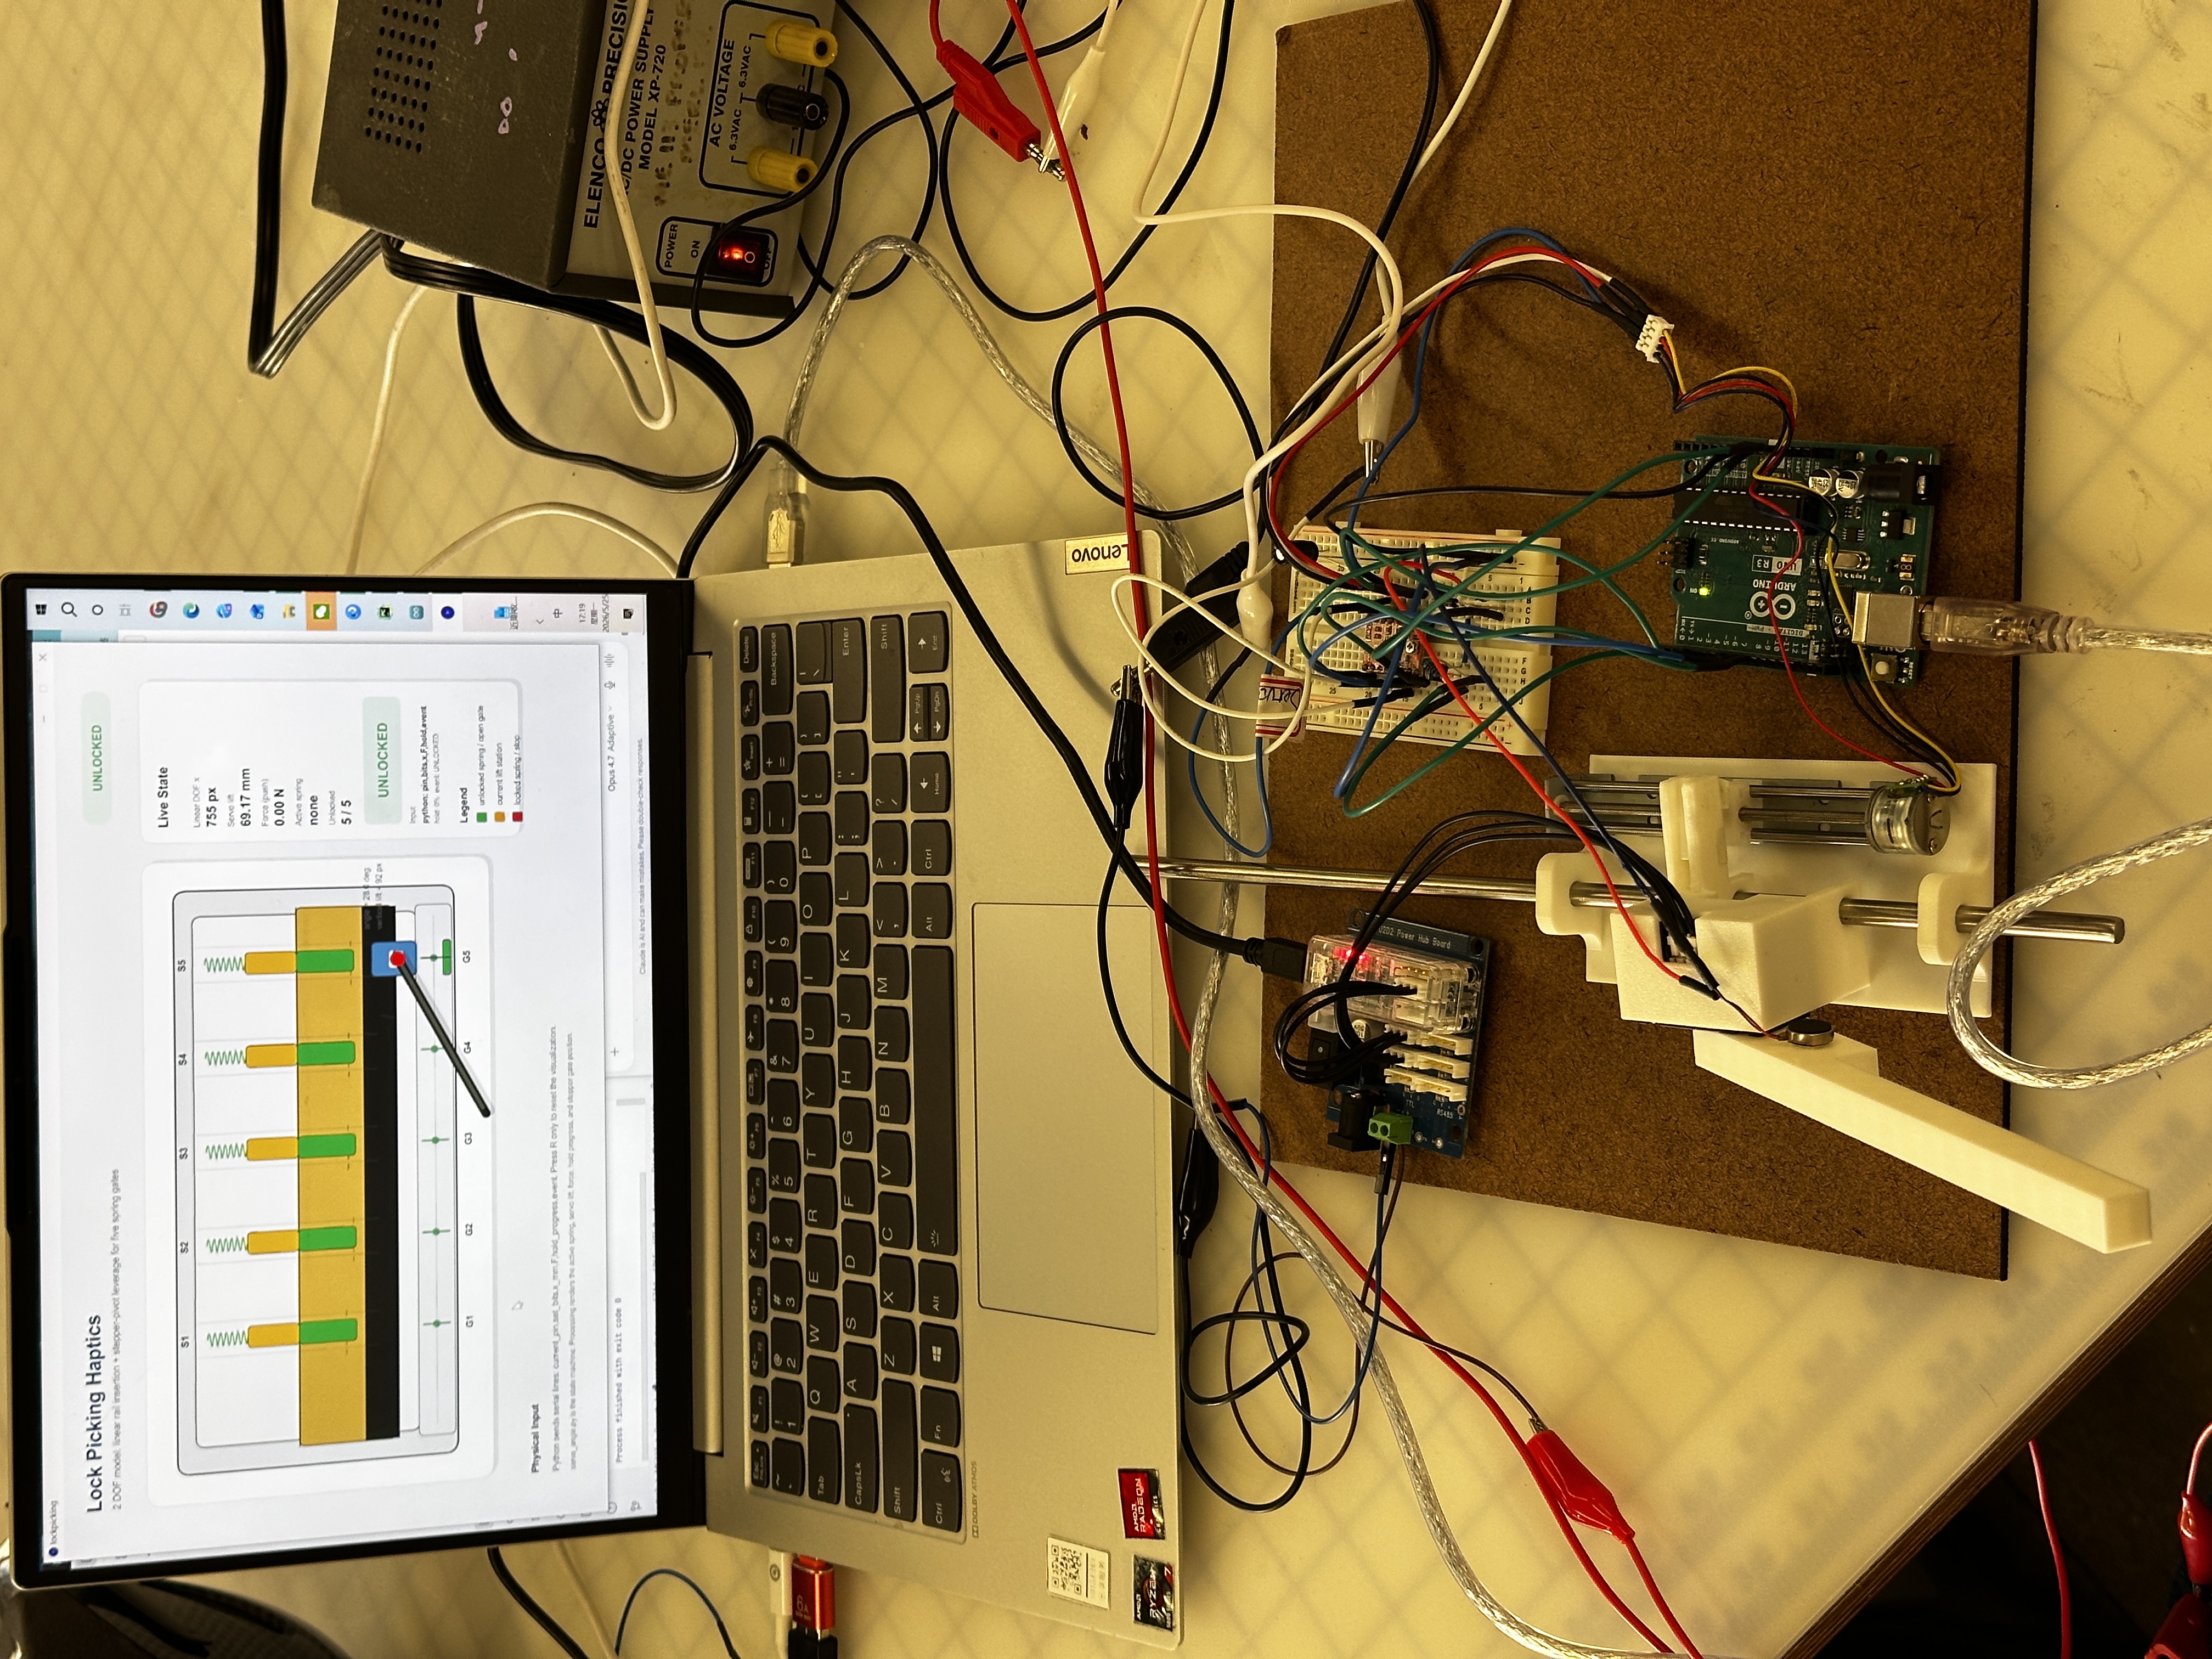
Fig 1. Hardware system assembly (electrical and mechanical).
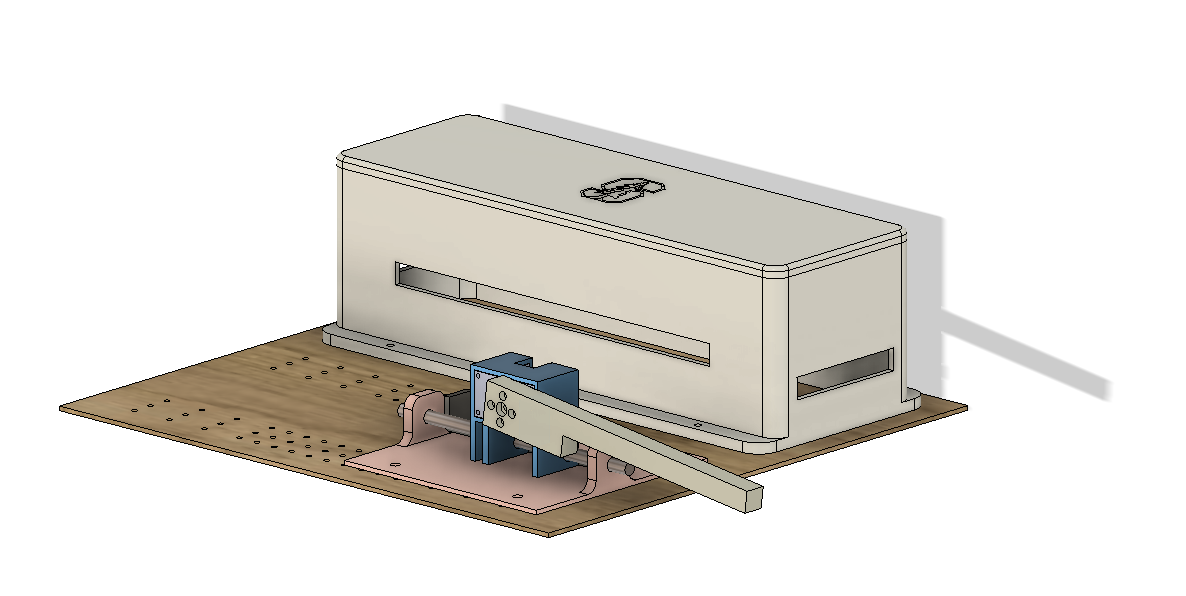
Fig 2. CAD model of the system design.
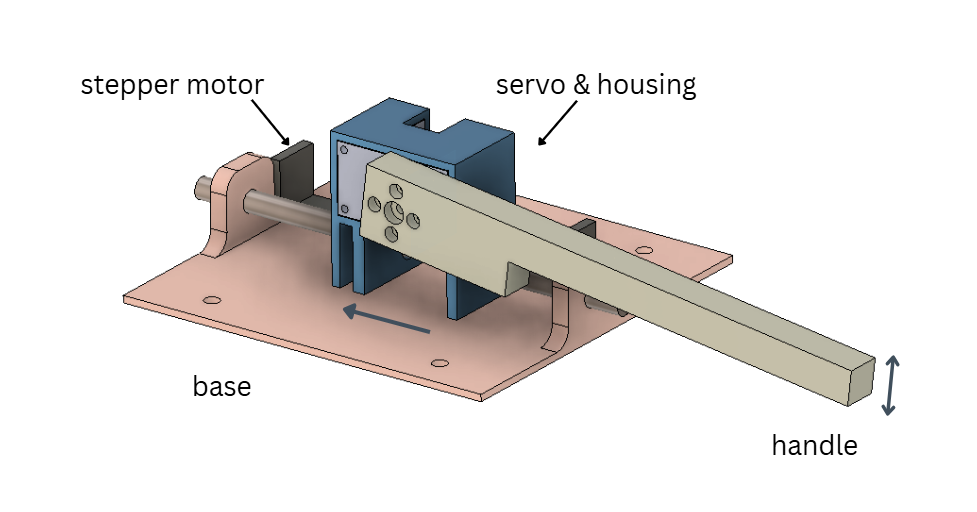
Fig 3. Detailed CAD view of the lock picking mechanism. The servo housing connects the servo motor to the system, while the stepper motor controls horizontal movement. The handle, attached directly to the servo motor, enables vertical picking motion.
System Analysis and Control
The virtual lock is modeled as a sequence of pin-tumbler mechanisms, each characterized by a unique spring stiffness, damping coefficient, and set position. The user's rotational angle of the handle determines the amount of pin lift applied. For each active pin, a virtual spring-damper model computes the reaction force according to
F = -kx - bv
where k represents pin stiffness, b represents damping, x is pin displacement, and v is pin velocity.
To increase realism, each pin must be held within a narrow set region for a specified duration before becoming permanently set. An overshoot detection mechanism prevents successful setting if the user lifts the pin beyond an allowable tolerance range, mimicking the behavior of over-setting a real lock. Once a pin is successfully set, the simulator generates a transient click event and temporarily releases the rendered force to simulate the sensation of a pin dropping into place.
The computed force is converted into an equivalent motor torque and rendered through the Dynamixel actuator. Velocity filtering and current limiting are used to ensure stable haptic rendering and safe operation. In addition to kinesthetic feedback, an ERM vibration motor provides vibrotactile cues during pin-setting and lock-opening events. A Processing-based graphical interface visualizes the lock state, active pin, set progress, and overall lock status in real time.
Demonstration / Application
During operation, users rotates the handle to lift the pin while feeling the corresponding spring resistance through the haptic actuator. If the pin is held within the correct setting range for a sufficient duration, the pin becomes set and a click event is generated. The user must then return the pick to a neutral position before proceeding to the next pin. This process repeats until all pins have been successfully set.
The simulator provides multiple feedback modalities simultaneously. Continuous kinesthetic feedback communicates pin stiffness and resistance, vibrotactile feedback indicates discrete events such as pin setting and lock opening, and the graphical interface displays the internal state of the lock. Together, these feedback channels create an interactive educational demonstration that allows users to experience the mechanics of lock picking without requiring a physical lock.
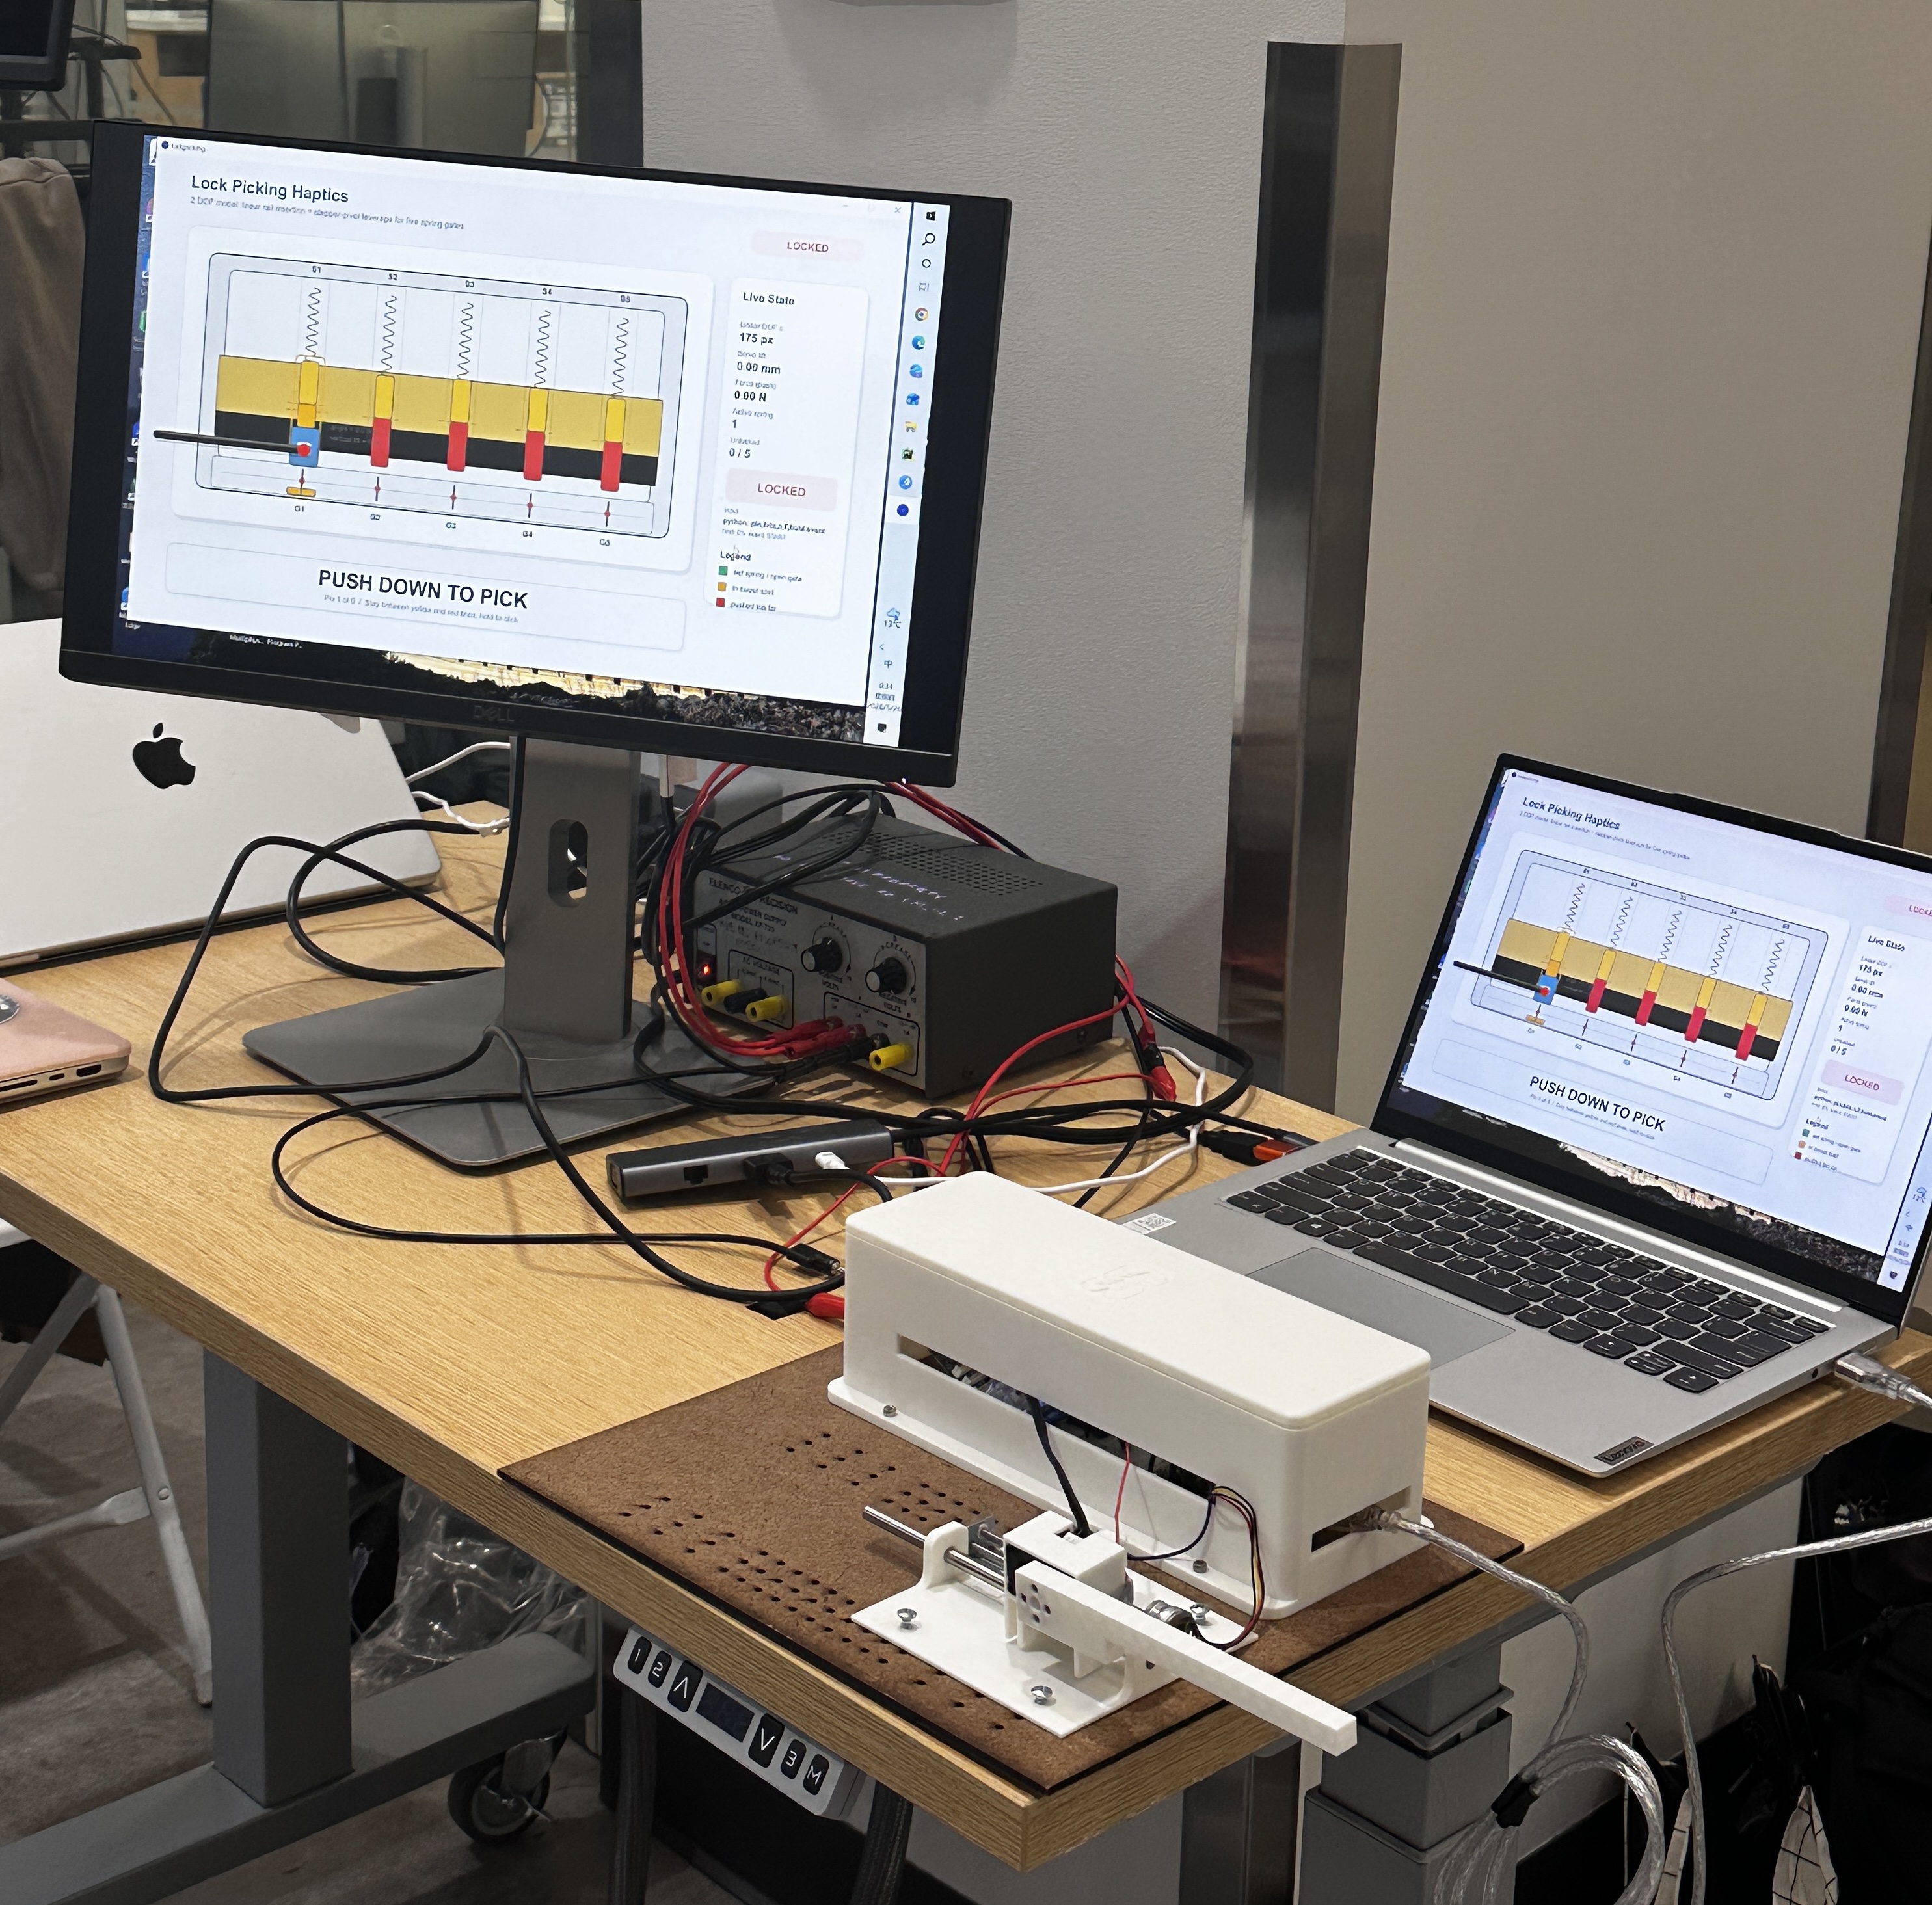
Fig 4. Final prototype demonstration setup.
Results
The completed system successfully achieved its primary objectives of creating an intuitive and engaging haptic lock-picking experience. During the ME327 Demo Day, participants evaluated the simulator through a post-experience survey. Users rated the realism of the force feedback (5.0/5.0), system responsiveness (5.0/5.0), and ease of use (5.0/5.0) exceptionally highly. Participants also agreed that the simulator effectively conveyed the sensation of setting a pin (4.78/5.0) and required precise control (4.67/5.0), reflecting key characteristics of real lock-picking tasks.
Qualitative feedback was similarly positive, with users describing the experience as "fun," "cool to try," and highlighting the spring forces and pin-setting sensations as particularly satisfying. Several participants also noted that the visual interface helped them understand the lock mechanism and learn the interaction quickly.
To view our project in action: https://youtube.com/shorts/-TE6WEep_Y8?feature=share
Future Work
The most common recommendation from the Demo Day survey was to separate the lock pick and tension wrench into two independent controls. In the current design, the actions of lifting pins and applying rotational torque are combined into a single handle to simplify the hardware and interaction. However, real lock picking is a bimanual task in which one hand manipulates the pins while the other applies torque to the lock cylinder. A future version could introduce a second handle representing the tension wrench, allowing users to independently control torque and pin manipulation. This would enable more realistic lock mechanics, including torque-dependent binding order, oversetting behavior, false sets, and security pins, while more closely replicating the experience of picking a physical lock.
Future work could also expand the lock simulation to include a wider variety of pin types and lock configurations. Since users rated the pin-setting sensation slightly lower than the other survey categories, the haptic rendering of click and set events could be further refined through improved force transients and vibrotactile feedback.
Acknowledgments
We would like to thank Professor Allison Okamura for her guidance in helping us refine and clarify the direction of our project. We are also grateful to course assistant Megan Coram for her help in debugging our stepper motor setup. Their support was invaluable to the success of this project.
Files
Source code and component list for the lock-picking haptic simulator: Python state machine, Arduino firmware, Processing visualization.
Also, attached is a list of major components and their approximate costs:
Appendix: Project Checkpoints
Checkpoint 1
1. Select the specific mechanism for horizontal movement (Rail vs. Capstan) and begin the 3D design of the pick handle and housing.
2. Order all necessary hardware components; begin 3D printing finalized structural components.
3. Write Pseudo-code for virtual lock picking and complete preliminary visualization.
4. Develop pipline to integrate visual, firmware and user interacition. Write the forward kinematics code to translate raw encoder counts from the 2-DOF setup into real-time Cartesian coordinates (x, y) for the virtual pick.
Goals met: 1. Deveop overall design and calculations of the whole pipeline:
2. Hardware setup: Here is the initial prototype we have developed, selecting a linear rail mechanism for horizontal x travel after evaluating the trade-offs against a capstan-based design. For vertical y displacement, we are utilizing a motor integrated with an encoder to provide high-resolution position feedback. Currently, we are finalizing the CAD models for the interface brackets and motor mounts to ensure a robust connection across the entire mechanical system.
3. Pseudo-code The user moves the pick inward or outward to position it under one of the pins, then tilts the pick up or down to lift that pin. Each pin is modeled as a spring with a different stiffness, so the user feels different resistance depending on which pin they are lifting. The visualization updates in real time to show the pick position, pin heights, and lock state. Once all 3–4 pins are lifted to their target heights, the lock unlocks.
loop() {
    // 1. Read pick motion
    pick_depth = read_in_out_position();   // selects pin
    pick_angle = read_tilt_angle();        // pushes pin up/down
    pick_angular_velocity = derivative(pick_angle);

    // 2. Select pin based on insertion depth
    current_pin = map_depth_to_pin(pick_depth);

    // 3. Convert pick tilt to vertical pin lift
    pin_lift = pick_length * sin(pick_angle);

    // 4. Update selected pin
    if (current_pin exists)
    {
        pin_height[current_pin] = max(0, pin_lift);

        if (pin_height[current_pin] >= target_height[current_pin])
        {
            pin_state[current_pin] = SET;
            trigger_click_vibration();
        }
    }

    // 5. Render stiffness feedback
    if (current_pin exists)
    {
        k = spring_k[current_pin];

        torque_feedback =
            -k * pin_height[current_pin] * pick_length
            - damping * pick_angular_velocity;
    }
    else
    {
        torque_feedback = 0;
    }

    // 6. Unlock condition
    if (all_pins_SET())
    {
        lock_state = UNLOCKED;
        trigger_unlock_feedback();
    }

    // 7. Output haptics + visuals
    output_pick_torque(torque_feedback);
    update_visualization(
        pick_depth,
        pick_angle,
        pin_height[],
        pin_state[],
        lock_state
    );
}
Preliminary Visualization

Next steps:
- Finalize the CAD design and 3D print the necessary mechanical parts for the lock-picking simulator.
- Assemble the physical system, including the pick mechanism, pin modules, sensors, and motorized haptic feedback components.
- Improve visual simulation interface with better UI and feedback, including real-time rendering of:
- pick position and angle
- pin heights
- pin states (unset/set)
- lock status (locked/unlocked)
- Tune the control parameters and force feedback for a stable and realistic interaction.
Checkpoint 2
Here you will write a few paragraphs about what you accomplished in the project so far. Include the checkpoint goals and describe which goals were met (and how), which were not (what were the challenges?), and any change of plans for the project based on what you learned. Include images and/or drawings where appropriate.
1. Finalized the CAD design and 3D printed the necessary mechanical parts for the lock-picking simulator
One of the major goals completed during this phase was finalizing the CAD design of the simulator and manufacturing the required mechanical components through 3D printing. The lock housing, rail supports, pin modules, and mounting structures were iterated multiple times to improve alignment, structural rigidity, and overall usability. These iterations helped ensure smoother motion of the pick mechanism and better integration between the mechanical and electronic subsystems.
2. Assemble the physical system, including the pick mechanism, pin modules, sensors, and motorized haptic feedback components.
Another major milestone achieved was the assembly of the physical system. The linear rail mechanism, pick handle, pin modules, sensors, and motorized haptic feedback components were integrated into a working prototype. We successfully interfaced the linear stepper actuator with the A4988 motor driver and Arduino control system. Bidirectional motor motion was verified, and the stepping behavior was calibrated to improve positioning consistency and responsiveness. Additionally, the rail mechanism was mechanically coupled to the pick handle, enabling the intended 2-degree-of-freedom interaction for lock manipulation.
3. Improve visual simulation interface with better UI and feedback
We also continued refining the software side of the project by improving the graphical user interface (UI) of the lock-picking simulator. The updated UI was redesigned to more closely resemble the appearance and interaction style of a real lock mechanism, improving both usability and immersion.
In addition, we designed and implemented the circuit schematics for the system electronics. The schematics included the stepper motor driver circuitry, Arduino control connections and power distribution required for the haptic feedback system. Developing the circuit diagrams early in the assembly process helped simplify wiring organization and improved the modularity and maintainability of the prototype. This also allowed us to systematically troubleshoot electrical issues during integration.
Next steps:
- Implement virtual pin states and binding order simulation.
- Add vibrotactile “click” feedback when pins are successfully set.
- Optimize force rendering stability and reduce latency in the control loop.
- Conduct preliminary user testing on perceived realism and usability.