

2026-Group 6
Space-IO
Project team member(s): Timber Carey, Sean Fowler, Luke Hyman, Jonah Simpkins
Space-IO is a two-player space game that uses custom haptic controllers to demonstrate the benefits of haptic feedback in combination with a virtual environment. Each player controls a spaceship using separate throttle and steering inputs in a playing field filled with stationary stars that give a speedboost on collision and moving asteroids that blow up ships on impact. A combination of force feedback and vibration communicates game events as the ship collides with other objects on the field, and changes in vehicle dynamics as the player applies throttle or steering inputs. The speed-dependent impedances and event-driven haptic effects are paired with visual and audio cues to create a more immersive experience. User testing during development and demonstration showed that the different haptic effects improve clarity in fast-paced gameplay and create a more intuitive and engaging controller.
On this page... (hide)
Introduction
The goal of this project was to investigate how haptic feedback can increase the ease of controlling a vehicle in a virtual environment. Many video games rely exclusively on visual and auditory feedback, at most incorporating touch through simple vibrations despite its ability to communicate rich information about dynamics, collisions, and position within an environment. This project takes inspiration from racing and flight simulators to use haptic feedback to communicate vehicle state. With two single-degree-of-freedom controls and a vibration motor for each player, the controller kinematics and game event-driven effects all collapse into three degrees of freedom per ship, necessitating careful calibration to maintain clarity and stability of the combined effects.
Another objective of this project was to explore physical implementations of haptic devices that differed from the hardware we experienced during the course, namely the Hapkit and 3D Systems Touch. These each use capstan drives connected to sector pulleys for force amplification. This encouraged us to explore alternatives like direct drive and geared force amplification. These each have advantages and disadvantages in transparency and force application.
Background
Haptic effects are incorporated on top of the traditional audiovisual videogame format both to improve usability and increase enjoyment through immersion [1]. In our game, we combine force feedback from academic guided training applications with tactile effects from more arcade-style games, with the goal of gaining benefits in both performance and enjoyment [1].
The game is fast-paced, so improving user control in highly dynamic environments is the primary source of performance improvement. Malik et al. found that flight simulation users tasked with increasing or decreasing altitude saw improved performance with haptic feedback included, which we can take inspiration from for the near-constant acceleration and attitude adjustments during gameplay [2]. Their findings are based on attractive and repulsive forces as guides towards a target, and �artificial force fields� around an exclusion zone, and found resulting improvements in both learning and overall control [2]. We incorporate similar haptic feedback with a centering spring on the steering knob and virtual walls along with viscous damping on the throttle lever. Both of these haptic systems have no force feedback when the user is not accelerating, which is consistent with the finding that having no haptic feedback yields the best performance for an altitude hold task, where the user is trying to maintain the vehicle state [2]. To further decrease the effect of controller dynamics when the user is trying to maintain a state, the hardware should be highly transparent and low mass where possible. The study also found that haptic feedback reduces visual illusions, which can help users stay oriented in the on-screen render when the vehicle state is changing quickly [2].
Looking at players in the sim racing game iRacing, Murphy et al. found that moderate force feedback improves performance while extremely strong feedback begins to decrease performance, so intensity of all effects�both active and passive�must be tuned carefully to maximize performance [3].
Unlike a realism-focused flight simulator for training, the game should also be enjoyable, so there must be a balance between the performance-enhancing passive effects that communicate vehicle state and the active effects that trigger based on environmental variables to increase immersion. In their iRacing study, Murphy et al. saw no change in performance with the inclusion of high-frequency vibrotactile effects, but participants preferred conditions that included more haptic modes [3]. The game used force feedback through the steering wheel to mimic the vehicle dynamics information communicated through the steering wheel in a real car, such as steering weight indicating how much of the vehicle�s weight is supported by the front or rear wheels [3]. The vibrotactile feedback focused on more tangential information such as the rumble of the engine or the different textures on a track [3]. Mapping these findings onto the haptic implementation for our game, we can expect performance improvements from the passive haptic effects on throttle and steering, and more immersion from the event-driven effects. The balance between performance and enjoyment can therefore be manipulated through the tuning of the passive haptic effects relative to the active effects, while including a hard cap on the maximum intensity to avoid degrading performance from overly strong effects.
Methods
Hardware Design and Implementation
The primary mechanical hardware consists of two game control consoles mounted to a 1/4� thick, 10� x 24� black acrylic base plate. The consoles occupy the front two corners of the plate, which is clamped and stiffly mechanically grounded to the playing table with two spring clamps. Each console includes a steering knob on the left and a throttle lever on the right. Both inputs use brushed Maxon RE-max29 motors salvaged from former DaVinci robot arms.
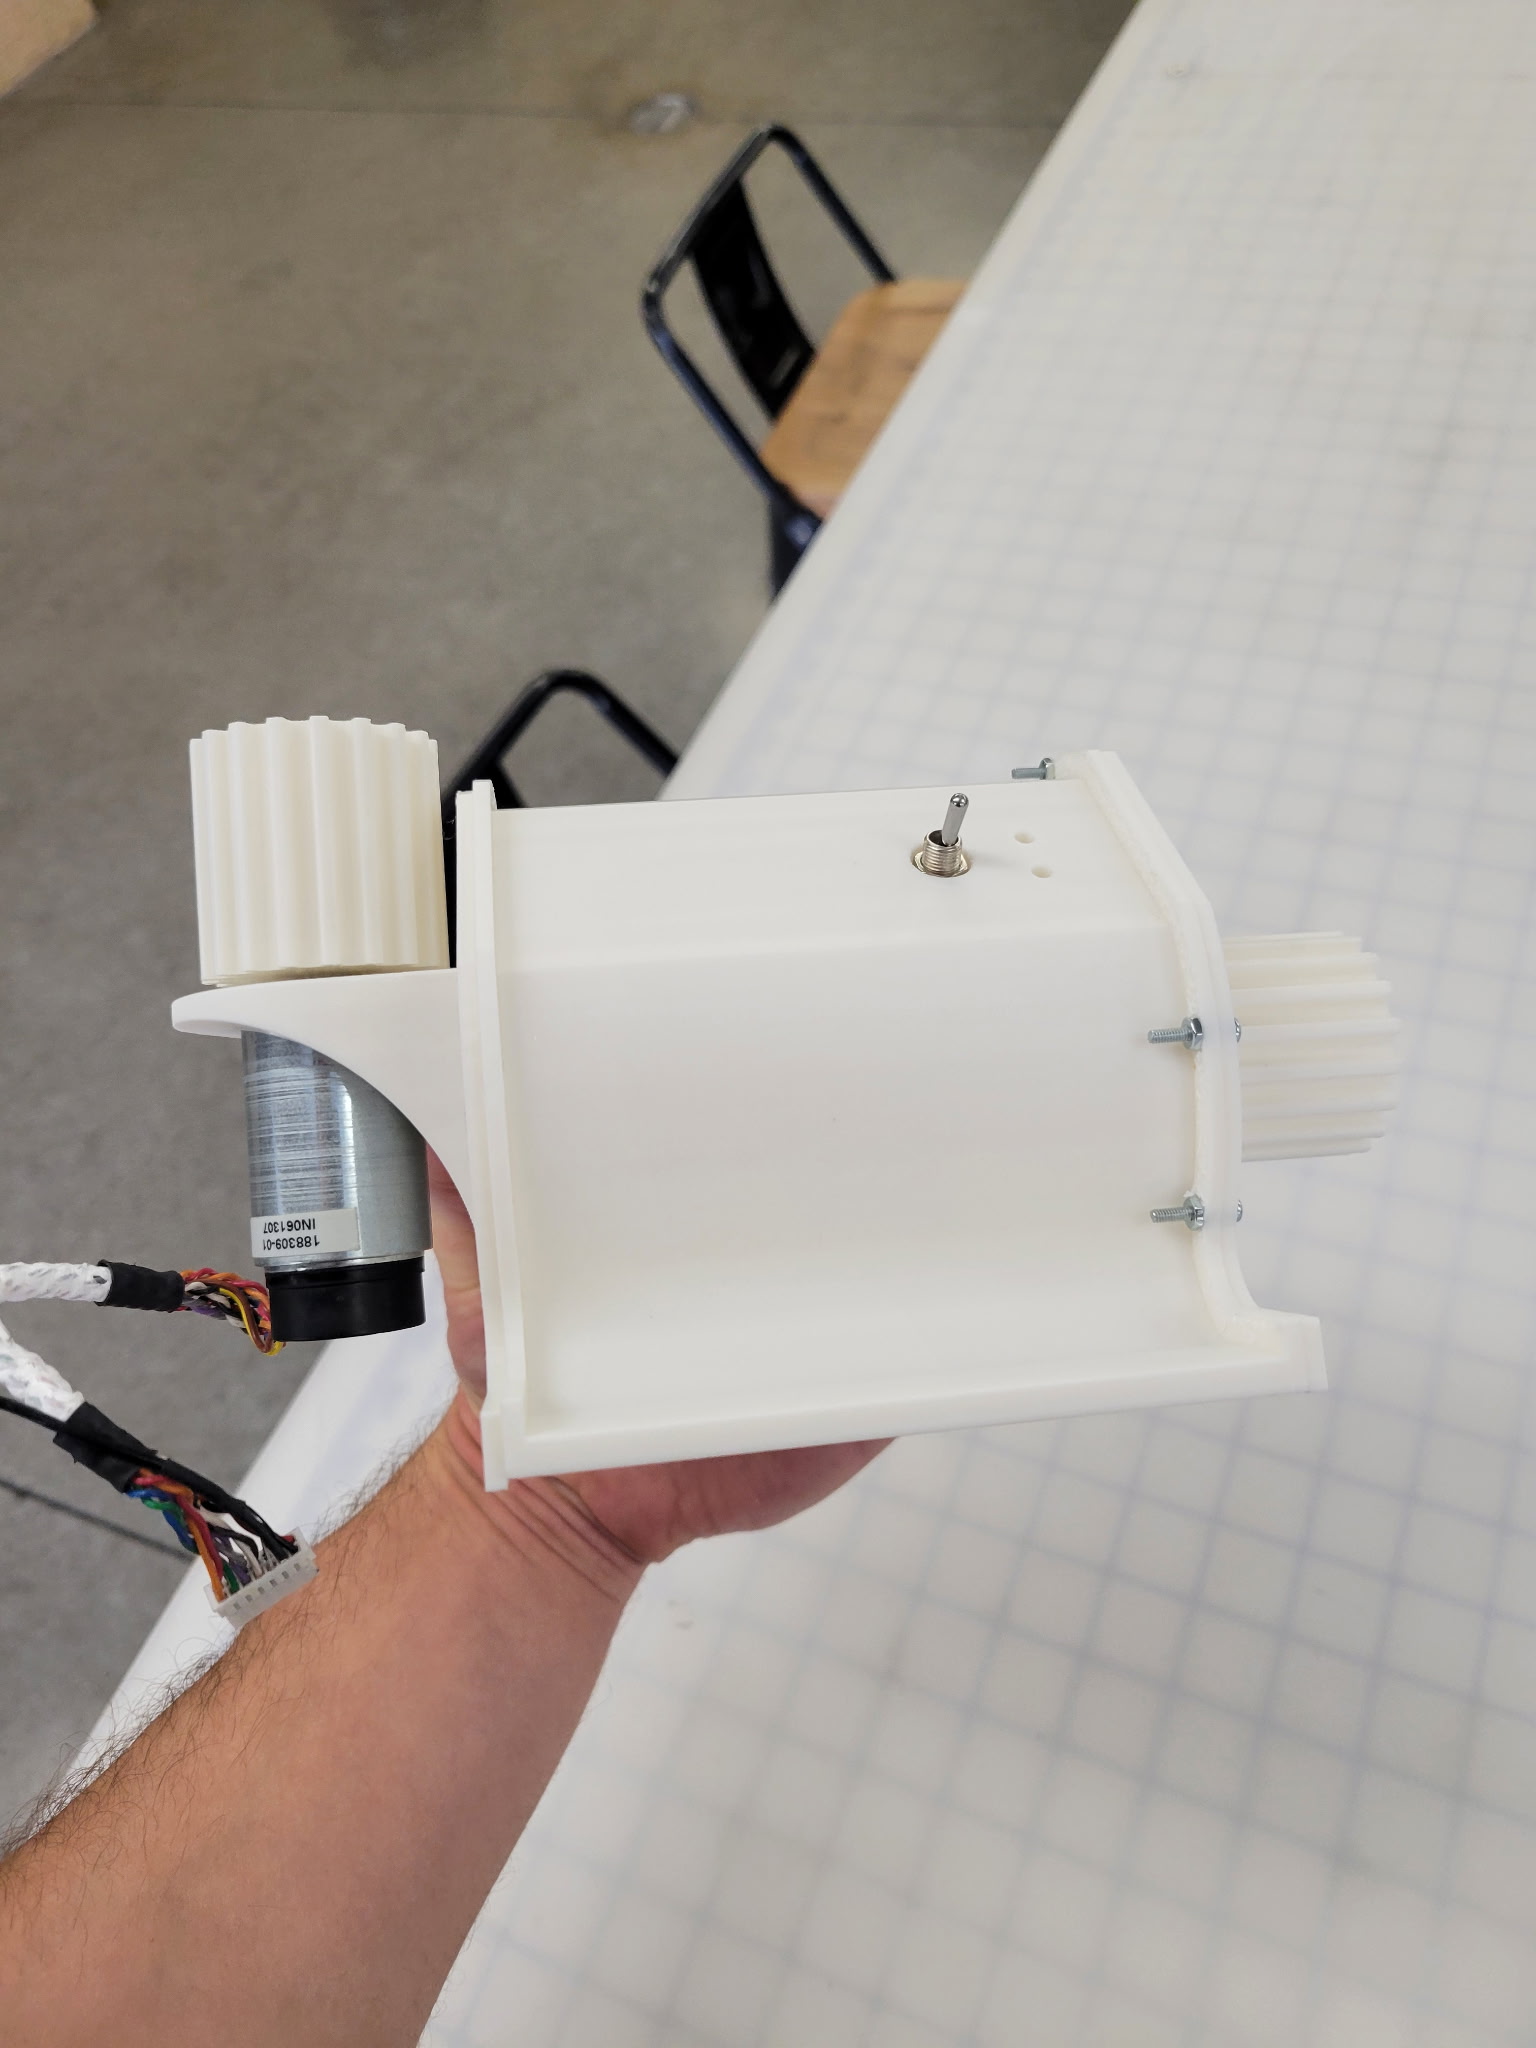
The steering knob is direct drive for maximum transparency and responsiveness at the expense of output torque. In contrast, the throttle makes use of the spur gear reduction, approximately 4:1, and capstan built into the salvaged DaVinci motor assemblies to create a much stiffer version of the Hapkit mechanism. While this increases the inertia of the mechanism and reduces transparency, it also allows for much stiffer walls to be rendered and for stronger haptic forces to be transmitted to the user, which are necessary to give the speedboost sensation when the walls disappear on collision with a star.
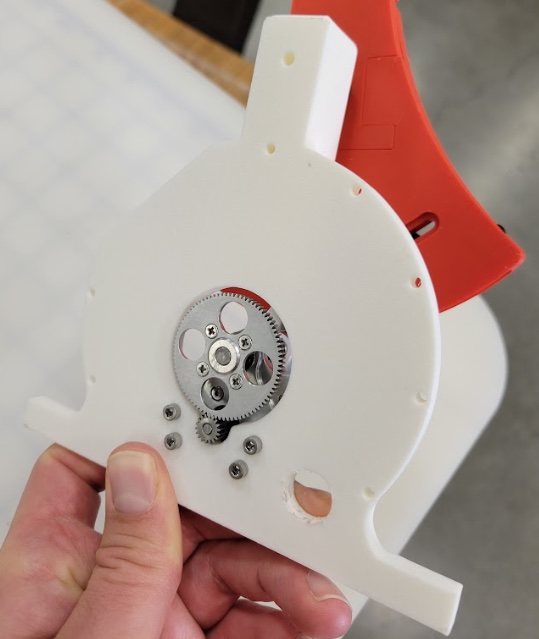
Geared motor integrated into the throttle assembly
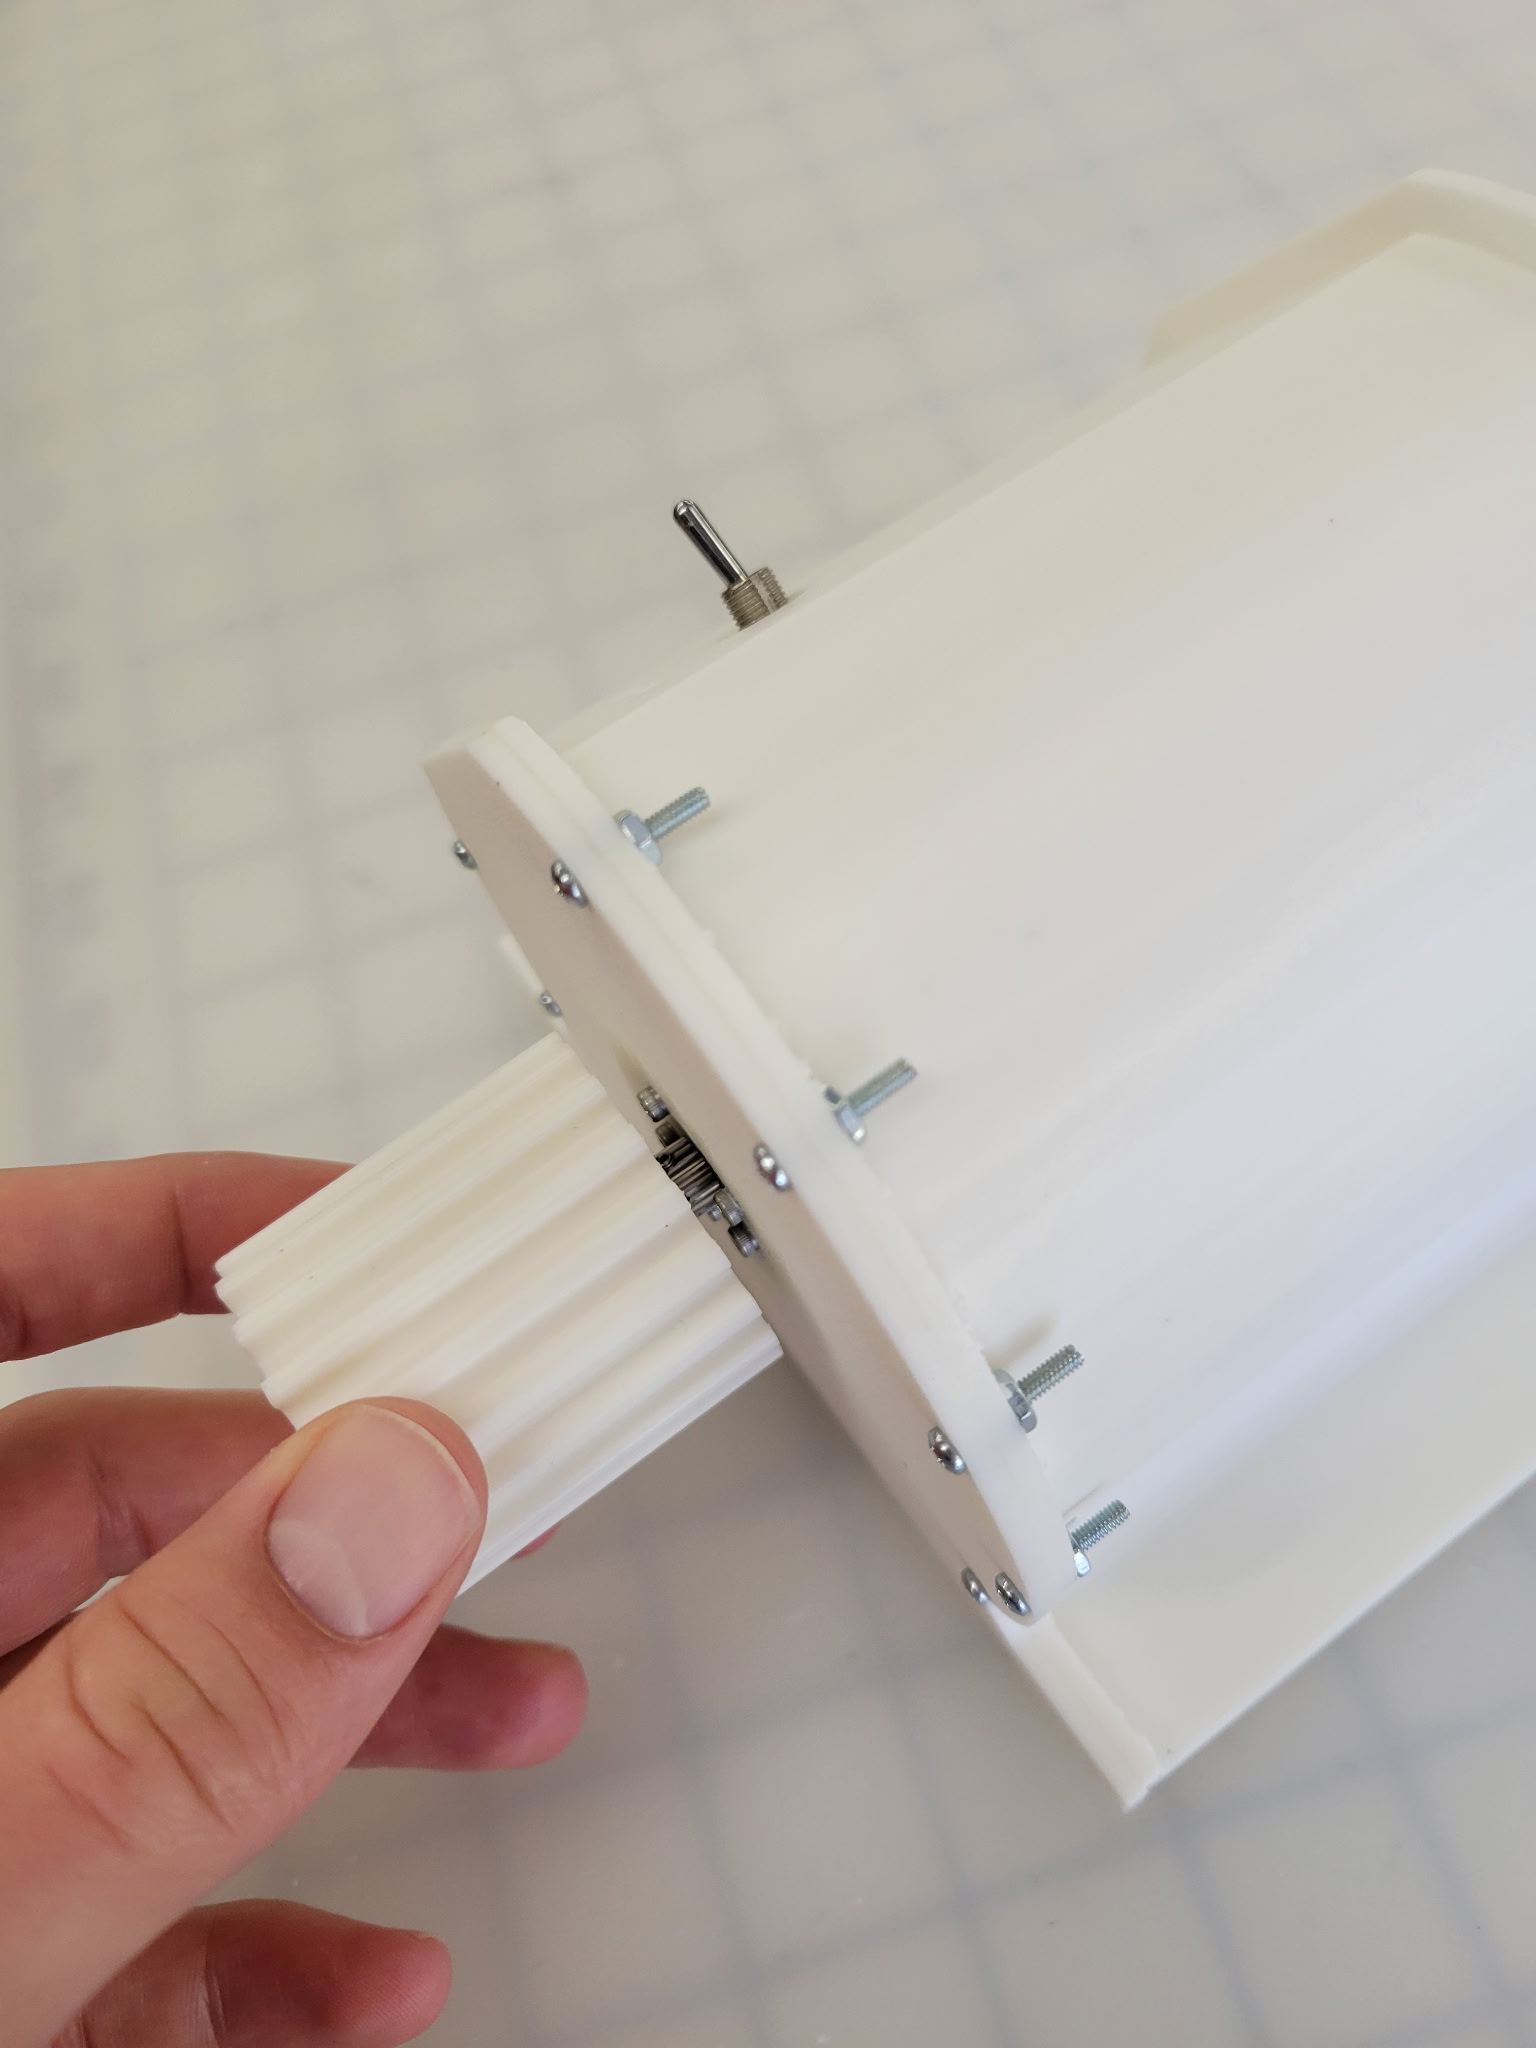
The throttle utilizes the same sector pulley as the Hapkit. Given students� familiarity with the performance of the Hapkit, comparing the feel of the throttle to that of the Hapkit makes for an instructive, intuition-building example of how gears and additional force amplification impact haptic performance.
Approximately 5 wraps of 0.8 mm UHMWPE kite cord were used to secure the sector pulley to the geared motor capstan.
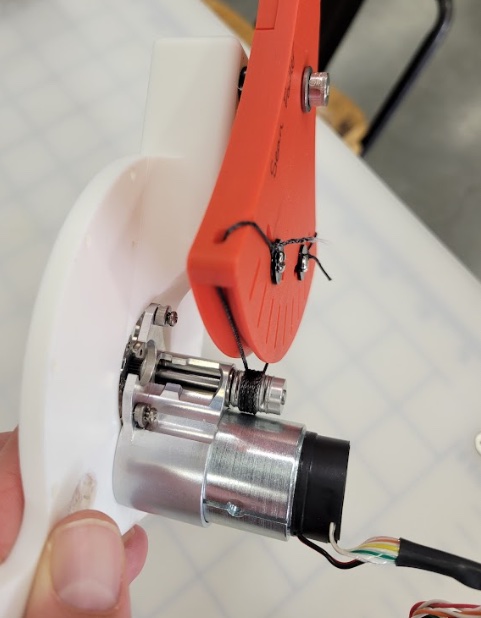
UHMWPE cord securing the sector pulley to the geared motor capstan
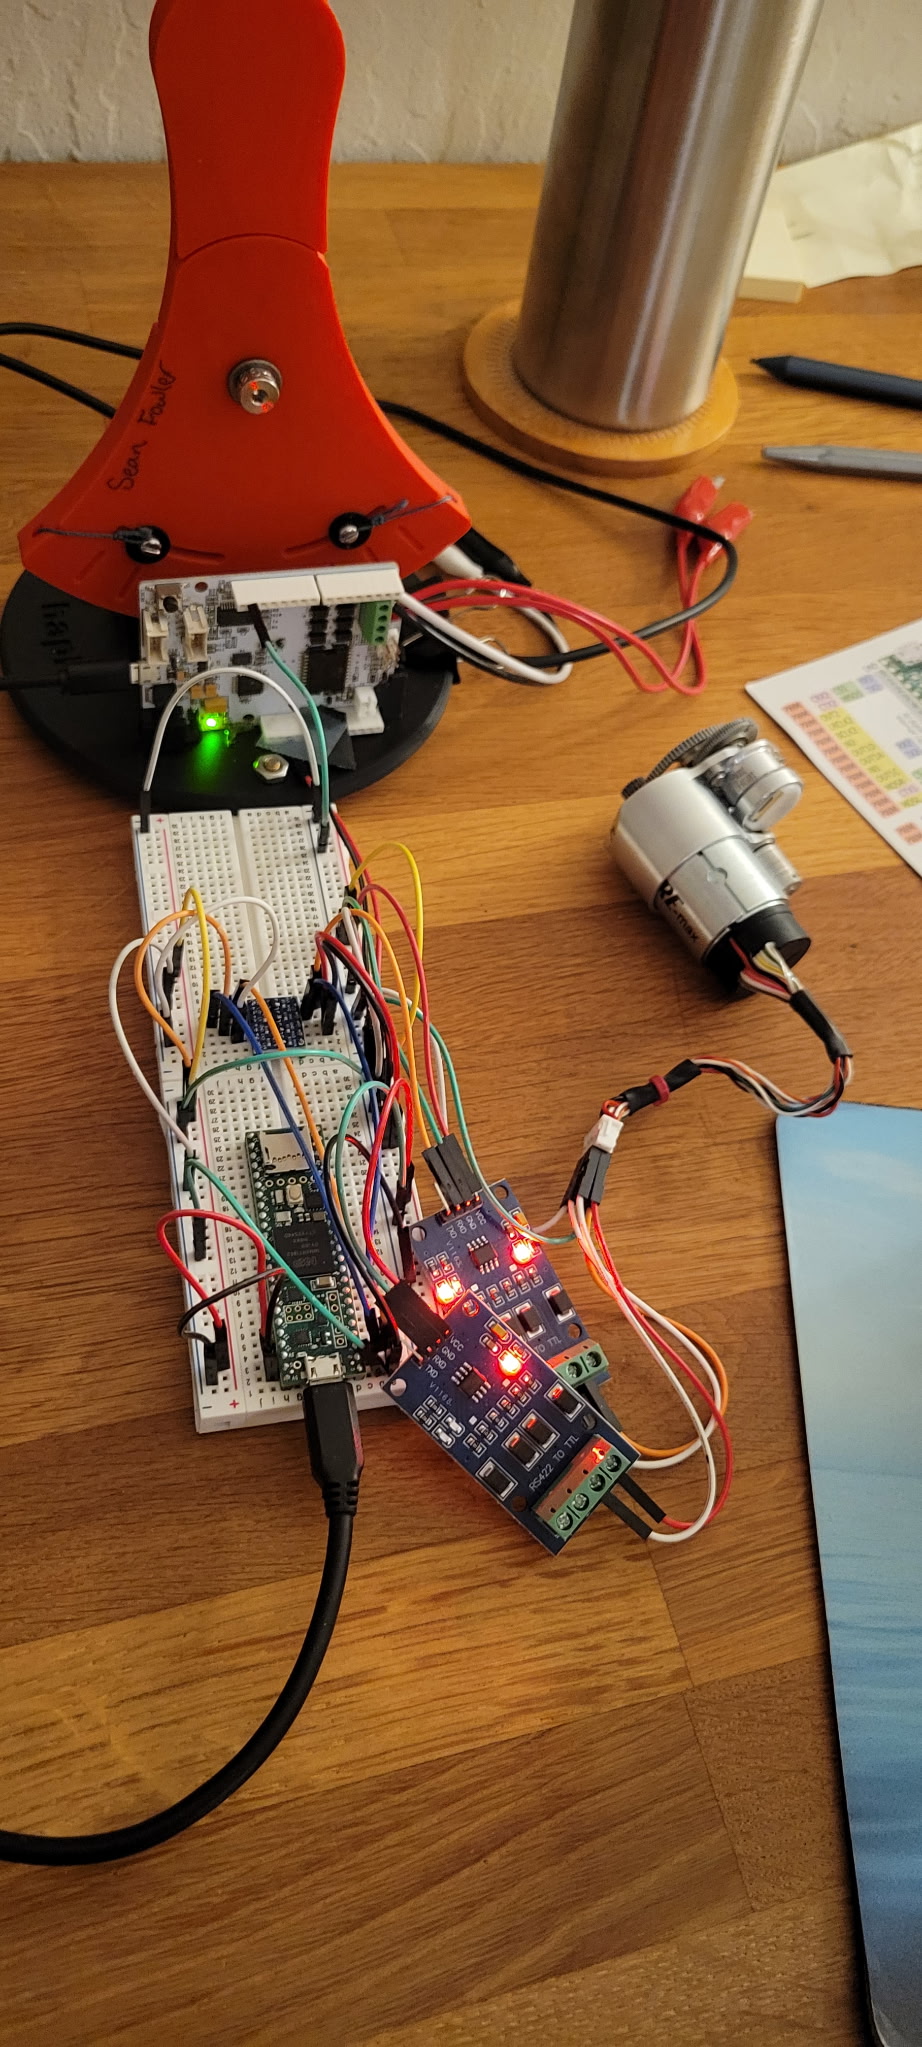
Each console has an Arduino Uno-derived Hapkit board with two motor drivers, one for each of the two Maxon motors. These were chosen, due to availability and convenience, as the motor driver boards. These convey commands to the motors based on serial control inputs received over their Rx pins from the primary game interface board, Teensy 4.1. This makes use of their 12 V DC power inputs to provide adequate power to the motors. The Teensy 4.1 runs solely off USB power from the PC, which is limited to 5 V and 900 mA for USB 3.0, which would be inadequate to power the motors alone.
An additional, centrally placed Hapkit board powers two eccentric rotating mass (ERM) motors mounted on the throttle lever of each game console for vibratory effects. The hard metal housing of the ERM motor is mounted in tight, direct contact with the rigid throttle handle for maximum vibration transfer to the user.
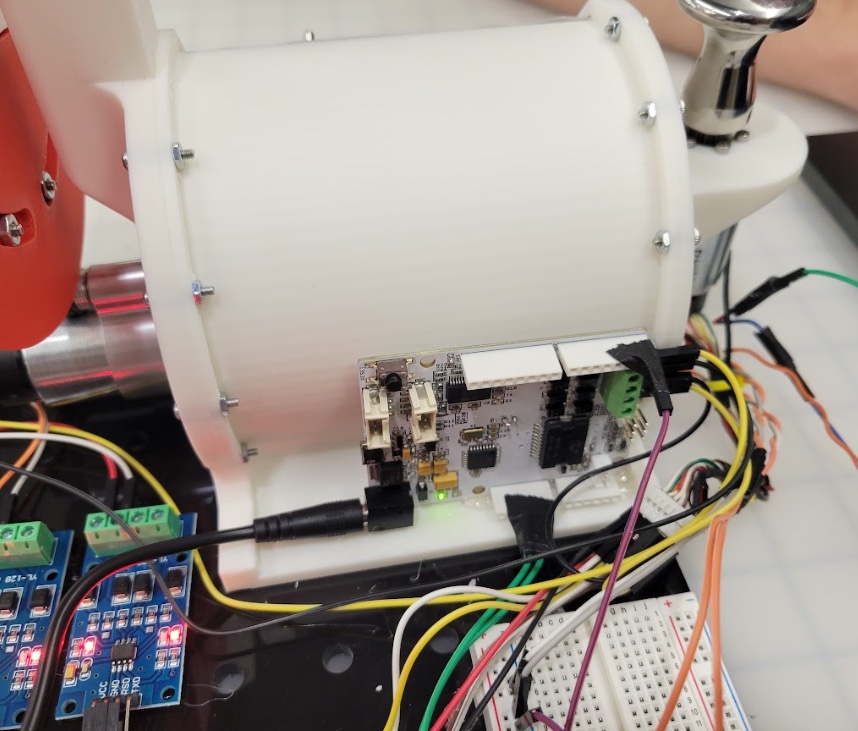
Hapkit board for motor driver power

ERM motor mounted on the throttle handle
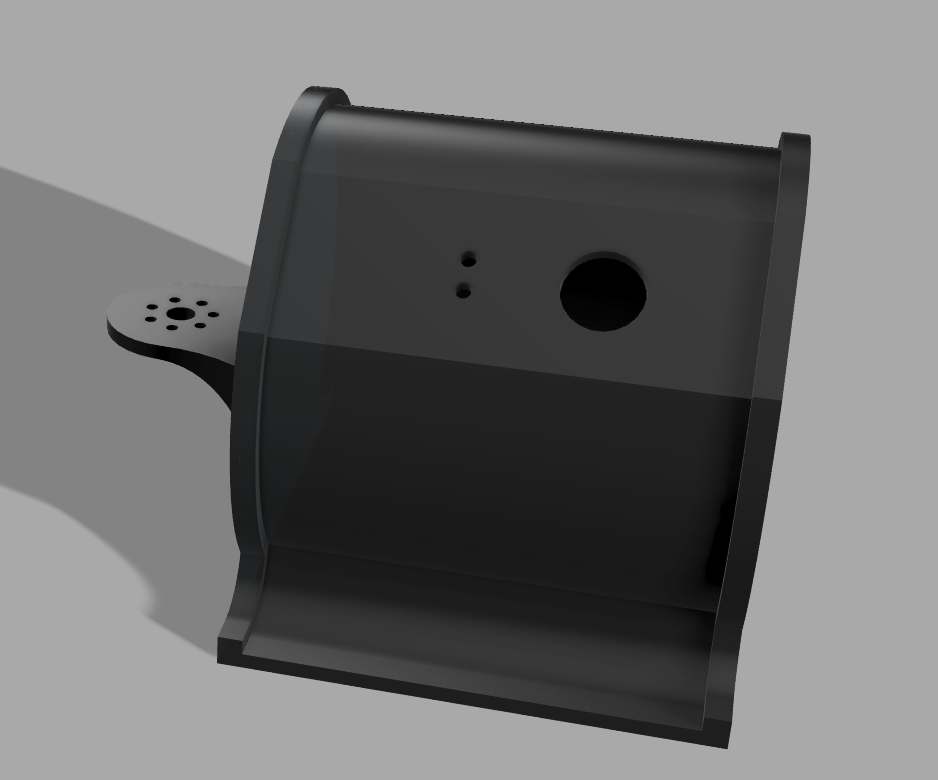
The console housings and motor mounts are 3D printed from PLA using a Bambu printer. They are hollow with ample internal space for cable routing and excellent stiffness for accurate rendering of haptic effects. Each console houses two information LEDs and one switch. On the Player 1 console, the 3-way switch controls game difficulty through asteroid presence, number, and speed, whereas on the Player 2 console, the switch controls whether the player is added to the game, enabling PvP mode or single-player mode. The LEDs indicate if the player is connected to the game, and flash if the player crashes into an asteroid or player tail.
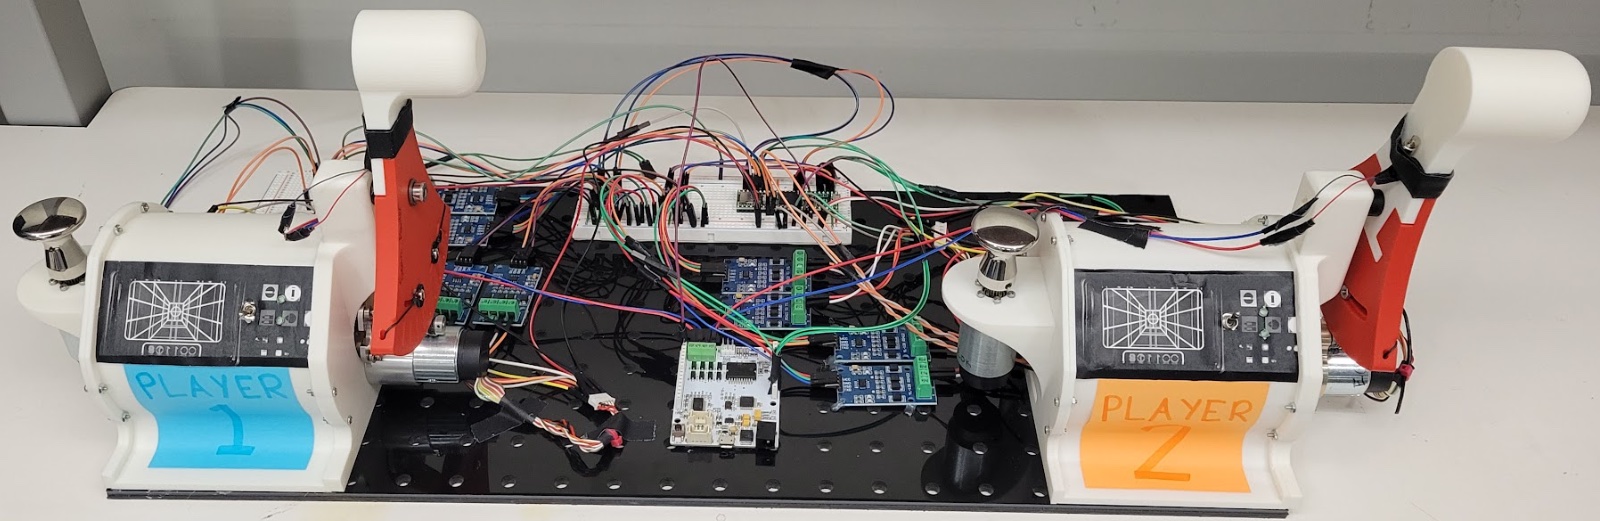
Assembly overview
Electronics
The connection between the physical haptic controllers and the virtual game environment is organized into several layers: the laptop running the Pygame game engine, a Teensy 4.1 acting as the real-time sensing and communication bridge, Hapkit boards acting as motor drivers for the kinesthetic haptic controls, and an additional Hapkit board used to drive the ERM vibration motors on the throttle handles. The laptop handles the visual display, game state, collision detection, and high-level haptic rendering calculations. The Teensy reads the 1,000 count/rev Maxon 225780 differential encoders in quadrature, estimates position and velocity, communicates with the laptop over USB serial, and routes force and vibration commands to the appropriate driver boards.
The Maxon motors utilize integrated differential encoders, which are much less vulnerable to electromagnetic interference than single-ended encoders, which are easily corrupted by adjacent PWM signals. Each encoder has an A and a B channel, and each channel uses two wires to transmit complementary signals, A and A-, and B and B-. Since these complementary signals are a twisted pair, signal noise should affect both wires equally. Subtracting the inverted signal from the noninverted signal then cancels out the noise. An RS422 to TTL board with a MAX490 chip is used to combine each encoder channel�s complementary signal pair into a single serial output signal read by the Teensy controller. This approach uses one board per channel, or two boards per motor.
At each control update, the Teensy samples the encoders at a 1 kHz local control rate. Computing the velocity on the Teensy reduces dependence on the laptop�s serial packet timing and helps limit phase lag and quantization noise in the haptic feedback loop. The Teensy sends encoder counts and filtered velocity estimates to the game engine, where they are normalized into steering and throttle inputs.
Teensy was selected to read the encoders instead of the Hapkit boards to enable extremely robust encoder readings, even at high speed. This is especially important for the geared throttle drive, as high-speed motions at the capstan are scaled up about 4X at the encoder. Early testing with the Hapkit board�s software-interrupt-based counting resulted in count skipping. High-speed inputs overwhelmed the processor, causing the count to freeze. By contrast, the Teensy�s NXP i.MX RT1062 microcontroller chip uses quadrature encoder interface modules built into its silicon for much faster encoder count tracking. Furthermore, Teensy�s ARM Cortex-M7 600 MHz processor is dramatically faster than the Hapkit�s 16 MHz ATmega328P. This design decision resulted in extremely stable, robust gameplay.
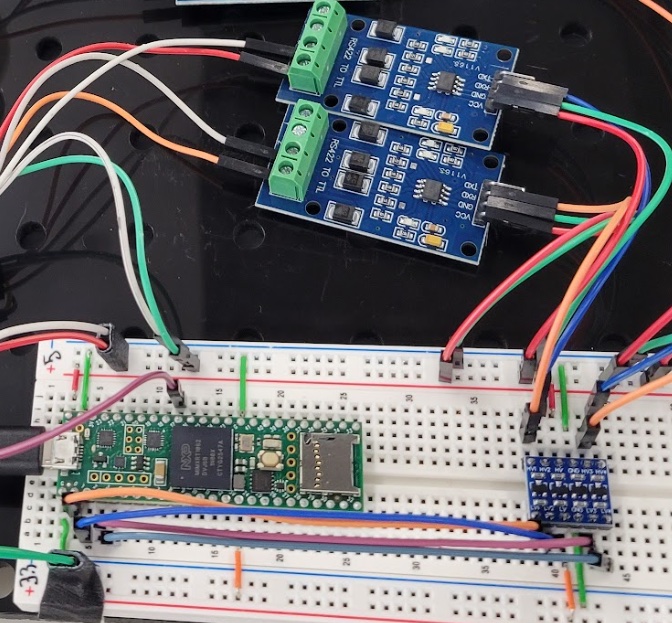
Bottom left board: Teensy 4.1; upper blue boards: MAX490-based RS422 to TTL modules; bottom right blue board: level shifters to convert 5 V encoder readings to 3.3 V inputs for Teensy 4.1
The game engine advances the game state, checks for collisions and discrete events, and calculates desired haptic outputs based on both controller kinematics and gameplay events. Continuous force feedback effects, such as steering damping, centering springs, throttle detents, and virtual walls, are sent back to the Teensy as signed force commands for the Hapkit motor drivers. Event-based tactile effects, such as collision alerts or trail proximity cues, are routed to the ERM vibration motors through the additional Hapkit board. This separation allows the system to provide both kinesthetic feedback through the main control axes and vibrotactile feedback through the throttle handles.
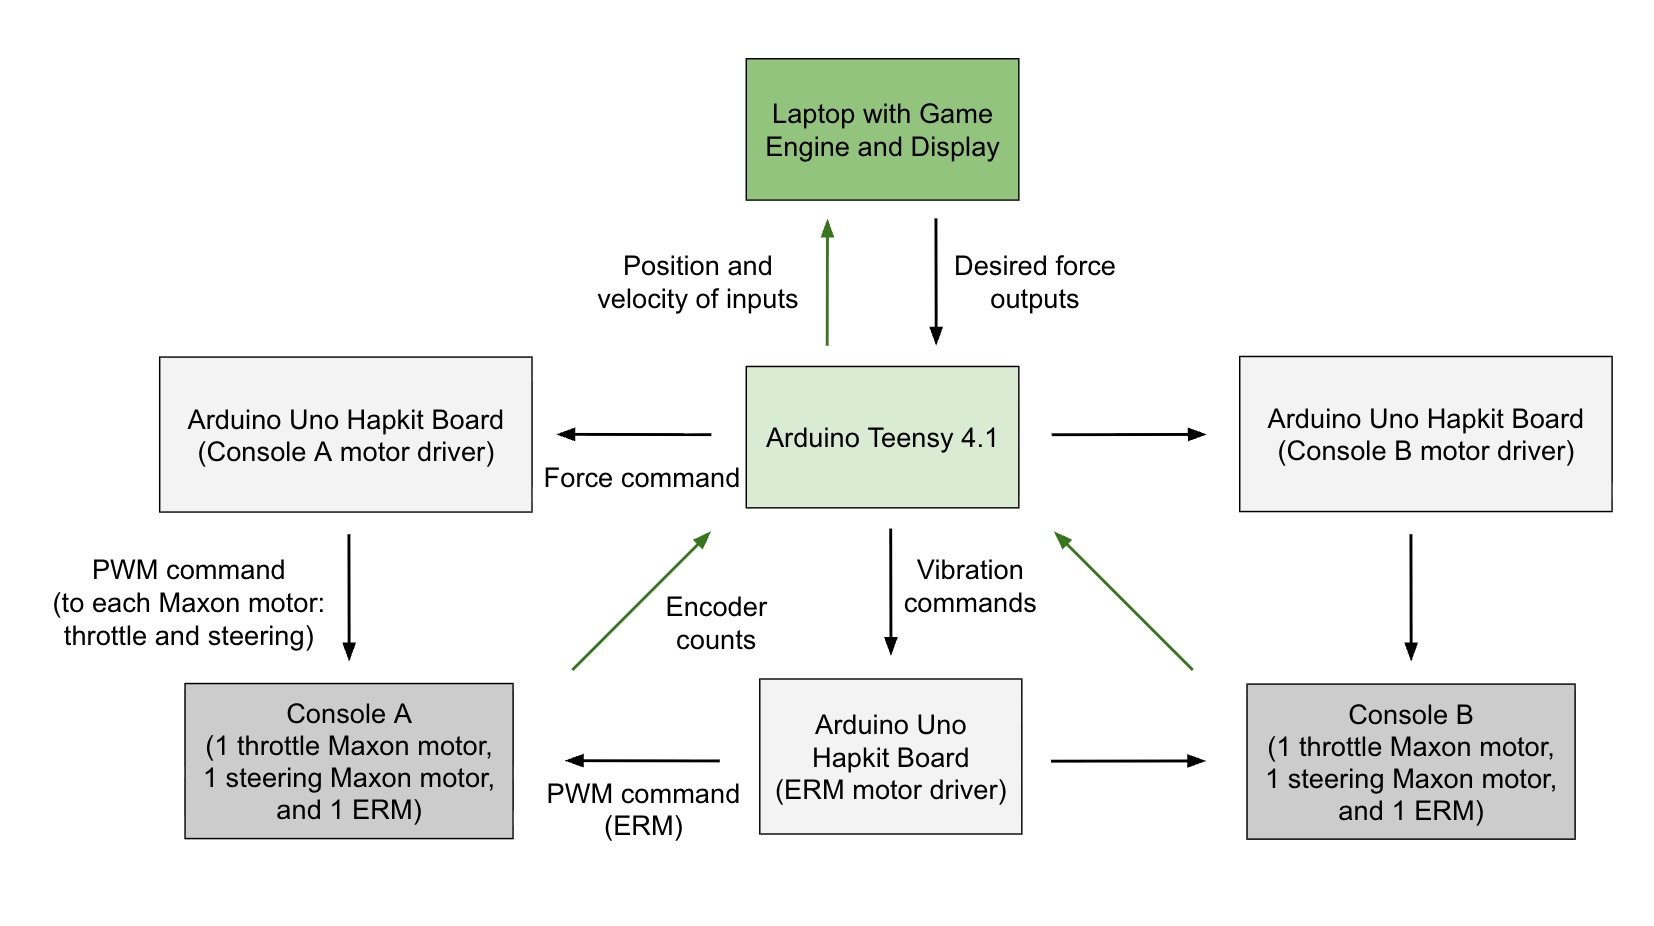
Figure 1: Simplified data flow diagram between motors, Teensy, Hapkit boards, and game engine
The electronics also include switches and LEDs for user-facing control and feedback. The switches provide simple inputs for adding a second player and changing the game mode, while the LEDs communicate state information such as player status and event feedback. These components make the haptic controllers more self-contained and reduce reliance on the laptop display for basic interaction cues.
| Component | Role |
|---|---|
| Laptop | Runs Pygame game engine and haptic rendering logic |
| Teensy 4.1 | Reads encoders, estimates velocity, routes commands |
| Hapkit Maxon motor boards | Drive steering and throttle force-feedback motors |
| Hapkit ERM motor board | Drives ERM vibration motors on throttle handles |
| Encoders | Measure steering and throttle position |
| Switches | Provide physical user inputs |
| LEDs | Show controller/game/system state |
| ERM motors | Provide vibrotactile event feedback |
Software
The game uses a hybrid Python and embedded C/C++ software stack. The laptop runs the main game application in Python, while two microcontroller programs handle the physical haptic interface. The Python side is responsible for gameplay, rendering, collision detection, haptic force computation, and communication with the hardware. The embedded side reads encoder positions, estimates knob velocities, forwards sensor data to the laptop, and converts force commands into motor outputs.
The main game engine is built with Python and Pygame. Pygame provides the window, rendering loop, keyboard input, menu system, and frame timing. The game state is organized into separate modules for entities such as ships, stars, and mines; a central GameState; a GameLoop; renderer classes; and controller abstractions. The renderer draws the ships, trails, collectibles, mines, HUD, and optional haptic visualization panels.
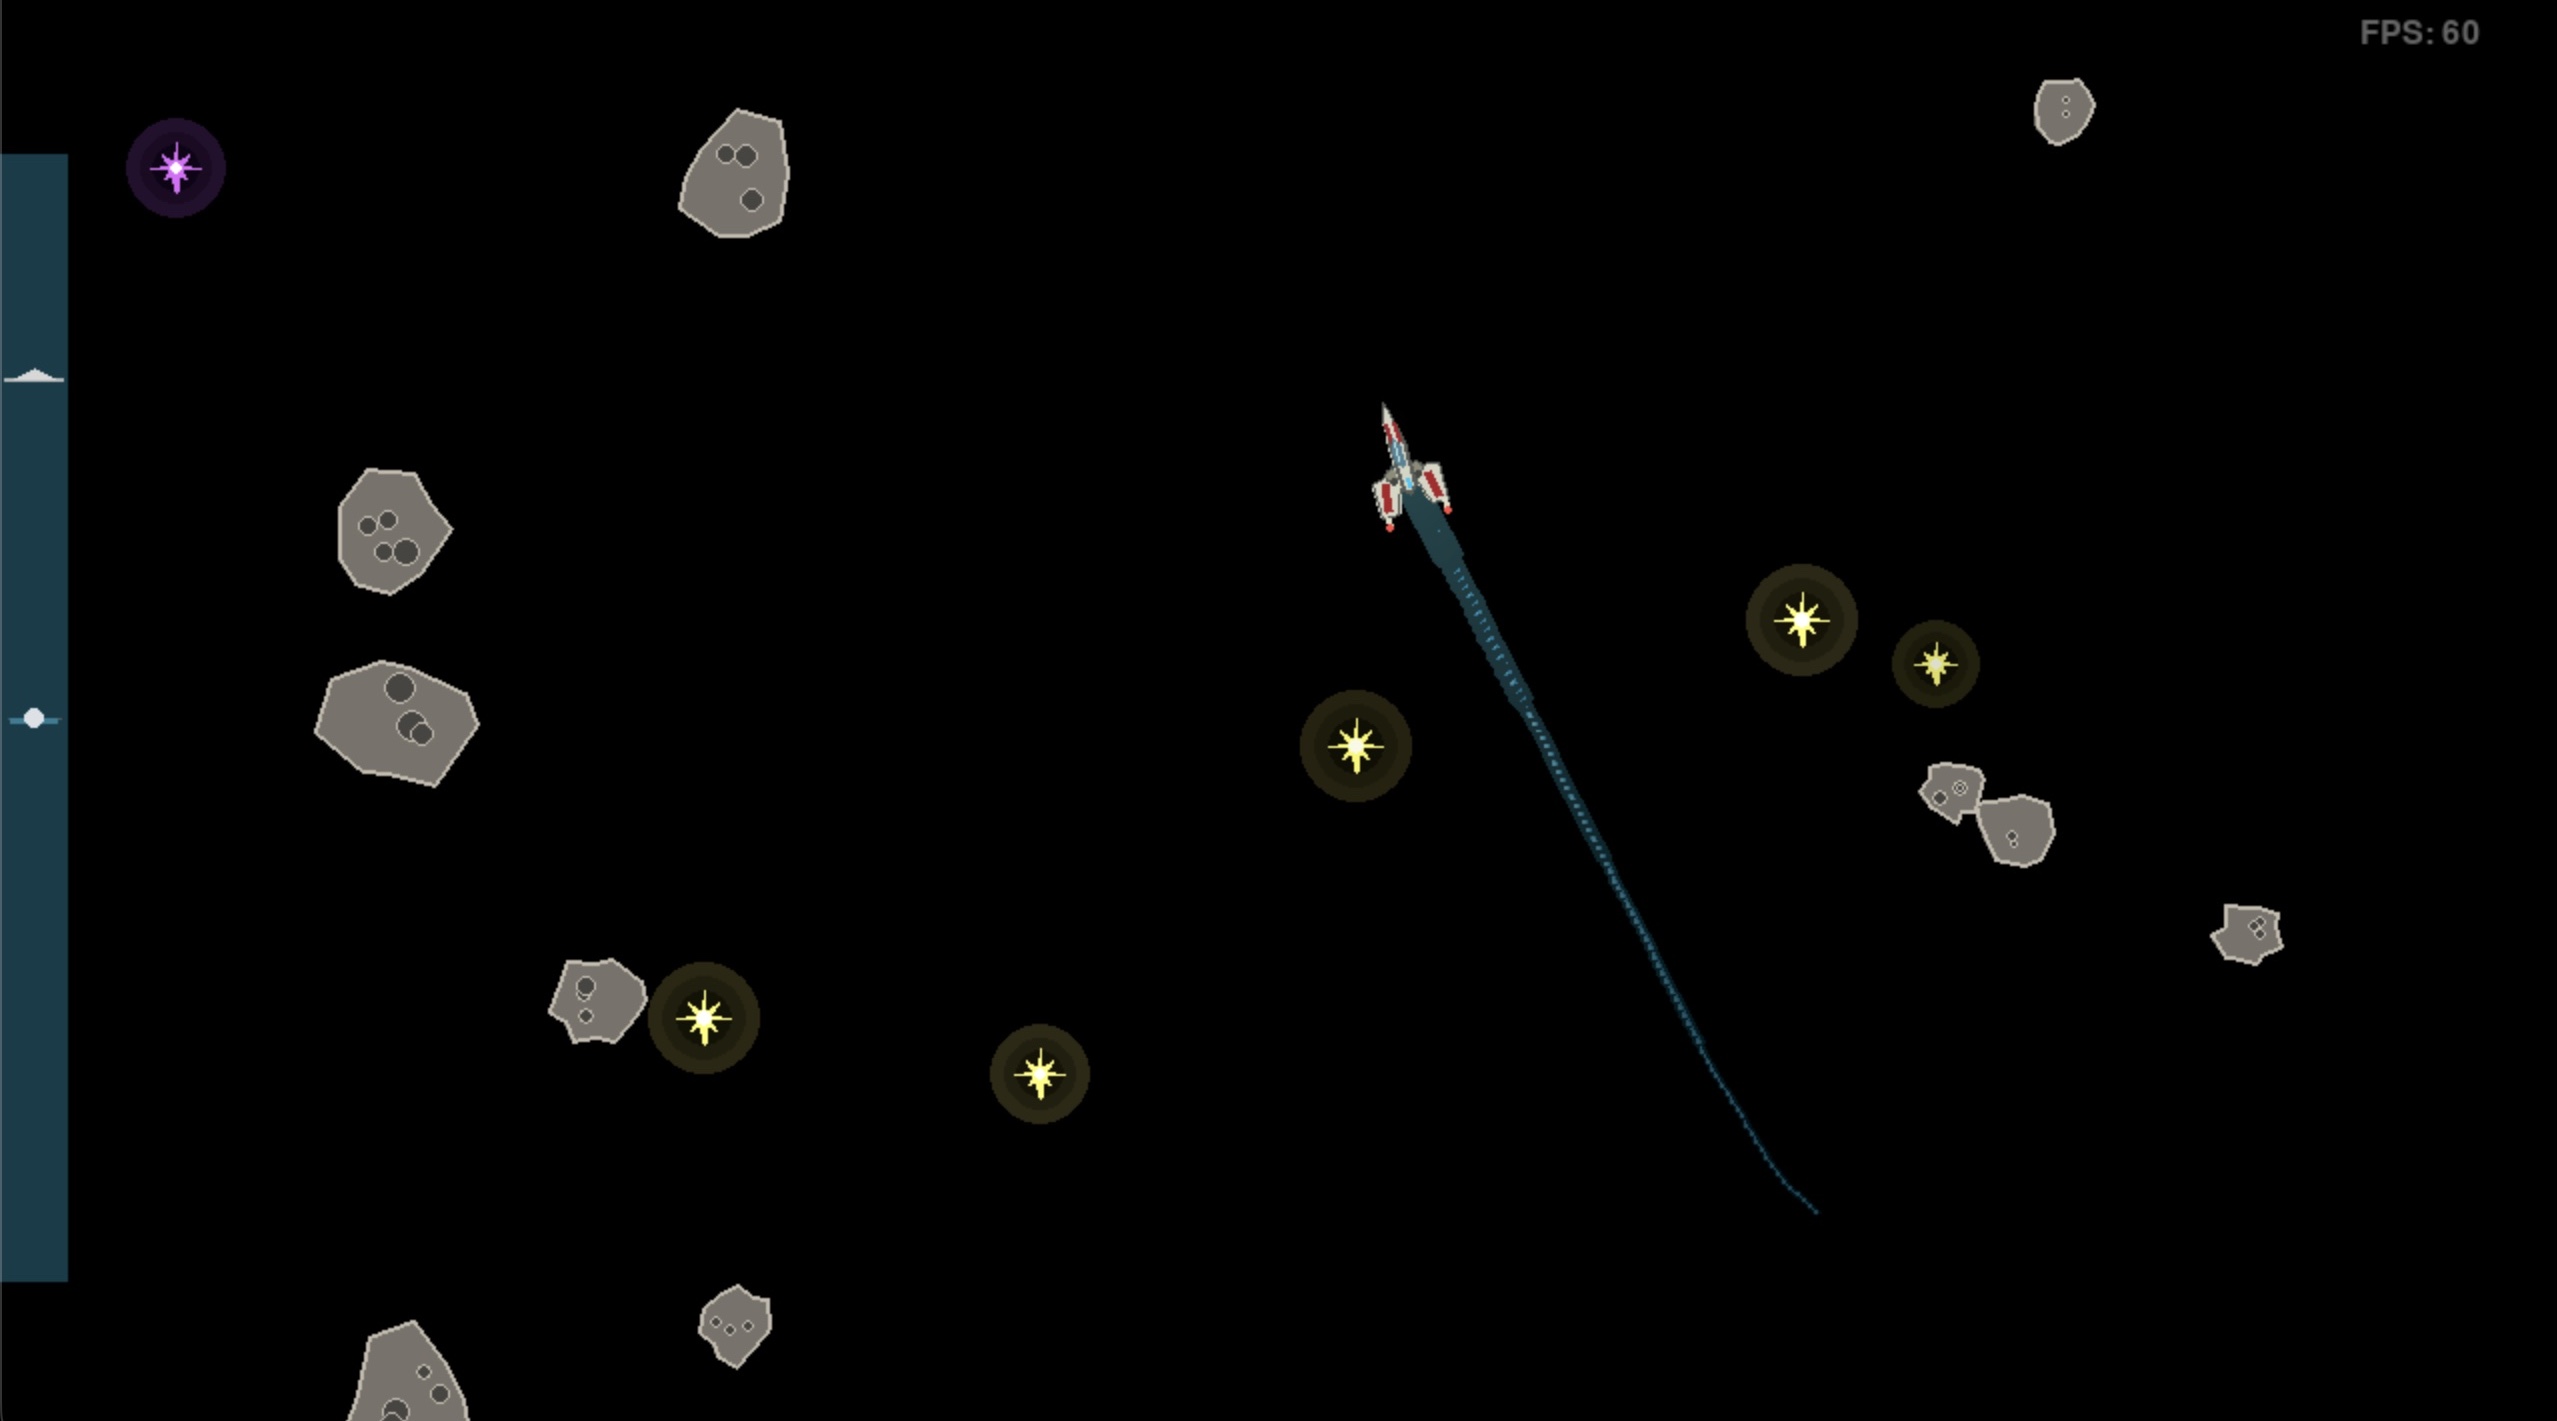
Game render in one-player mode showing spaceship with trail, meteors, stars, and throttle interface on left edge.
The runtime is split into two timing layers. The visual game loop runs at 60 FPS, while the physics, input, collision detection, haptic force calculation, and force output run in a separate high-rate control thread at 1000 Hz. This separation keeps the haptic response more consistent than if it were tied directly to display frame rate.
For hardware communication, the Python application uses PySerial to communicate with a Teensy 4.1 over USB serial at 1,000,000 baud. The Teensy sends encoder counts and filtered velocities to the laptop using a comma-separated text protocol. The Python code normalizes these raw counts into -1.0 to 1.0 steering and throttle inputs, then computes the force feedback values in the range -1000 to 1000.
The haptic force system is implemented in Python. It supports several force models, including centering springs, viscous damping, virtual walls, spring-damper combinations, throttle push-through effects, trail vibration, and mine-collision kickback. The force parameters, encoder scaling, serial port, game constants, and debug settings are centralized in game_engine/config.py.
On the embedded side, the Teensy firmware is written in Arduino-style C/C++. It uses the Teensy QuadEncoder library to read four quadrature encoder channels for two players� steering and throttle controls. It also computes filtered encoder velocities at a 1000 Hz control update rate and sends position packets to the laptop at 500 Hz. Incoming force commands from the laptop are clamped, converted to Hapkit motor command bytes, and forwarded over a second serial link.
The Hapkit controller firmware receives binary motor command packets from the Teensy at 115200 baud. It verifies each packet with a simple checksum, then drives the steering and throttle motors using PWM and direction pins. In this architecture, the Hapkit board acts as a low-level motor driver, while the Teensy acts as the real-time encoder/communication bridge and the laptop performs the higher-level game and haptic controller logic.
System Analysis, Control, and Tuning
The haptic effects are split into two categories: passive effects based on the position and velocity of the throttle and steering controls, and active effects triggered by game events. Passive effects include force laws such as throttle damping and virtual walls, and a centering spring on the steering knob. Active effects are sudden force or vibration cues due to asteroid, star, purple star travelling mine, or spaceship trail collisions.
A key stability challenge in the haptic controller was the timing of the velocity estimate used for damping. In an ideal passive damper, the commanded force should oppose the user�s instantaneous motion. This means the damping force must be approximately proportional to negative velocity and closely synchronized with the physical motion of the steering or throttle input. Early versions of the controller introduced too much delay in this velocity calculation and force update loop. As a result, the damping force was not applied at the correct phase relative to the user�s motion.
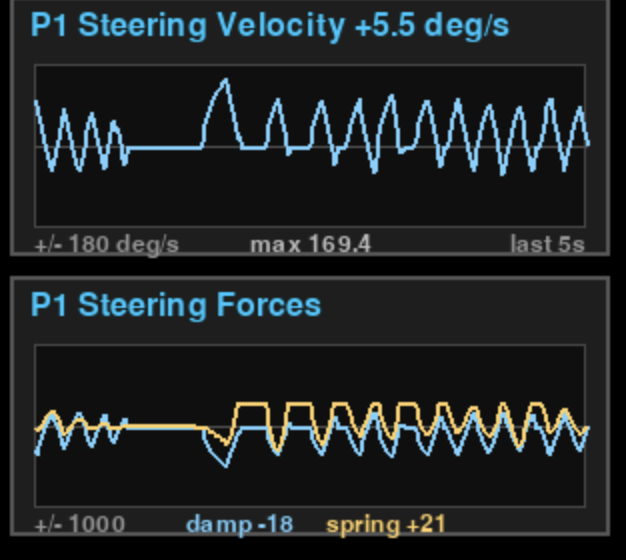
Haptic tuning plot providing live gameplay readings, showing spring and damping forces in phase due to excessive phase lag
This phase delay had a direct effect on stability. When the velocity estimate lagged behind the true motion, the damping term no longer behaved like a purely dissipative element. Instead of consistently opposing motion, the delayed damping force could become partially aligned with the spring force or even with the direction of motion. In practice, this made the virtual spring-damper feel unstable: rather than removing energy from the system, the controller could inject energy at certain frequencies. The user would feel this as oscillation, buzzing, or a tendency for the control to �fight back� after being displaced and released.
This issue was especially important because the haptic effects were intended to feel like simple mechanical impedances: centering springs, damping, detents, and virtual walls. These effects only feel physically convincing if the rendered force is correctly phased with the measured motion. A centering spring can tolerate some delay because it depends mainly on position, but damping is much more sensitive to phase lag because it depends on velocity. If the velocity signal is delayed or excessively filtered, increasing the damping gain does not necessarily improve stability. Beyond a certain point, it can make the rendered impedance less passive and more oscillatory.
To stabilize the system, we reduced phase lag in the control loop rather than only lowering gains. Velocity estimation was moved closer to the real-time sensing layer, where encoder counts could be sampled at a high and consistent rate. This reduced dependence on the laptop game loop, serial packet timing, and frame-rate variability. The controller was then tuned with the goal that damping should feel resistive rather than spring-like or impulsive. After reducing the delay in the velocity path, damping could be increased without causing the same oscillatory behavior, allowing the steering and throttle effects to feel more stable and predictable.
The final tuning process therefore considered not only the magnitude of the spring and damping gains, but also their timing. Spring stiffness, damping strength, force saturation, and velocity filtering were adjusted together. If the controller oscillated after release, the solution was not simply to add more damping; the phase of the damping term had to be checked first. This was one of the main practical lessons from the project: in a haptic interface, stability depends as much on control-loop timing and passivity as on the chosen gain values.
Results
While we did not conduct a quantitative or controlled qualitative analysis of the performance of our system, we received anecdotal evidence from users that they found the haptic effects noticeable, strong, and immersive. Many players of the game showed joy and excitement at playing, becoming competitive with their opponent and improving at the game over the course of a few minutes. We did find that it was harder for some users to pick up the game mechanics, which made having the easily switchable game and 1 vs. 2 player modes very helpful for ramping up the experience. For example, we found we often had to start players out with no asteroids and no adversary, but steadily added complexity so they could experience the more involved and dynamic haptic effects, such as crashing into or bouncing between asteroids, as well as the combat mechanics.
The system performed well on the day, running for the full demo and only requiring occasional resets due to slight capstan slippage and game engine interruptions. The Player 2 capstan drive began to stick a little bit more than in testing due to our efforts to increase the capstan friction, so we mostly presented Player 1 to users. That being said, Player 2 was still very playable, with haptic effects very noticeably rendered.
Some users reported trouble identifying which ship they were, or in what direction their ship was pointed. This was more common for circular ship models. Since more pointed ship models did not appear to present this issue, more intuitive, directional ship designs should be chosen as default.
Because it took some players a few minutes to understand the gameplay mechanics, which become more haptically active with stronger inputs and unintuitive actions like crashing into asteroids or other players, we had to coax users to push the limits of the game, which they did not always succeed at in the short time frame they had. Some in-game prompts, or a tutorial level, could have helped expose users to the full suite of features before moving on to free exploration.
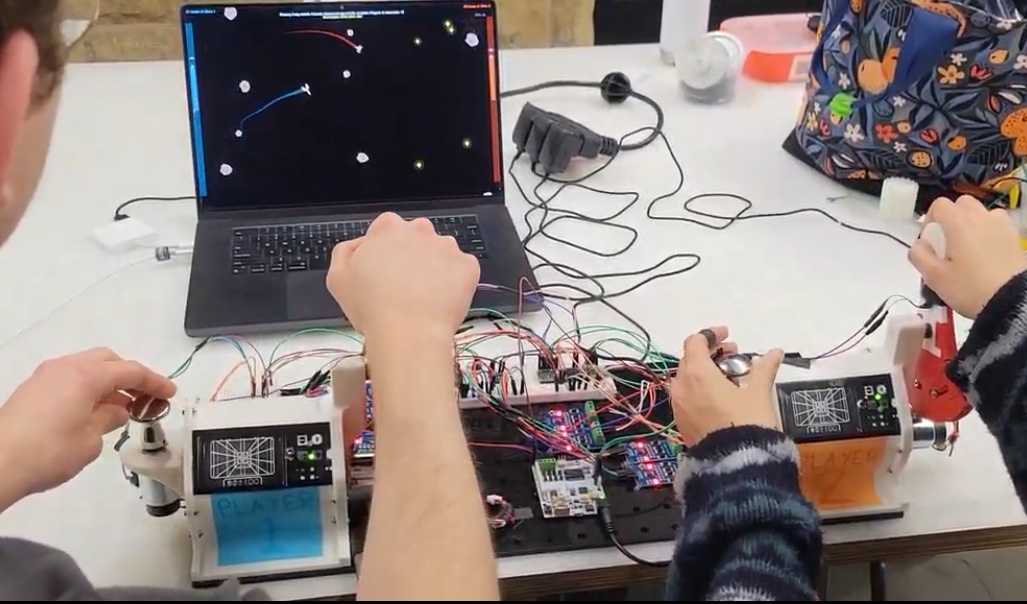
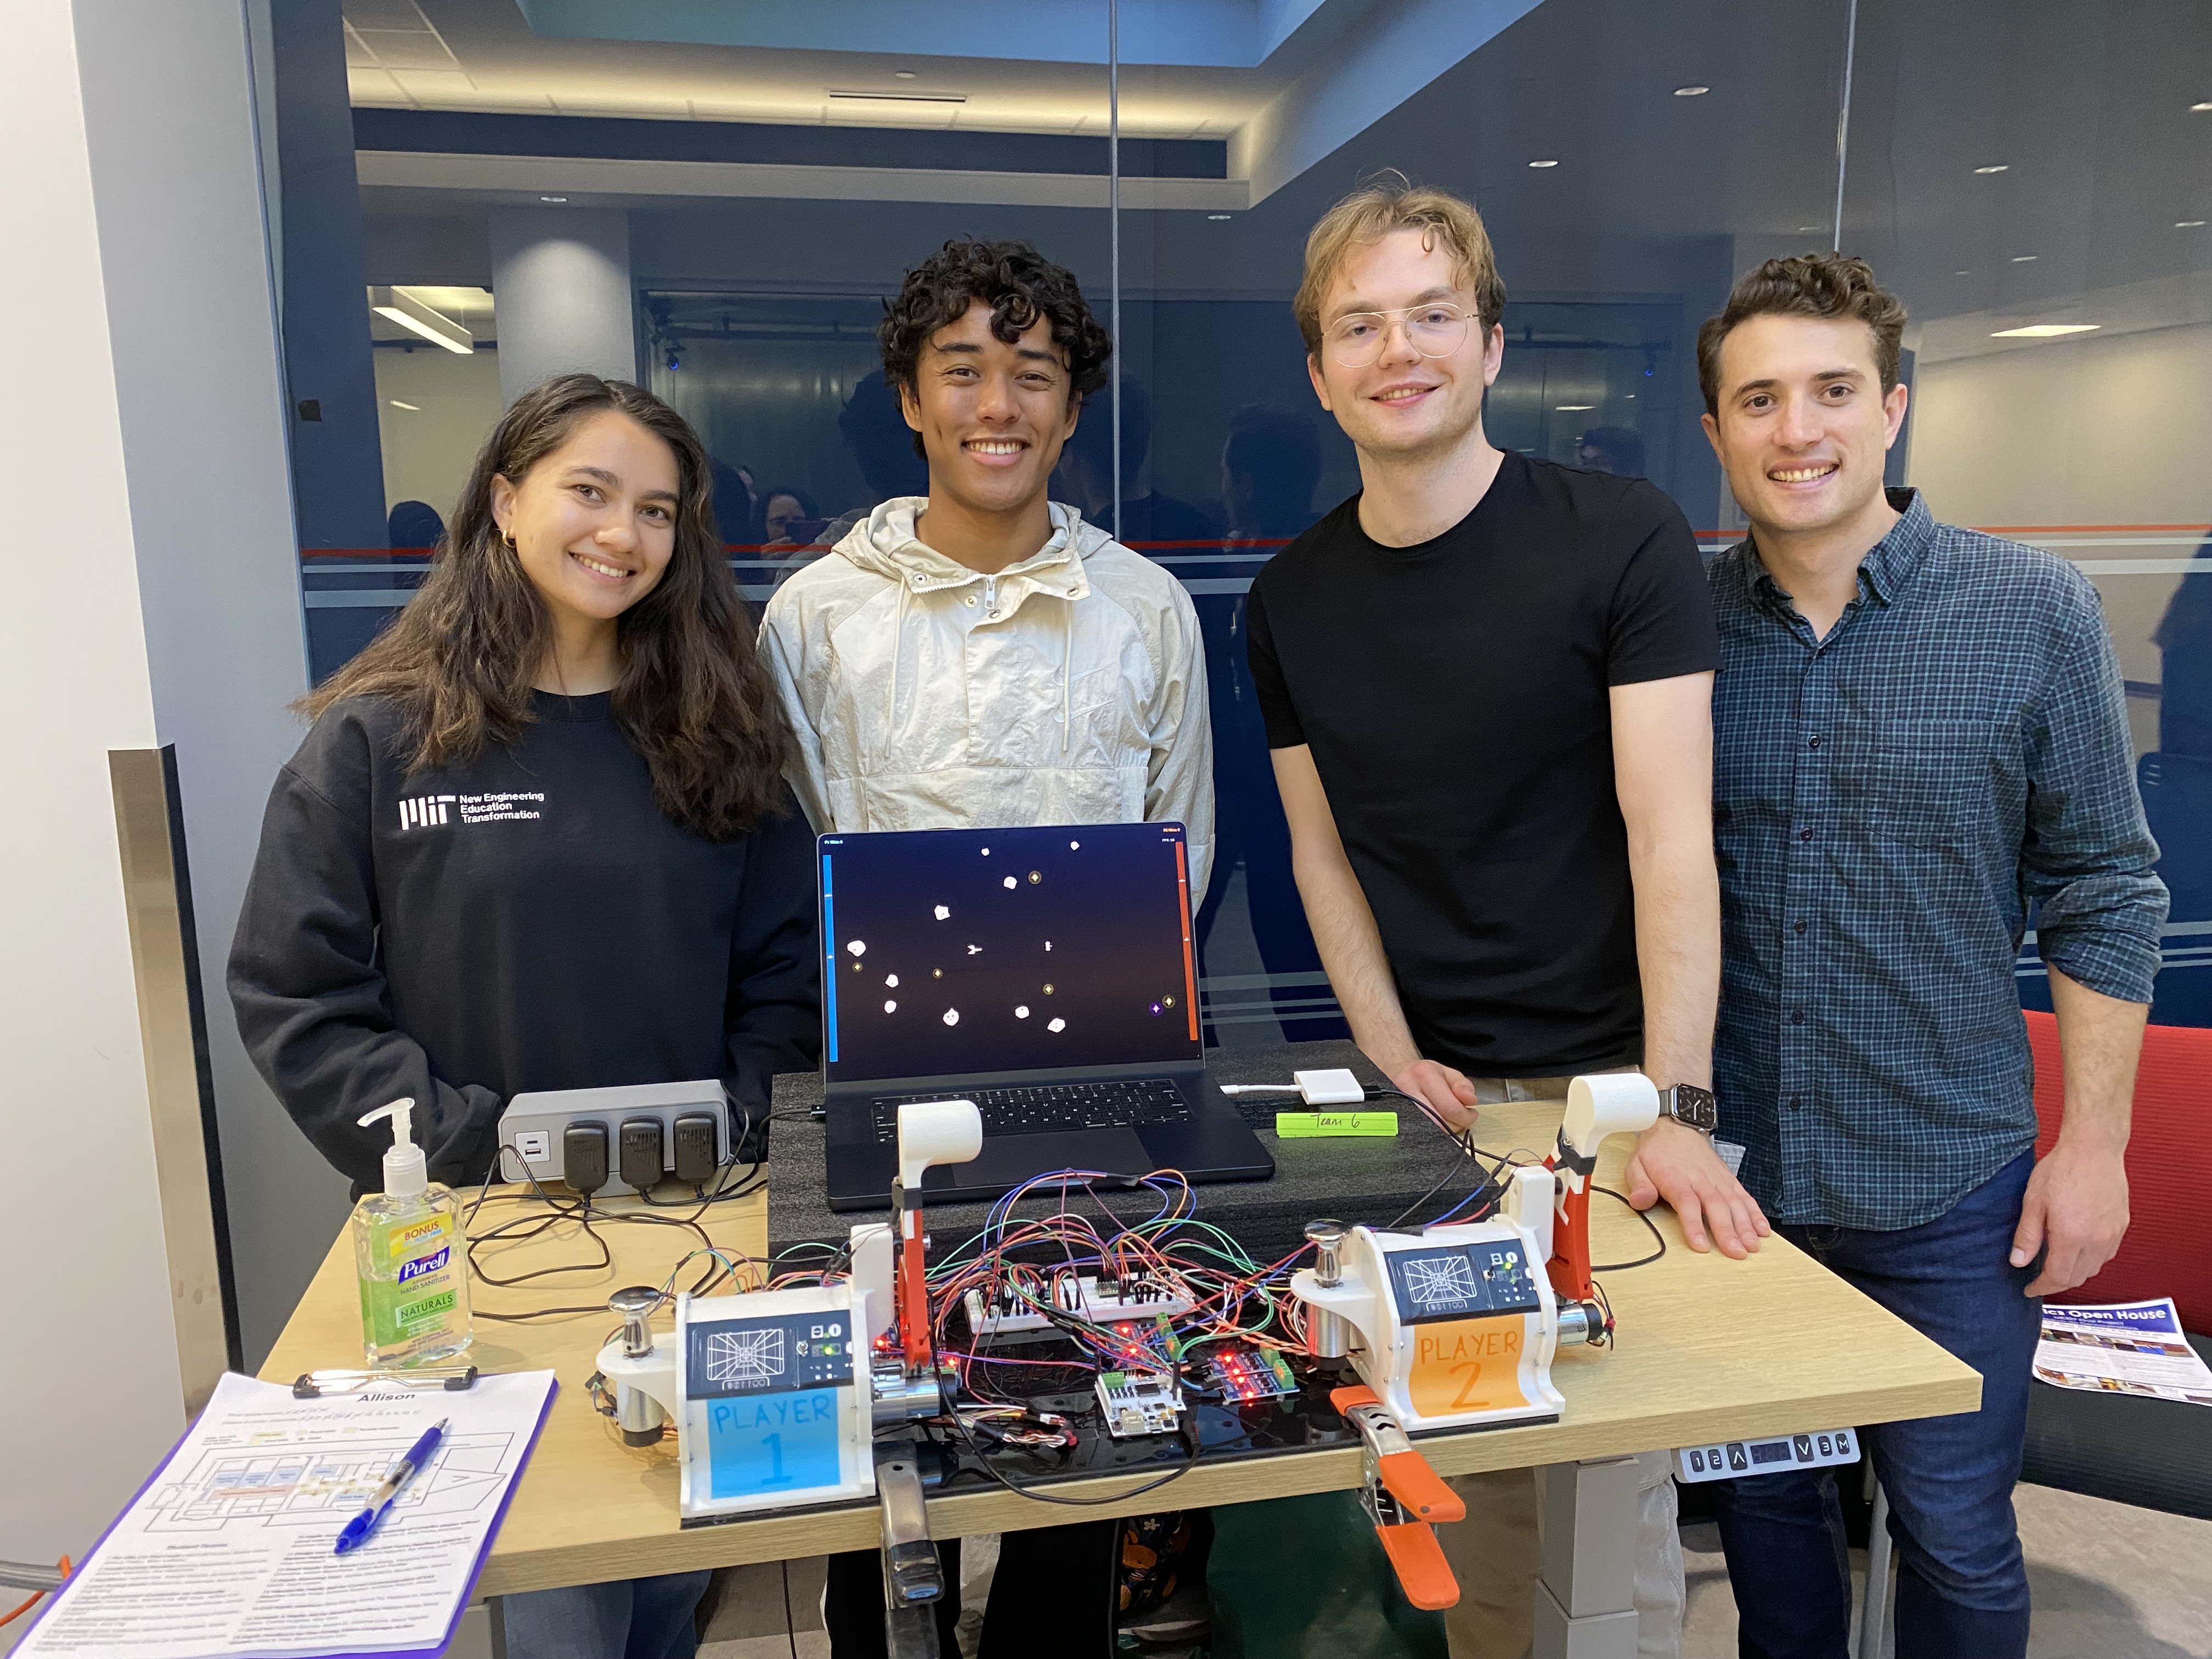
Gameplay view showing controllers for two players and console
Future Work
Future work could include a structured user study comparing no haptic feedback, only event-driven haptic feedback, only controller kinematic haptic feedback, including springs and damping, and full force-feedback modes. We would quantify differences in perceived realism, in-game performance, and rate of learning for new users. The results would provide a more rigorous assessment of which haptic effects contribute most to the player experience.
The current game design requires users to control linear and rotational acceleration, like pressing a gas pedal in a car. Switching to direct velocity controls would reduce realism but allow for more focus on the haptic effects.
Regarding hardware, the numerous RS422 to TTL boards used to read the four Maxon motor encoders could be greatly simplified and condensed into a single MAX3096 receiver instead of a MAX490-based solution.
The system would be made more robust by using 18 V motor drivers to supply greater maximum power. In rare edge cases, such as activating a star boost, applying maximum steering input, and colliding with an asteroid simultaneously, the available power from the motor drivers was insufficient to maintain all haptic effects on both controllers, and the steering spring would briefly loosen. Higher-power motor drivers would allow for haptic effects to render consistently in all game states. To complement this, we could modify the smaller radius capstan to handle greater forces without slipping, such as a custom rubber sheathing over the metal output shaft.
Much more ambitiously, the game could be reworked for haptic navigation rather than haptic feedback. With a ship speed reduction and the addition of directional vibration cues that increase in intensity as an asteroid gets closer, users could play with no visual input at all.
Acknowledgments
Thanks to the ME 327 teaching team and especially Megan Coram for opening up and sifting through the CHARM Lab�s motor stock!
Files
CAD / drawings: Attach:SpaceIO_CAD.zip
Hardware BOM: Attach:SpaceIO_HardwareBOM.pdf
Teensy Pin Map: Attach:SpaceIO_TeensyPinMap.pdf
References
[1] M. Orozco, J. Silva, A. El Saddik, and E. Petriu, �The Role of Haptics in Games,� in Haptics Rendering and Applications, A. El Saddik, Ed. London, UK: IntechOpen, pp. 217�234, 2012. DOI: 10.5772/32809.
[2] H. A. Malik, S. Rasool, A. Maqsood, and R. Riaz, �Effect of Haptic Feedback on Pilot/Operator Performance During Flight Simulation,� Applied Sciences, vol. 10, no. 11, Article 3877, 2020. DOI: 10.3390/app10113877.
[3] C. J. Murphy, A. J. Toth, F. Hojaji, and M. J. Campbell, �Force feedback drives sim racing performance: The influence of force and vibrotactile haptic feedback in simulator steering wheels,� Computers in Human Behavior Reports, vol. 22, Article 100993, 2026. DOI: 10.1016/j.chbr.2026.100993.
[4] S. Deng, J. Chang, and J. J. Zhang, �A Survey of Haptics in Serious Gaming,� in Games and Learning Alliance: Second International Conference, GALA 2013, Revised Selected Papers, Lecture Notes in Computer Science, vol. 8605, A. De Gloria, Ed. Cham, Switzerland: Springer, pp. 130�144, 2014. DOI: 10.1007/978-3-319-12157-4_11. URL: https://link.springer.com/chapter/10.1007/978-3-319-12157-4
Appendix: Project Checkpoints
Checkpoint 1
Physical game controller hardware concept and design
To interface the player with the game engine, we aim to design a 2 DOF direct drive controller that is rigidly attached to a fixed surface so as to allow rigid application of controller forces to the player. One degree of freedom controls player orientation, while the other controls the throttle. Both of these will be direct driven by a Maxon motor, and will be oriented 90 degrees from one another. For the first check point, we have completed the preliminary hardware conceptualization and design for the box itself.
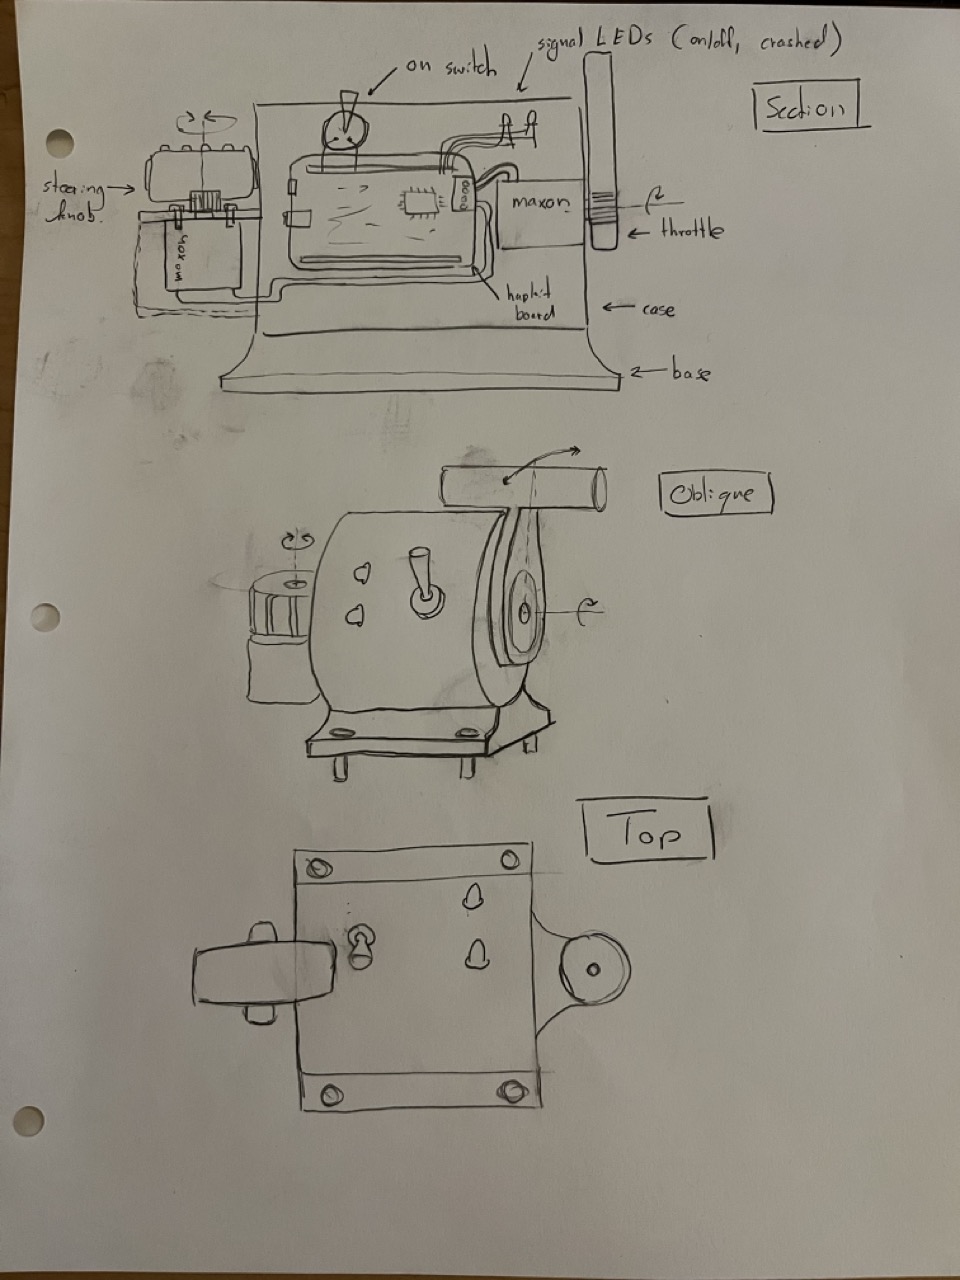
We are waiting to design the actual control inputs until we have characterized the torque of the Maxon motors. If it is lower than expected, we will want the smallest moment arms possible to transfer the greatest force. The design will house the hapkit board that drives the two motors, as well as a power on switch and status LEDs mounted to the outside of the game controller. Side-mounted plates constitute the motor mounting points, and bolt to the main housing with a flange. The whole assembly can be easily 3D printed, and is made thick enough to be completely rigid within the limits of human tactile forces.
Precise measurements of our motors will allow us to complete this design. The use of the Maxon motor with built in encoder was successfully derisked. The interrupt pins, D2 and D3, on the hapkit board were used to read the encoder in quadrature. This allows the mechanical design to be built up around this motor. Position in encoder counts and calculated RPM were communicated via serial as demonstrated:
Attach:DaVinciEncoderCounting.mp4
The �dry� haptic effects (both player-driven and event-driven) are given in the Arduino file below. They currently exist as isolated functions with their associated variables and will later be connected with the motor drivers and game engine to complete the stack. The given functions can be used with the hapkit helper function framework from Homework 4.
Attach:Haptic_Effect_Functions
Checkpoint 2
Summary
For Checkpoint 2, we have a functioning version of the hardware, as well as the game engine (hardware and software not yet integrated). Unfortunately our Teensy motor controller boards fried, and so we could not demonstrate the hardware controlling the game. The final tasks are to tune the interaction between the two, which we can do starting Saturday when the new boards arrive, iterate on the hardware handles, and design a fixture to more rigidly hold the game boxes to the table.
Hardware and Electronics

Game Engine
The game engine was implemented using Python and Pygame. The system architecture is made up of three main parts: the game engine running on a computer, the Teensy code to route messages from the computer to the Hapkit boards, and the Hapkit code, which handles implementation of haptic effects on the controllers. The following is a summary of the data flow in the system:
Data Flow:
Laptop → Teensy → Hapkits (Force Commands):
- Game engine calculates what forces each motor should apply based on game state
- Sends force commands via USB Serial to Teensy
- Teensy routes commands to appropriate Hapkit board via Serial1/Serial2
- Hapkit boards execute motor control loops locally
Hapkits → Teensy → Laptop (Sensor Data):
- Hapkit boards read encoder positions
- Send position/velocity data to Teensy
- Teensy forwards to laptop
- Game engine uses this as player input (like joystick position)
In its initial state, the game was developed using keyboard inputs for control, so that the software may be tested before hardware is complete. The two players control their respective ships using WASD and arrow keys. The game is fully functional with keyboard inputs, and code for hardware integration has been developed and is ready to test soon. Here is an example video of gameplay: