

Duc Li Trzpit Ritter

Pantograph
Liar Liar Pantos on Fire
Project team members: Kevin Li, Minh Ngo Duc, Brandon Ritter, Tom Trzpit

For our project, we decided to build a two degree-of-freedom pantograph to augment some of our favorite childhood video games with more complex haptic feedback beyond simple vibrational motors. Part of this involved designing a pantograph with a higher resolution and enhanced sensitivity to allow for more precise positional control and better response time. Furthermore, we wanted to build a device that would have the versatility to interact with multiple games and enrich the experiences of playing them. As a proof of concept, we built two different games with different enhancements to explore the modalities of simple haptic feedback versus haptic guidance. It is important to note that the device is adaptable to virtually any planar games. After building the device, we demonstrated both games on the device.

On this page... (hide)
Introduction
Our initial motivation for this project was based on a desire to develop a game that takes advantage of the unique benefits of haptic feedback to create an entertaining collaborative experience between a blind player and a sighted player. In doing so, we hope to deepen our understanding of haptic systems and controls, and hopefully create an environment / development kit for games that are accessible to wider audiences. For inspiration, we drew upon the games of our childhood that utilized novel and entertaining game mechanics rather than complex graphics. Ultimately, the aim of this project is to be an �edutainment demonstration� of the power of combining tactile feedback with other induced sensory cues (i.e. visual and audio) to augment and convey realism in a virtual gaming environment for people of all abilities. We successfully designed and fabricated a dual pantograph system and programmed two games for users to play. One of the two games was built with accessibility as a primary focus - allowing players who are visually impaired to play and interact with others. We decided for the edutainment portion of our game, we would play a cooperative version of Simon. However, we also saw that our designed hardware and software is flexible enough to allow us to implement other easy games, which was why we implemented a haptic virtual dodgeball game.
Background
Many pantographs and 2-DOF systems have been built in the field of haptics, as they are robust systems for demonstrating two degrees of freedom of motion and actuation.
To accelerate our development, we based our pantograph design on the capstan-driven GraphKit [4]. However, instead of designing specifically for additive manufacturing, we designed our pantograph for laser cutting to allow us to have faster design iteration capabilities and smoother surfaces. One salient feature of the original GraphKit [4] that we kept was the capstan drive. We chose to retain the capstan drive because this type of drive allows for high torque scaling while maintaining high back-drivability and system transparency. Additionally, we drew inspiration from a variety of sources, especially the DualPanto device by Schneider et al [3]. This device allows blind players to �continuously interact with virtual worlds� by tracking both their own positions and the positions of key objects in their environments.
Methods
Hardware design and implementation
From the beginning of this project, we knew we wanted to build a pair of 2-DOF pantographs in order to allow for users to play a wide range of games (as compared to the limited applications of 1 degree of freedom systems). In their paper, Campion et al. [1] introduces and discusses the kinematics of a 2-DOF, direct drive pantograph with a five bar linkage, one of which is grounded. Two base bars are actuated using motors, providing the system�s 2 degrees of freedom.
While we began with the GraphKit [4] as a design prototype, our design differs in four main ways. First, we designed for manufacturing with a focus on using only laser-cut components (which allow for a cheaper and lower-friction device). Second, we modified the end effector interaction from a stylus/pen to a custom ergonomic handle with a momentary pushbutton on top and a caster ball underneath. The caster ball provided consistent, compelling interaction with the surface below the pantograph and the pushbutton provided another dimension of user interaction with our virtual environments. Next, in order to reduce off-axis loads on linkages, we lowered the location of the end effector to bring it closer to the table. Finally, we redesigned the connection between the housing and the motors to account for the new, stronger motors purchased.
Mechatronic Design and Control
The most important purchased component in our design is the motor. We reviewed our system requirements to determine the necessary specifications of a motor ideal for haptic interfacing. We determined that we needed a motor with the following general characteristics:
- High torque
- Reasonable stall current
- Backdrivable (which means minimal or no gearbox)
- Embedded encoder.
We settled on a Pololu High-Power 12V Motor with no gearbox and an integrated 48 CPR encoder. This gives us much higher power output compared to the Hapkit motors running at 6V. On top of this, the integrated quadrature encoder gives us a more reliable sensor compared to the MR sensors integrated with the Hapkit. Although the MR sensors were fairly high resolution, they were prone to drift or offset at high speeds. Finally, the lack of gearbox gives us a motor with minimal backlash and frictional losses that are essential for maximizing transparency of the device.
Using an Arduino Mega and our purchased motors and drivers, we prototyped the motor circuitry to implement a basic control scheme. Our motors came with precise encoders which allowed us to track the position of our motors and, through forward kinematics, determine the position of our end effector. Our design of dual pantographs required 8 pulse-with-modulation pins and 8 interrupt pins at a minimum, far more than most microcontrollers could provide. We had to make some compromises in absolute accuracy over time with our encoders because we did not have all the interrupt pins required. Thus, we modified our encoders to use faster interrupt pins for rotation tick count and slower regular pins for rotation direction sensing. Some preliminary testing showed that the encoder drift is most noticeable in large, fast, sweeping motions and could be remedied with regular calibration.
We then integrated a momentary button to the design of the end effector in order to help us transition between game states.
Below is our wiring diagram:

System analysis and control
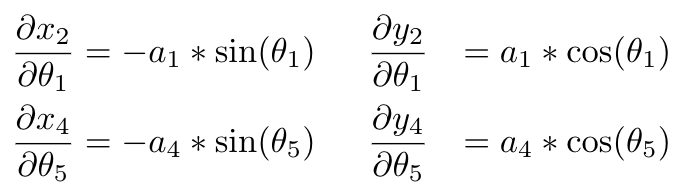
Using existing literature, we implemented the forward kinematics and Jacobian of the pantograph mechanism in MATLAB based on the work of Campion et al. [1]; the equations are as shown below:


When implemented on our pantograph with the appropriate segment lengths, we saw that the forces outputted were inconsistent with the desired in direction. When we attempted to do the kinematics ourselves, we saw that equations 14 and 15 from Campion et al. [1] were missing negative signs; these equations should be:
Our goal was to input a robot configuration and desired end-effector velocity or tip force and output the required joint torques in order to achieve end-effector motion of the correct magnitude and direction. While the Jacobian allowed us to transform from the end-effector forces to the base link torques, one more transformation was necessary to get the required motor torque outputs. This was simply the effective ratio between the base link sector and the capstan attached to the motor. Since this ratio was not consistent due to the manufacturing methods of the capstans, the ratio was calibrated experimentally and found to be approximately 13:1.
To map this motor torque to an analog PWM value, we mapped the magnitude of the torque with the stall torque of the motor as the maximum 255 PWM value. While this means that our motor could be running at its maximum stall torque at times, we relied on game design and choice of output forces to limit the amount of time the motor would be running at maximum stall torque as much as possible, to avoid overheating.
We also plotted the usable workspace of the end-effector in preparation for creating a virtual bounding box that would help prevent damage to the mechanism by avoiding mechanical hard stops as well as avoiding singularities in the workspace. Shown below are a couple of our MATLAB visualizations.


From these workspace calculations, we were able to determine a "home" calibration position and workspace center that would give us the largest available workspace before nearing some of our singularities and mechanical limits. We set this "home" calibration position to be the origin for our character/object workspace coordinate system. This required a simple axis flip and translation to convert the pantograph end-effector position to the new workspace origin. These were mapped to pixel space in Processing for displaying graphics.
Demonstration / application
In the two weeks we had to work on this, we managed to build and implement two very different games using an application programming interface we originally created. Our API allowed us to easily implement the different controls and kinematics for each game. With the right state-machine logic structure for each game, we could leverage all of the main functionalities required to create a compelling virtual environment. For example, much of our code resulted in a force output to either pantograph�s end effector, which we were able to leverage the API to calculate and create the appropriate motor torques.
We will now consider the two games and respective environments in turn.

First, we focused on the centerpiece of our project - an entertaining game accessible to both sighted and visually impaired players. Our goal was to guide the blind player via kinesthetic haptic feedback, but we still needed to decide what we would guide the player to. Initially we imagined a chaser and runner game where the blind player would pursue the sighted player. By applying a force to end effector of the visually impaired player in the direction of the sighted player, we could lead the blind individual and provide effective guidance in the absence of visual feedback. Unfortunately, we soon discovered this application was pointless, as participation on the part of the visually impaired player was completely superfluous to the progression of the game.
We had essentially implemented a proportional control teleoperation system, meaning the chaser end effector automatically tracked to the runner. We were not guiding the blind player and enabling them to play the game, we had programmed the game to play on their behalf.
With this in mind, we brainstormed ways we could haptically guide a blind player and still require their input and participation in the game. We settled on a memory game that occurs in three stages. First, the sighted player inputs a sequence of movements. Second, the pantograph moves the end effector of the visually impaired player, guiding their hand along the way. Finally, the blind player attempts to remember and repeat back the original sequence. This haptic Simon Says game is shown in the video below:
One key feature we want to highlight about the game is the difference between remembering and repeating a sequence from one player to another and a teleoperation system. Our system does not guide the blind player while the sighted player is being moved, as would be done in teleoperation. Rather, we record key events (namely collisions with virtual walls) and then replicate these events after they occur. In this way, our game was path-agnostic. We avoided teleoperation because we felt it would be confusing for the blind player to feel each and every movement undertaken by the sighted player. As a parallel if one were to be asked to repeat a sequence of keys pressed on a keyboard, it would be confusing to tell them about the entire path of the typists fingers, they need only know the keys pressed. We only wanted the blind user to feel the key events which they were required to repeat.
The second game we created was a dodgeball-type experience. The game�s rules are mostly like those of real dodgeball, with the exception that players could traverse both sides of the field. The ball starts off a neutral white and will change color to indicate the ball�s possession. The end-effector works like a regular joystick; the on-screen velocity of the player is proportional to the position of the end-effector relative to its home position. We found that the velocity-control scheme was much more intuitive for this type of game while allowing us to work with a larger visual / virtual workspace with a smaller physical workspace. The end-effector also has a force that pushes it back to its home (or equilibrium) position such that the grip would roll itself home when a user stop exerting a force. When the ball hits a player, the handle would exert a collision force based on the direction of impact.
The ball�s initial velocity is the set to the thrower�s velocity upon release, and which is steadily dampened as the ball travels. The ball was modeled to have perfectly elastic collisions with the walls. We also implemented a catch counter so the ball�s speed is scaled up as the ball is caught each time.
The button on each handle allowed us to add another dimension to the game - catching and holding the ball. If users press their button while within a certain distance from the ball they gain possession of the ball. When holding the button users carry ball with them, and then upon release of the button the ball is released with the same initial direction and velocity of the user. Either player can catch the ball, the one who originally threw it and the one who would lose a life if they were hit by the ball.
Results
When we started this problem, there was a clear challenge of calculating the Jacobian to help us transform desired forces and the end-effector. We initially adapted the work of Campion et al. [1] to be used in our forward and backward kinematics. However, from debugging and testing, we found that the forces were not what we expect and suspect it came from the Jacobian. When we did the Jacobian derivations ourselves, we found that there were some missing negative signs in very early stages of the calculations. Once those were corrected, we found reliable force calculations and outputs to the end-effector.
In addition, due to sensor drift on our encoders, we built a calibration step into the end of each round of the game to return to a known calibrated position. The sensor drift was due to a lack of interrupt pins on the microcontroller, requiring three of our four encoders to run with a single interrupt pin and a single non-interrupt pin instead of two interrupt pins. We usually ofund this to be an issue at the limits of the workspace or during high end-effector forces and velocities.
Future Work
While users seemed to enjoy interacting with our system and were amused by the two games, we would like to conduct a more rigorous user study surround our design. In the future, we would like to perform a study similar to Schneider et al [3], asking Likert-like questions focused on user experience, ease of control, accessibility, and more.
With the given time constraints, we were not able to scope and acquire the correct motors and specifications we ideally wanted. With more time, we would like to build on our design for better motors and encoder combinations. Due to the limited interrupt pins available to us (an unforeseen hardware challenge), we experienced a significant dropping of encoder counts in large and fast motions.
A clear direction of improvement would be to generalize and further develop the API such that we are more thoughtful and comprehensive in the functionality supported, such that there would be more flexibility in the range of games to build.
Acknowledgments
Special thanks to Prof. Okamura, the teaching staff, Dan Somen (Room 36), and our classmates. Thank you for the many immeasurable ways you have helped us during the short amount of time we had to complete this massive project.
Files
Code:
Bill of Materials

References
1. G. Campion. "The pantograph MK-II: a haptic instrument," The Synthesis of Three Dimensional Haptic Textures: Geometry, Control, and Psychophysics, pp. 45-58, 2011. http://www.cim.mcgill.ca/~haptic/devices/pub/GC-QW-VH-IROS-05.pdf
2. Petridou, Maria (2014) Playful haptic environment for engaging visually impaired learners with geometric shapes. PhD thesis, University of Nottingham. https://pdfs.semanticscholar.org/f7b4/a6b5ecf8c92c966939b2b29883322d509f87.pdf
3. Schneider et al. (2018). DualPanto: A Haptic Device that Enables Blind Users to Continuously Interact with Virtual Worlds. 877-887. http://www.thijsroumen.eu/data/publications/2018-UIST-Dualpanto.pdf
4. Martinez, Melisa (2017) .Open Source, Modular, Customizable, 3-D Printed Kinesthetic Haptic Devices, https://par.nsf.gov/servlets/purl/10057536
Appendix: Project Checkpoints
Checkpoint 1
Goal 1: Design and manufacture pantograph components
Description: Using the GraphKit http://hapkit.stanford.edu/twoDOF.html as a starting point, we designed our pantograph mechanism as seen in the picture below.
The reason for our redesign of the GraphKit was to:
- Allow for the manufacturing of the pantograph mechanism using only laser-cut components (which allow for a cheaper and lower-friction device).
- Modify the end effector interaction from a stylus/pen to a custom ergonomic handle with a momentary pushbutton on top and a caster ball underneath.
- Move the end effector location lower to reduce off-axis loads on linkages.
- Account for new, stronger motors.
Status: Complete
Goal 2: Determine required motor specifications Description: The most important purchased component in our design is the motor. We reviewed our system requirements to determine the necessary specifications of a motor ideal for haptic interfacing. We determined that we needed a motor with the following general characteristics:
- High torque
- Reasonable stall current
- Backdrivable (which means minimal or no gearbox)
- Embedded encoder.
We settled on a Pololu High-Power 12V Motor with no gearbox and an integrated 48 CPR encoder. This gives us much higher power output compared to the Hapkit motors running at 6V. On top of this, the integrated encoder gives us a more reliable sensor compared to the MR sensors integrated with the Hapkit. Although the MR sensors were fairly high resolution, they were prone to drift or offset at high speeds. Finally, the lack of gearbox gives us a motor with minimal backlash and frictional losses that are essential for maximizing transparency of the device.
Status: Complete
Goal 3: Identify and purchase other hardware components
Description: Regarding the remaining hardware, the CAD was completed and a first functional prototype is quickly coming together. Mechanical components are either custom laser-cut or 3D-printed parts, while OTS components are sourced primarily from Room36. Remaining electrical components were purchased from Pololu, including an A-Star 32UV Mini SV Microcontroller and TB9051FTG Single Brushed DC Motor Drivers.
Status: Complete
Goal 4: Assemble control circuitry and test control scheme
Description: Using an Arduino Mega and our purchased motors and drivers, we prototyped the motor circuitry to implement a basic control scheme. We experienced some initial misgivings about the potential performance of our motor due to high cogging torque and minimal encoder resolution without a gearbox. However, upon implementing a simple proportional controller with some predictive braking and a deadband, we were able to get acceptable precision that will only improve with further implementation. In particular, we were able to hit a target position to within 2 encoder ticks, which is an angular error of about 15 degrees at the motor shaft. With a capstan ratio of approximately 10:1, this is approximately a 1.5 degree error at the pantograph linkages.
Status: Complete
Goal 5: Derive the kinematics of the pantograph mechanism
Description: Using existing literature, we implemented the forward kinematics and Jacobian of the pantograph mechanism in MATLAB. Our goal was to input a robot configuration and desired end-effector velocity or tip force and output the required joint torques in order to achieve end-effector motion of the correct magnitude and direction. We have also plotted the usable workspace of the end-effector in preparation for creating a virtual bounding box that will help us prevent damage to the mechanism by avoiding mechanical hard stops as well as avoiding singularities in the workspace. Shown below are a couple of our MATLAB visualizations.
Status: Mostly Complete
Checkpoint 2
Here you will write a few paragraphs about what you accomplished in the project so far. Include the checkpoint goals and describe which goals were met (and how), which were not (what were the challenges?), and any change of plans for the project based on what you learned. Include images and/or drawings where appropriate.
Goal 1: Finish deriving the kinematics of the pantograph mechanism
Description: As described in Checkpoint 1, Goal 5, we worked on a MATLAB script to implement the kinematics and Jacobian of our pantograph mechanism. We completed the script, validated its accuracy, and also converted the code to Arduino. Full testing of functionality pending completion of hardware.
Status: Mostly Complete
Goal 2: Replace motors due to high cogging torque
Description: Our original motors were very powerful, but exhibited a high cogging torque, resulting in a disruptive force at the end effector that would destroy the transparency of the device. We purchased low-power version of our original motors which have much less cogging torque, fixing the issue at the expense of some power output.
Status: Complete
Goal 3: Finish assembly of first pantograph assembly
''Description: After receiving the new motors, we completed mechanical and electrical assembly on the first pantograph. We then finished first pantograph assembly. After receiving the new motors, we rewired and reassembled our first pantograph which is now ready to test code. Started second pantograph. We laser cut the necessary pieces for the second pantograph and will complete assembly of the new pantograph after we purchase necessary hardware and validate the hardware on the first pantograph.These new motors were integrated into pantograph and the transparency of the system was tested. The transparency was great on the pantograph, especially for our haptics applications. However, we ran into more problems with the motors, since they came with gears attached to the motor shaft and we had to design around that using some 3D printing and laser cut parts.''


Here's a video of our pantograph in action.
Status: Complete
Goal 4: Work on software API
We built software API on Arduino. After finishing the MATLAB script, we replicated the Jacobian calculations in Arduino and wrote the necessary code framework. We can implement various virtual environments by computing end effector position as well as output forces to the user.
Status: Almost complete
Goal 5: Game development
We developed and iterated on our game ideas that would be interactive and engaging for both visually-impaired and non-visually-impaired users in either a cooperative or competitive game. After working on math to establish the overall workspace, we planned our game workspace to work within the total available workspace. We incorporated and started working on the Processing rendering of the game. The visual aspects of the game will be displayed on the two monitors we recently bought for the game. Below is an image of the current visuals of the game.

Status: Almost Complete