

Group 10
FeelTheRow
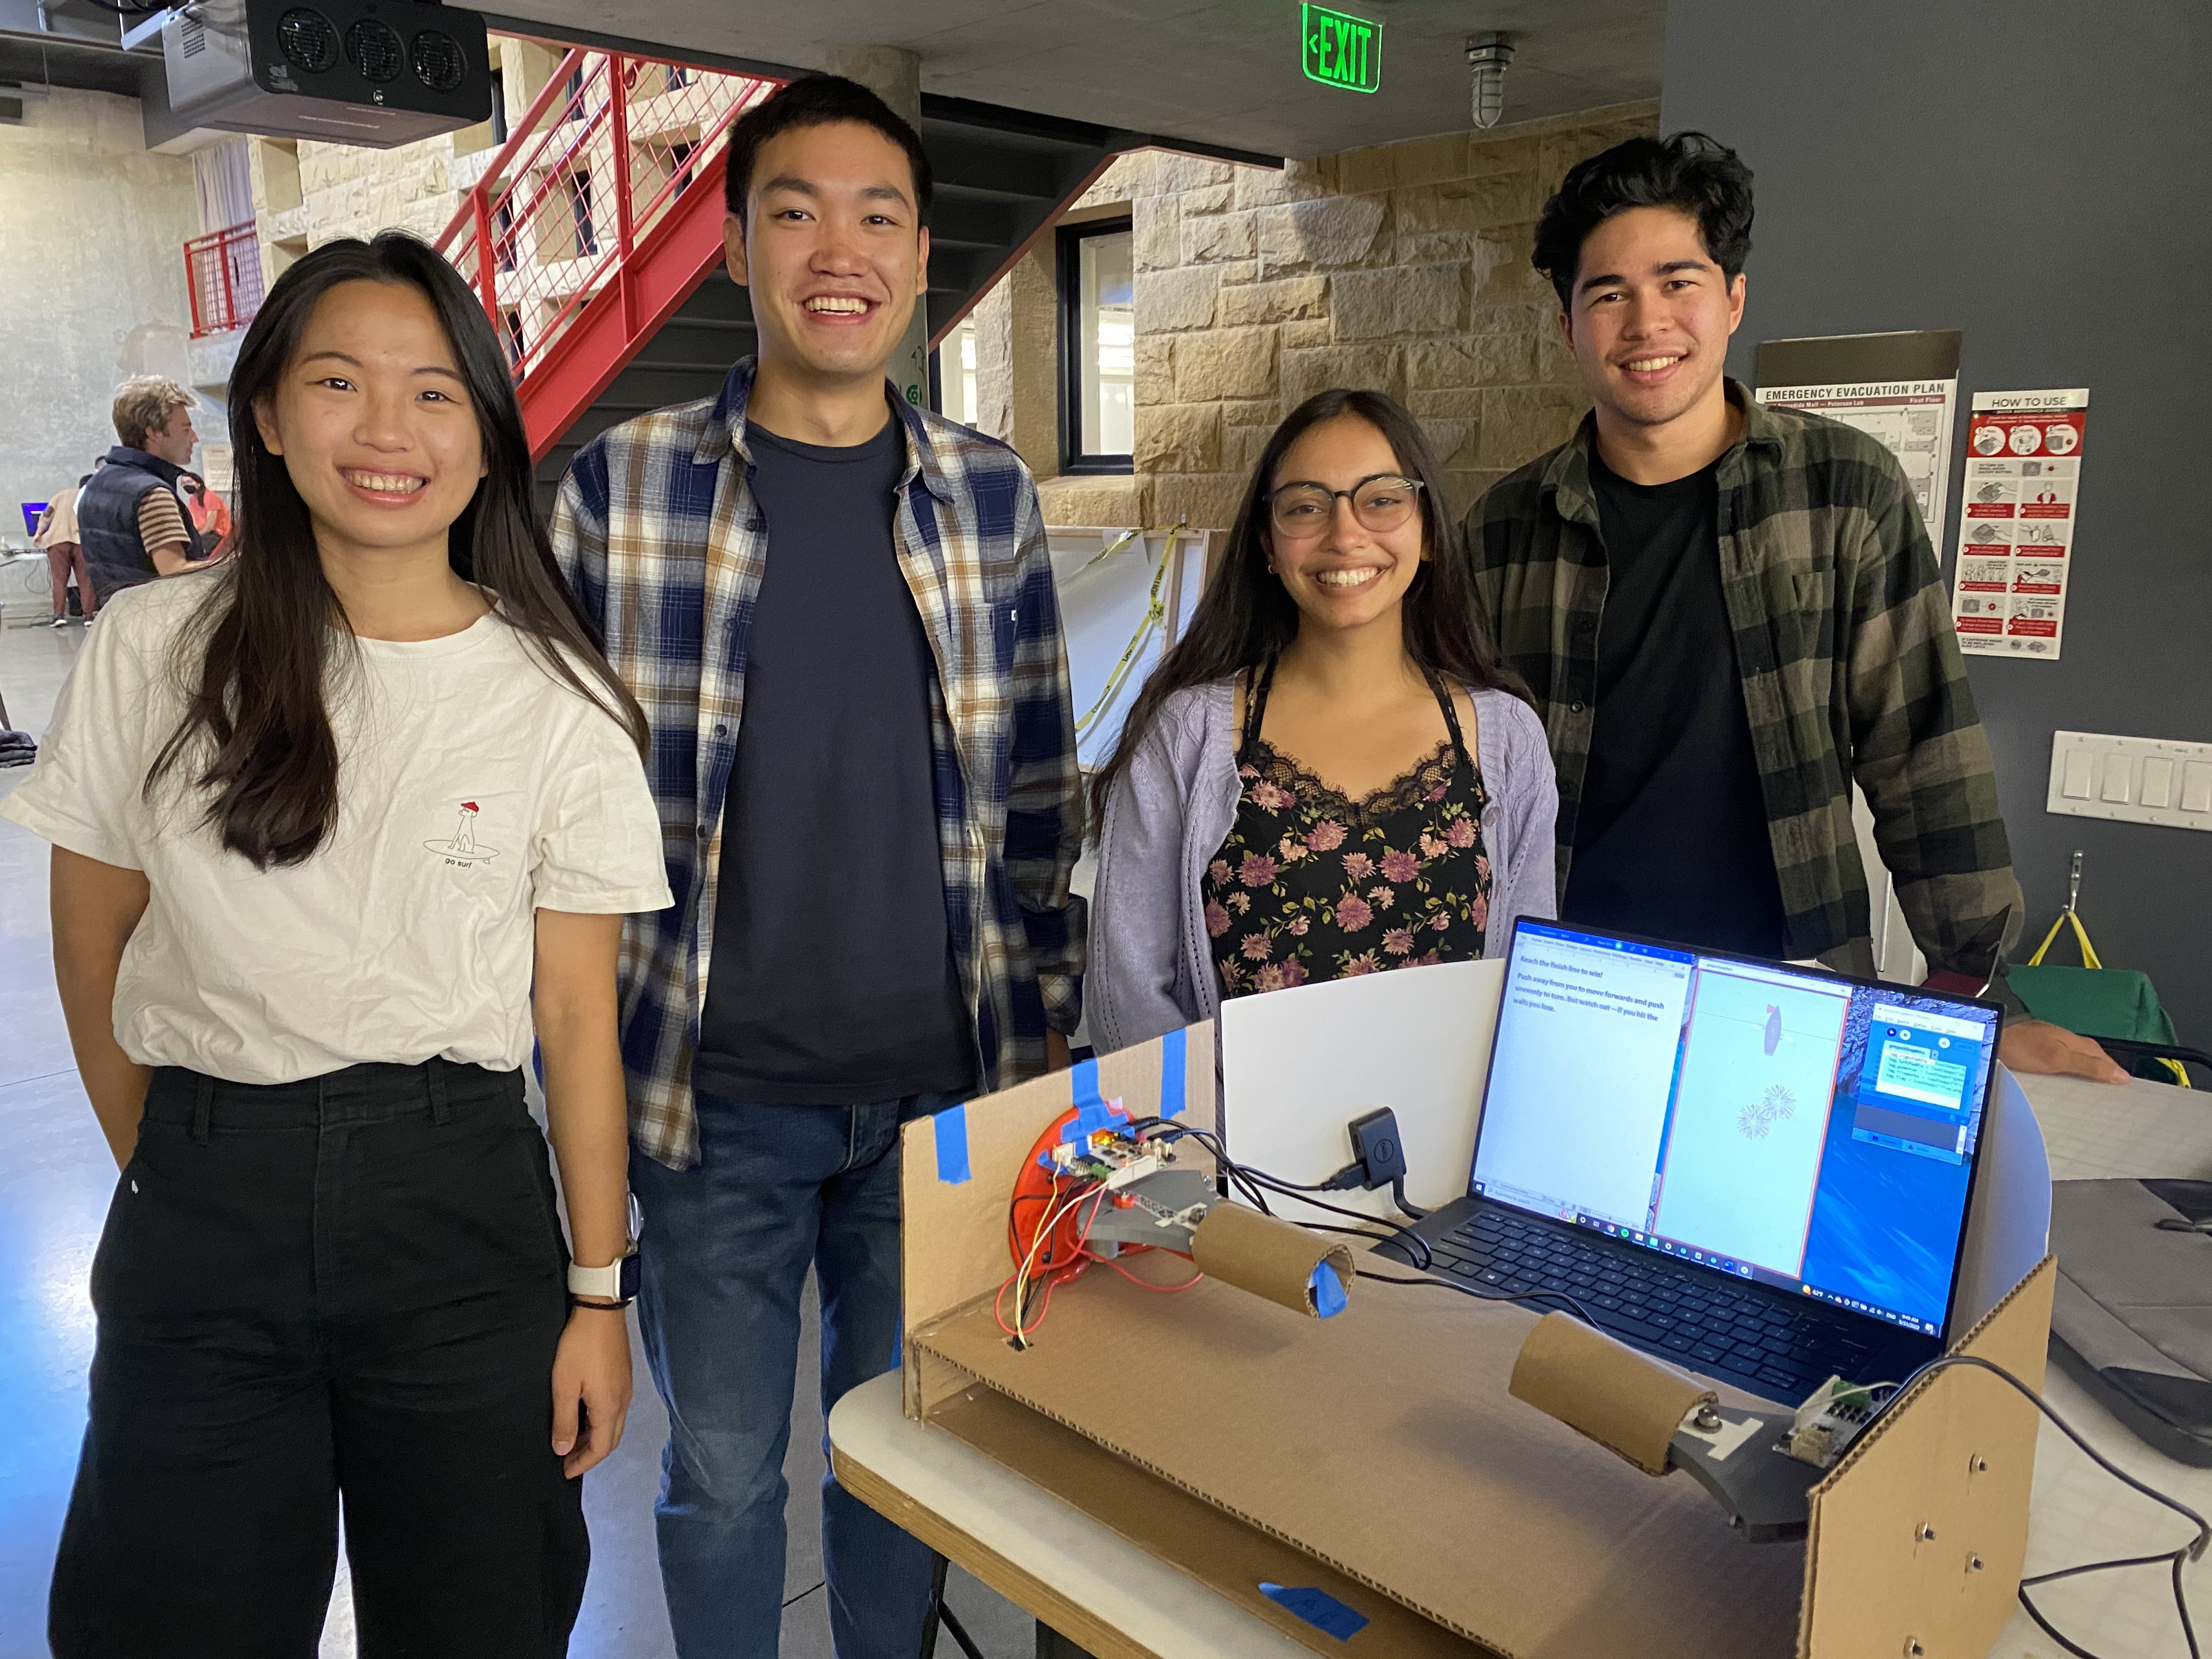
Project team member(s): Chih-Ling Chang, Peter Shih, Anupama Phatak, Andrew Franco
Our plan, to simulate rowing, used the hapkits we built. PD control of the velocity of the handle would provide corresponding force feedback. We orient the hapkit sideways, to better mimic the rowing maneuvers. Pulling towards yourself is a pull through water, and the subsequent push is the reset through air. To simplify the problem, we assume that the water is static, and only the velocity of the pull impacts the motion. The travel, or displacement, of each pull is ignored.
On this page... (hide)
Introduction
Rowing is a fun and popular activity, known to serve as a competitive sport or an exciting recreational activity to participate in. With rowing, there are interesting physical interactions occurring between the user, the boat, the oars, and the water, creating notifiable haptic feedback for the user. With proper skill and movements, the user can maneuver the boat by applying a force through the oars on the water. We wanted to see if we can imitate this and visually display the boats progress through graphics. In this project, we used two hapkits on a vertical board to act as the oars, and through arduino and processing code, allow the user to feel the oars push through water and visually see their boat move. We want to ensure the user enjoys a realistic and engaging rowing experience, giving them the chance to Feel The Row!

Gif from GIPHY.
Background
From Tang et al.'s study, the authors developed a haptic device that simulated paddling a tandem canoe. A virtual environment was created to graphically represent paddling the boat through a course marked by buoys. The devices used for simulating the paddling motion provided force feedback to the user. More importantly, this paper provides the dynamics of the tandem canoe, giving useful equations to determine the forces, positions, and velocities of the paddles and canoes. These equations can be applied and modified, and provide a good starting point for our code. They also provided experimental data to measure the force in the left and right paddles, and path of the boat through the course. This paper was the primary contributor to the physics of our boat system, and a lot of our equations are influenced from this source.
A 2019 article by Basalp, Ekin, et al. studied the effect of changing the water density in learning a sweep rowing task. By changing the water density, they also changed the water resistance force. The authors hypothesized that a group training with varying water densities would show superior learning as compared to a group training with a fixed water density. In the end, changing the density conditions was beneficial for learning the rowing task. What is particularly interesting about this paper is the experimentation on water density and how the user interacts and adapts to changes in this variable. This gave us the idea to imitate this by changing the damping coefficient in our system, with a higher damping coefficient representing a higher water density. This would be interesting to test and observe if a higher or lower damping coefficient would result in the user completing a course faster or slower, and whether there is an optimal damping coefficient for the user to comfortably use.
Another article by Basalp, Ekin, et al. in 2020 discovers how to make a rowing simulation more realistic for rowers. It explores the use of visual, auditory, and haptic feedback to simulate an actual rowing scenario. This brings up the idea of building a multisensory platform that gives visual, auditory, and haptic cues related to rowing. We unfortunately did not get the chance to add auditory feedback, but the visual and haptic cues provide a lot of the realism behind our rowing simulation. Similarly, this article reveals the importance of visualizing rowing and how important it was for improving the rower�s experience, especially when it comes to recognizing mistakes they make when performing a rowing task. It also gives us insight into the calculation of blade�water interaction forces during the drive phase, as well as forces that the user should feel during the recovery phase.
Methods
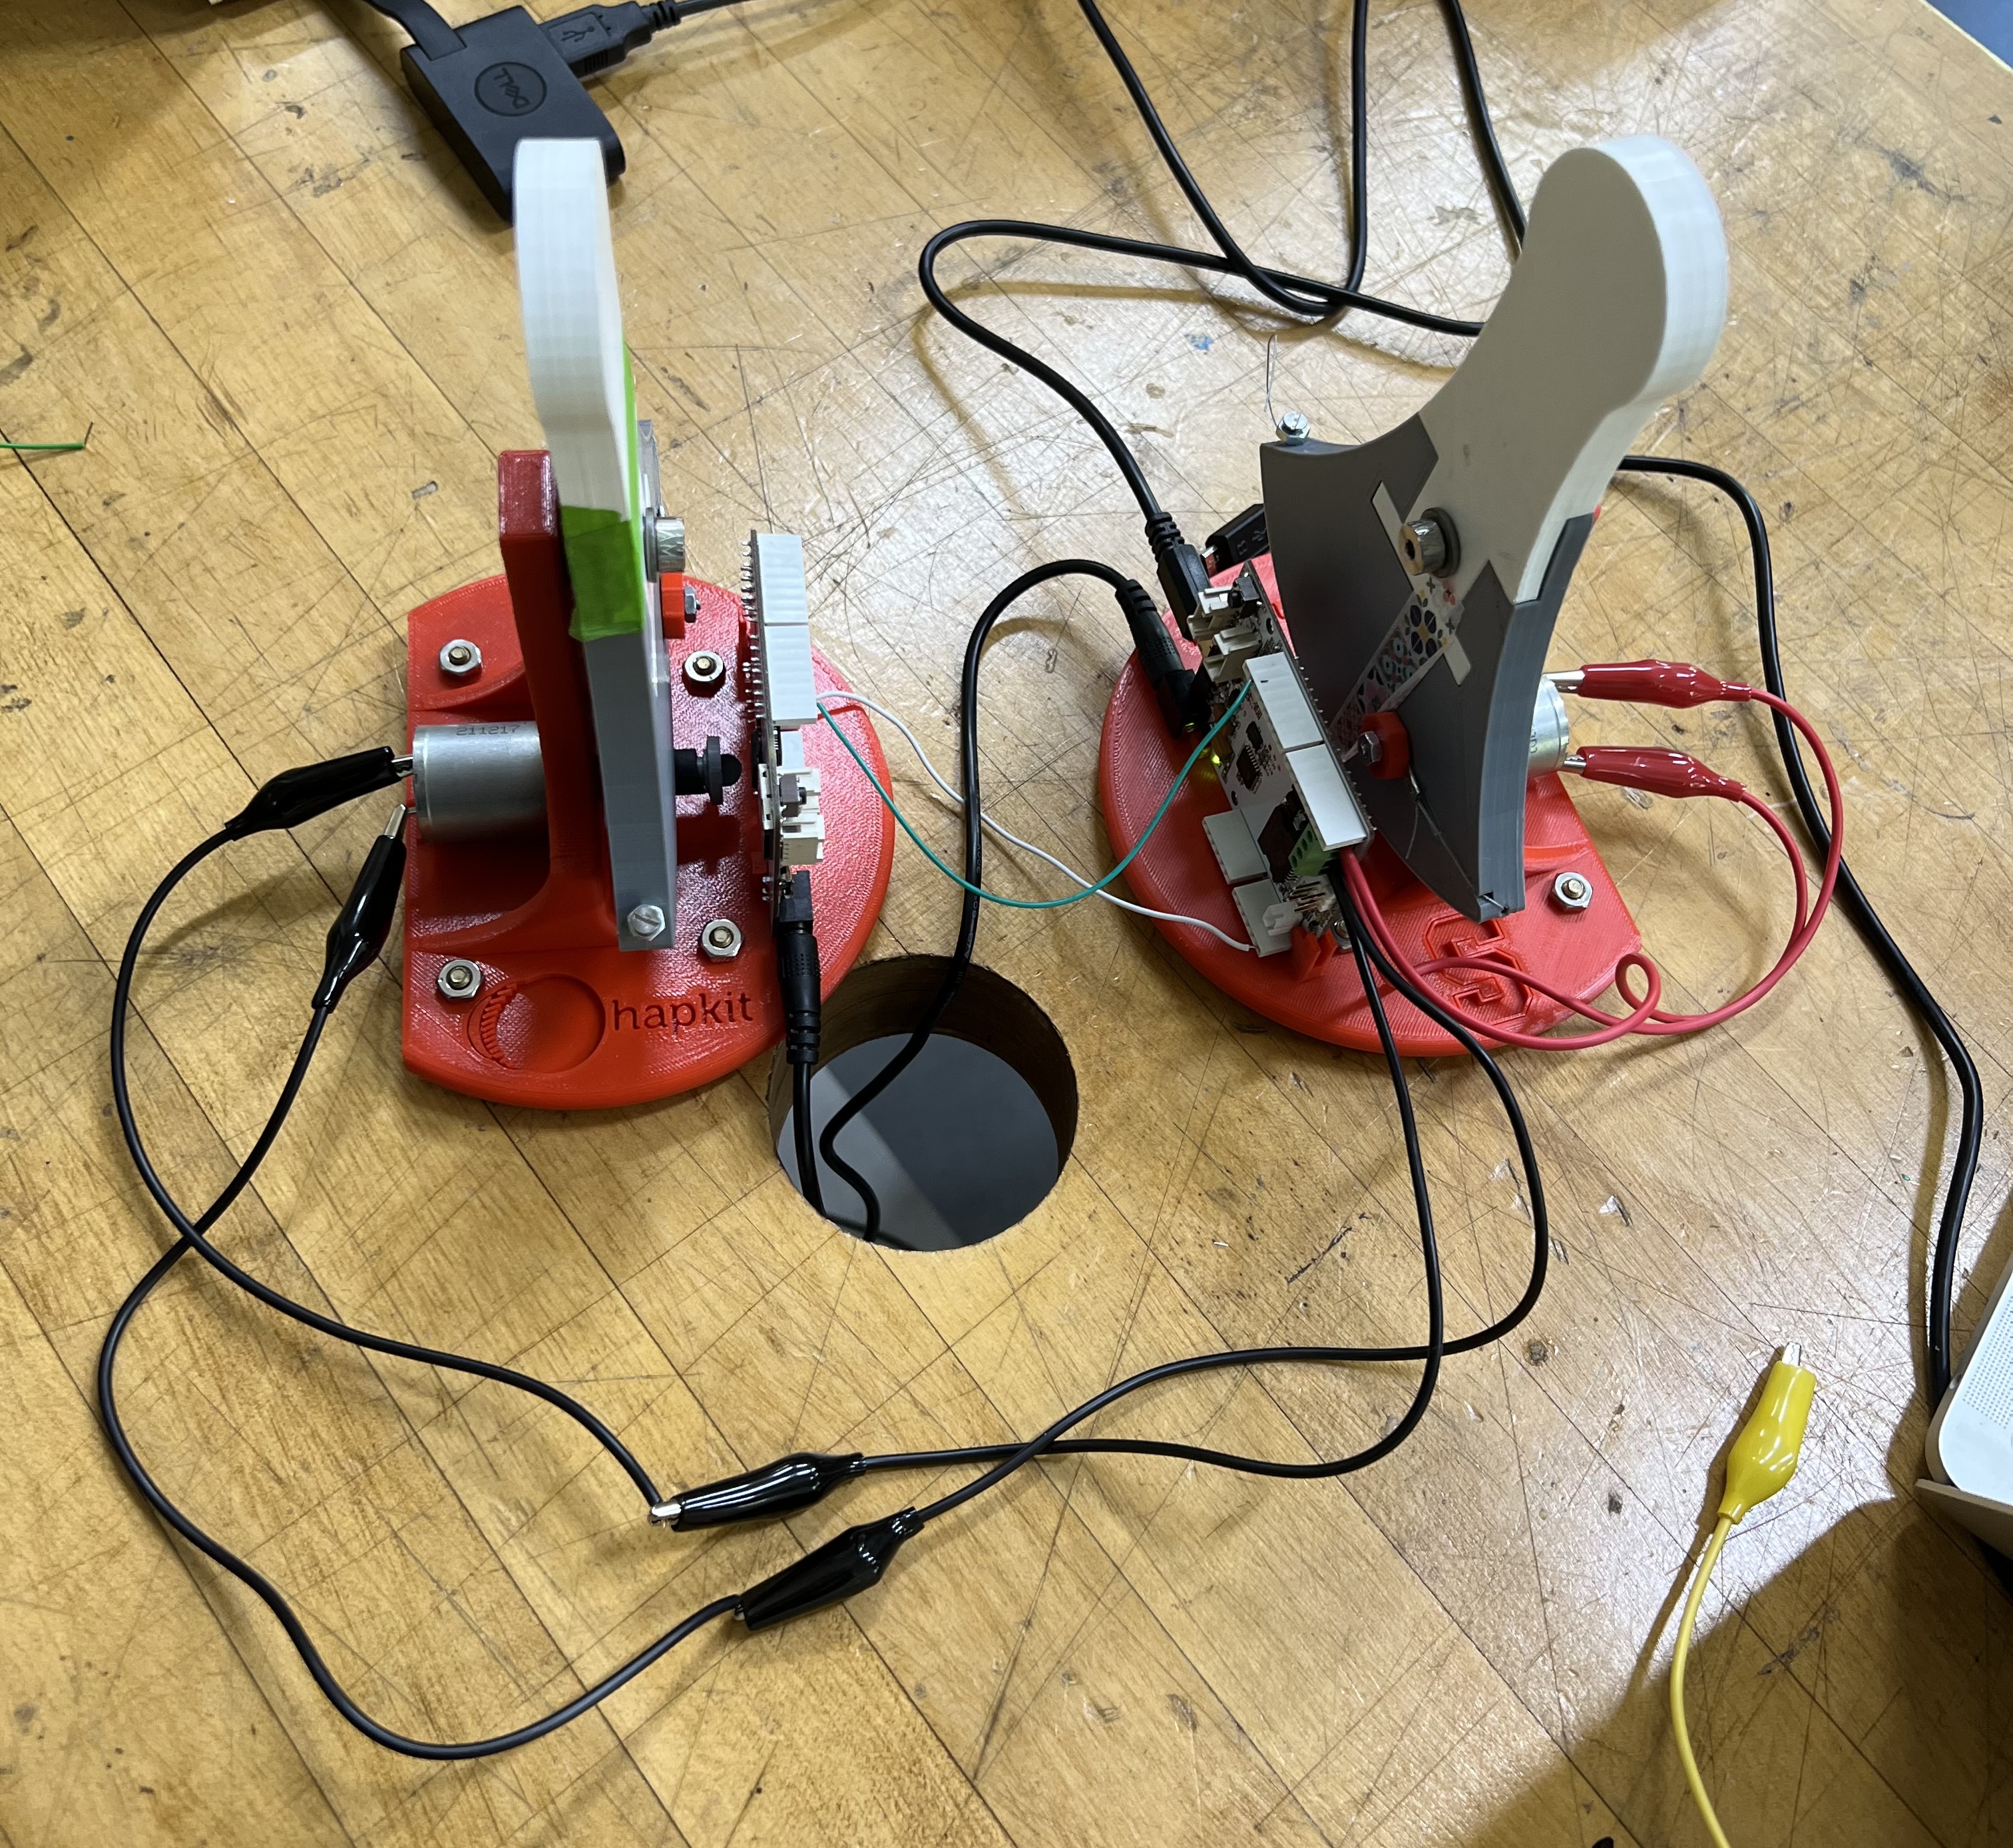
Hardware design and implementation
To mimic the position of rowing, we set up two hakits sideways, mounted to parallel boards.
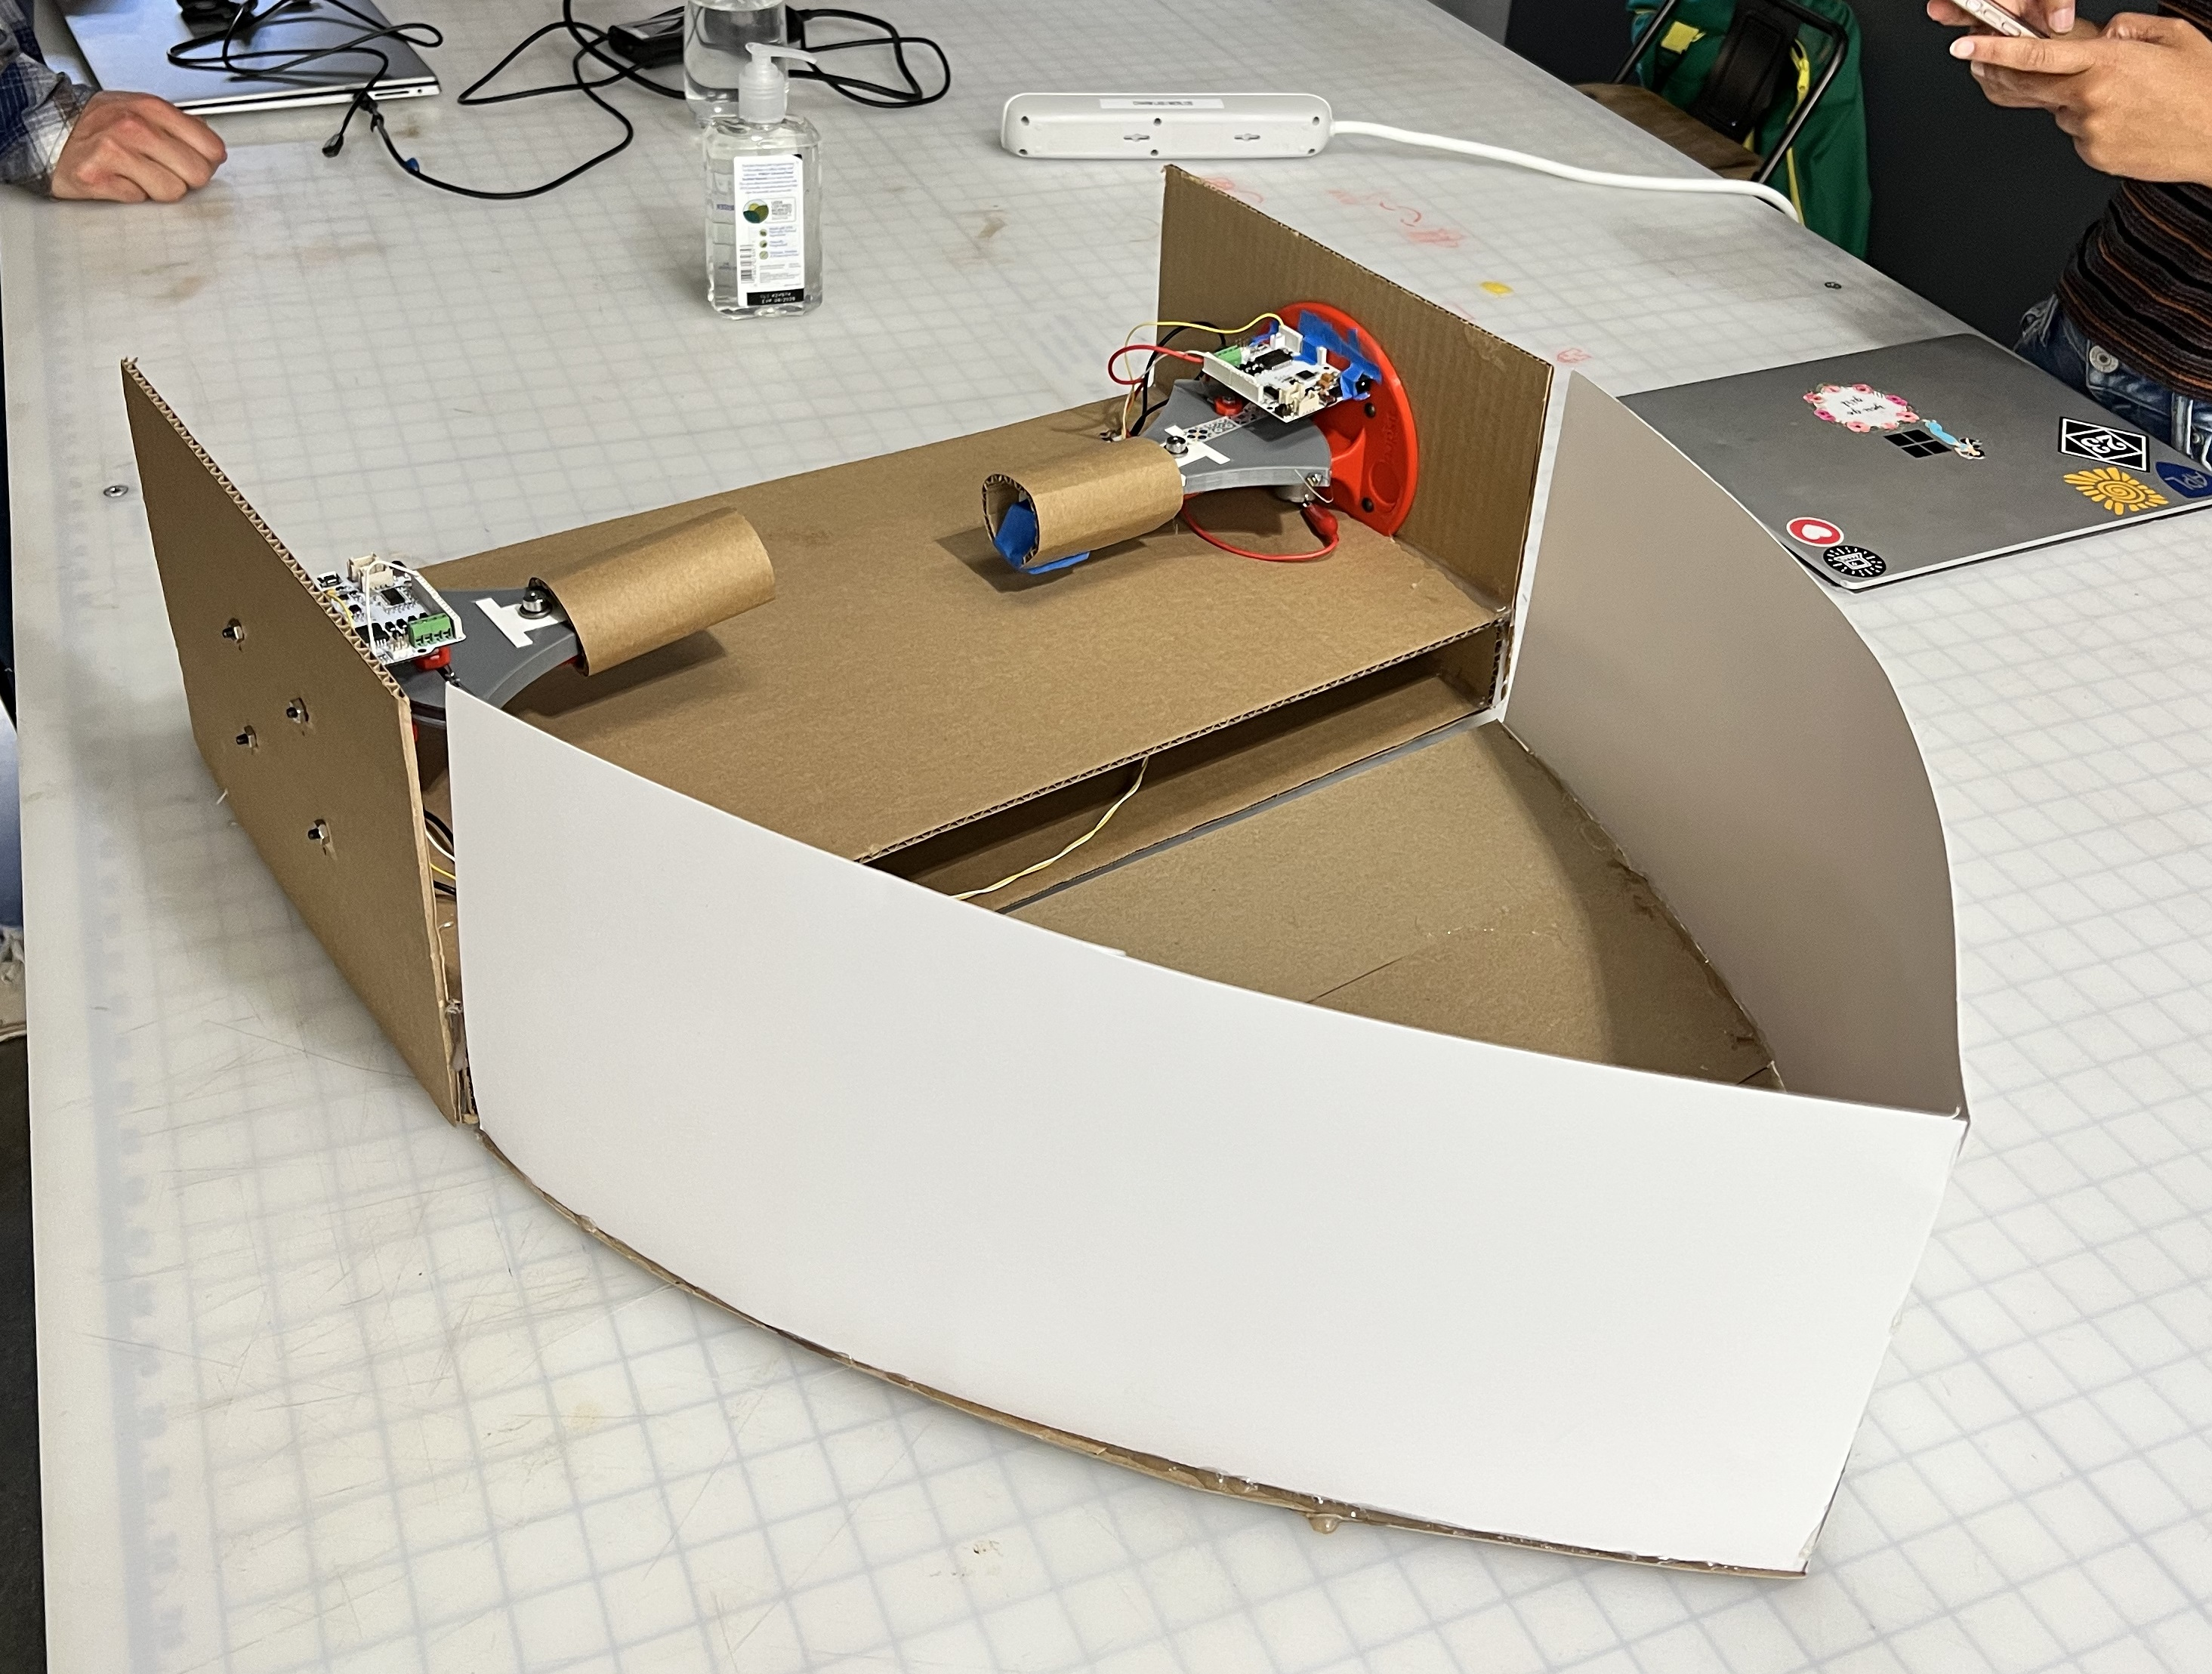
Each hapkit is connected to its own arduino, to maintain the magnetic calibration. The handle position data from the left hapkit is sent to the right, and all calculations are done in the right hapkit code.
System analysis and control
Hapkit Code
For the forward movement through water, we implemented the following equations: When moving through water, F_user = -b_paddle*v_boat ; the only haptic feedback provided is the damping force, proportional to the velocity of the handle. When moving through air, F_user = 0 ; there is no force felt on the pull.
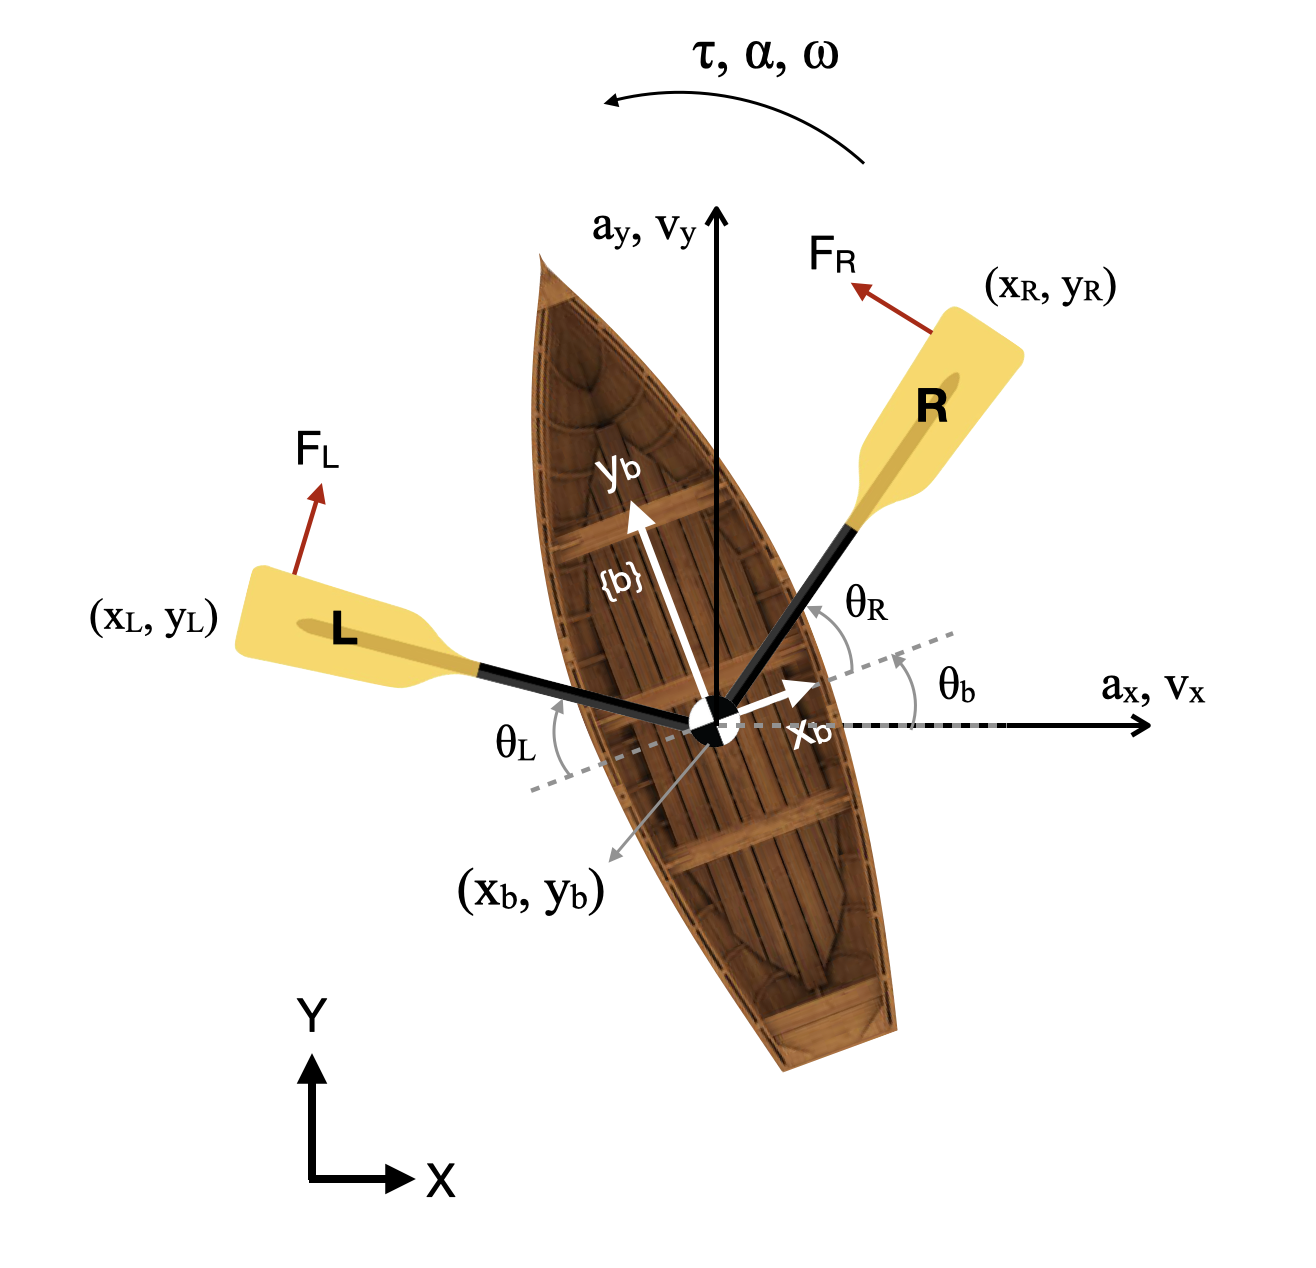
The force of the paddle on the water is opposite to what user feels. After calculating the paddle force relative to the boat frame, we used a rotation matrix, rotating theta_b clockwise, to convert the force in the boat frame to the force in the global frame, using the equations below:
fR_x = cos(theta_b)*fR_xb - sin(theta_b)*fR_yb;
fR_y = sin(theta_b)*fR_xb + cos(theta_b)*fR_yb;
where fR_x, and fR_y are the right paddle forces in the global frame, and fR_xb, fR_yb are the right paddle forces in the boat frame.
To model the turning of the boat, we used these equations of motion:
a_x = (fL_x + fR_x - vx_b*b_water) / m_boat;
a_y = (fL_y + fR_y - vy_b*b_water) / m_boat
vx_b = vx_b_prev + ax_b*t;
vy_b = vy_b_prev + ay_b*t;
Where a_x and a_y are the x-y components of the acceleration of the boat, F_L and F_R are the left and right damping forces felt by hapkits, broken into x-y components, v_b is the velocity of the boat, calculated from the hapkit handle position, and m_boat is the mass of the boat. The equations of motion are then used to calculate the x-y position of the boat:
xb = xb_prev + vx_b*t
yb = yb_prev + vy_b*t
Then, based on how quickly the handle is pulled on either side, the code computes an angle of direction traveled.
torque = (F_R - F_L) * l_b - b_rotation*omega_b
alpha_b = torque / I_b
omega_b = omega_b_prev + alpha_b*t
theta_b = theta_b_prev + omega_b*t
Where l_p is the length of the paddles, b_rotation is the rotational damping of the boat in the water, omega_b is the angular velocity, alpha_b is the angular acceleration, I_b is the inertia of the boat, and theta_b is the angle at which the boat is traveling.
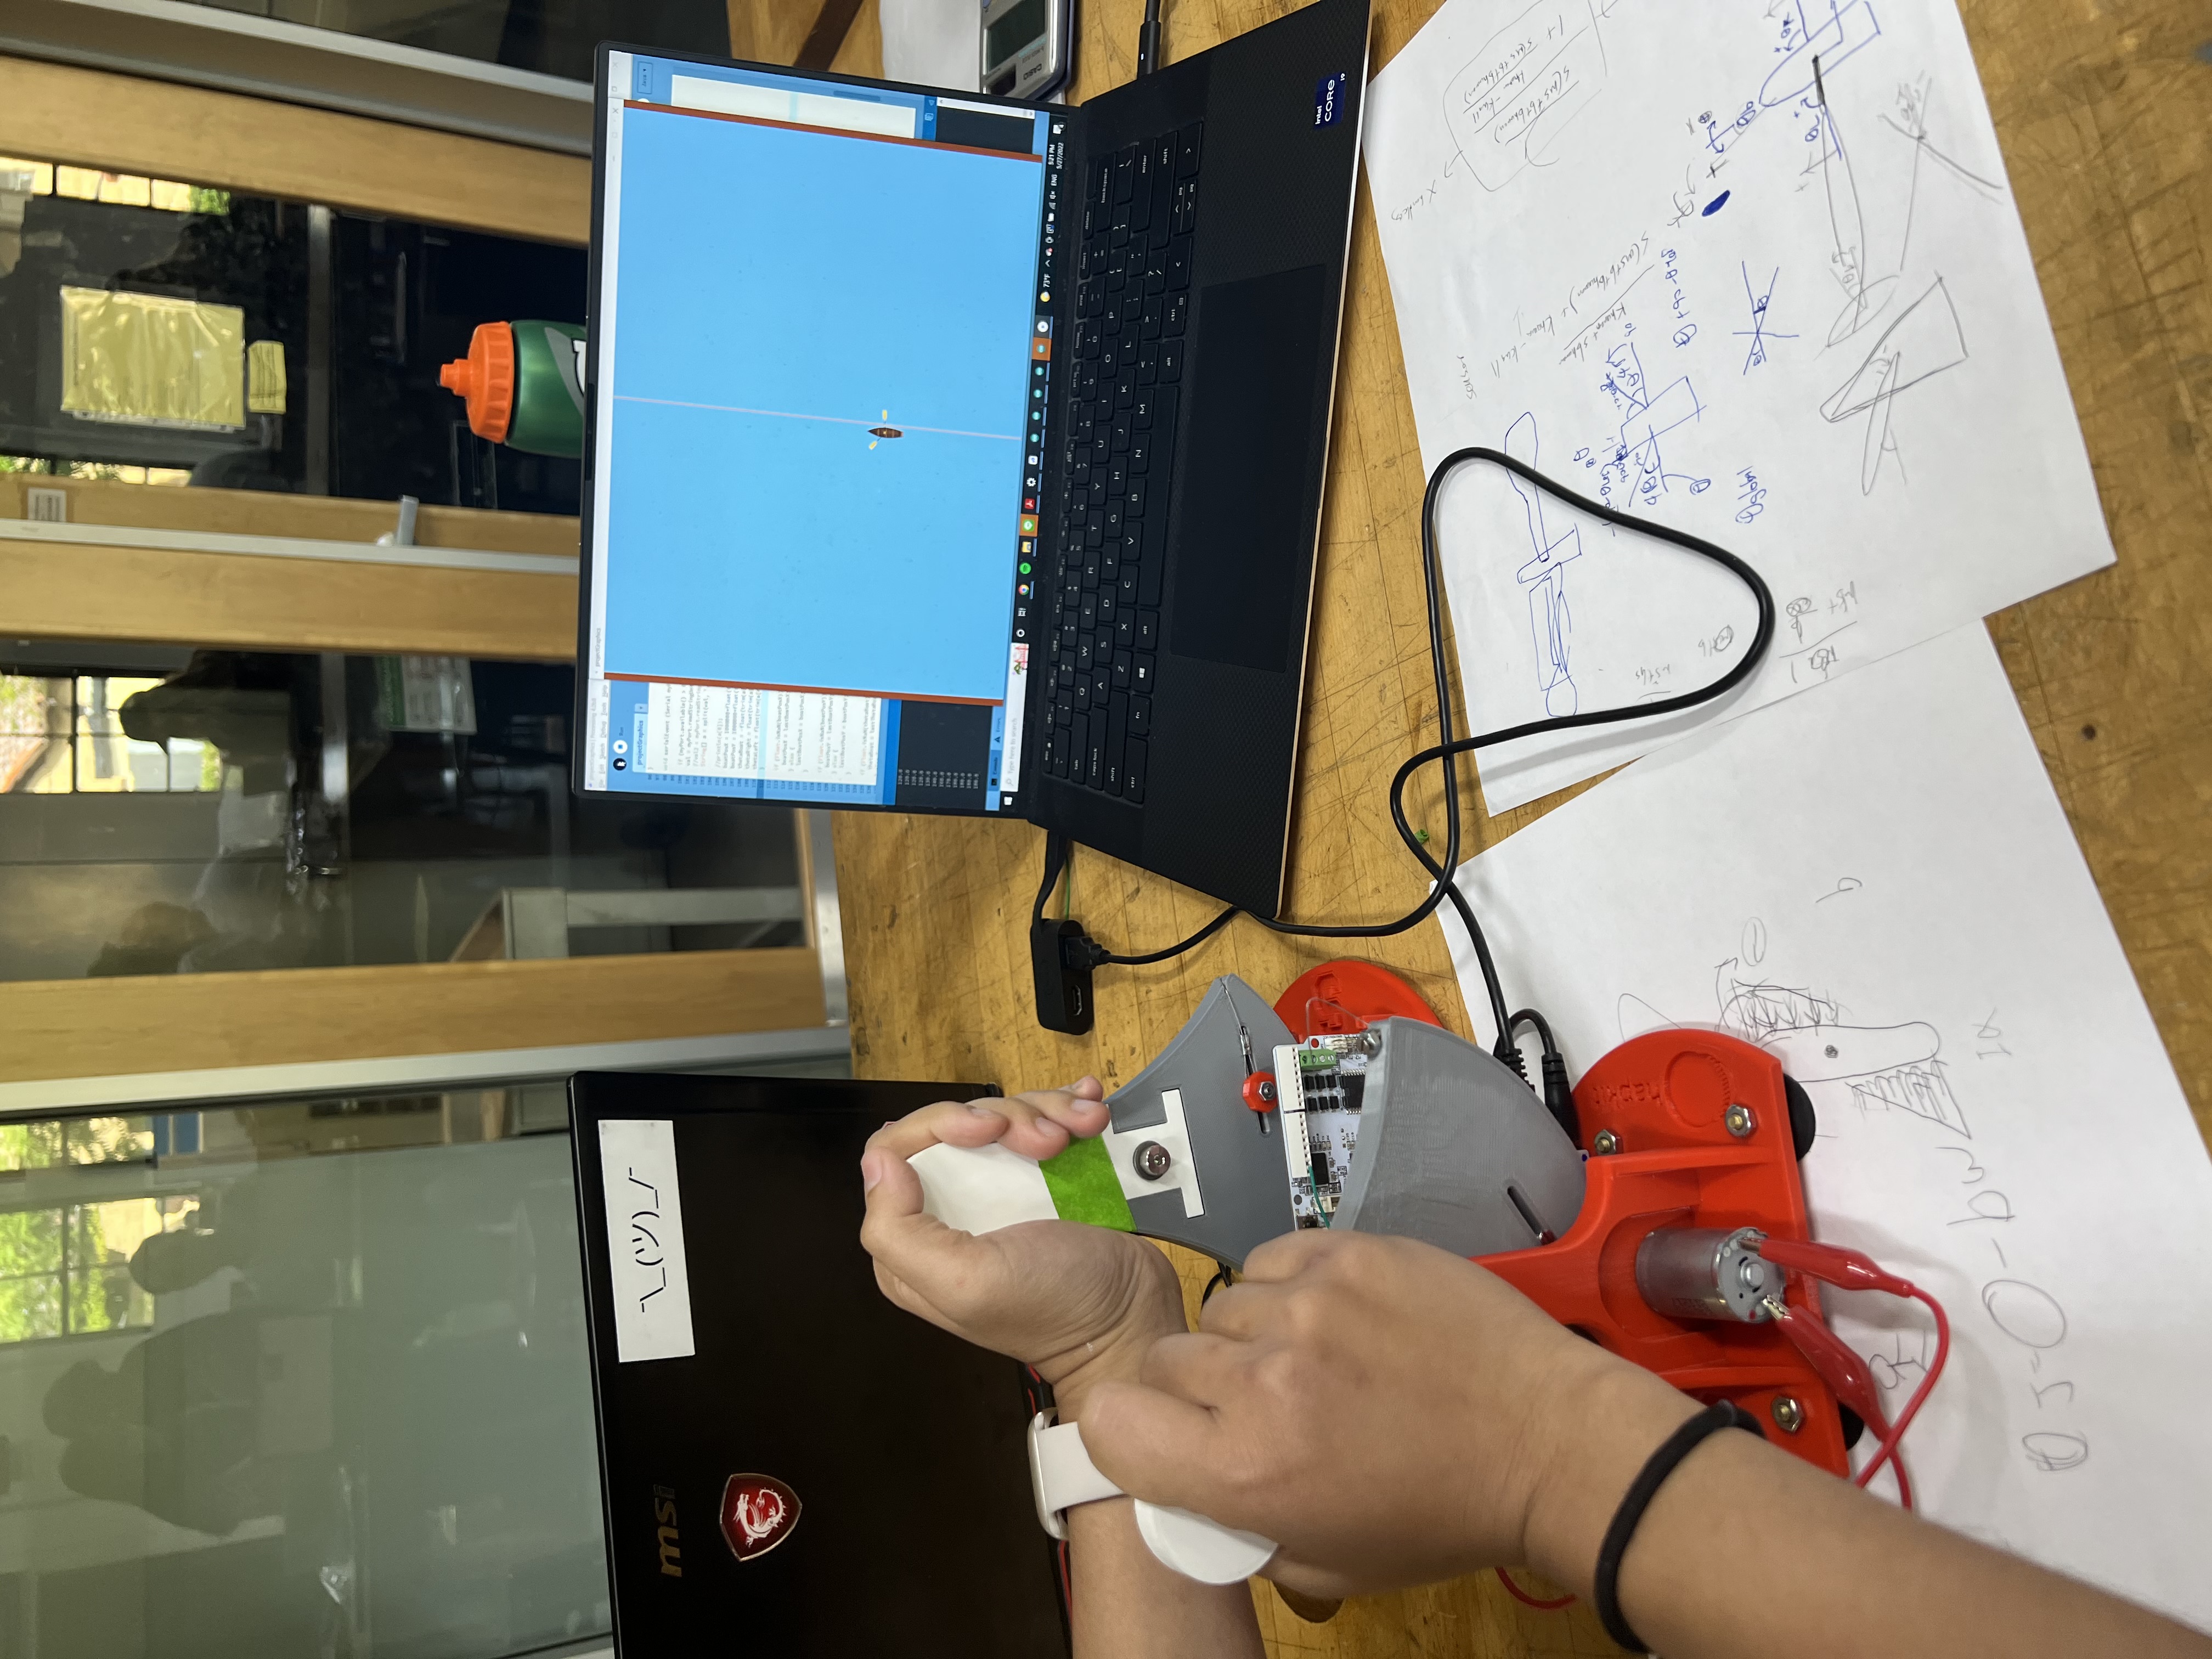
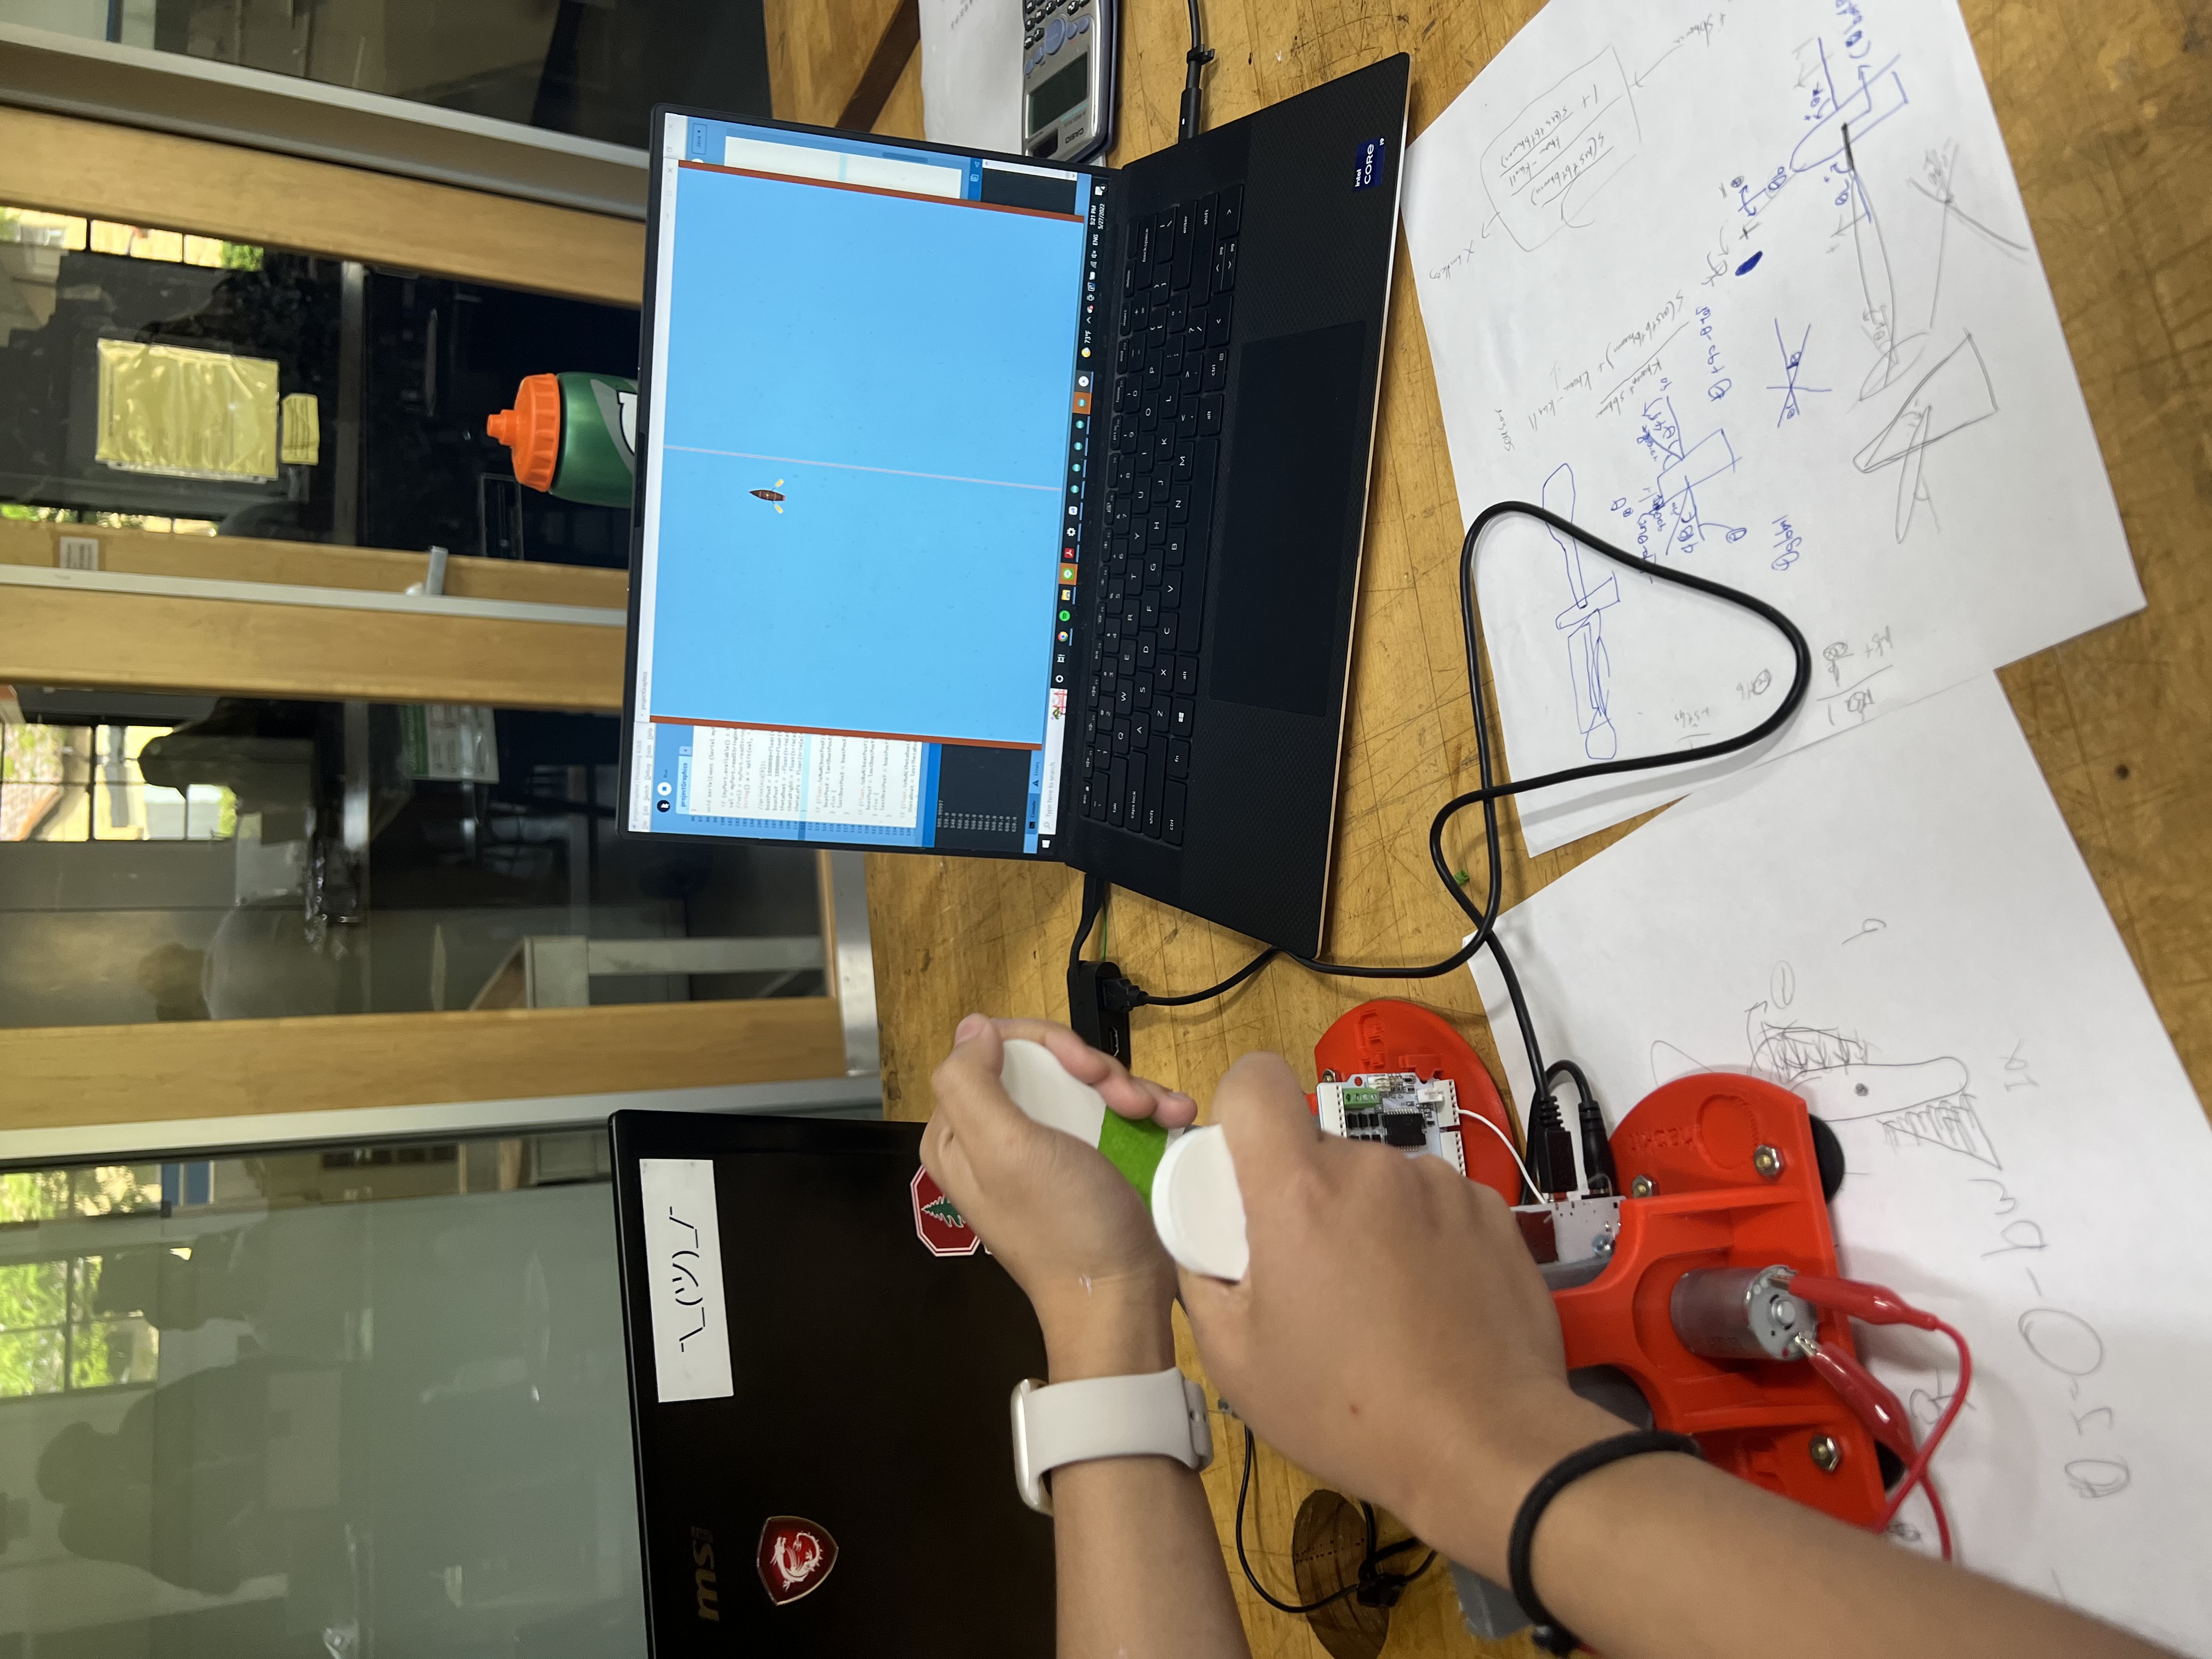
Processing Code
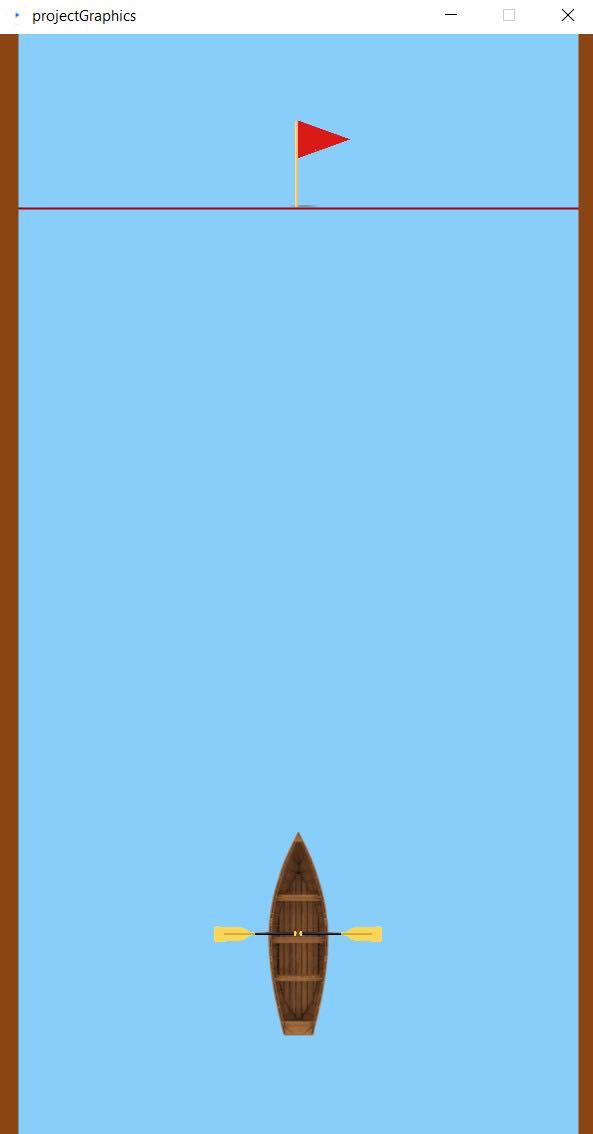
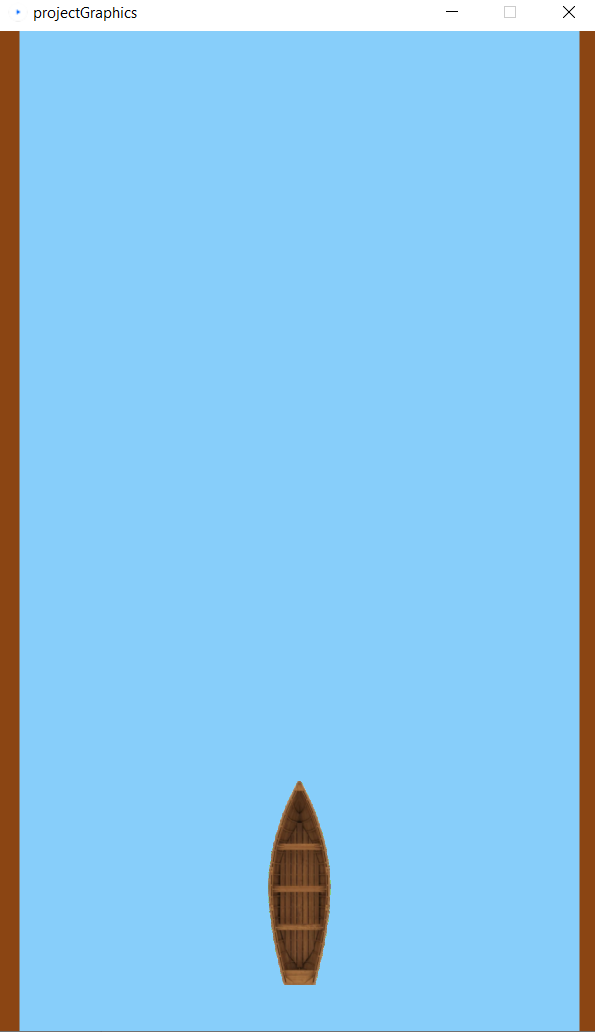
We also created a visual display for our model; using the x-y position and angle values from the arduino, we developed a simulation of a boat moving through water. In addition, the angle of each hapkit was also used for the angle of the paddles with respect to the boat in the visual.
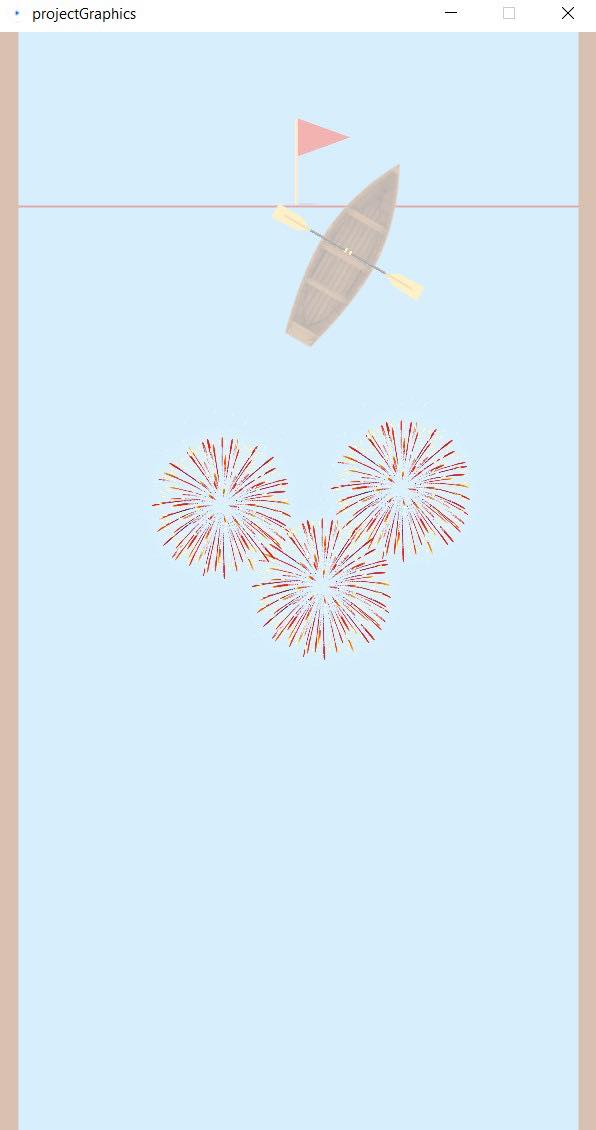
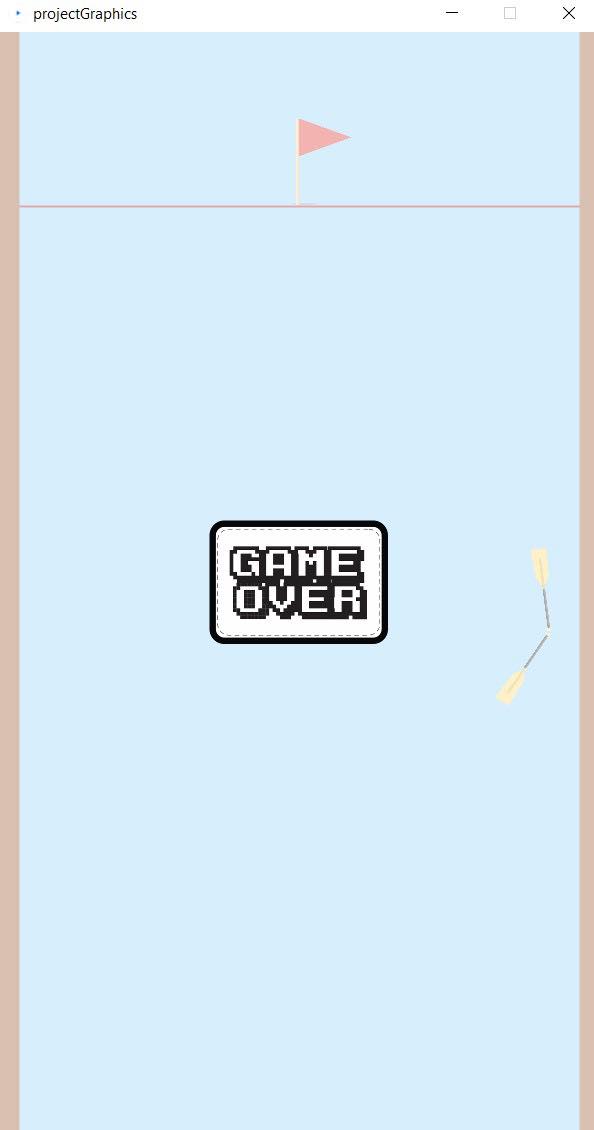
For our visual display, we created a mini-game. There is a straight channel for the boat to travel through, with a finish line at the end. If you pass through the finish line, you win! However, if you hit a wall, the game ends and you lose. After you win or lose, the motors switch off and the hapkit handles rotate freely until the game is reset.
Demonstration / application
Here are video of our simulation in action! The first is of a successful path. The second is what happens when you hit the wall, and the third video is a side view of the action. We had people sit and grasp the handles with their entire hand.
Results
During the open house, we were able to show our simulation to a good amount of people! In general, the feedback was very positive; the simulation mimicked the feel of rowing fairly well, the set-up of both the hapkits and the visuals were intuitive, and the force feedback was enough to simulate moving through water.
People seemed to enjoy the game aspect, and were successful, albeit slow, in crossing the finish line. A few people even described the action as a workout! Most of the constructive feedback was that real rowing has a much higher damping force, and turning is more difficult. Given that we were constrained by our hapkit motors we think this is a valid but unavoidable concern.
One interesting observation was that 327 students familiar with hapkits knew the motion was constrained in one plane of motion; the handles only move front to back. However, non-327 users tended to try and move in a circular motion, as rowers do, which was not feasible with our hapkit set-up.
Future Work
One future experiment we can try that would be helpful in improving our scripts would be to build obstacle courses and have users go through these courses without hitting walls. This makes the rowing more complex, requiring more skill and precision on the user�s part. We could potentially gain better feedback on the feel of our system, as the added complexity could in theory allow us and participants to discover inconsistencies in the simulation.
One major improvement would be improving the actual rowing motion of the system. One participant said they felt the real and responsive forces from the haptic feedback, but noted the actual motion of the hapkits was not similar to actual rowing, saying that rowing is more of a circular motion, not a back-and-forth movement. We can develop better handles that are not 1 degree of freedom like the hapkits. We can take this idea a step further and add stationary foot pedals to allow the user to row with their whole body. With improving realism, we can provide a better experience for the user.

Image showing the full range of motion of rowing through the whole body. Taken from Alicia Filley's "Low back pain: anything but a dream for rowers."
Interestingly, one verbal feedback that was often repeated from participants was that it �felt like a workout� or �it was very tiring.� This demonstrates one of the more interesting applications of this rowing simulator: its application for working out, whether it be recreational activities or competitive rowing. Rowing is an uncommon activity that not everyone experiences for reasons such as inaccessibility to nearby bodies of water, cost, or general uninterest. Making a machine that simulates the motion of rowing and steering on a small boat could be exciting for non-rowers. This can spark interest in rowing or it can be a casual fun activity to do with family and friends.
For more competitive rowers, a rowing simulator can provide plenty of benefits. First, it provides a convenient way for a rower to practice without traveling to a nearby body of water. This can also let the rower never have to worry about missing practice due to out-of-town traveling, time of day, or weather conditions. A rowing simulator can also give the opportunity to practice certain techniques or conditions that can be emulated into the system.
Files
The arduino and processing code, as well as the videos, are all in this google drive folder: https://drive.google.com/drive/folders/1a5fAdOAcrtlvrMG-HnioCf2Xet5CiSMH?usp=sharing
References
Tang, Jonathan & Carignan, Craig & Olsson, Pontus. (2006). Tandem Canoeing over the Internet using Haptic Feedback.. 2006. 40. 10.1109/HAPTIC.2006.1627130. https://www.researchgate.net/publication/221012513_Tandem_Canoeing_over_the_Internet_using_Haptic_Feedback
Basalp, E., Bachmann, P., Gerig, N., Rauter, G., & Wolf, P. (2020). Configurable 3D rowing model renders realistic forces on a simulator for indoor training. Applied Sciences, 10(3), 734. https://www.mdpi.com/2076-3417/10/3/734/htm
Basalp, Ekin, et al. "Rowing simulator modulates water density to foster motor learning." Frontiers in Robotics and AI (2019): 74. https://www.ncbi.nlm.nih.gov/pmc/articles/PMC7806073/
Filley, Alicia. "Low back pain: anything but a dream for rowers." Sports Injury Bulletin. https://www.sportsinjurybulletin.com/low-back-pain-anything-but-a-dream/
GIPHY. https://giphy.com/gifs/the-lonely-island-t-pain-im-on-a-boat-l2Jeczy9FOg59bKYE
Appendix: Project Checkpoints
Checkpoint 1
For this checkpoint, we fleshed out (and simplified!) our idea, and started building. We decided to stick to using hapkits, given the material and time constraints. The hapkits will be attached to a vertical board, so the handle is parallel to the ground. Pushing the handle away represents a stroke through the water, and pulling the handle towards you represents moving the paddle back through the air. Here is a video of our initial set-up (will upload to youtube soon! for now, a downloadable attachment):

In addition, we wrote an arduino script to model the general motion. We programmed the damping, as well as equations to calculate the distance travelled and the angle of travel of the boat, based on the handle velocities. The snipped of code is listed below:
  // Moving through air (pushing backward):
  if (dxh_L < 0)
      f_L = 0;
  // Moving through water (pushing forward):
  else
       f_L = -dxh_L * b_water;

  // Moving through air (pushing backward):
  if (dxh_R < 0)
       f_R = 0;
  // Moving through water (pushing forward):
  else
       f_R = dxh_R * b_water;

  //direction (?)
  f_total = f_R + f_L;
  a_b = f_total/m_b;
  v_b = a_b*time_step;
  p_b = v_b*time_step;

  torque = (f_R -f_L)*l_bp;
  omega = sqrt(torque/I_b);         // ignore angular acceleration
  angle = omega*time_step;
Finally, we started brainstorming for a visual that we'd want to show along with the simulation. We show the boat moving over a short course, using processing. The arduino files would send the distance travelled, as well the angle of motion. The boat should correspondingly move up the screen.
Over the next week, we hope to figure out serial communication, so that we can simulate having two paddles change the direction of motion. We plan to make the processing visual more robust, and hopefully test the device on a few users to get general feedback. We think we are on track to finish by demo day!
Checkpoint 2
In checkpoint 2, we worked on our arduino script to be used with two hapkits to represent the left and right oars, and on the processing code to correlate the user's rowing motion with the motion of the boat on screen.
We originally thought of using serial communication to operate the two hapkits with 2 boards, but we were able to simplify it down to using one board for 2 hapkits. We did this by keeping the second and main hapkit boards mounted, taking the ground and signal lines of the extra MR sensor from the second board and connecting it to the main board through a ground and available A/D channel. From this, the position of the second hapkit can be tracked by the main hapkit board.
For arduino, we significantly improved our script. We were able to program the rowing motion on both hapkits and refined the physics of the boats motion. The script will output angle of the boat, the angle of the left and right oars relative to the boat, and the x and y position of the boat. These outputs will be used in processing to showcase the boat turning and moving.
We also worked on improving the graphics of our simulation in processing. We added oars to the boat that would correspond with the hapkits, visualizing the motion of the oars. We were somewhat successful in getting the boat to move in our processing script. Throughout coding arduino and processing, we have encountered problems with the signs of our variable. We have been solving this through debugging by examining how the boat reacts to the hapkits. We are encountering minor inconsistencies in the movement of the boat, but so far, we believe most of the problems have been fixed and we are satisfied with how the graphics and hapkits operate together.
Movement of boat accurately correspond to the movement of hapkits.
Movement of the boat from one point to another was successful!
Some goals we have for the next few days:
Finalize our arduino and processing code, and test it on users to get feedback.
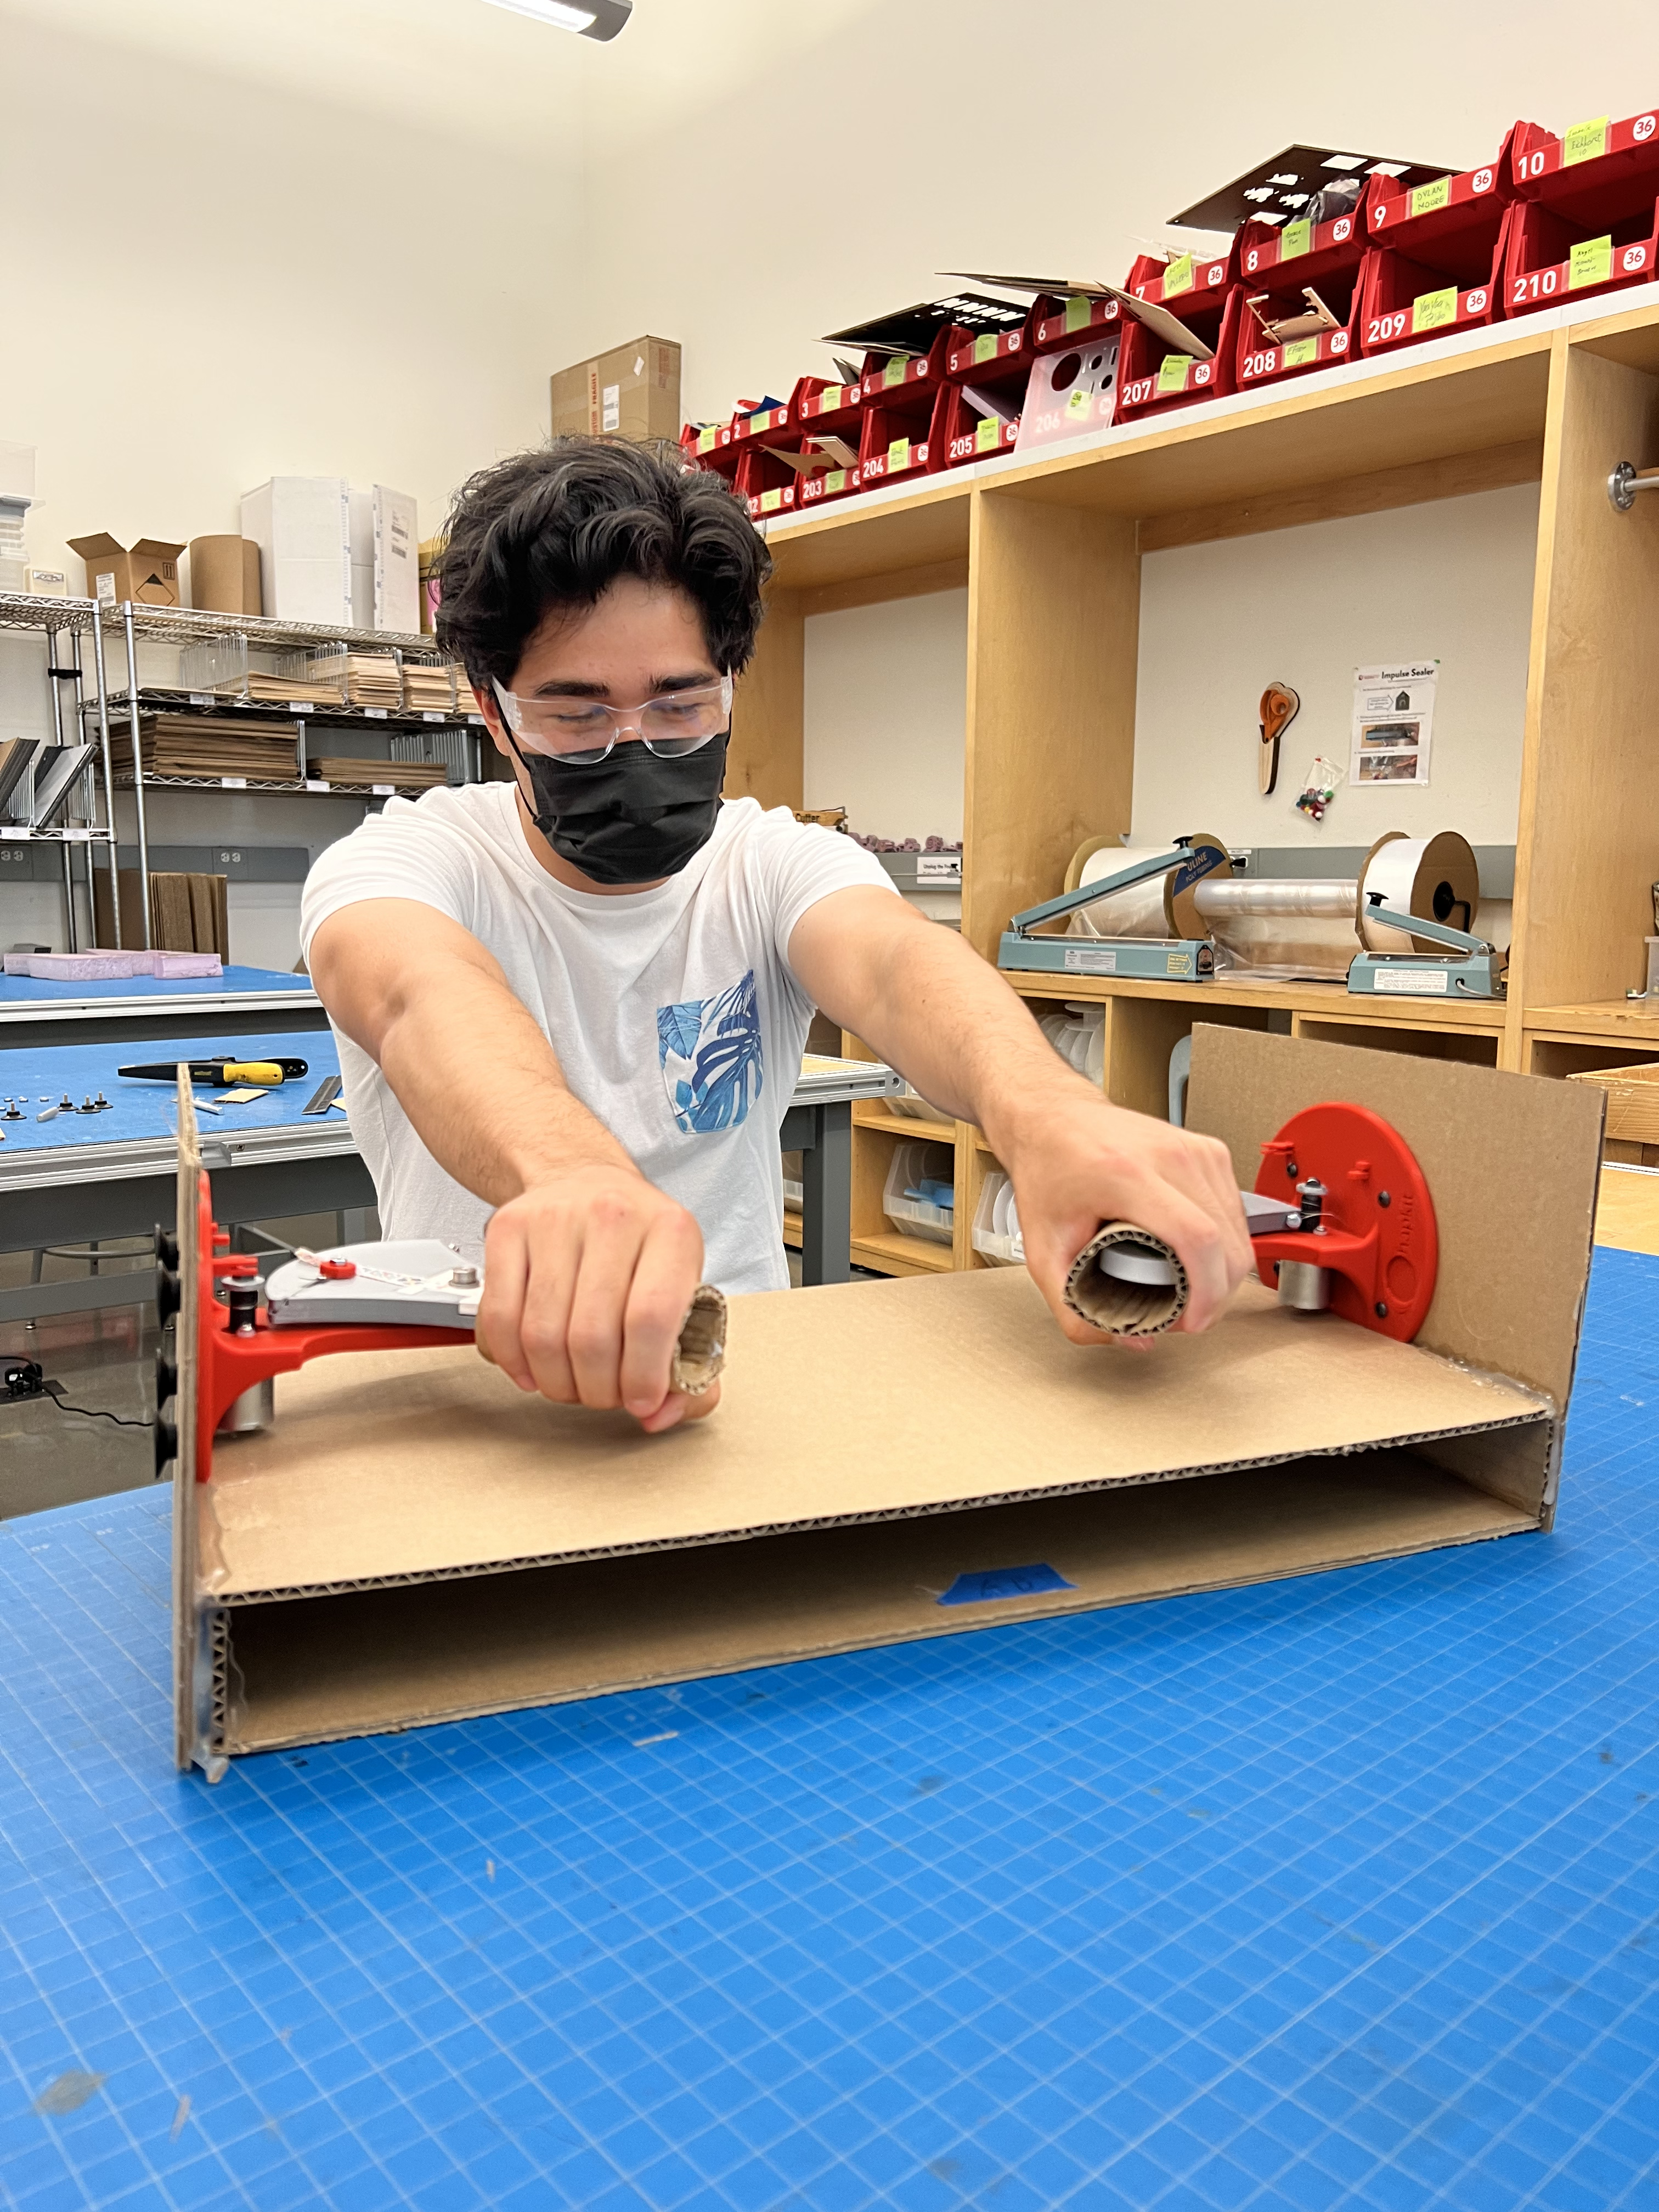
Build our hapkit setup, placing them on vertical boards and arranging them in a rowing position. This will likely be done with cardboard as we found out it was sturdy enough to hold everything in place.