

Group 19

Picture of Haptic Fruit Ninja Setup
Haptic Fruit Ninja
Project team members: Andrew Low, James Wang, Jiwen Chen, Yuying Huang

Team members Yuying Huang (left) and Andrew Low (right) with setup. Not Pictured: James Wang and Jiwen Chen
Fruit ninja is a popular mobile game in which users are required to slice fruit tossed upward into the screen before they fall down to the ground. In this project, we create a more realistic version of the game using a 2-DOF pantograph device that provides vibration feedback to the user as they guide a cursor to slice animated fruit on a screen.
The device uses a hall effect sensor and a magnetoresistive sensor to track the user's position at an end-effector placed on the pantograph device. These sensors input into a HapKit board, which also drives two motors to provide haptic feedback to the user when cutting through fruit. Through this work, we hope to provide a greater understanding of how games can become more interactive for users when haptic feedback is implemented. Additionally, this project contributes a greater understanding of how vibration and force haptic feedback can be implemented with a 2-DOF pantograph device.
On this page... (hide)
Introduction
Our team will attempt to replicate the classic mobile game, Fruit Ninja, in which a user attempts to slice animated fruits flying on the screen. In the mobile game, the user drags their finger across the screen in a slicing motion (the user’s “sword”). If the user’s finger comes into contact with a fruit, it will slice through the fruit, and the fruit will drop as two halves. The premise of this game is to be able to slice all the fruit on the screen before they fall off the screen. However, this game does not provide any haptic feedback to the user while slicing fruit, making the slicing motion feel unrealistic. In our rendition of this game, we will use a haptic device to simulate the slicing motion of the fruit. Our haptic device will create resistance against the user’s motion as the user cuts through the fruit in order to provide a more realistic experience. The graphic interface for this game will be done in Processing, while the haptic device simulation and game physics will be done in Arduino.
The motivation for this project is that adding haptics, where the player experiences force feedback when slicing a fruit, could be a compelling addition to the original game. Having users operate a physical device that provides haptic feedback will provide a more realistic experience of cutting fruit compared to that of the mobile game.
Background
Gianni, et. al. has implemented a 2-DoF pantograph haptic device with a 5-bar linkage structure [1]. The mechanical structures, steps of building such a device and the related kinematics details are referred to [1]. For the graphic implementation, [EDIT HERE TO EXPLAIN THE RESOURCE FOR FRUIT.CPP IF THERE IS ANY]. Prior research has investigated the simulation of cutting objects from a fracture mechanics approach [2] and dynamics of cutting of foods that factors in deformation, fracture and friction [3]. A simplified version of these prior works will be used as the basis of our modeling.
Methods
Hardware Design and Implementation
A 2D pantograph device was built and assembled based on the instructions given for assembling the GraphKit (https://hapkit.stanford.edu/twoDOF.html). This device consisted of two HapKits that have been placed horizontally onto an external base with a four-bar linkage connecting both HapKits. Washers were added in between the joints of the pantograph in order to elevate the linkages and make sure they stay upright when used. The end effector of the device was a pen that was slotted into the four-bar linkage. This end effector was manipulated by users to move the "blade" on the screen. Through the HapKits' sensors and the kinematics as discussed in the next section, we were able to track the 2D position of the end effector and map it to a location on the screen.
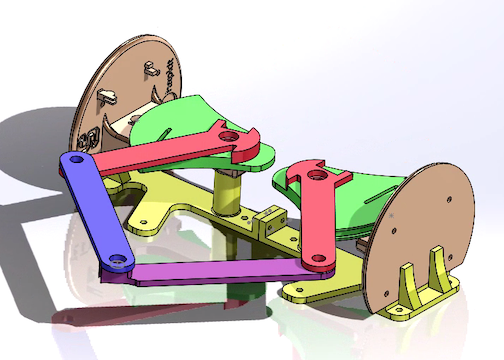
CAD model of 2D pantograph device
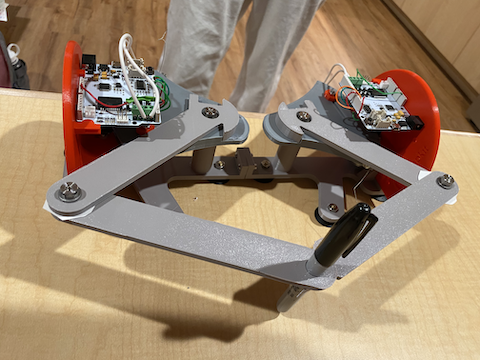
Built 2D pantograph device
All sensing and haptic feedback was controlled using one HapKit board. One hall effect sensor and one magnetoresistive sensor were used to measure the rotation angles of the haptic paddle, and were wired to the board on the right side of the pantograph (see figure below). Pins 5-8 on the HapKit board were used to run the two motors responsible for haptic feedback during the game.

Schematic of sensor and motor wiring on Hapkit board
System analysis and control
The pantograph is a five-linkage structure with the link lengths a1 = a4 = 5.0 inch, a2 = a3 = 6.0 inch, and a0 = 3.25 inch.
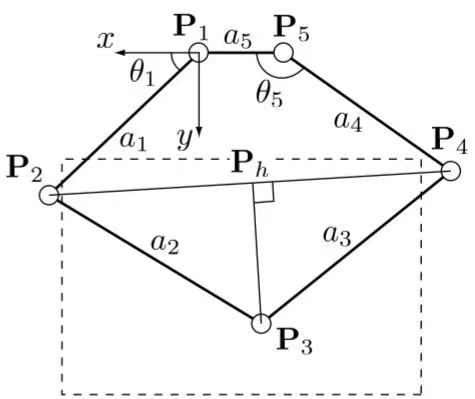
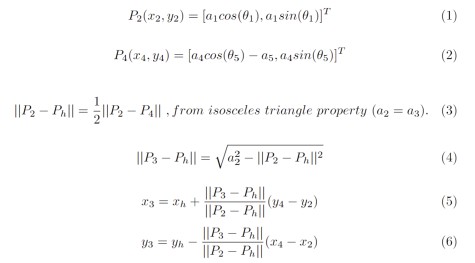
A cartesian coordinate is set up with the POINT 1 to be the origin and the positive x axis direction to be pointing out of the ground link. From our two sensors mounted on POINT 1 and POINT 5 separately, two input angles θ1 and θ5 could be found with the use of a Hall-Effect Sensor (AS5048A) and a magnetoresistive sensor (KMA221). From the forward kinematics of the five-bar linkage, the position of POINT 3 is calculated as:
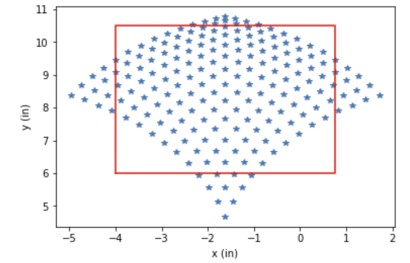
The actuator we are using, two 12-Volt DC motors (RF370CA-15370), can each span 14 encoding states within the working range of the pantograph. In our model, θ1 can span between 35 to 90 degrees, and θ5 can span between 90 to 145 degrees. The reachability set of POINT 3 based on the forward kinematics and the motor resolution is shown in the figure below, with the scattered points corresponding to the reachable points (x, y) in the coordinate defined in the pantograph diagram, and the red rectangular box corresponding the selected working space for our application.
For the feedback control of the haptic device, we decided to create a damping force that is proportional to the relative velocity between the user and the simulated fruit. The dynamic of the pantograph is shown in the figure below:
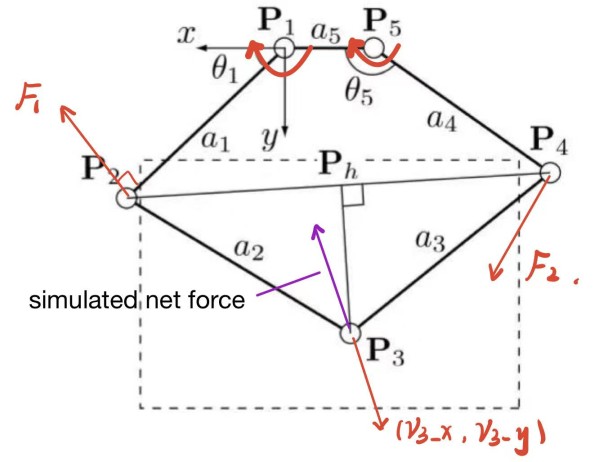
In order to render a force in the opposite direction of the relative velocity, the torque needed from the motors are calculated as:
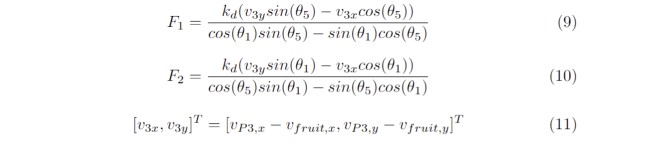
where v3x and v3y are the relative velocity between the user and the moving fruit under the coordinate defined by the pantograph, and kd is the damping coefficient.
Physics Simulation/Visualization
The physics simulation for the fruits is implemented on the Arduino with a C++ class that creates fruits, tracks their state variables, and simulates their motion with 1st order explicit Euler integration. The position of the cursor and the fruits is sent via serial to Processing, which renders the fruits and cursor as circles.
Demonstration / Application
A demonstration of the device and game can be found at our GitHub repository (under Haptic Fruit Ninja Demo.mov):
https://github.com/andrewkwl12/ME327Project_Haptic_Fruit_Ninja
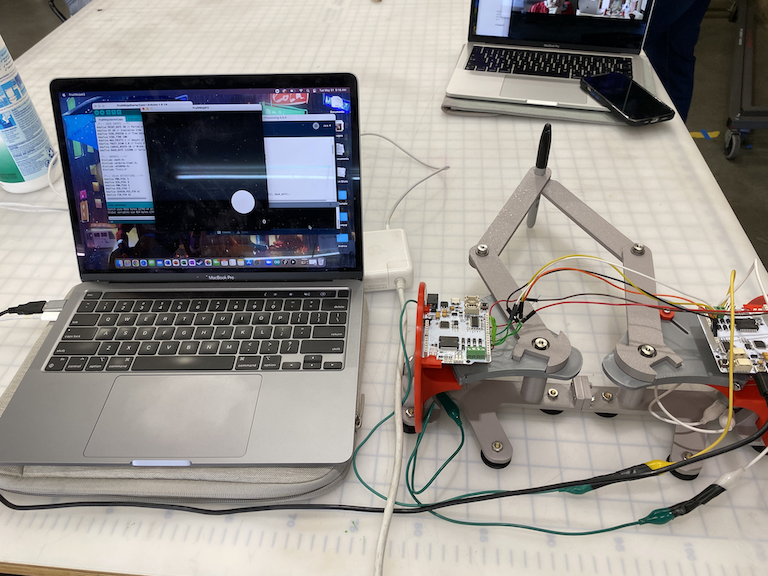
Picture of haptic fruit ninja setup on demo day
Results
Describe the results, which may include qualitative responses from users at the open house.
The cursor position representation on the screen corresponds well with the end-effector motion of the haptic. The simulation of fruit dynamics well mimics the motion of fruits being thrown up. The hall effect sensor performs unstably which requires the device to reset once in a while. The visual illustration needs some improvement as the fruit representations were simplified as white circles and vibrotactile feedback was identical for all fruit types.
Overall, most users at the open house enjoyed playing the Fruit ninja game with haptics feedback. We received one statement saying that it is fun enough that they can play with this haptics device all day long. But there were some potential improvements suggested. First, although spacers are added to the joints to keep the pantograph horizontal to reduce the friction between linkages, the friction from the Capstan drives is noticeable and disturbing. Second, the vibrotactile feedback is weak for about half of the users. Lastly, since the range of motion cannot capture the entire displayed fruit cutting space due to hardware limitations, fruits are not reachable in certain locations.
Future Work
The drawbacks of the current version of our device include (1) non-ideal haptic feedback based on the forward kinematic and the dynamic model, (2) lack of sensing stability with the use of Hall Effect sensor, (3) motor latency, and (4) friction influencing the user's experience. To improve in (1), other methods for finding the torques, for example with the use of Jacobian, could be used. To improve in (2), further tests about the source of instability should be conducted, including checking whether the wire connection or the soldering is loose, or whether it is the problem coming from the sensor itself. If the problem comes from the Hall Effect sensor itself, then we should use two magnetoresistive sensors instead. To improve in (3), alternative motors or servos with faster rise time should be considered. To improve in (4), we could lubricate before mounting the bearings, and use some extra spacers to reduce friction.
Acknowledgments
Special thanks to Dr. Allison Okamura and the ME 327 TA's (Elyse, Nathan, and David) for their help and assistance during the class and project.
Files
The following Arduino and Processing code used for the project can be found at the following GitHub repository:
https://github.com/andrewkwl12/ME327Project_Haptic_Fruit_Ninja
Bill of Materials:
- 2 HapKits
- Two 5-inch 3D-printed linkage bars (paddle to joint)
- Two 6-inch 3D-printed linkage bars (joint to end-effector)
- 3D-printed base for two HapKits to rest on
- Computer to connect to HapKit
References
[1] G. Campion, Qi Wang and V. Hayward, "The Pantograph Mk-II: a haptic instrument," 2005 IEEE/RSJ International Conference on Intelligent Robots and Systems, 2005, pp. 193-198, doi: 10.1109/IROS.2005.1545066.
[2] Mahvash, Mohsen, and Vincent Hayward. "Haptic rendering of cutting: A fracture mechanics approach." (2001). https://digital.lib.washington.edu/researchworks/handle/1773/34885
[3] Schuldt, Stefan. Analysis of rate-dependent deformation and fracture phenomena during cutting of viscoelastic materials. Diss. Technische Universität Dresden, 2017. https://www.researchgate.net/publication/331382892_Analysis_of_rate-dependent_deformation_and_fracture_phenomena_during_cutting_of_vicoelastic_materials
Appendix: Project Checkpoints
Checkpoint 1
Checkpoint 1 Goals: (1) CAD and assemble pantograph: in progress, (2) write physics simulation for fruit: complete, (3) implement processing graphics for fruit: complete, (4) test haptic rendering of fruit cutting: in progress
For this checkpoint, we implemented a fruit class which initializes fruit objects. The class tracks fruit positions and velocities and simulates their projectile motion physics with forward Euler integration. Fruit initial conditions are semi-randomly initialized, with the condition that they are launched towards the center of the screen. All simulation is done on the Hapkit. Graphics rendering of fruit positions are done in Processing.
We will follow the instructions in the link below to build a two-degree-of-freedom (2-DOF) pantograph based on Hapkit. https://hapkit.stanford.edu/twoDOF.html
Based on the 2-DOF pantograph of the Hapkit, we have designed the following device to use:
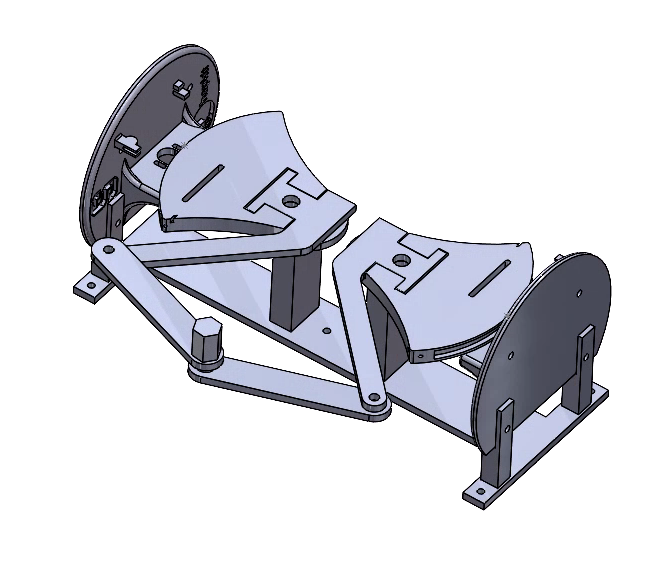
This device uses the same components as the 2-DOF pantograph, with an added knob at the end of the pantograph for users to manipulate. The device will be assembled by early next week so that it can integrated together with the completed physics simulation.
Checkpoint 2
We have finished assembling our pantograph device (see picture below) and are in the process of developing the Arduino and Processing code and dynamic correlations to track points on our pantograph to an actual position on the screen.