

Group 9

Michael Phan, Aaron Garza, Richard Barakat (left-to-right),
Poom Prasopsukh (not shown).

Shoot the Moon! haptic device with
visual rendering.
Shoot the Moon!
Project team member(s): Aaron Garza, Michael Phan, Poom Prasopsukh, Richard Barakat
The goal of our project was to create a haptic rendering and simulation of the 1940s game, Shoot the Moon. Our project lets you experience the fun and challenge of this classic game, but this time without a steel ball, rods, or wooden plank! Specifically, we wanted to model the back and forth movement of the ball on the rods and simulate the forces of the ball on the rods the user feels as well as the vibrations on the rods as the ball moves. Using a modified Hapkit, an eccentric rotating mass vibration motor, and a 2D visual rendering, we have recreated the experience of playing this nostalgic balancing game.
On this page... (hide)
Introduction
Shoot the Moon is a game that has been around for decades and continues to attract players today. Although the game seems simple, mastering the technique to play it well requires practice and patience. The objective of the game is straightforward: move the rods back and forth to make the ball move up and down the ramp. The closer the ball drops to the player, the more points they score. Moving the rods outward creates a virtual slope that causes the ball to roll towards the player. Conversely, moving the rods inward will cause the ball to roll away from the player. Since the rods are naturally angled downward, seeing the ball move up the ramp is quite intriguing. Having played the game before, we thought that modeling this system in a virtual environment and recreating the feeling of playing the game would be an interesting and unique project. We believe that using a modified handle with a Hapkit is a simple, yet effective way for a user to experience the game. With such a device, we can mimic the feeling of moving the rods back and forth and relay the horizontal force a user might feel from the ball on the rods as well as the vibrational feeling of the ball rolling.
Background
In �Dynamics and Control of the Shoot-the-Moon Tabletop Game� [1], researchers at Clemson University analyzed the dynamics of Shoot the Moon to develop a device and controller that can play the game autonomously. The paper describes all of the parameters necessary to fully define the geometry of the game and uses a Lagrangian approach to derive the dynamics of the system which had never been defined before in literature. The device uses two controllers to control the linear position of the ball which were tested both in simulation and with a physical Shoot the Moon game board. The experimental results and results of the simulation matched closely which helps to validate the dynamic model derived in the paper. Although the dynamics in the paper are quite complicated and in 3D, the paper served as a great starting point for understanding the dynamics of the ball in 2D and defined many of the geometric constants and variables of the physical game board we needed for the haptic and virtual rendering.
The study in �Human Adaptation to Interaction Forces in Visuo-Motor Coordination� [2] aimed to test if humans learn to adapt to or counteract interaction forces in a ball and beam task where a user must control the position of a rolling ball on a pivoting beam. This paper presents relevant information to our project since the task of the study is very similar to the act of controlling the position of the ball in Shoot the Moon. The study analyzed both a simulated version of the ball and beam task with interaction force from the ball being rendered with a DC motor and the performance of the task with an actual ball and no feedback from the motor. The results showed that the simulated feedback improved users� ability to transfer the learned skill to the actual task. This was useful in validating whether our proposed form of force feedback for Shoot the Moon would help a user learn how to play and experience the game without an actual game board. The study also noted that users were able to feel changes in vibration as the ball�s velocity changed which further motivated us to incorporate vibration feedback into our device.
Lastly, in �Development of a puzzle-box game with haptic feedback� [3], researchers investigated and developed a virtual puzzle box with haptic rendering for learning and rehabilitation. The paper found that using haptic rendering for a virtual game is a useful tool for helping users learn a given task. The haptic feedback helped users feel more immersed in the game, even if a physical puzzle box was not present. Since this haptic rendering allowed users to learn the task of a puzzle box game, we were further convinced that our proposed haptic rendering would help users learn the mechanics of Shoot the Moon and help them experience and feel it without a physical game board.
Methods
Dynamic Model
Looking at the actual dynamics of Shoot the Moon game discussed by Xu et al. (2012), we quickly realized the complexity of the system that we had not anticipated. We decided that trying to incorporate the entirety of the system dynamics into our game was beyond the scope of this project and instead focused on coming up with a model that would require much simpler computation but still provide a satisfying result in 2D. To do this, we first established the necessary parameters that were needed to represent the system (i.e. ball diameter, ramp angle, rod length, initial rod separation, etc.). We chose the values that reflected one of the real game setups in hope of capturing most of the elements the user would expect to experience. The results is shown below.

Initially when the rods are parallel, the ball experiences the gravitational pull to move down the ramp. We set this force (fg) to be constant and continually acting on the ball to avoid dealing with the change in ramp angle as the user open and close the rods. For the opposing force (fr) that would push the ball up the ramp, we used the difference in distances of the rod from the centerline at the two extreme edges of the ball to scale the gravitational force mentioned earlier.

Namely, when the rods are parallel this force is zero, and when the rods are separated a gradient is generated and the opposing force is produced. After the sum of forces on the ball is calculated, its acceleration can be obtained. Simple integrations can then be employed to approximate the ball�s velocity and position on the rods. To check if the ball had fallen off the track, we simply compared the ball�s radius to the distance of the rod from the centerline measured at the center of the ball.
Force Rendering
In the real game, as a player holds and moves the rods back and forth, the player can feel the force of the ball on the rods. Specifically, moving the rods quickly inward causes the user to feel the resistance of the ball and moving the rods outward causes the user to feel the ball pushing outward on the rods. In this way, the user can feel the curvature of the ball as the point of contact between the ball and the rod changes. This was a feeling of the game we wanted to capture in our haptic simulation, and therefore, we came up with a model to render these horizontal forces.
To calculate the horizontal force the user would feel, we first have to find the distance, D, between the center position of the ball and the point of contact with the rod. We assumed that both rods were always at the same angle from the center line. In this diagram x represents the position of the ball, d_o represents the distance between the attachment of the rod and the center line, and theta represents the angle the rod makes with the center line.

Using the diagram, we can get an expression for D below:

Next, we have to find the angle the point of contact of the rod makes with the center line of the ball. The diagram below shows this angle where r is the radius of the ball, D is the distance between the center of the ball and the point of contact of the rod calculated in the previous step, and alpha is the angle of interest.

We then get the following expression for alpha:

Then, using a simple force balance in the y-direction and the angle calculated in the previous step, we can derive an expression for the horizontal force component of the force of the rod on the ball. We assume the ball is not accelerating in the y-direction.


Finally, plugging in variables from previous calculations produces the final expression for the horizontal force of the rod on the ball. The force the user feels is of the same magnitude but in the opposite direction pointing outward away from the ball.

This equation grows to infinity as the rod approaches the diameter of the ball (alpha goes to 90 degrees) which is not what you would feel in the real game. Therefore, we limited the output force in the Arduino code by establishing a force threshold. The calculation of this force in our haptic rendering can be found in "Shoot_the_Moon_v7.ino" in the "Files" section at the end of this page.
Vibrational Feedback and Hardware Design
We first did initial prototyping of the Shoot the Moon game using pencils and a steel ball as shown in the left image attached below. We learned that the vibrations felt larger the faster the ball was moving and the there were no vibrations felt when the ball was still. Furthermore, we learned that the vibrations felt larger when the ball was further away from the user's hands.

We then attached vibration motors to the end of the handles as shown in the right image attached above to determine the range of duty cycles that created transmitted vibrations to the user's hands that were similar to the vibrations felt with the rolling steel ball. We found that the duty cycles of around 20% were reasonable when the vibration motors were placed about 1-2 inches from the user's hands.
Using these insights, we re-designed our HapKit handle as shown in the image below to provide a thin, rod-like handle for the user to grab which mimic the rods in the actual game. We also designed the handle to package a vibration motor at the base of thin rod.

We modeled the duty cycle to the vibration as function of the virtual ball's velocity and position using the following equation:

where x/rod length is the normalized ball position on the rods relative to the user's hands, and v/Vmax is the normalized ball velocity (using a reasonable estimate for the max velocity of the ball). We chose to use the normalized kinematics so we don't have to re-tune this model when the physical parameters of the system are changed. We also added a duty_SS component which is a constant duty cycle output to the vibration motor during the game that is not noticeable by the user. We did this to make it easier for the vibration motor to increase to a duty cycle that is noticeable by the user. We used the following constants for our model:
k_pos = 0.027
k_vel = 0
duty_SS = 0.15
which were tuned to create vibrations in the handle that are similar to playing the actual game. Our final model resulted in vibrations that felt noticeable and realistic as we could feel their magnitude relative to the position and velocity of the ball felt similar to the vibrations in the initial prototypes.
Visual Rendering
Another important aspect of our project was to provide a visual rendering of the game to help users visualize the movement of the ball and the position of the rods in the virtual environment. We chose to display a 2D rendering with a top down view of the game board. An image of the final rendering is shown below:

Since we wanted our project to feel like an actual game, we implemented a scoring system similar to the one used on an actual game board. The user's goal is to make the ball fall in any of the scoring slots and score as many points as possible with five attempts. The exosphere slot does not award any points since this is the easiest spot to reach for new users. The user has scored if the center position of the ball is anywhere within the vertical diameter of the scoring slot. If the ball falls in any of the slots, the user receives a message saying "Nice job!". Otherwise, The user is prompted to try again as long as they still have attempts. If the number of attempts, reaches zero, a "GAME OVER" message shown below appears to display that the game is done.

The parameters necessary to update the visual rendering such as the position of the Hapkit handle, the position of the ball, and whether the ball has fallen, were all updated in the Arduino code and sent to the Processing module via serial communication. The point at which the user manipulates the handle is indicated by the blue dot at the end of the right rod. The rod on the left is programmed to move in an equal magnitude but opposite direction to the handle moved by the user.
Demonstration / Application
A short demo of our Shoot the Moon! haptic simulation is shown below. The user feels both force feedback and vibration feedback at the handle that mimic the experience of playing the real game.
https://youtube.com/shorts/HC-MPdm4QnY
Results
The simplifications made in the dynamics mentioned above ended up being fairly successful. As a whole, the objective to 'shoot the moon' was just hard enough to force individuals to make multiple attempts and learn how to best approach the game. Most feedback was fairly positive. Additionally, for those that had already played the game in real life, they had felt that we did a good job capturing the general feel and pace of the game. However, for those that had not encountered the game before, a little more time had to be spent explaining how the game actually worked. A point of confusion for those newcomers was the viewpoint we rendered. Since the render was made from a birds-eye view with the ball at rest at the top of the screen initially, players were confused why the ball would travel upwards and end at rest at the top of the rendering. This prompted us to display a YouTube video of the game, in order to explain that the rods were angled in such a way that forced the ball to rest in that location.
Overall, we were extremely happy with the realism of our rending, and enjoyed watching people learn how to play "Shoot the Moon".
Future Work
Our simulation currently takes only one input from the user to determine the end position of one of the rods. The position of the other is then reflected about the centerline and displayed for guiding purposes. This makes the overall system more stable as there are less components to be controlled. However, this also subtracts from the user's experience when playing. The future work of our system could be to integrate another modified Hapkit into the system and adjust the codes to include both positions for force calculations. To make the experience even more realistic, a better model to track the dynamics could be implemented and improved upon. With these two modifications, the system can then be tested against the physical game and calibrated accordingly. One way this can be done is simply by obtaining Shoot the Moon game and set it up against the system to observe the ball's dynamic given the same inputs. The gains of the forces on the ball as well as the user's handles (vibration and kinesthetic) can be adjusted to achieve the most accurate rendering of the real system.
Acknowledgments
ME310 Loft Space and Resources
Files
Arduino code for haptic rendering and dynamics: Attach:ShootTheMoonArduinoCode.pdf
Processing code for visual rendering: Attach:FinalProcessingCode.pdf
Zipped folder of code files: Attach:ShootTheMoon_CodeFiles.zip
CAD file for modified HapKit handle: https://drive.google.com/file/d/15RRXaFtYKET7NF2V0vvvjELGl8x46FAa/view?usp=sharing
List of major components: https://docs.google.com/spreadsheets/d/1BpC5mbgsiOnDlHXZ3lzwsIS9YxkLjIa_28qwXP7eSP4/edit?usp=sharing
References
[1] Xu, P., Groff, R.E., & Burg, T.C. (2012). "Dynamics and Control of the Shoot-the-Moon Tabletop Game." Journal of Dynamic Systems Measurement and Control-transactions of The Asme, 134, 051006. https://doi.org/10.1115/1.4006223.
[2] Huang, Felix & Gillespie, Brent & Kuo, Arthur. (2006). "Human Adaptation to Interaction Forces in Visuo-Motor Coordination." IEEE transactions on neural systems and rehabilitation engineering : a publication of the IEEE Engineering in Medicine and Biology Society. 14. 390-7. http://dx.doi.org/10.1109/TNSRE.2006.881533.
[3] Yoshimasa Tokuyama, R.P.C. Janaka Rajapakse, Tsubasa Miyazato, Kouichi Konno, Yi-Ping Hung, "Development of a puzzle-box game with haptic feedback," Proc. SPIE 11049, International Workshop on Advanced Image Technology (IWAIT) 2019, 110490T (22 March 2019). https://doi.org/10.1117/12.2521513.
Tutorial Video Shown at the Haptics Fair: https://www.youtube.com/watch?v=qahDfNTh0S8&ab_channel=MarblesTheBrainStore
Appendix: Project Checkpoints
Checkpoint 1
We provide progress updates on our goals for Checkpoint 1: 3D printing the modified handle for the Hapkits, developing the dynamic model, developing a model for the force on the user, creating a preliminary 2D rendering, and exploring vibration feedback on the handles.
3D-PRINTED HANDLE
We 3D printed modified handles for the Hapkit as shown in the image below. Our initial strategy for the user interface with our haptic device was to orient the Hapkits horizontally on the tabletop. Our reasoning for this configuration was that the handle on the hapkit could rotate side-to-side like the rods in the actual Shoot the Moon game so the user would feel the rotation of the rods.

The main drawback with this configuration is that the angles on the Hapkit will be larger than that of the actual game for a given lateral displacement; we could fix this by making the length of the handle the same as the rods, but the resolution of the handle angle would become quite large. Therefore, we may try orienting the Hapkits vertically on the table and 3D print a handle that sticks out normally from the plane of the Hapkit handle in our next iteration.
DYNAMIC MODEL
We simplified the complex 3D dynamics of the actual Shoot the Moon game into an easy-to-render, 2D dynamics. To do this, we first established the necessary parameters that were needed to represent the system (i.e. ball diameter, ramp angle, rod length, initial rod separation, etc.). Initially when the rods are parallel, the ball experiences the gravitational pull to move down the ramp. We set this force (fg) to be constant and continually acting on the ball to avoid dealing with the change in ramp angle as the user open and close the rods. For the opposing force (fr) that would push the ball up the ramp, we used the difference in distances of the rod from the centerline at the two extreme edges of the ball to scale the gravitational force mentioned earlier.
Namely, when the rods are parallel this force is zero, and when the rods are separated a gradient is generated and the opposing force is produced. After the sum of forces on the ball is calculated, its acceleration can be obtained. Simple integrations can then be employed to approximate the ball�s velocity and position on the rods. To check if the ball had fallen off the track, we simply compared the ball�s radius to the distance of the rod from the centerline measured at the center of the ball.
FORCE ON USER
We also came up with a preliminary strategy for deriving the force the user feels from the ball on the rods. The magnitude of this force would correspond to the horizontal force component of the force of the rod on the ball. To find this force, we can use a combination of the geometry of the game and statics of the ball. First we have to find the distance between the center of the ball and the position at which the rod makes contact with one side of the ball, D. Using some trigonometry we can derive the expression D = d_0 + x*tan(theta), where d_0 corresponds to the distance between the attachment point of one rod and the centerline, x corresponds to the position of the center of the ball, and theta corresponds to the angle between the rod and the vertical line. Next, we find alpha, the angle between the point of contact with the rod and the center line of the ball. Again, using trigonometry, we can find the expression alpha = arcsin(D/r), where r is the radius of the ball and D is the expression we calculated in the first step. Using a free body diagram of the ball in part 3), we can find the vertical force component of F_rod with a simple statics equation in the y-direction (we assume the ball is not accelerating in this direction). Finally, using the triangle shown in part 4) we can use our previously calculated angle, alpha, to find an expression for Fx since this angle is also the angle at which the force is applied on the ball. The force the user feels would be in the direction opposite Fx.

PRELIMINARY 2D RENDERING
We want to provide some visual feedback to the user so that they can visualize the location of the ball and rods as they play. Our goal for the rendering this week was to draw a rod that would change its angle based on the distance traveled by the hapkit handle and depict the location of the ball based on the updated position in the dynamic model. An image of this initial rendering is shown below:

VIBRATION FEEDBACK
We first set up a mock Shoot the Moon game as shown in the image below using colored pencils and a steel ball. We wanted to get a feel for the vibrations when the ball is moving along the rods while we hold the tips of the rod as we would in the actual game.

We learned that the vibrations increase in magnitude the faster the ball is moving. We also learned that the vibrations feel stronger when the ball is further away from the user�s hands. Based on these learnings, we plan on modeling the vibration feedback to the user as:
duty = [(k_pos x position) + k_vel] x velocity
where duty is the duty cycle to the vibration motor, position is the distance from the ball to the user�s hands, velocity is the velocity of the ball, k_pos is the constant multiplier for position, and k_vel is the constant multiplier for velocity. We plan on using this model because the vibrations are primarily driven by the velocity as there are no vibrations when the ball is not moving regardless of its position; the position will only amplify the vibrations felt when the ball is already moving.
Next, we attached vibrations to the pencils in our mock Shoot the Moon game as shown in the image below to determine where the vibrations motors should be placed on the handle and range of duty cycles resulting in vibration feedback that felt similar to the first test above.

We learned that the vibration motors could be placed about an inch-and-a-half from the free end of the rods; this allows us to use a lower duty cycle since it�s easier to feel the vibrations when the motors are close to the user�s hands and allows us to the makes the 3-d printed handles relatively short which saves material and time. We also learned that the duty cycles of ~0.2-0.25 were reasonably representative of the vibrations of the actual ball.
Checkpoint 2
We provide updates on the new handle design integrated with the vibration motors, the finalized dynamics, and improved virtual rendering.
HANDLE AND VIBRATION FEEDBACK
We updated the HapKit handle as shown in the image below to provide a thin, rod-like handle where the user grabs the handle to mimic the rods in the actual game. We also attached a vibration motor to the base of thin rod that sticks out on the handle.
We modeled the duty cycle to the vibration using the following equation which we have slightly adapted since last week:
duty cycle = {k_pos*(position/rod length) + k_vel] *(velocity/max velocity) + duty_SS
where position/rod length is the normalized ball position on the rods relative to the user's hands, and velocity/max velocity is the normalized ball velocity (using a reasonable estimate for the max velocity of the ball). We chose to use the normalized kinematics so we don't have to re-tune this model if we change the physical parameters of the system. We also added a duty_SS component which is a duty cycle output to the vibration motor at all times during the game that is not noticeable by the user. We did this to make it easier for the vibration motor to increase to a duty cycle that is noticeable by the user. We used the following constants for our model:
k_pos = 0.027
k_vel = 0
duty_SS = 0.15
which were tuned to create vibrations in the handle that are similar to playing the actual game. Our final model resulted in vibrations that felt somewhat realistic as their magnitude relative to the position and velocity of the ball followed the trends discovered last week. However, there may be room for further tweaking the model as occasionally the vibrations seemed too large relative to how fast the ball was moving.
DYNAMICS
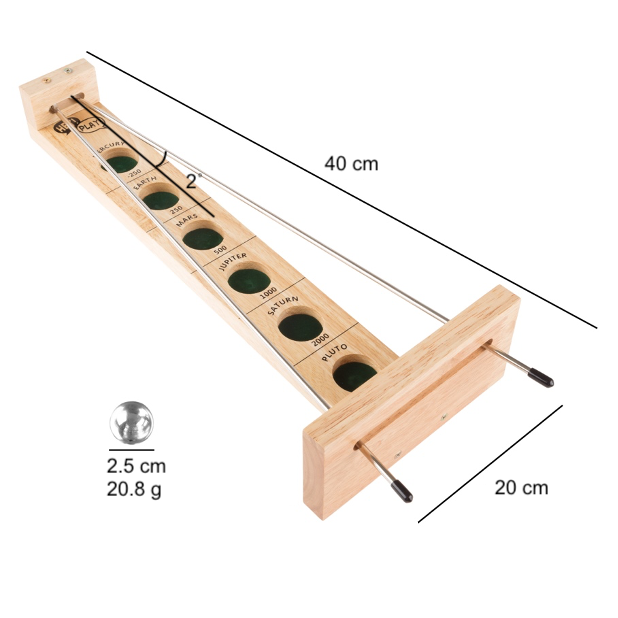
We have accomplished all of our goals for this checkpoint in terms of dynamics. The system now behaves at the level of realism that we have anticipated. Some of the key adjustments and improvements from the first checkpoint were in the area of physical parameters and force calibration. Initially, the ball diameter was set to be bigger (3 cm) than the typical value that the actual game used. This was because we thought that the game would be too difficult to play with the same size diameter ball in the virtual setting. However, we were mistaken and having the ball to be true to size (2.5 cm) ultimately improved the overall realism of the game. Similarly, the ball mass had to be adjusted to be the real mass value (20.8 g) of the typical steel ball used to play the game. This dramatically affected the kinesthetic rendering on the ball since the mass was set to be 100 g at the beginning making the ball rolled very slowly up and down the ramp. The latest system parameter is shown below.
To render the dynamic force on the ball, we still apply the same concept of force scaling using the correlation from the distances to the rod at the extreme ends of the ball. Since this model was not derived from the physical dynamic of the real life Shoot the Moon game, multiple calibrations had to be performed and scaling factors tested before the consensus was reached among the team members. The current values now reflect the best approximation that we have deemed most accurately represent the system.
2D RENDERING
We updated the rendering to reflect a second handle whose motion is equal and opposite to the primary handle that is directly driven by the kinematic outputs from the microcontroller. We also added to the aesthetics of the rendering as shown in the image below with the different goals and their respective points tally. Our next step is to create a points counter for the user based on a sequential trials.
